The First 60 Minutes of Paper Mario: The Thousand-Year Door

Have you ever been undecided on what to play next? 

Should you buy that game? Should you install that game?

I’ve been there, and sometimes you just need to take a look at the graphics, hear the music, and learn a little about the plot to see if it resonates with you before taking the next step. I’m here to help! I am creating the first 30 to the first 60 minute videos of games; indie and mainstream, new and old!

This week let’s take a look at the first 60 minutes of Paper Mario: The Thousand-Year Door…

Do you want to play the rest? 

The First 30 Minutes of Princess Peach: Showtime!

Have you ever been undecided on what to play next? 

Should you buy that game? Should you install that game?

I’ve been there, and sometimes you just need to take a look at the graphics, hear the music, and learn a little about the plot to see if it resonates with you before taking the next step. I’m here to help! I am creating the first 30 to the first 60 minute videos of games; indie and mainstream, new and old!

This week let’s take a look at the first 30 minutes of Princess Peach: Showtime!…

Do you want to play the rest? 

DIY – Disney VHS Bookmark

Welcome back friends! Do you still have a VCR? Not many people have VCRs anymore. We do, although we don’t really use it anymore.

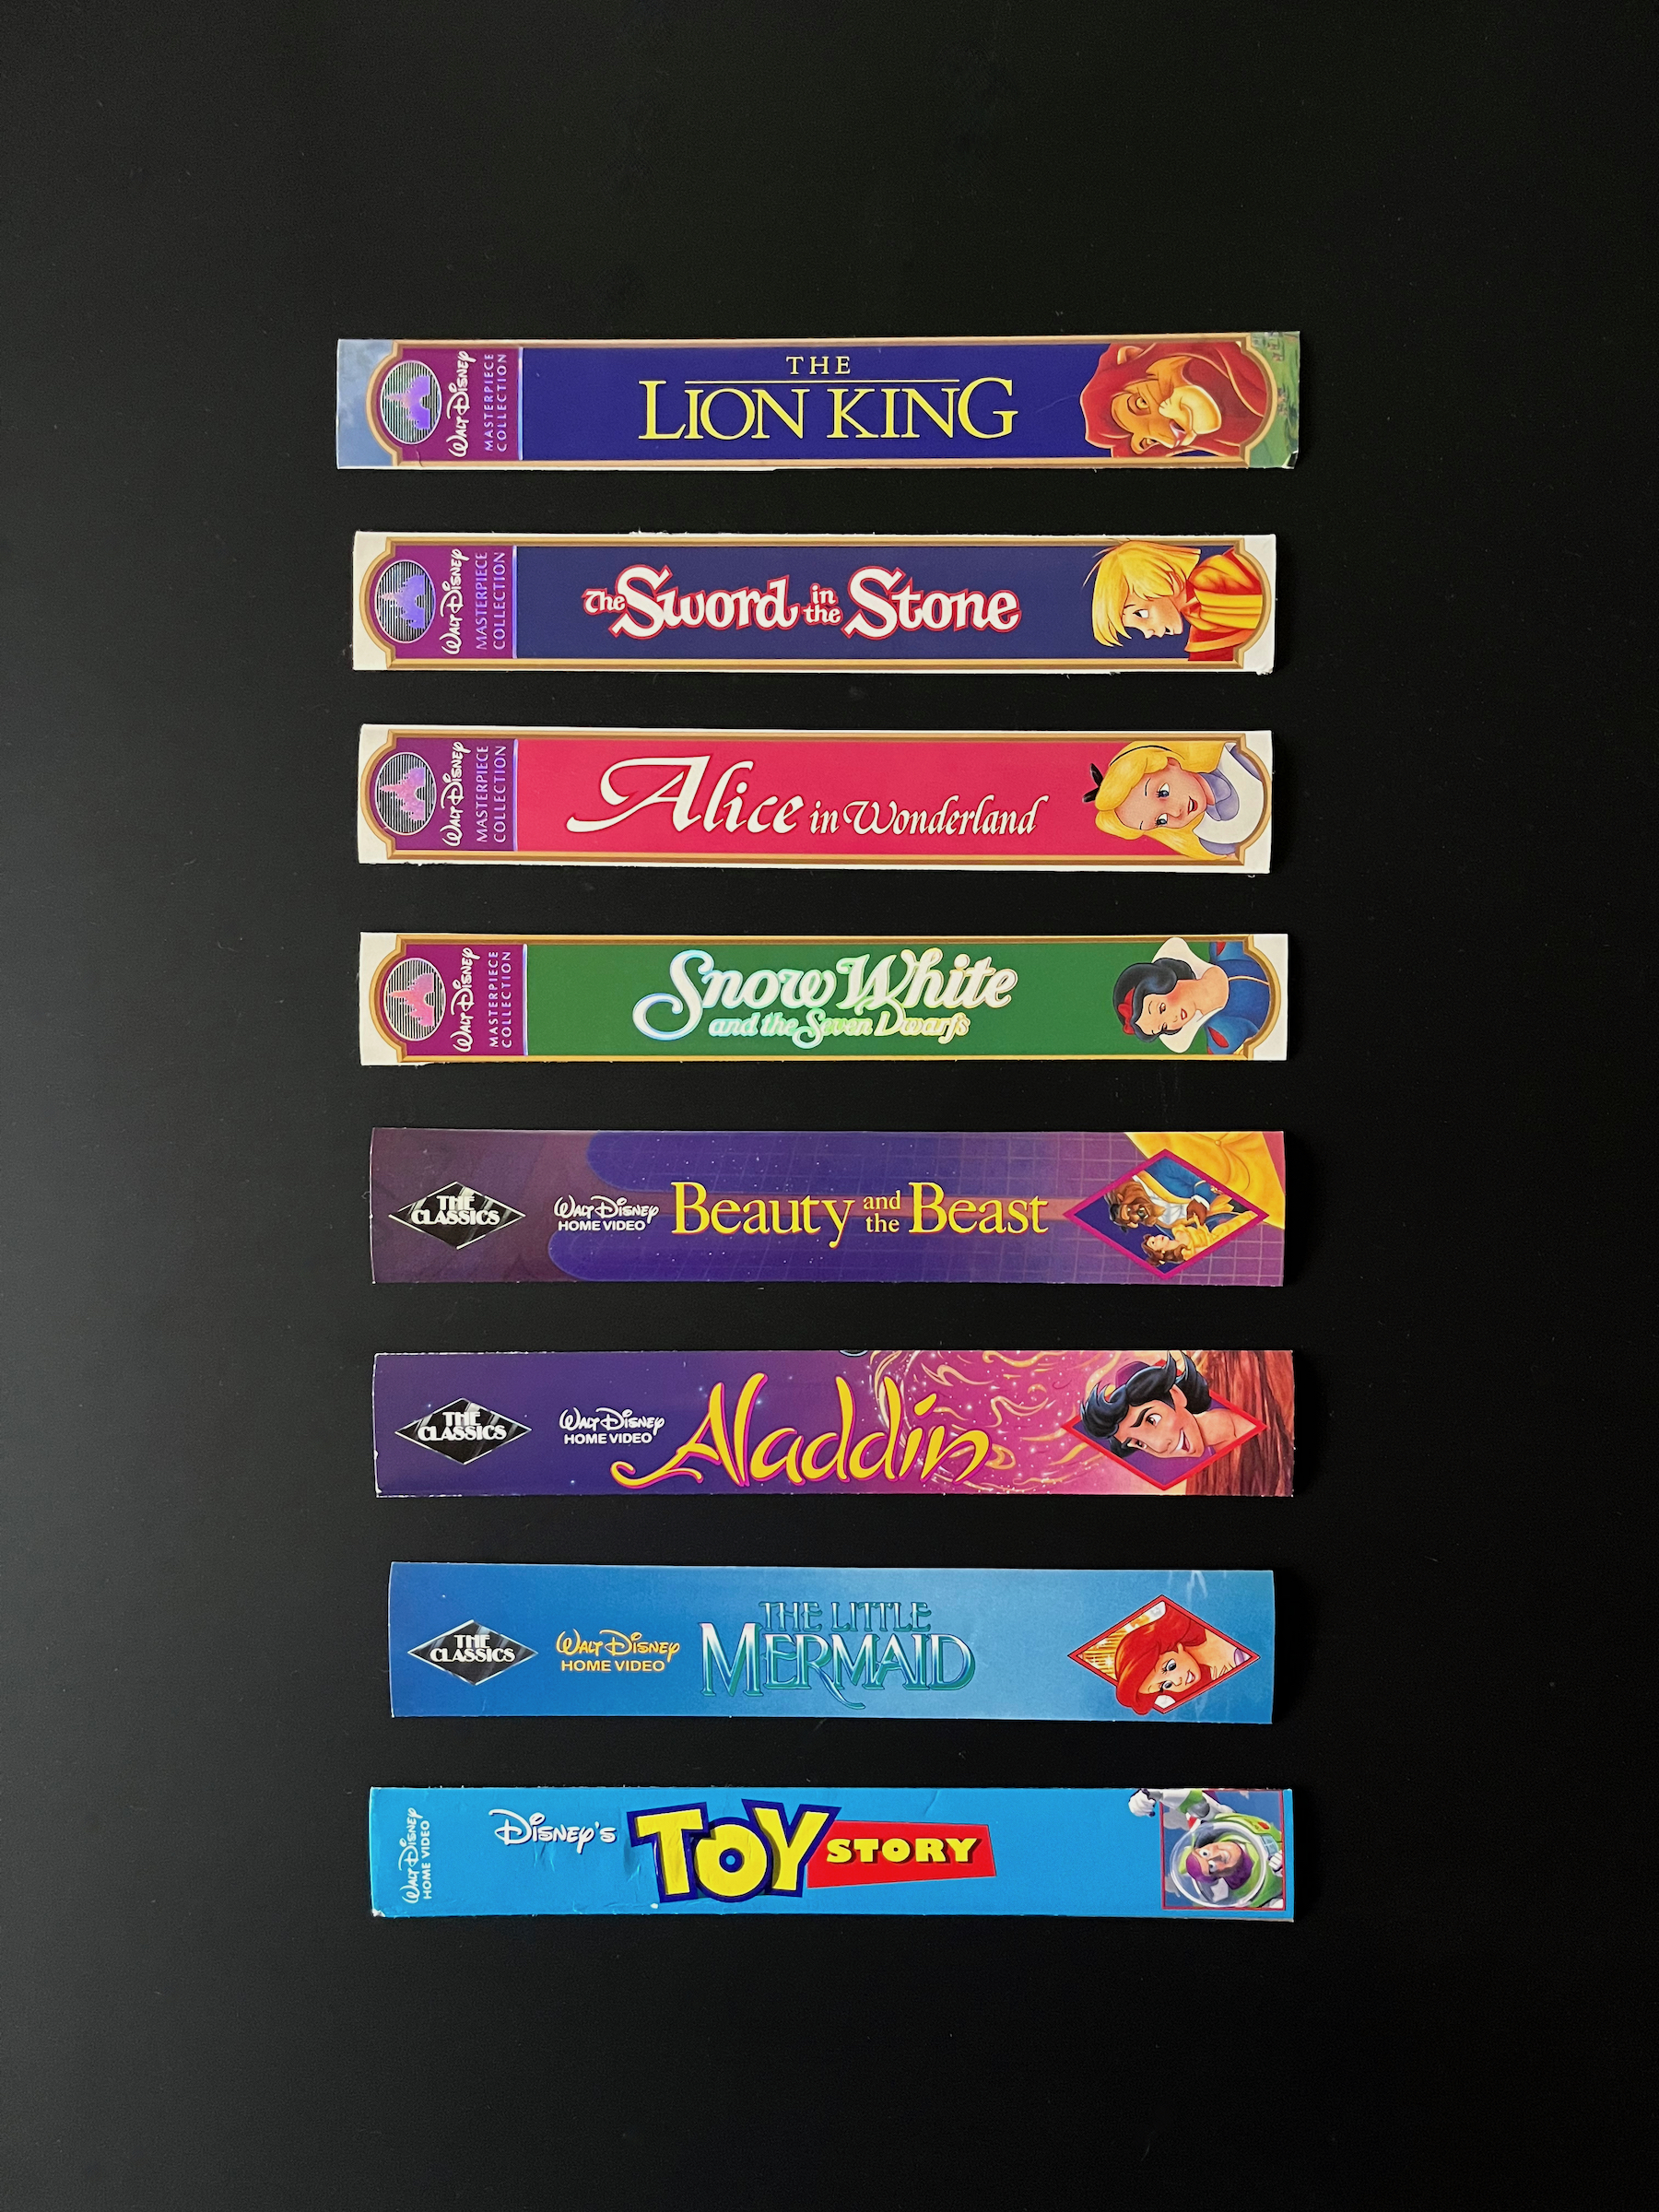
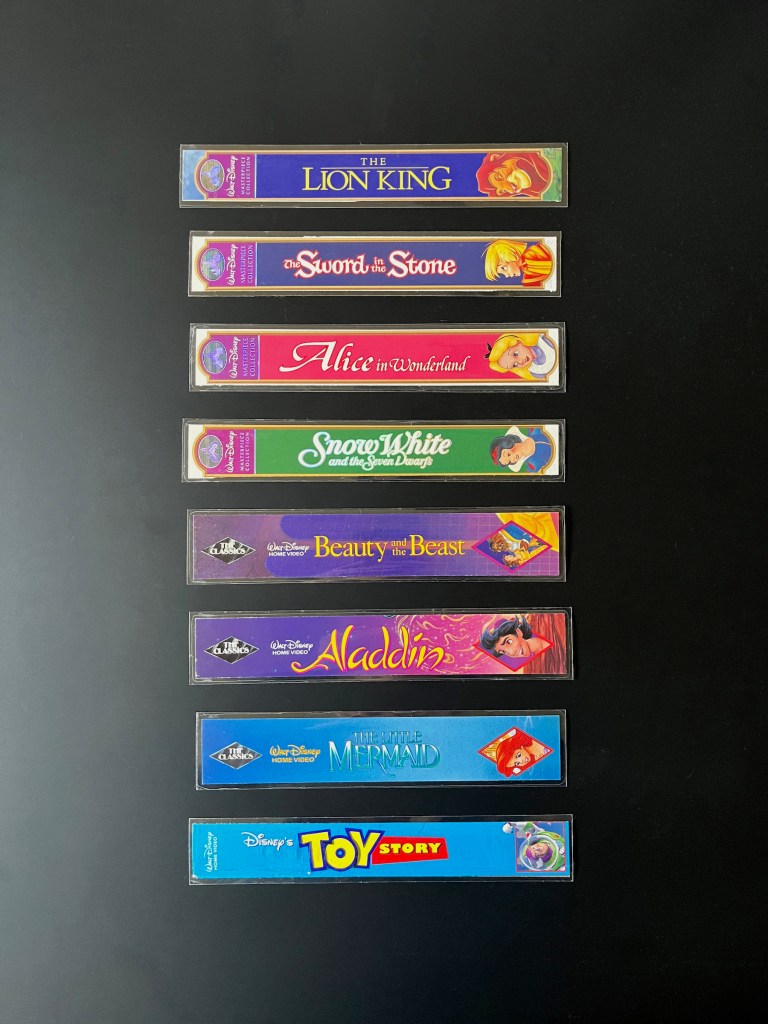
If you don’t have a VCR anymore, what should you do with all your old VHS, including all those Disney films you grew up with? You could collect them, donate them, or recycle them. But wait! If you decide to recycle them, let’s remove the spines and use them to create bookmarks! 

I’ve also used the beautiful Disney cover art to make drink coasters you can find here!

Let’s get started!

SUPPLIES
  • Disney VHS cover art
  • Guillotine paper trimmer
  • Plastic ruler
  • Self adhesive clear laminating sheets
INSTRUCTIONS
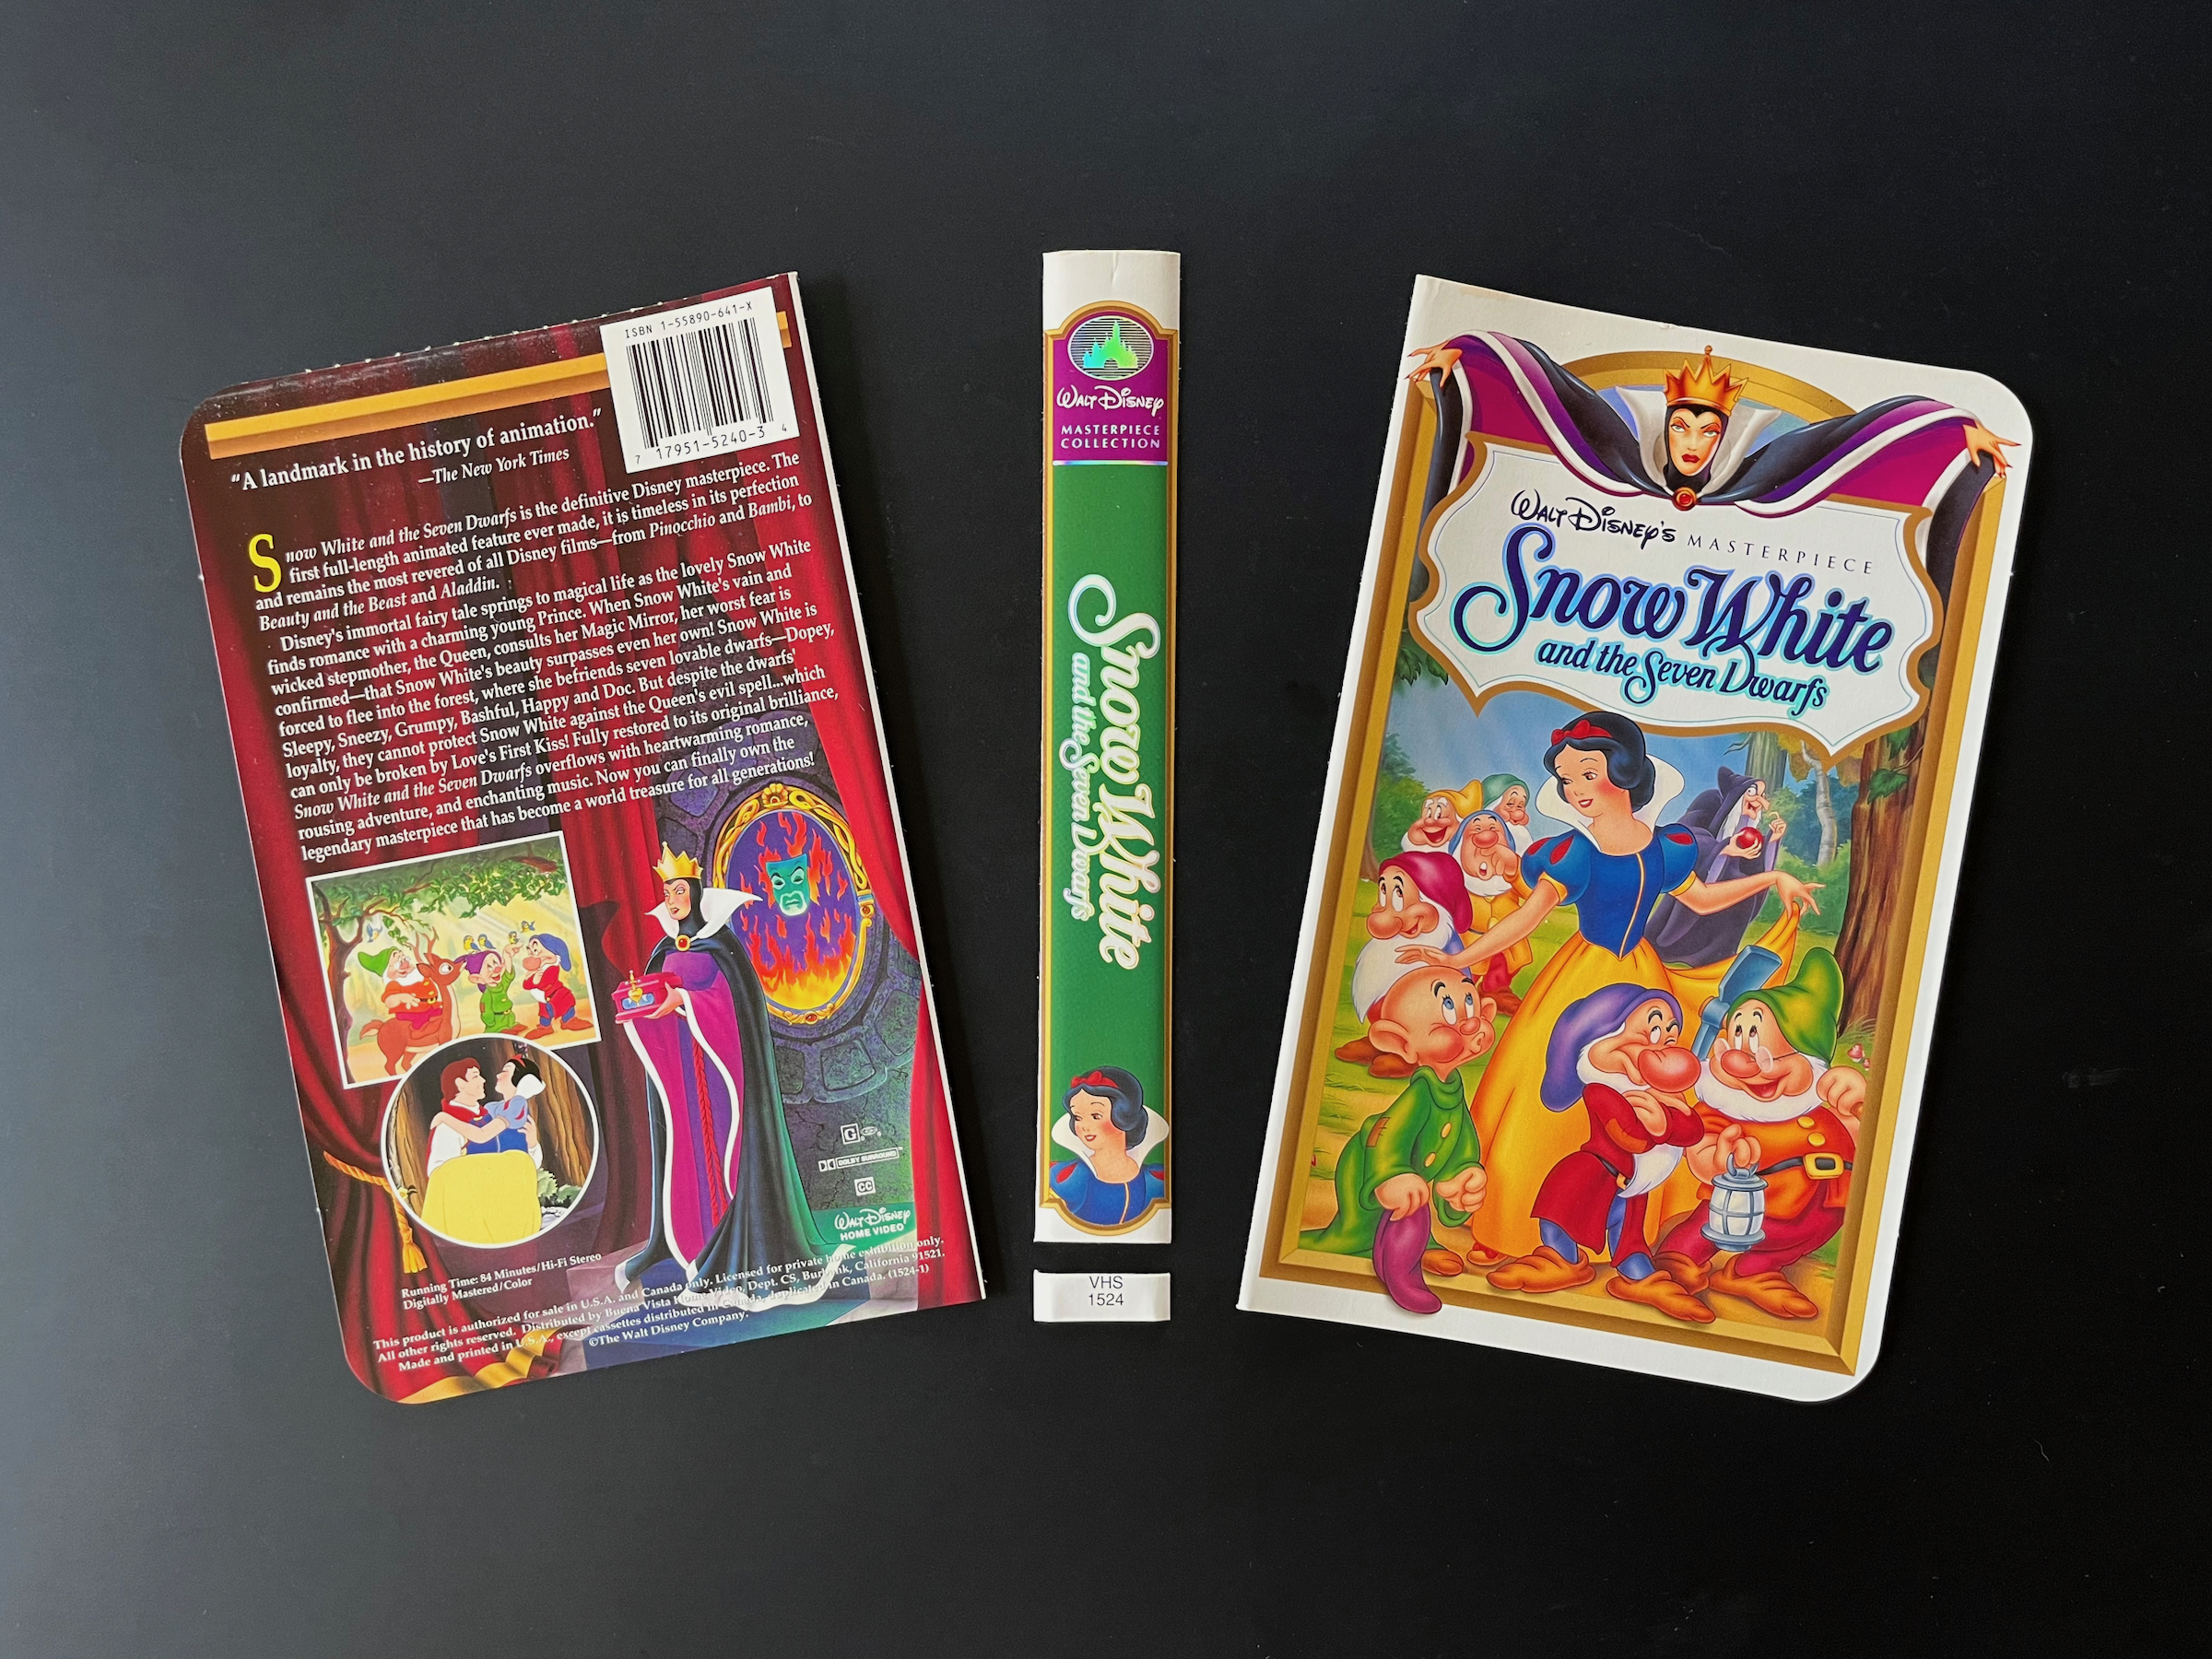
  1. Remove the cover art from the VHS cases.
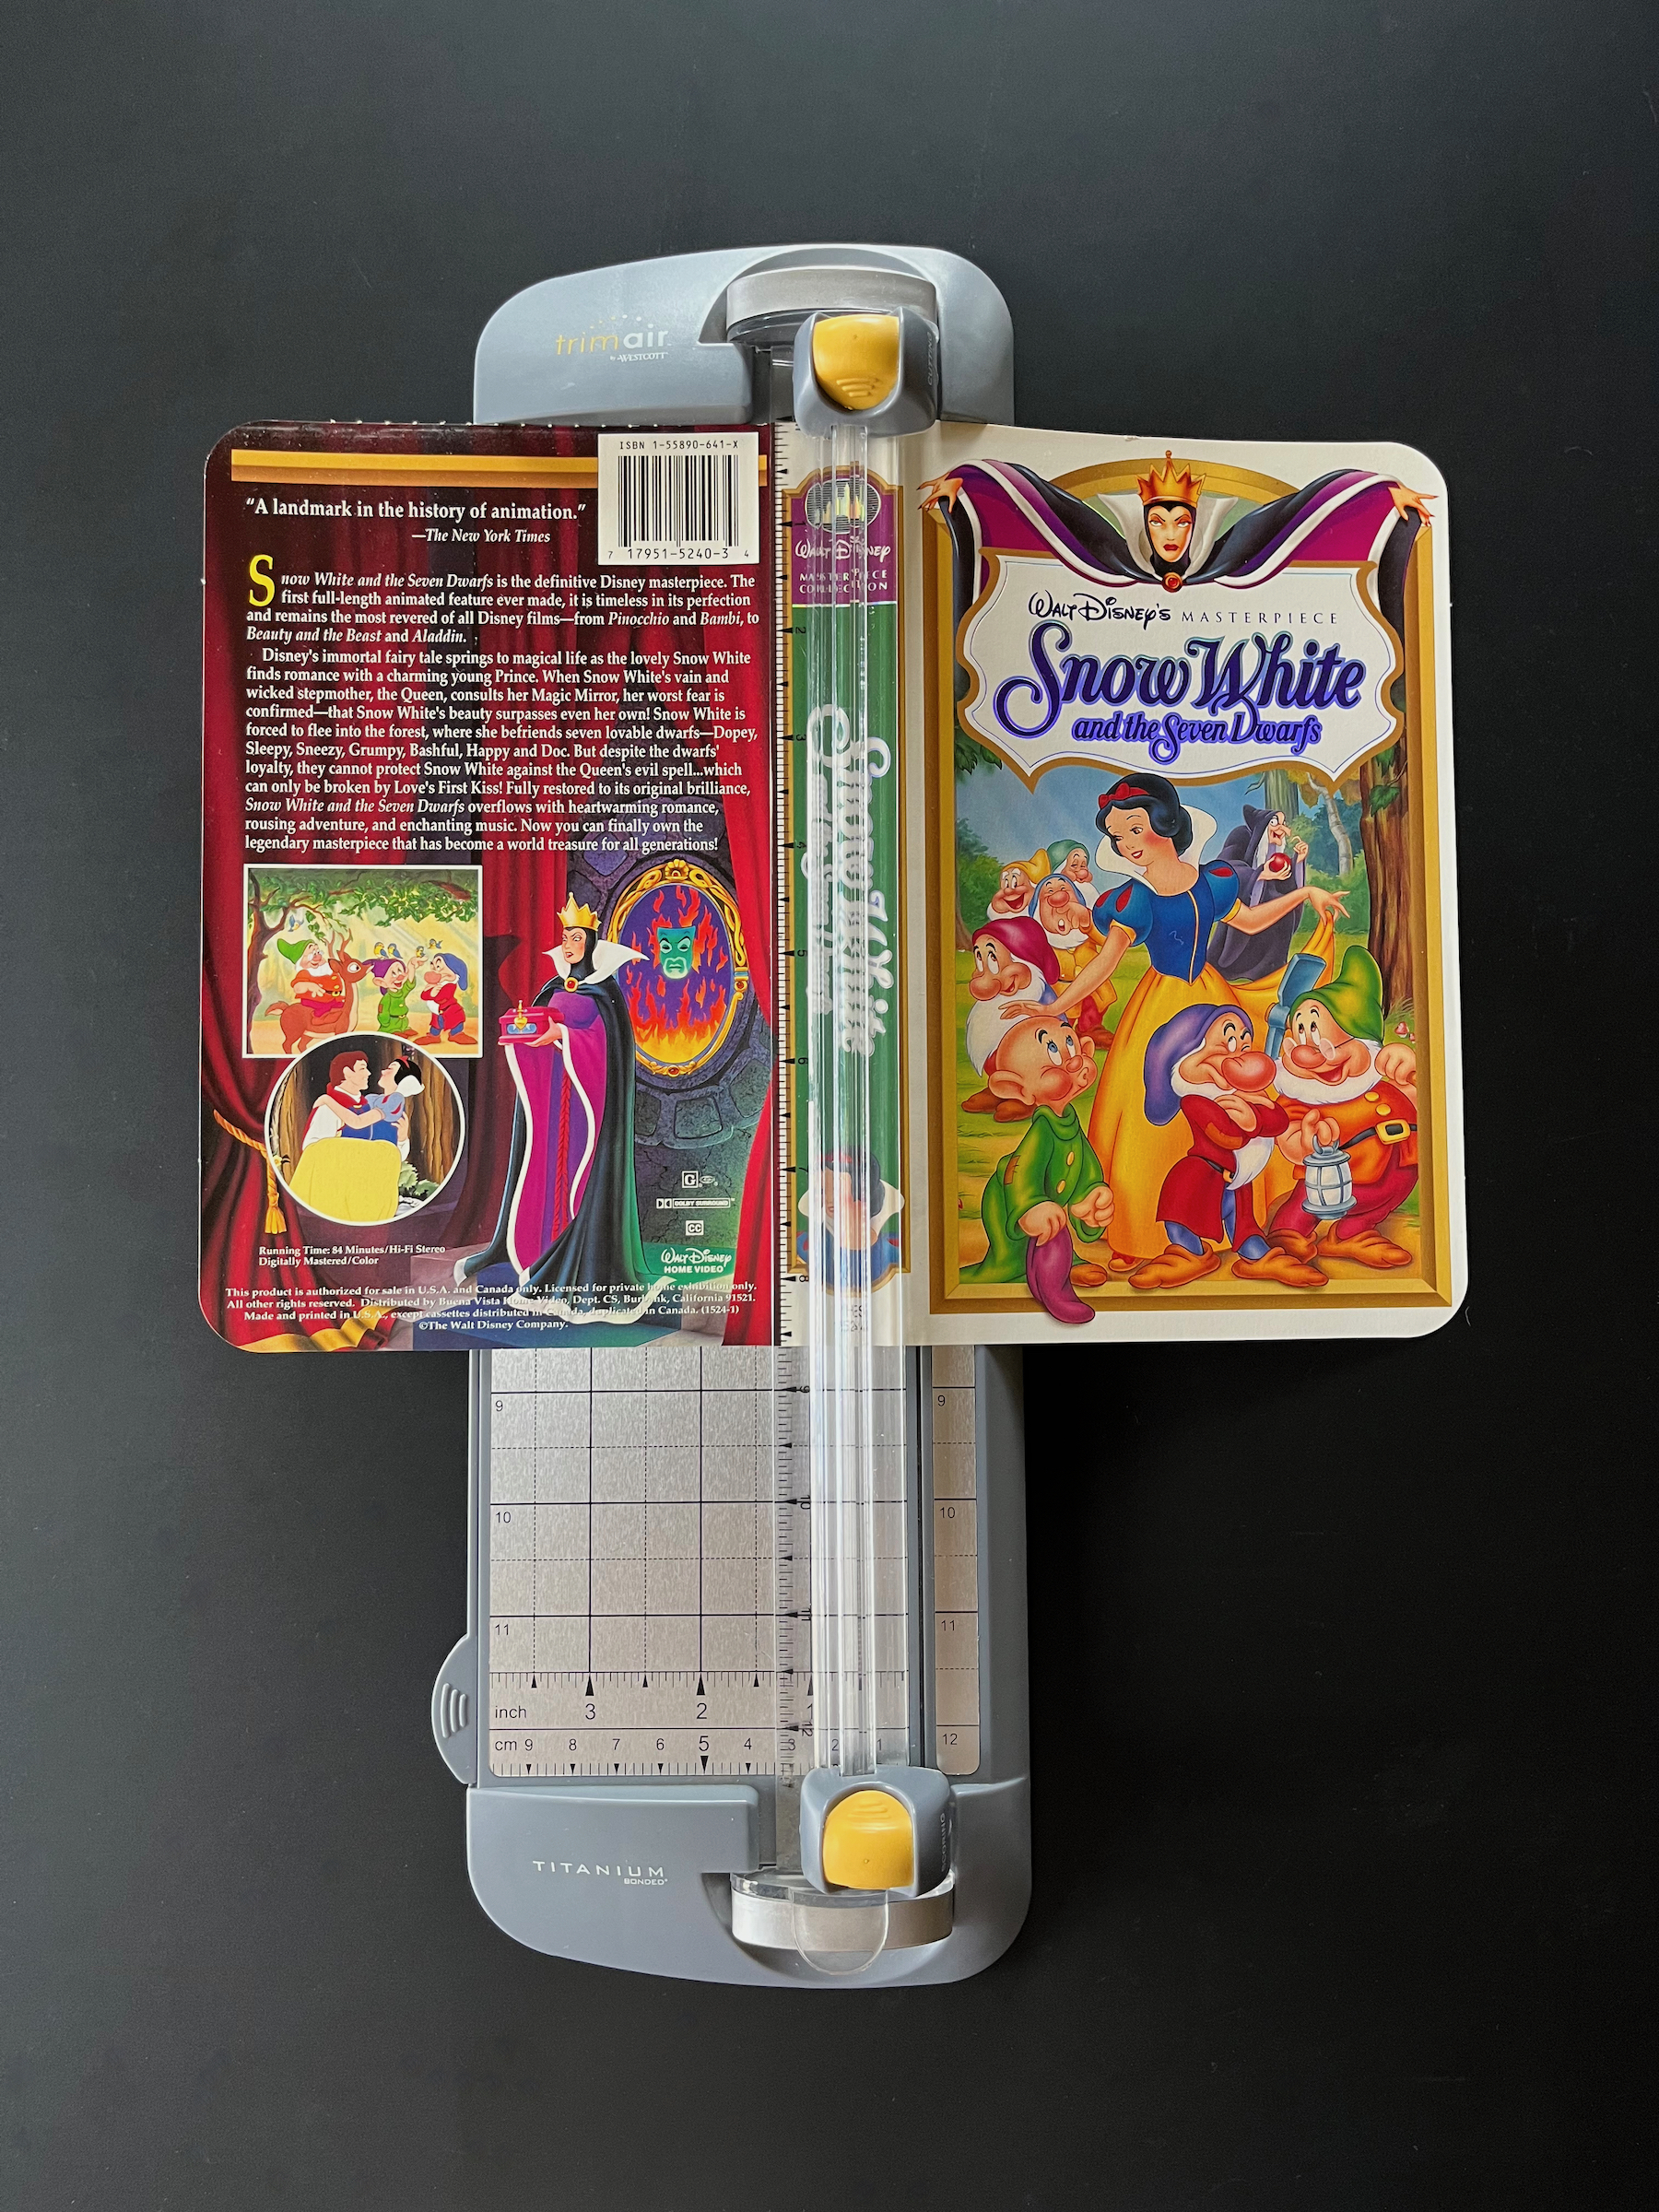
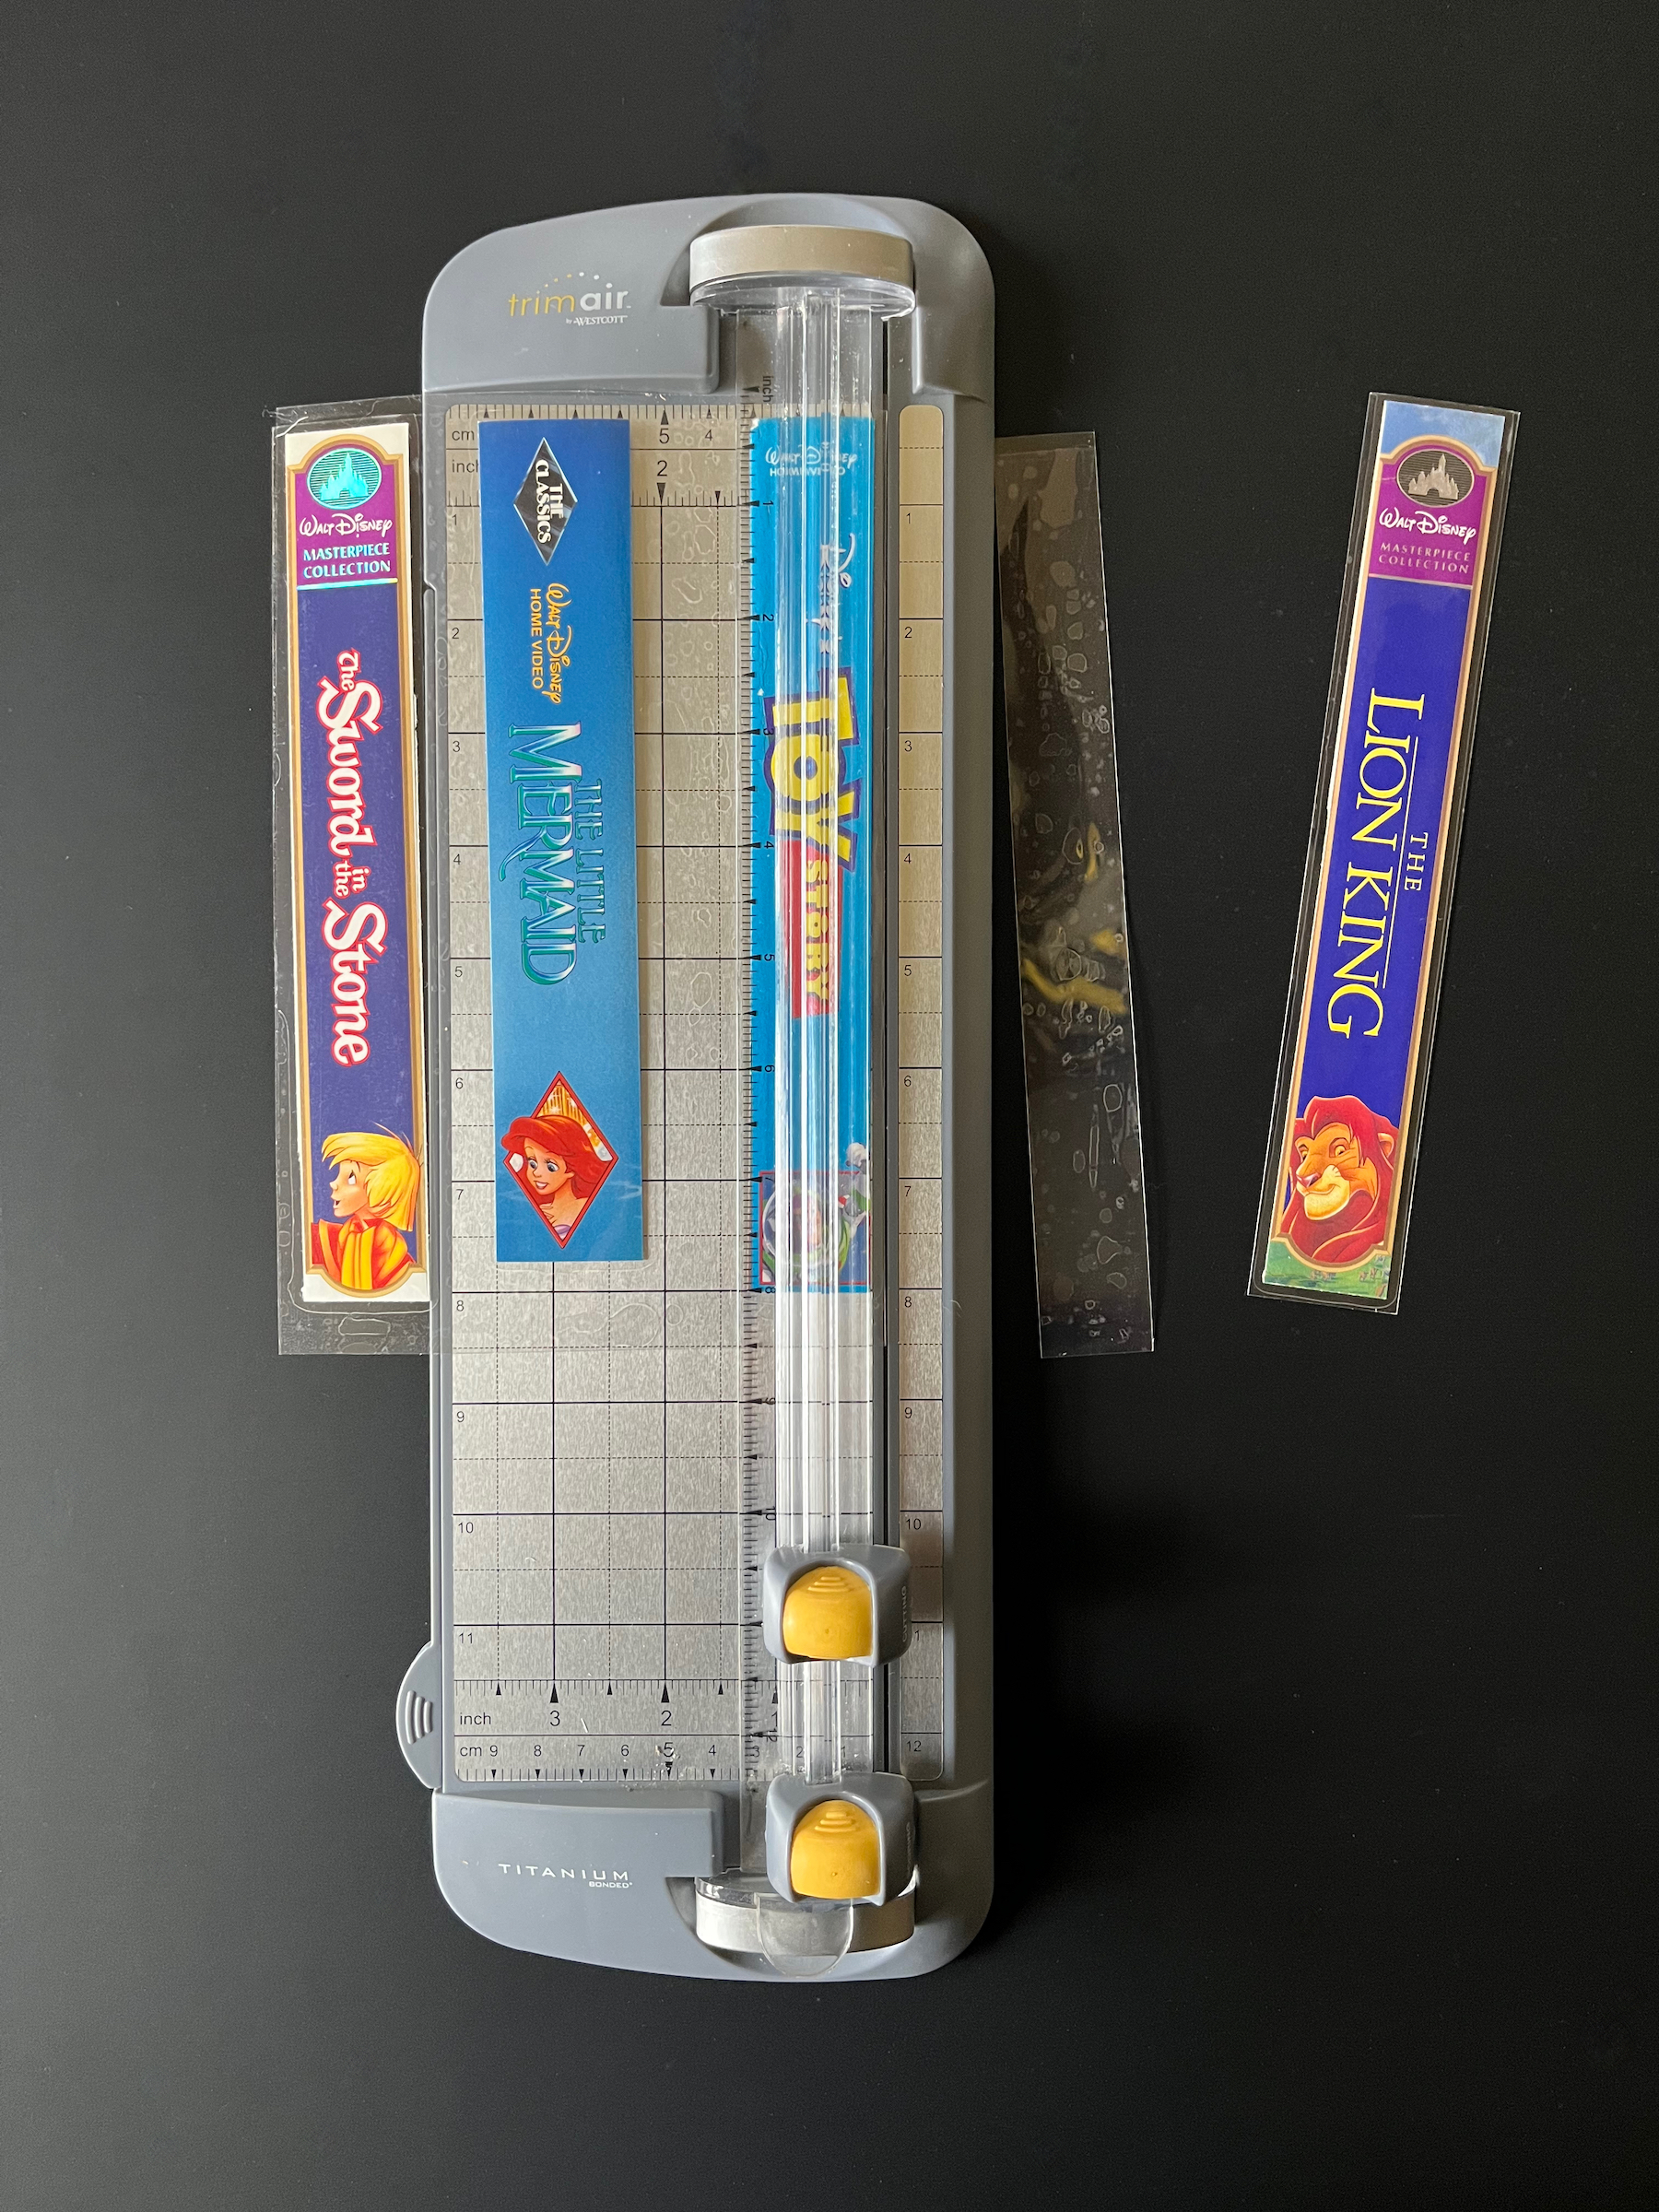
  2. Use a guillotine paper trimmer to cut the spine from the cover art in straight, smooth edges
  3. Make sure the spines and surface you’ll be working on are clean and free of lint, then place a laminate page on your working surface with the adhesive side face-up.
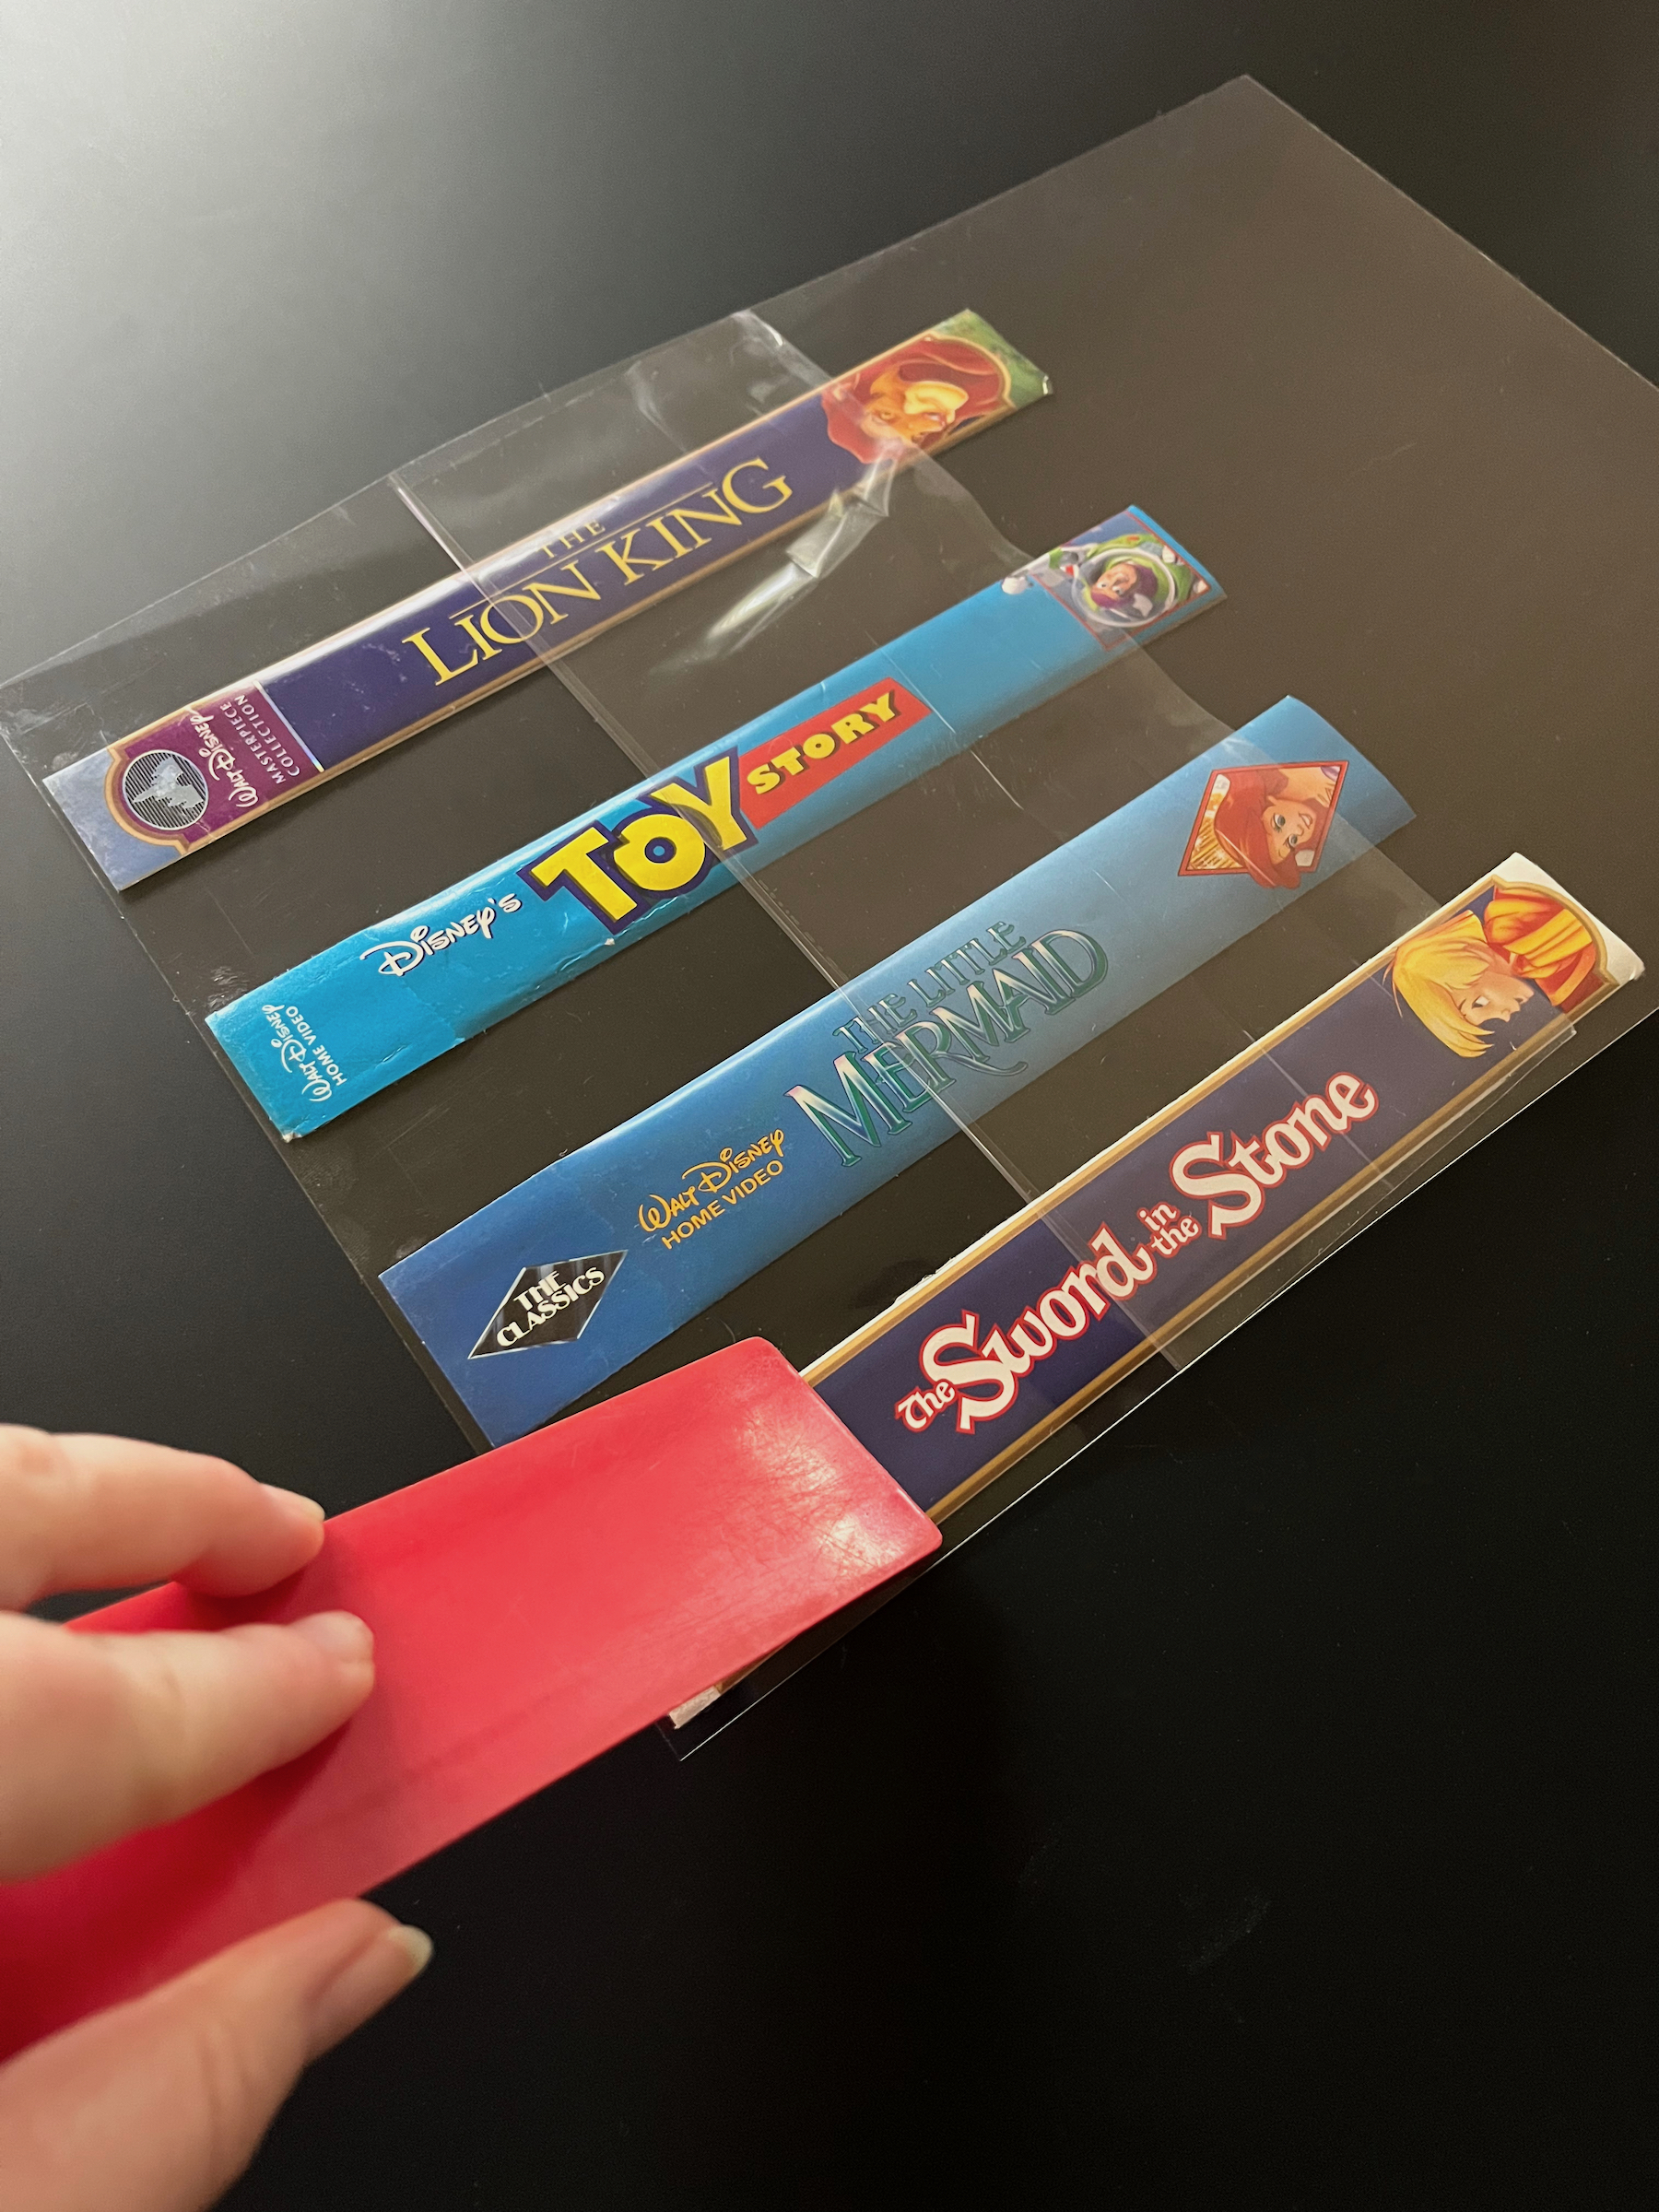
  4. Peel back about an inch and a half of the release liner and place the spines (artwork side down) on the adhesive, leaving about a half inch above the spine for sealing and trimming.
  5. Turn the laminate page over and use a plastic ruler to smooth the laminate onto the artwork, removing any air bubbles. 
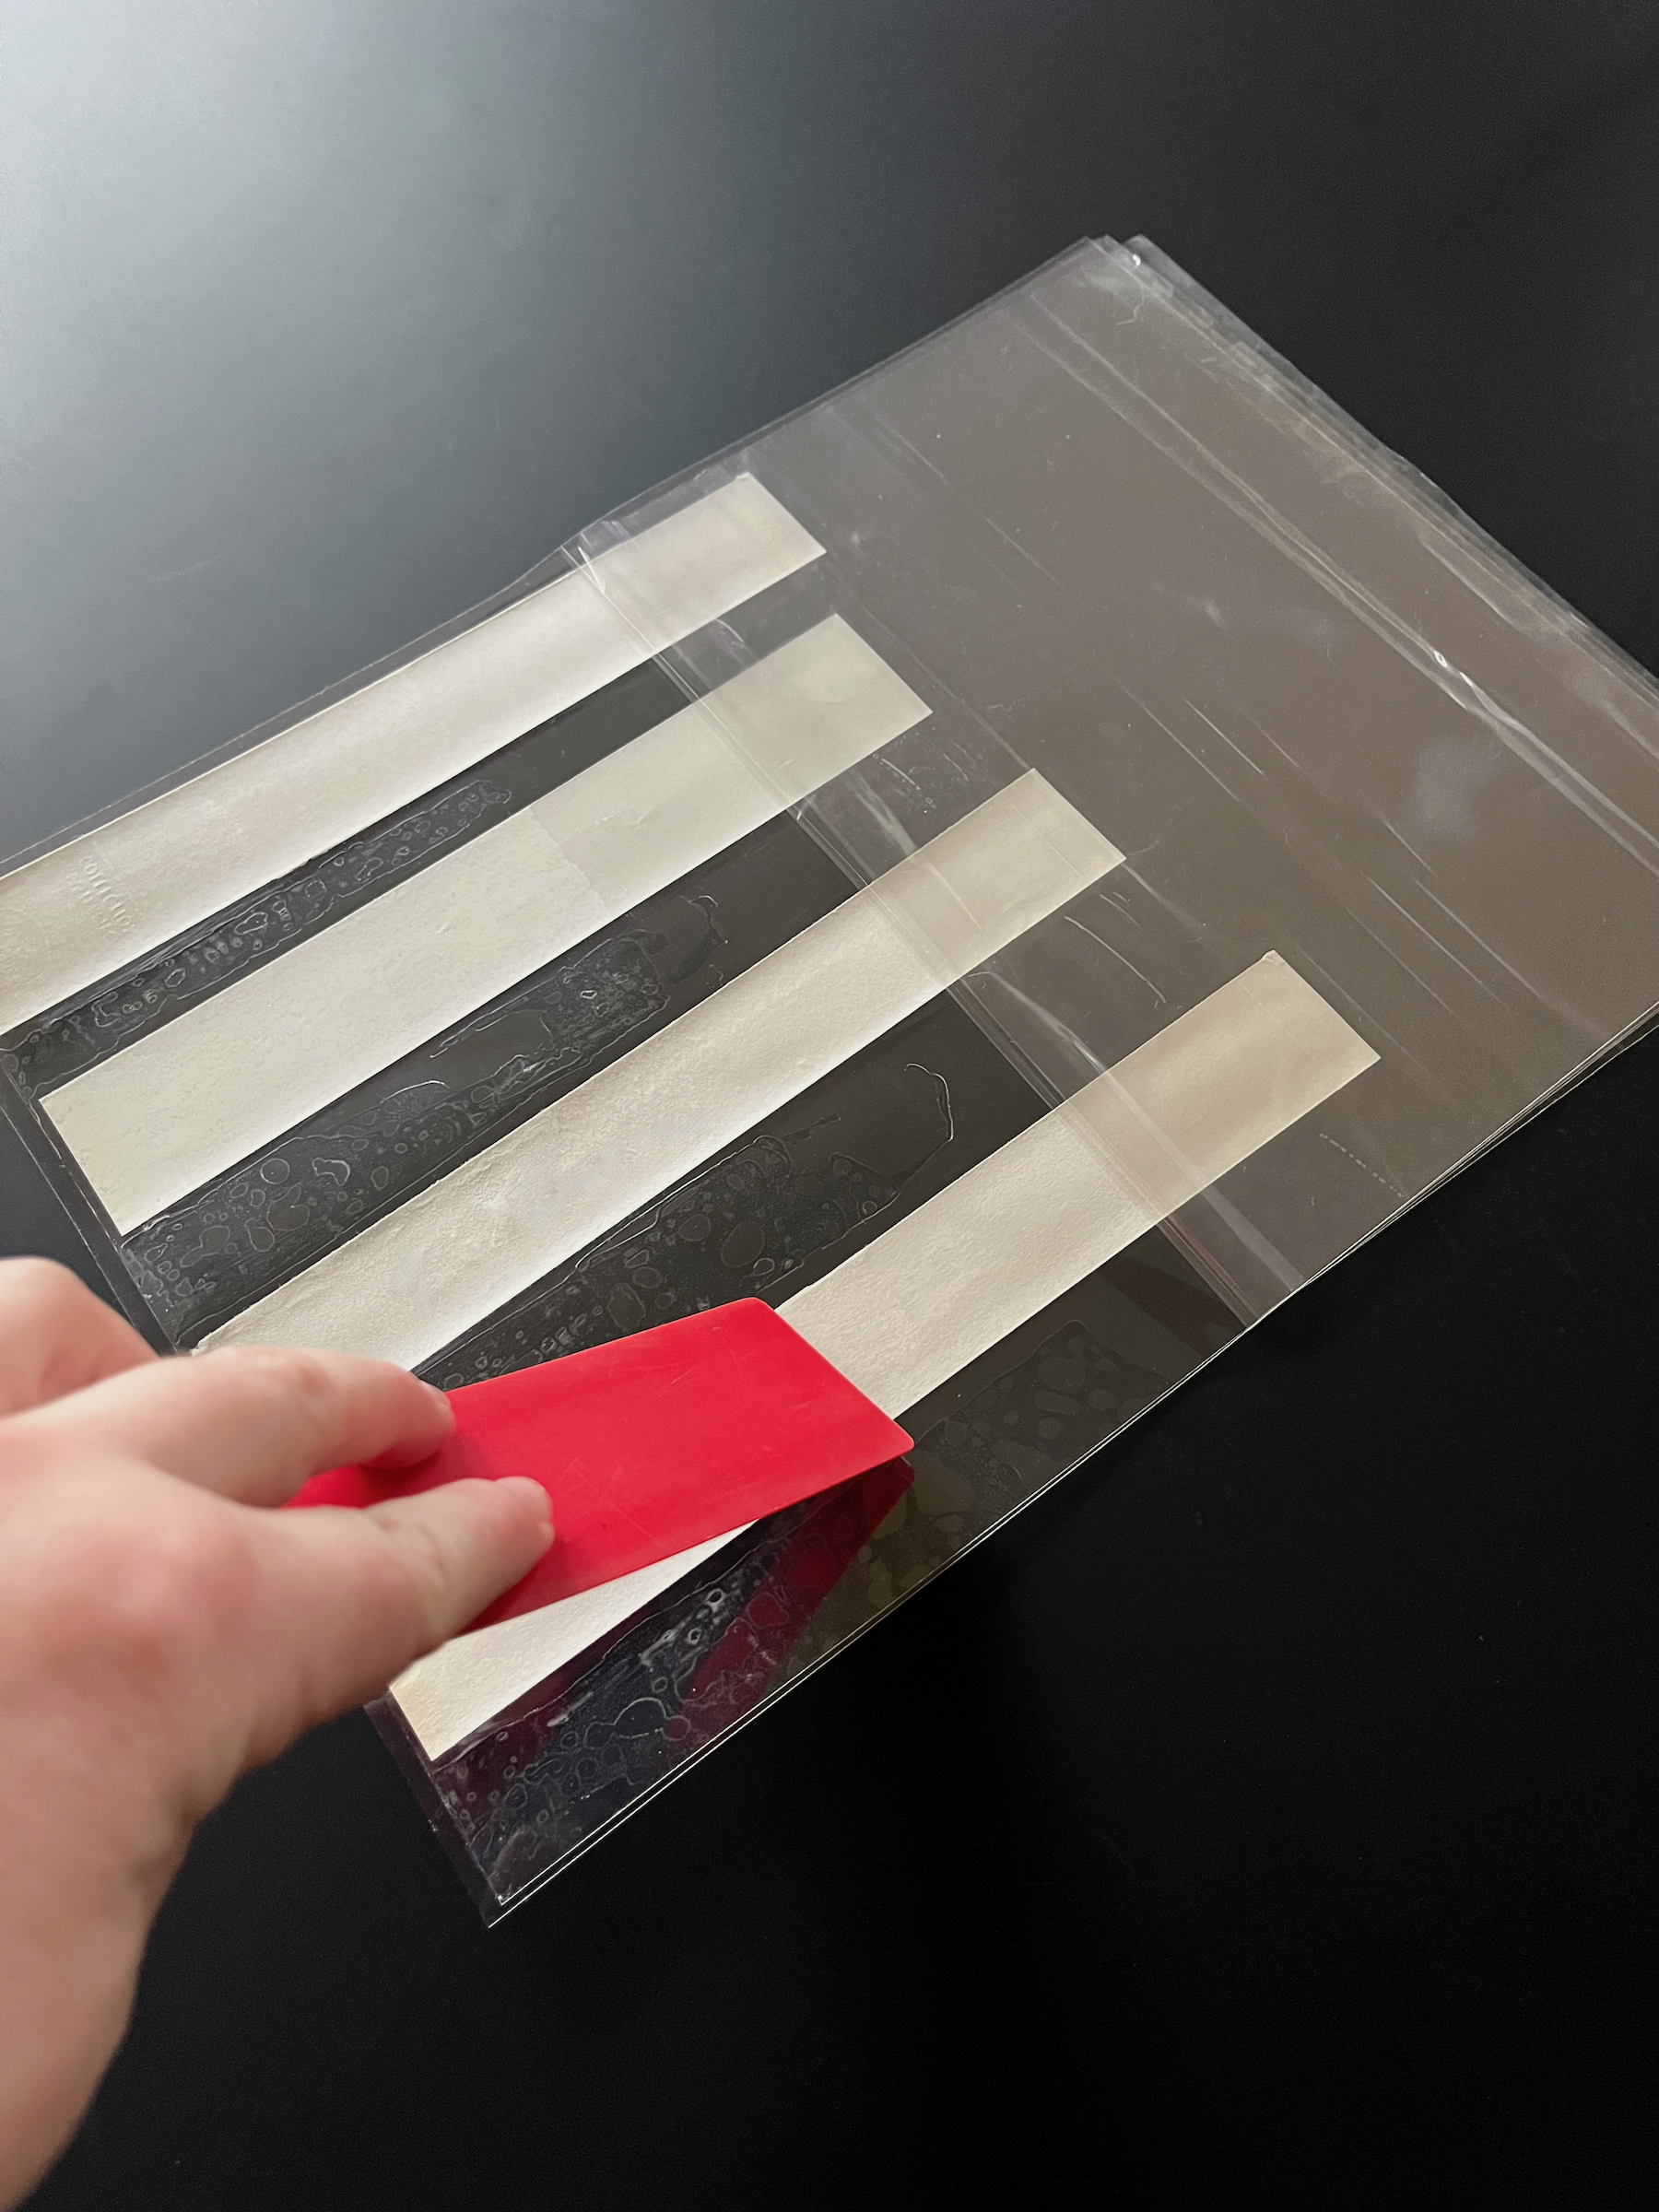
  6. Gently peel back the release liner about an inch at a time, using the ruler to smooth the laminate all the way down until the artwork is completely adhered. Leave the release paper attached at the bottom for now and flip the page back over (the artwork facing down again).
  7. Take another laminate page and peel back about an inch and half worth of the release liner, then align the top of this page (adhesive side down) with the top of the first page (adhesive side up).
    • Pull the release liner from the first page up to meet the new release liner between the two laminate pages, this will keep the pages from sticking to to the wrong places while you work.
  8. Using the plastic ruler, smooth the laminate all the way down (peeling both release liners back together a little at a time) until the bookmarks are completely laminated between the two pages.
  9. Allow for a little space so the laminate remains sealed (but less conspicuous), use the guillotine trimmer to trim down the bookmark edges.
  10. Place in the books you’re reading, and enjoy!

The First 60 Minutes of Disney’s Illusion Island

Have you ever been undecided on what to play next? 

Should you buy that game? Should you install that game?

I’ve been there, and sometimes you just need to take a look at the graphics, hear the music, and learn a little about the plot to see if it resonates with you before taking the next step. I’m here to help! I am creating the first 30 to the first 60 minute videos of games; indie and mainstream, new and old!

This week let’s take a look at the first 60 minutes of Disney’s Illusion Island…

Do you want to play the rest? 

How to Play – The Fantasyland Game

Part of the fun in raising Zoey is finding things that delight and educate her; I want to find fun, creative board games to play with her during our family game nights! This week we played Walt Disney’s Fantasyland Game for 2 to 5 players.

This adorably nostalgic game was originally released in 1956, but I picked up the re-release in 2005 and now wish I had bought the whole set! There are also Adventureland, Frontierland, Tomorrowland and a straight Disneyland one! Zoey was a little under the age range for this one, but could still grasp the numbers and movement. It also helped to point out the artwork for the different rides she saw when we visited Disneyland!

So let’s play!

IN THE BOX
  • 5 game pieces
  • A game board
  • Star cards
  • Ticket cards
INSTRUCTIONS
  1. Each player selects a game piece and places it on the “Start” space. 
  2. Shuffle the ticket cards and place them in a pile with the number sides down.
  3. Shuffle the star cards and place them in a pile with the number sides down.
  4. To start the game, the youngest player draws the top ticket card and moves the number of spaces indicated on it. 
    • This first ticket is a “free” ticket to begin the game, after each player has had their first turn, tickets can then only be obtained by landing on the spaces marked “ticket”.
  5. Play then passes to the player on the left, and so on (a player may land on the same space occupied by another player).
  6. On a player’s second turn and thereafter in the game, they move their piece as shown on the space on which their piece rests at the start of this turn. They do not draw a ticket or a star unless they land on a ticket or star space.
    • The star and ticket spaces are special spaces. A player landing on one of these spaces draws a top ticket or star as indicated and immediately moves the number spaces shown. They continue to move in this manner as long as they land on either star or ticket spaces, and their turn does not end until they land on one of the regular numbered spaces. 
    • A player always keeps their tickets and stars, as they determine the winner of the game.
  7. There are two places on the board where the player may follow the regular path or may turn off on a side track to collect extra stars which will give them additional points.
    • Once a player has turned off the main track, they must continue on the turn off until they get a star, and then must return to the regular track by the same route.
    • A player reaching the space which gives them two stars entitles them to move the total number shown on the two stars they draw.
  8. The game ends when a player reaches the “Finish” space; the player with the highest number of stars and tickets wins!

ENJOY!

The First 60 Minutes of Kingdom Hearts III

Have you ever been undecided on what to play next? 

Should you buy that game? Should you install that game?

I’ve been there, and sometimes you just need to take a look at the graphics, hear the music, and learn a little about the plot to see if it resonates with you before taking the next step. I’m here to help! I am creating the first 30 to the first 60 minute videos of games; indie and mainstream, new and old!

This week let’s take a look at the first 60 minutes of Kingdom Hearts III…

Do you want to play the rest? 

The First 60 Minutes of Kingdom Hearts II Final Mix

Have you ever been undecided on what to play next? 

Should you buy that game? Should you install that game?

I’ve been there, and sometimes you just need to take a look at the graphics, hear the music, and learn a little about the plot to see if it resonates with you before taking the next step. I’m here to help! I am creating the first 30 to the first 60 minute videos of games; indie and mainstream, new and old!

This week let’s take a look at the first 60 minutes of Kingdom Hearts 2 Final Mix…

Do you want to play the rest? 

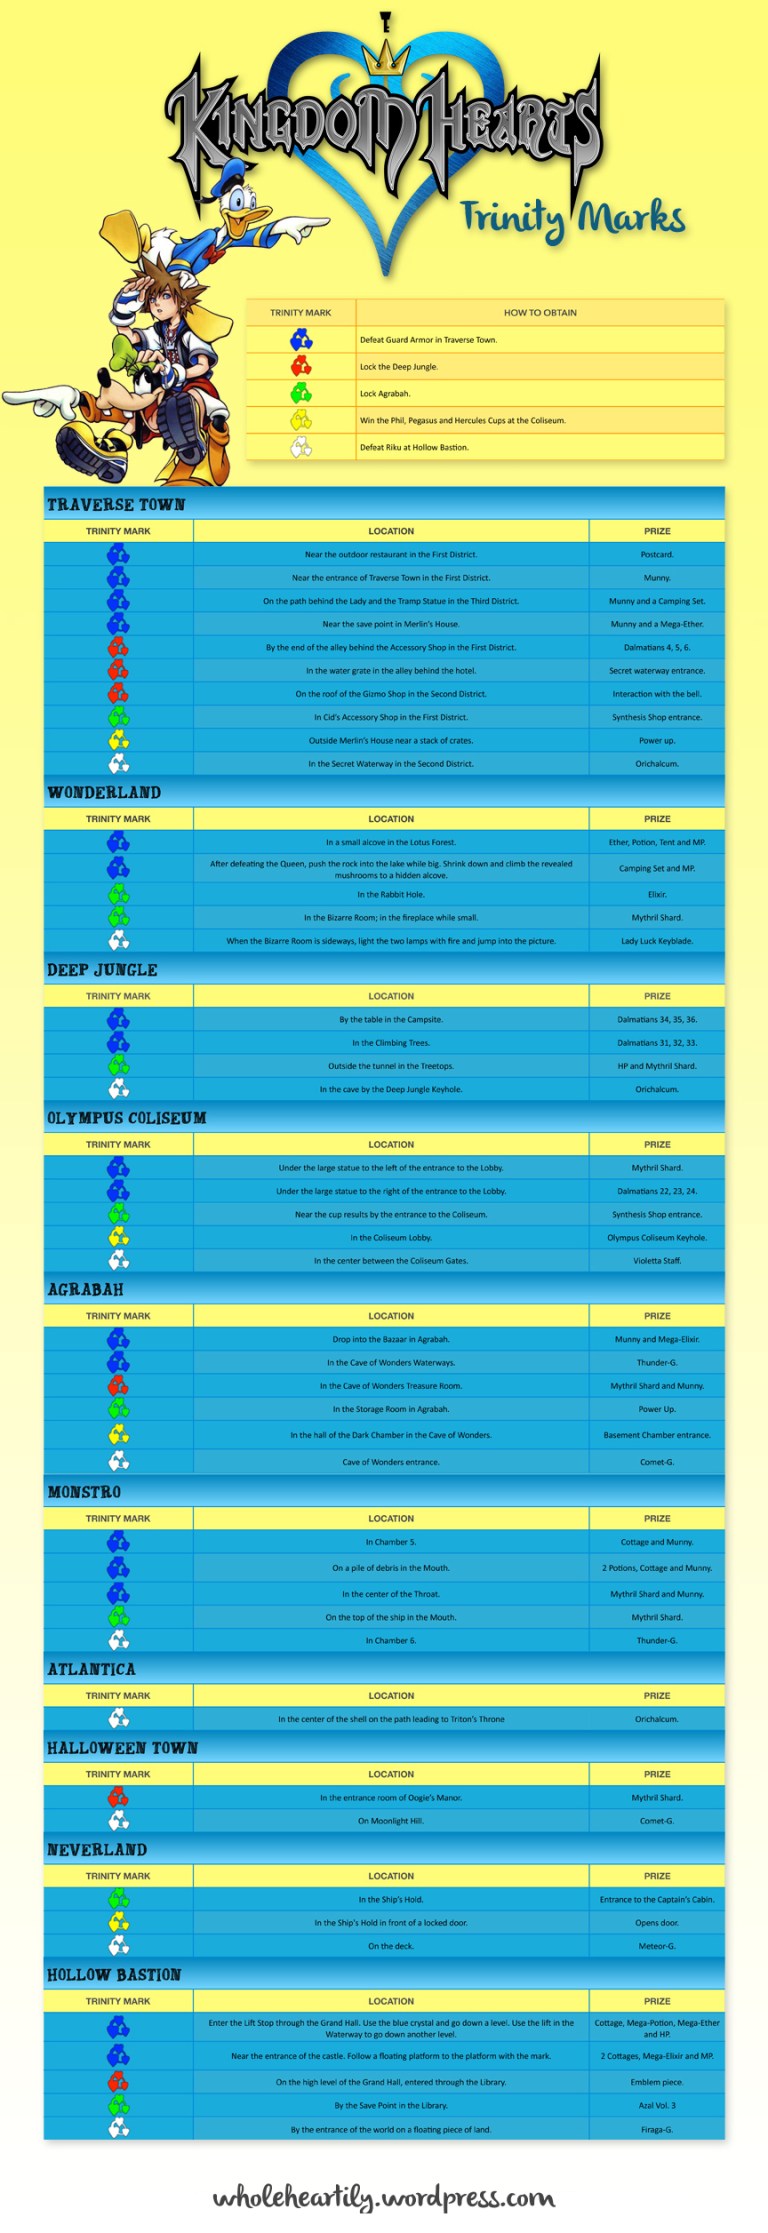
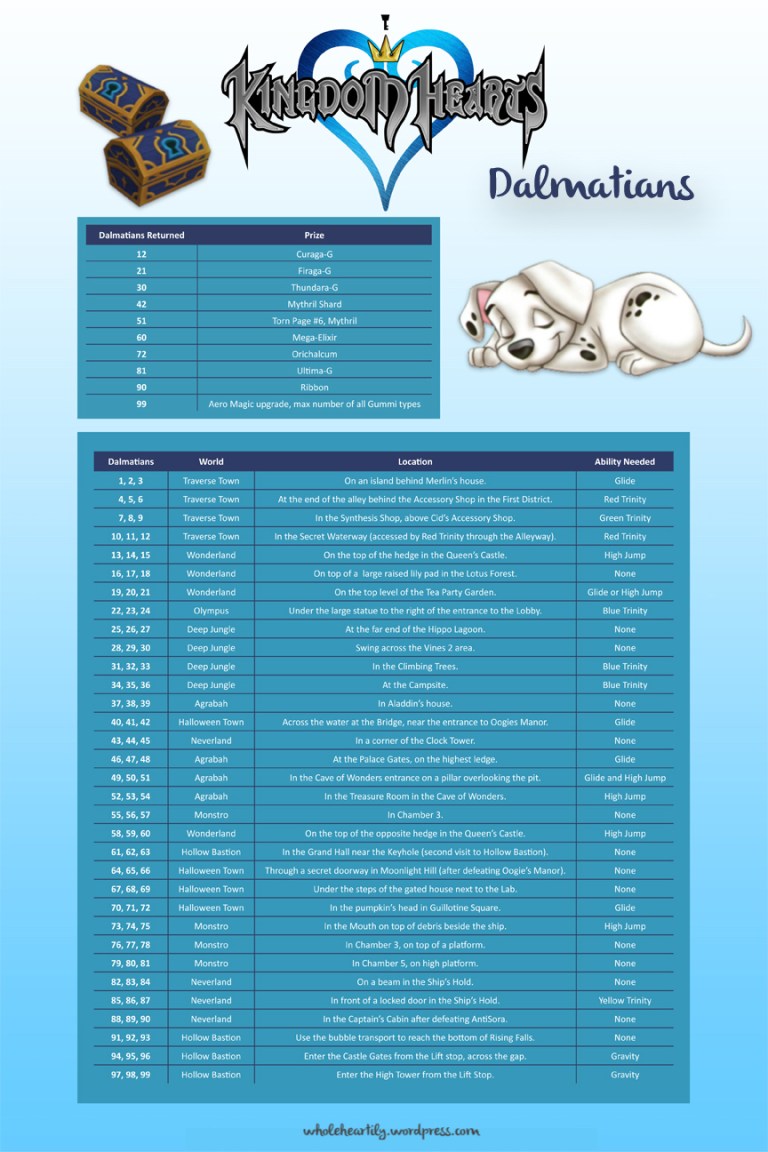
Kingdom Hearts – Trinity Mark and 101 Dalmatian Guides

If there’s one thing I do when I play a game (besides trying to relax and enjoy myself), it’s look up information. I get curious or stuck, and I find myself turning to the internet for answers. There are a lot of good guides out there that are super helpful, but what I don’t see are an abundance of simple and clean visual guides that lay out all the information in one place.

I recently posted the first 60 minutes of Kingdom Hearts and in conjunction with that I wanted to re-post the Trinity Mark and 101 Dalmatians Guides I made several years ago!

These visuals or infographic guides are organized into helpful sections and downloadable so you don’t need to keep hopping back online to check on the information.

Please let me know if you would like me to work on a guides for anything else within Kingdom Hearts or if there are any games you would like to see visual information or guides for in the future! I love helping people, discussing games and organizing information!

The First 60 Minutes of Kingdom Hearts Final Mix

Have you ever been undecided on what to play next? 

Should you buy that game? Should you install that game?

I’ve been there, and sometimes you just need to take a look at the graphics, hear the music, and learn a little about the plot to see if it resonates with you before taking the next step. I’m here to help! I am creating the first 30 to the first 60 minute videos of games; indie and mainstream, new and old!

This week let’s take a look at the first 60 minutes of Kingdom Hearts Final Mix…

Do you want to play the rest? 

DIY – Throw Pillow Envelope Cover

Welcome back friends! I found this really wonderful Disney fabric at Joann’s Fabric and Craft Store nearly a year ago and I’ve finally created envelope throw pillow covers! 

Envelope throw pillow covers are the perfect solution if you ever need to replace the pillow insert, or wash the pillow and/or cover separately.

This project is a good project for beginners; with this one piece of fabric folding method, there are less seams to stitch! 

Let’s get started!

SUPPLIES
  • 2 yards of fabric (your choice)
  • Cutting mat
  • Quilting ruler
  • Rotary cutter
  • Sewing pins
  • Sewing machine
  • Sewing thread (in a color that compliments your fabric choice)
  • Sewing scissors
  • Pillow inserts (16×16)
INSTRUCTIONS
  1. Firstly, I recommend ironing your fabric to smooth out any folds or creases.
  2. Using your cutting mat, quilting ruler and rotary cutter, measure and cut a 17” wide by 20” tall rectangle of fabric.
  3. Keeping the 20” sides vertical, spread the rectangle of fabric out face-down then fold the bottom edge up by half an inch and then once more by half an inch. Pin the fabric into place using the sewing pins.
  4. Fold the top edge down by half an inch and then once more by 2 inches. Pin the fabric into place using the sewing pins.
  5. After preparing your sewing machine with the sewing thread of your choice, sew the bottom 1/2” hem, removing the sewing pins as you proceed. Then sew the top 2” hem (see photo above for the placement of this seam).
  6. Spread the rectangle of fabric out face-up this time (now with the top and bottom hemmed). Fold the bottom hem up and the top hem down until they overlap, with the 2” top hem covering the bottom 1/2” hem. When folded this way, the cover should now measure 17” wide and 16” tall, check with your quilting ruler and/or cutting mat, then pin the sides.
  7. Using the sewing machine, sew the two sides of the pillow cover with 1/2 seam allowance on either side, removing the sewing pins as you go!
  8. With your sewing scissors, snip off the corners at a diagonal, but do not cut through the seams!
  9. Turn the pillow cover right-side out and insert your pillow.
  10. Repeat steps 2 through 9 for the second pillow cover!
  11. Enjoy!