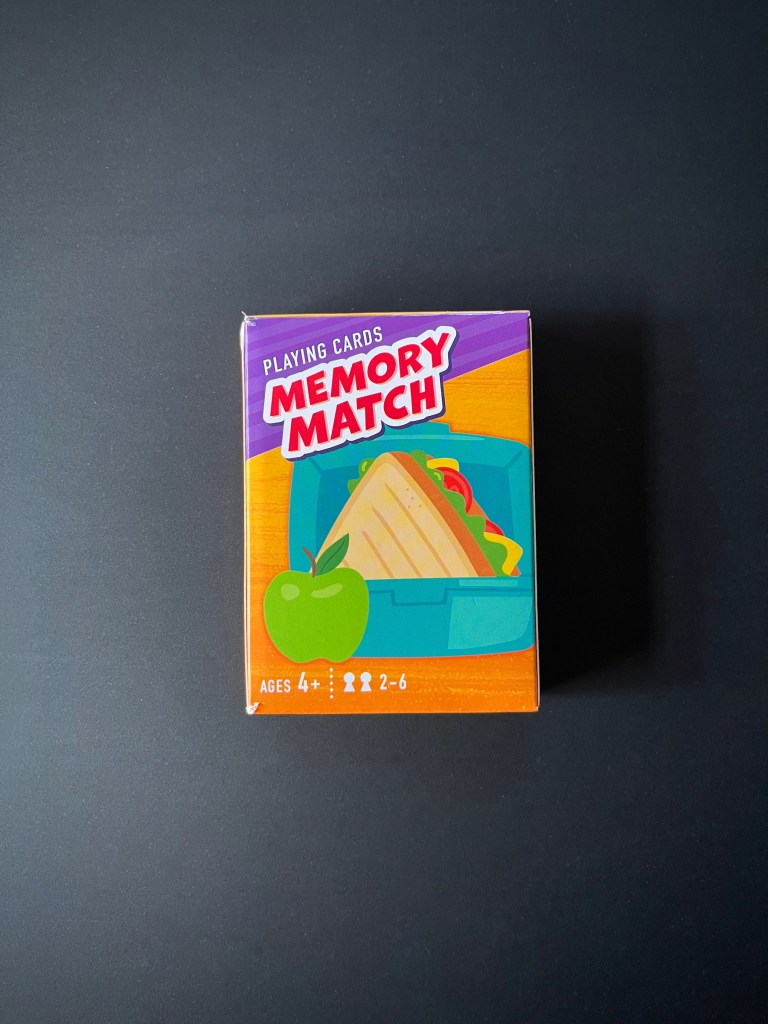
Part of the fun in raising Zoey is finding things that delight and educate her; I want to find fun, creative board games to play with her during our family game nights! This week we played Memory Match, the LotFancy version, for 2 to 6 players.
This specific memory match game is designed for kids and does a great job building visual recognition and, of course, memory recall. The graphics are adorable and gameplay is fun and engaging; especially when competition narrows in Zoey’s focus.
So let’s play!
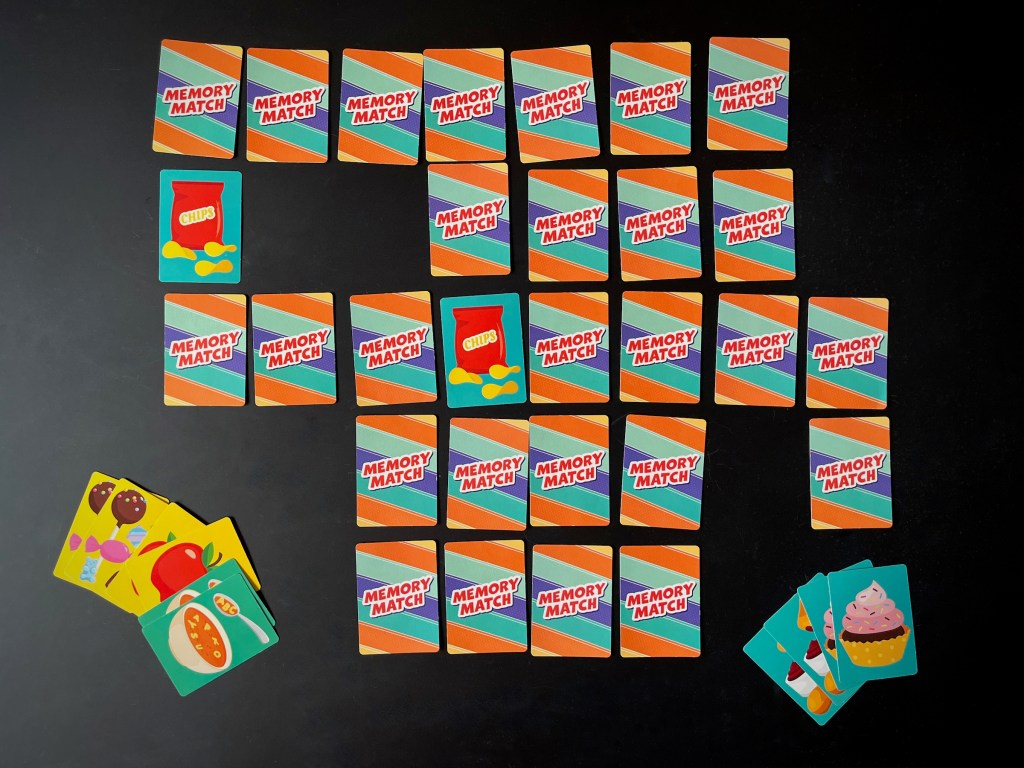
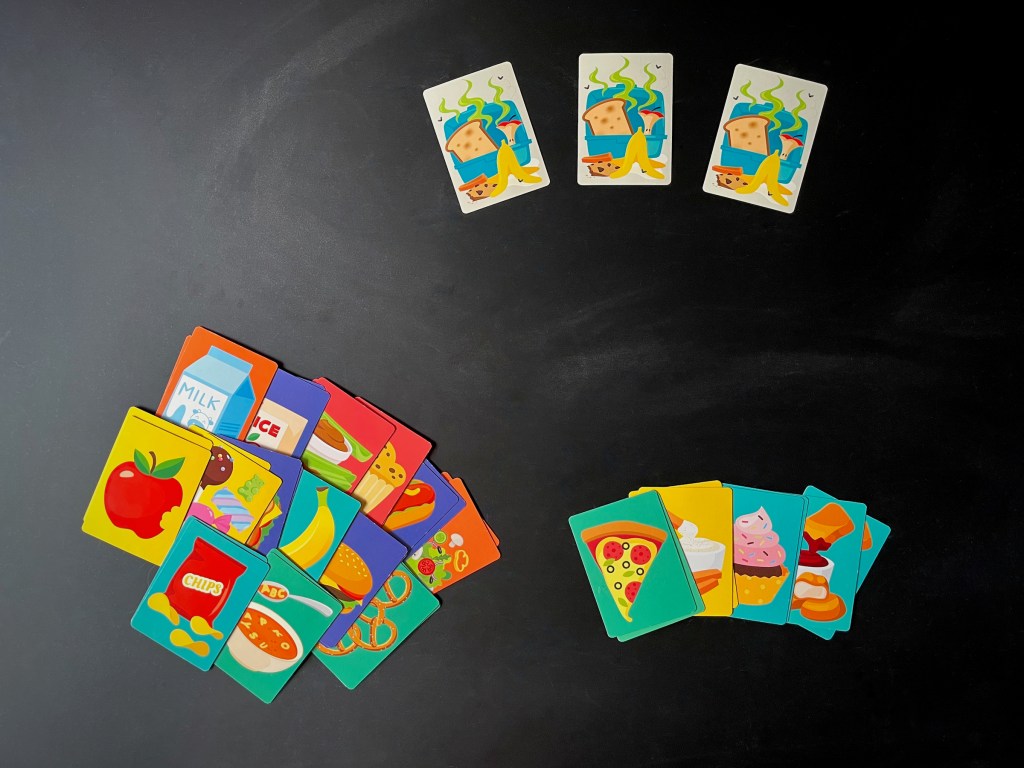
IN THE BOX
39 cards
INSTRUCTIONS
For standard play, remove the 3 stinky lunchbox cards. For more of a challenge, leave them in the deck.
Shuffle the deck and lay them face down so the cards are not overlapping. You may place them in a grid or randomly, it’s up to you.
Players take turns, the youngest player goes first.
On your turn, flip two cards face-up. Make sure that the other players can see the cards too.
If the two cards match, you get to keep them! Place them in a score pile in front of you. As a reward, you get to go again and flip over two more cards.
If you do not make a match, flip the cards back over so they are hidden, your turn is over.
If you are playing with the stinky lunch box cards and you turn one over, your turn is over.
Play continues to the left and the next player takes their turn.
When all the cards have been picked up (minus the stinky lunchbox cards if in play), each player counts the pairs of food they’ve collected. The player with the most food wins!
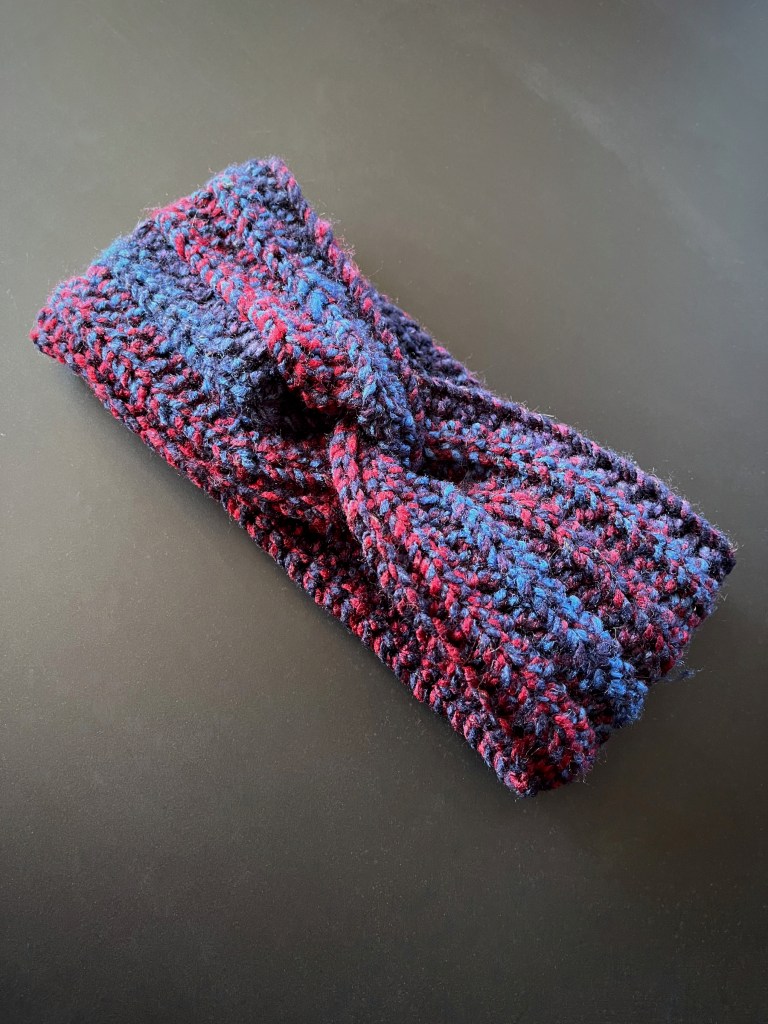
Welcome back friends! Do you crochet? I dabbled in crochet off and on for a few years, always fascinated, but never fully catching on. I kept at it, and suddenly, it clicked! I feel calm and cozy when I’m crocheting, and fiercely proud whenever I complete a project.
It’s that time of year for keeping warm! Whether you’d like to create a ear-warmer headband for yourself or to gift to a friend, I’m here to help!
This headband is cozy, classic and ideal for any level of crocheter (beginners included)! Any bulky size 5 yarn can be used in this pattern.
SUPPLIES
Crochet hook (size 6mm)
Yarn (size 5)
Scissors
Yarn needle
INSTRUCTIONS
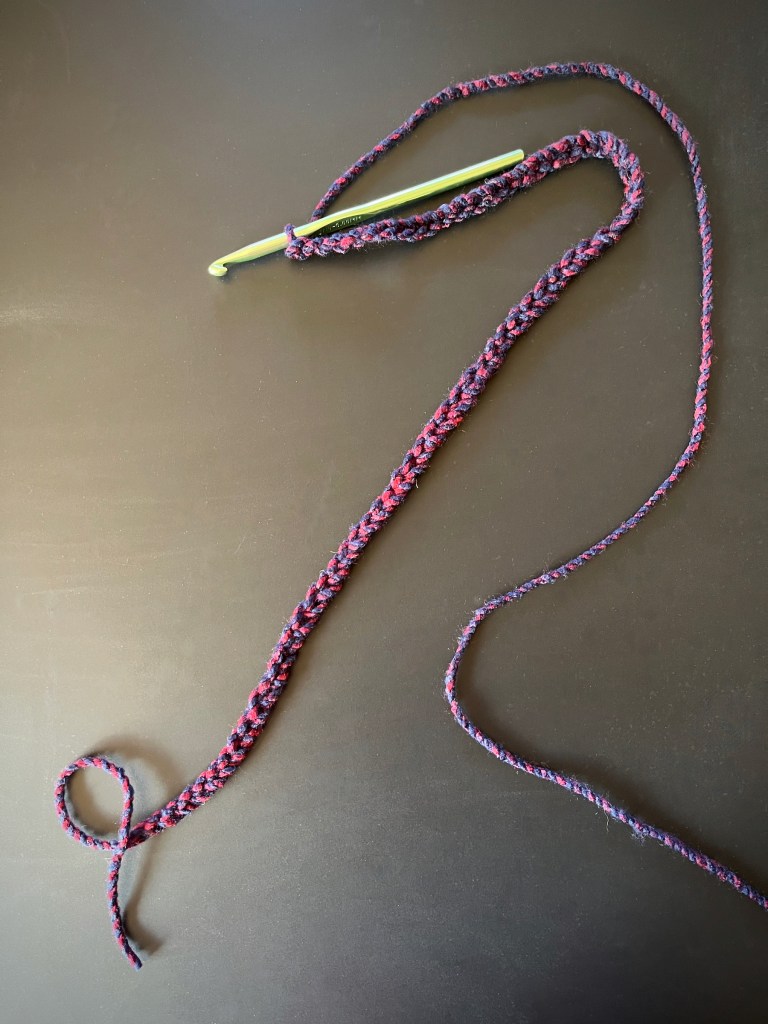
Create a slip knot and then 64 chain stitches. The chain number may vary a bit depending on the head size you are creating the headband for. If possible, hold the chain around your head or theirs to measure.
Turn your chain around and half double crochet (hdc) into the back loop of the second stitch from the hook, then continue to hdc in the back loops of each stitch all the way across your chain.
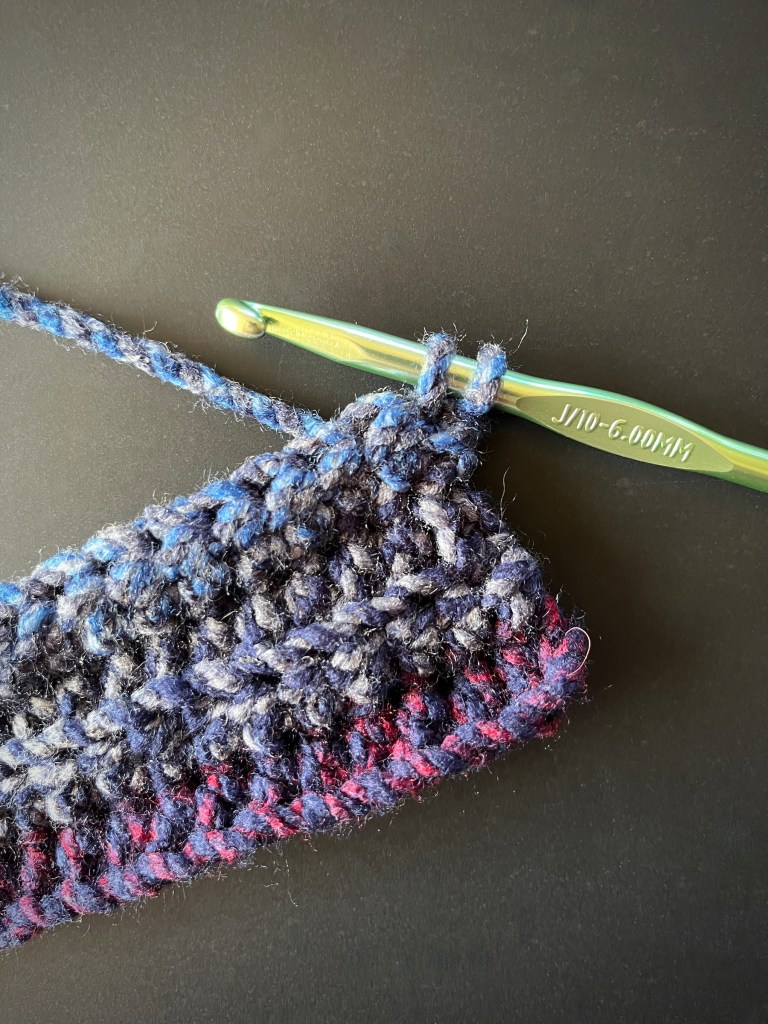
Turn your work. Insert your hook under both loops of the first stitch, yarn over and pull through. Then insert your hook behind the second vertical loop of the stitch you just created, yarn over and pull through. This create a smoother/ straighter finish along the sides of the project.
In the next stitch, hdc into the back loop and then continue to hdc in the back loops of each stitch all the way across your project.
Repeat steps 3 and 4 for the next 8 rows for a total of 9 hdc rows. You are welcome increase or decrease the amount of rows if you’d prefer a thinner or wider headband.
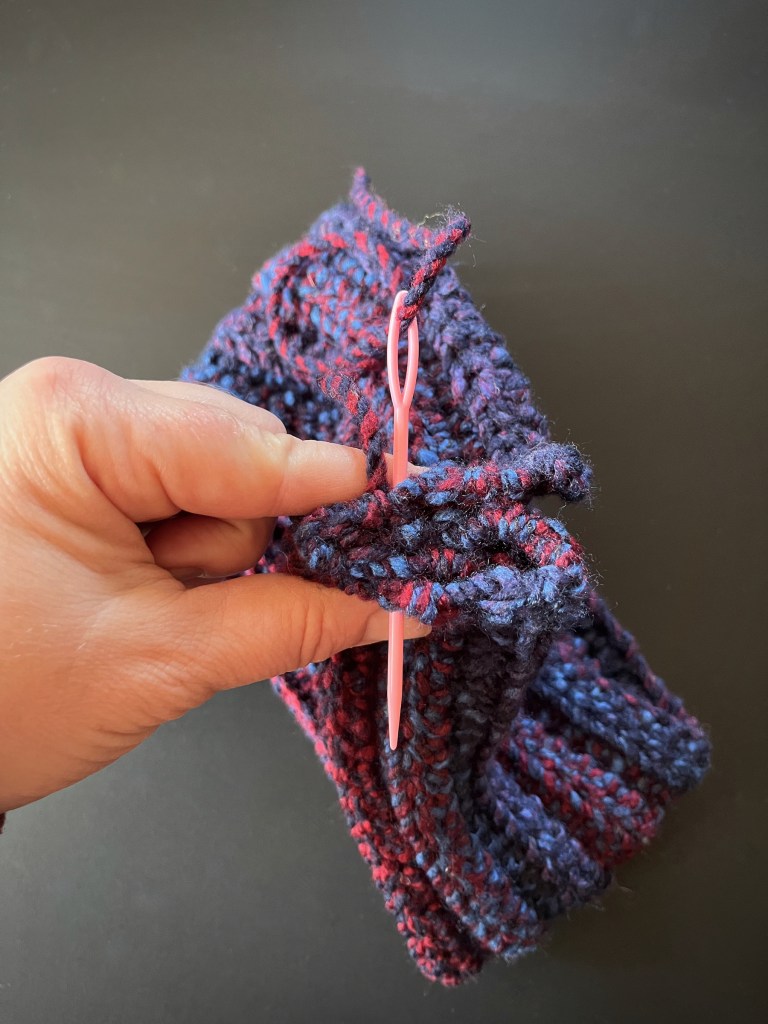
After the last hdc of your last row, use the scissors to disconnect the yarn from the skein and pull the loose in through your crochet loop, leaving a good length to sew the headband together.
Taking each end of the project, pinch the corners in towards each other to create a C and a backwards C, then bring the C’s together to interlink. Using a yarn needle, stitch the remaining yarn back and forth through all 4 layers of the interlinked ends.
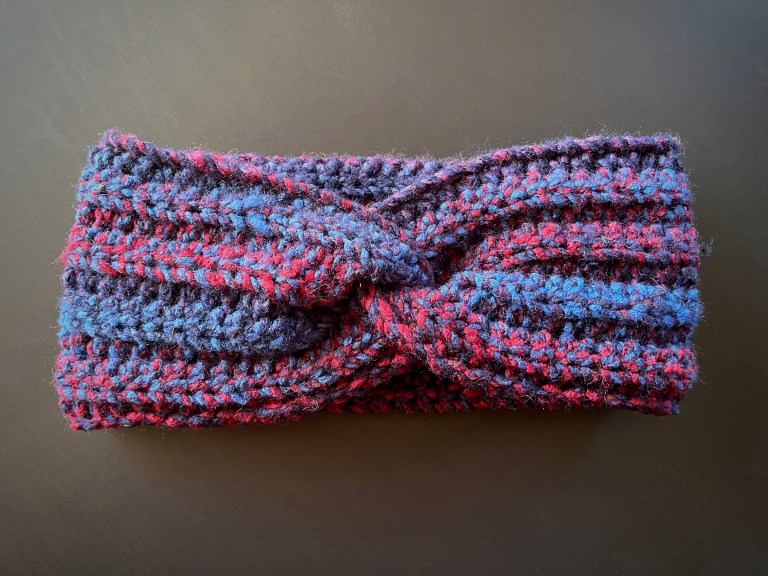
Turn the headband right-side out and there’s your twist!
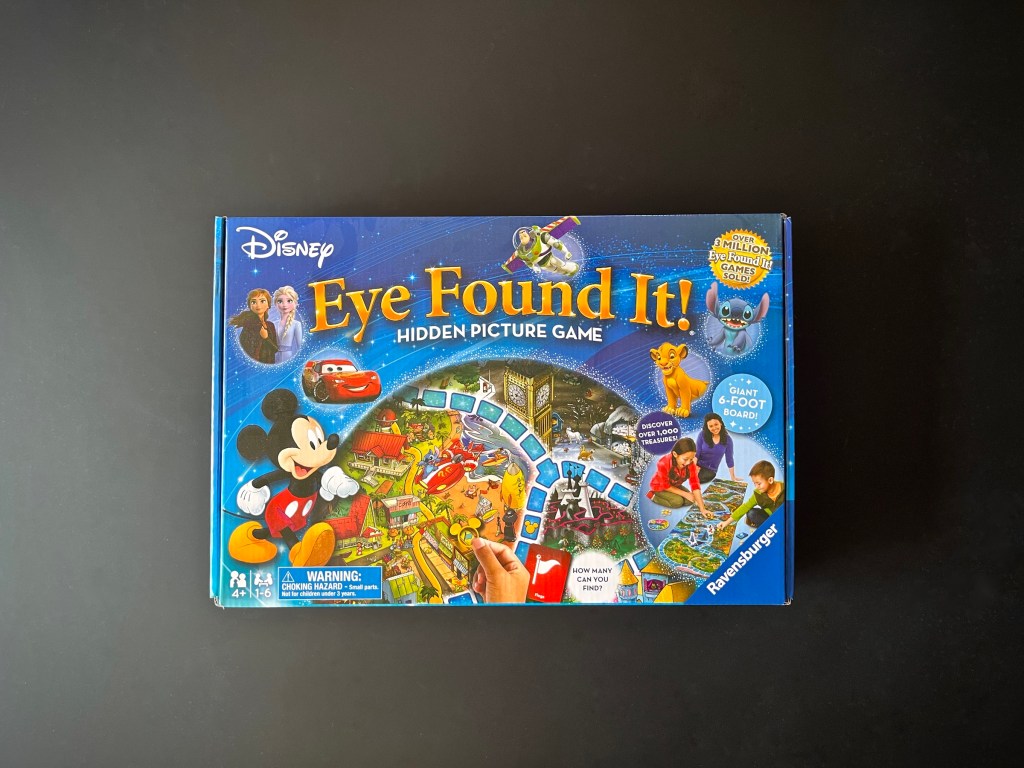
Part of the fun in raising Zoey is finding things that delight and educate her; I want to find fun, creative board games to play with her during our family game nights! This week we played Disney’s Eye Found It! for 1 to 6 players.
This is a cooperative game, which is nice when you’re not feeling competitive and want to focus on teamwork instead. Zoey enjoys the Disney content and searching the board for hidden objects (so do I honestly). The only warning I will give is that the game board is rather large, you’ll either need a long table, countertop, or you can set it up on the floor like we do!
So let’s play!
IN THE BOX
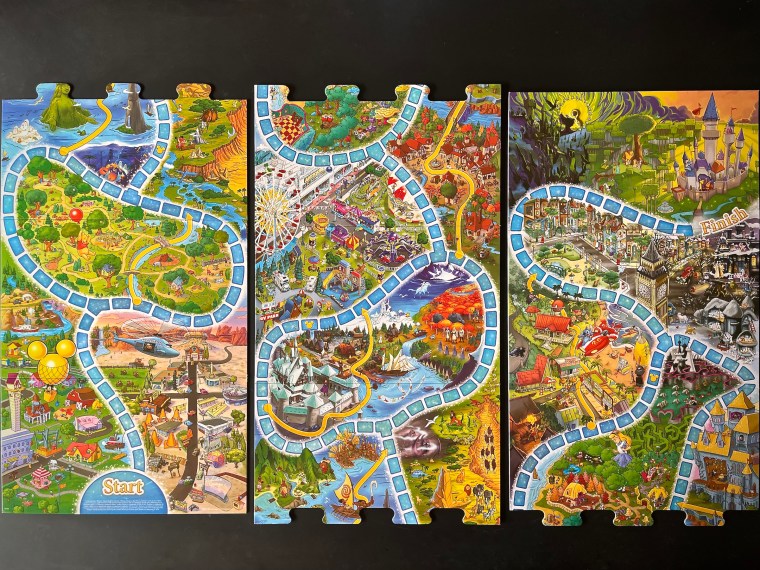
1 game board (in 3 sections)
6 characters
6 character bases
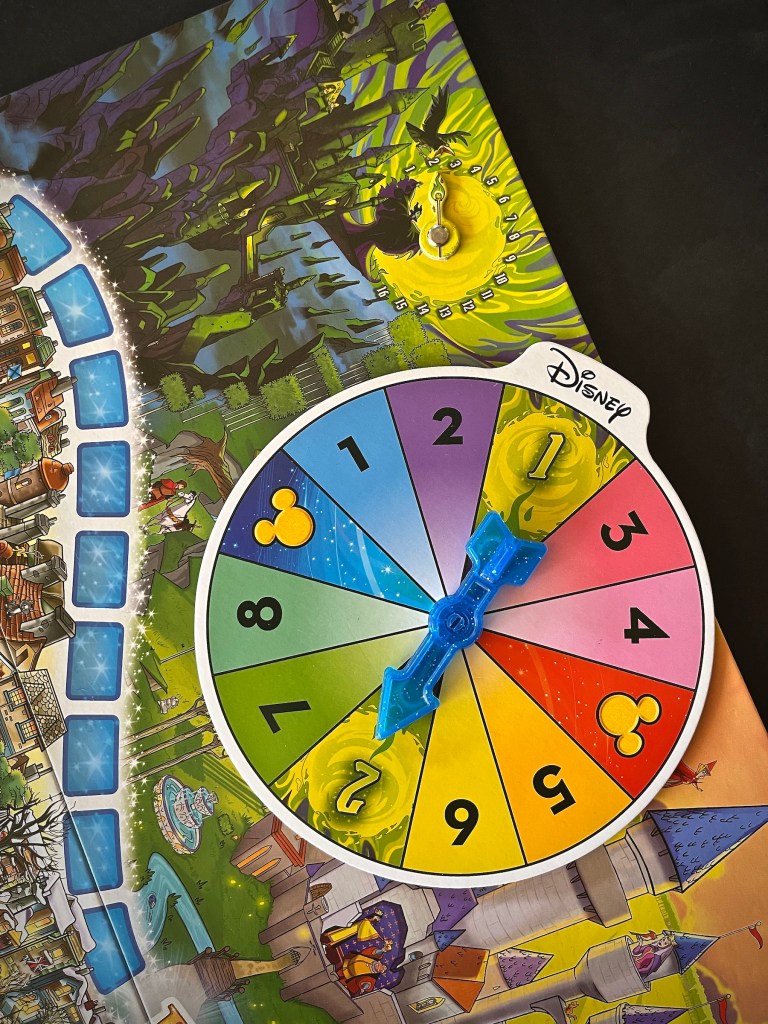
1 spinner
12 Mickey marker
30 search cards
1 sand timer
INSTRUCTIONS
Unfold the game board sections and connect them.
Set the Mickey markers, sand timer and spinner near the board.
Shuffle the search cards and put them in a pile near the board. Either the blue or red sides may face up.
Set Maleficent’s staff to “1”.
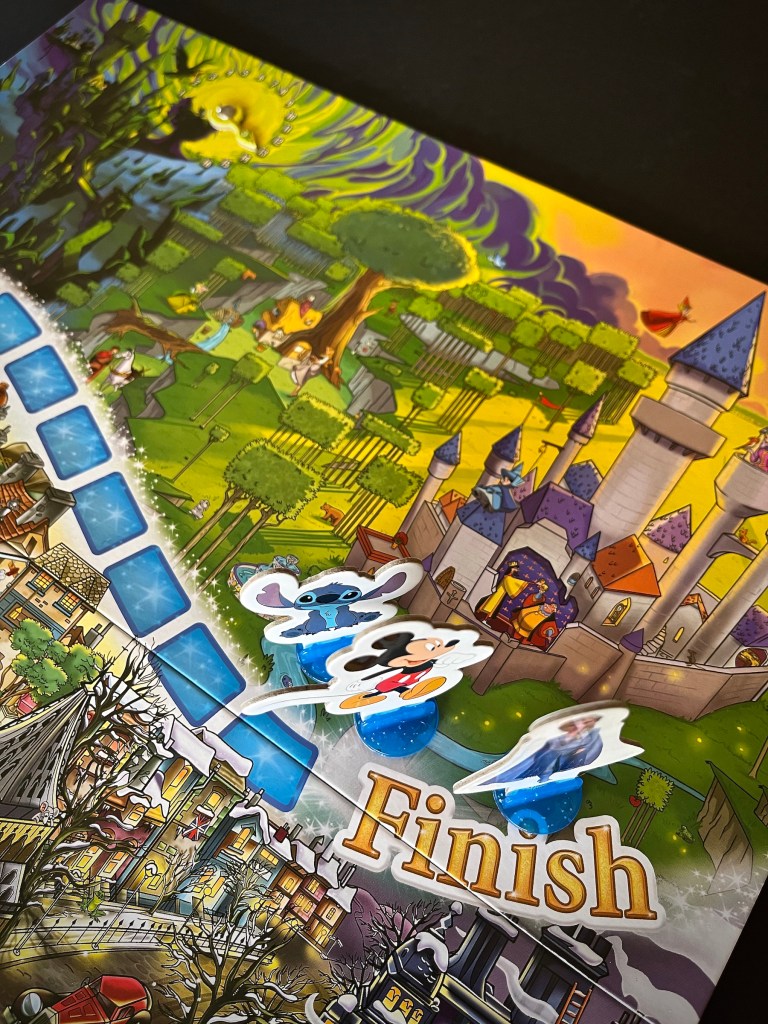
Insert each character into a base. Each player chooses a chapter and puts them on the “Start” space.
The youngest player goes first. On your turn, spin the spinner and follow its instructions:
Move – Move your character forward the number of spaces indicated.
If you land on a shortcut, follow the arrow.
If you get to a fork in the road, choose which way to go.
If you land on a “search” space, follow the search rules.
Maleficent’s Magic – Move the staff one or two spaces forward, then spin again!
Search – If the spinner or your character land on a “search” space, draw the top card of the deck.
If you spun a search on the spinner, use the side of the card matching the color on the spinner. If your character landed on a search space you may choose which side of the card to use.
Start the timer. All players help look for the object(s) shown, hidden on the game board. Each time you find one put a Mickey marker on it so you remember where it is. When the time runs out, stop looking and count up all the Mickey markers you placed on the board. Everyone’s character moves forward that many spaces!
If all players arrive at Aurora’s castle before Maleficent casts her spell (when her staff reaches 16), you all win!
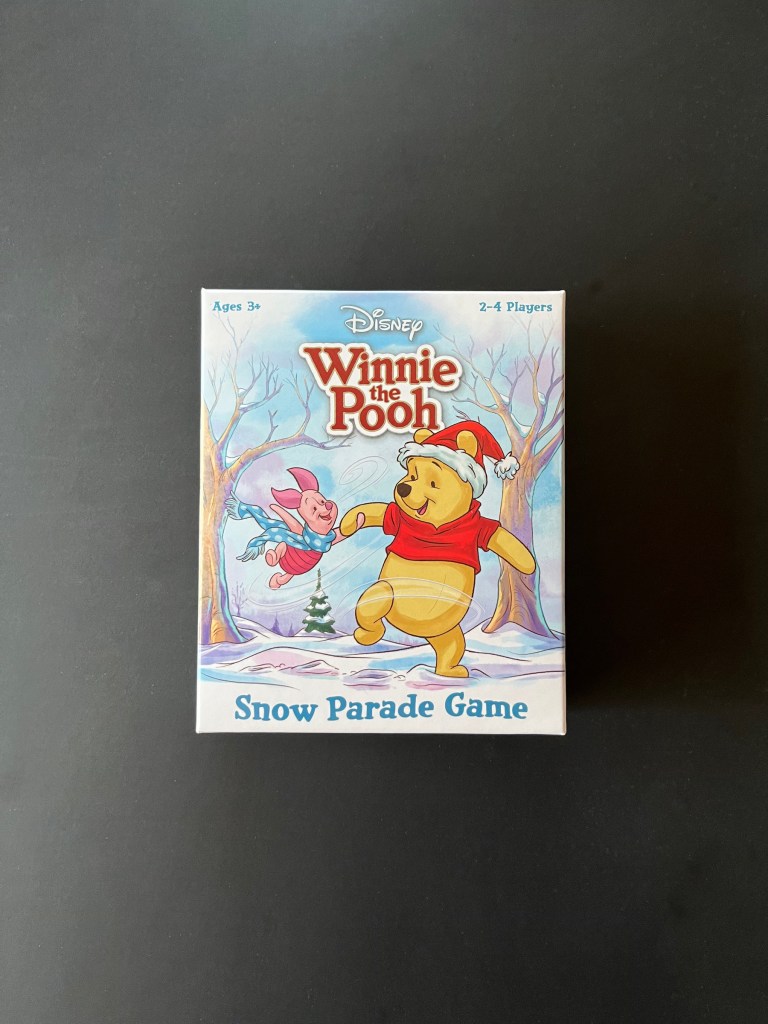
Part of the fun in raising Zoey is finding things that delight and educate her; I want to find fun, creative board games to play with her during our family game nights! This week we played Winnie the Pooh – Snow Parade Game for 2 to 4 players!
I purchased this game on a whim! I saw Winnie the Pooh and I saw the Christmas/Winter theme, and it piqued my curiosity! It was worth it! We enjoy that this game is cooperative, which is a nice departure from the competitive games we’ve been playing!
So let’s play!
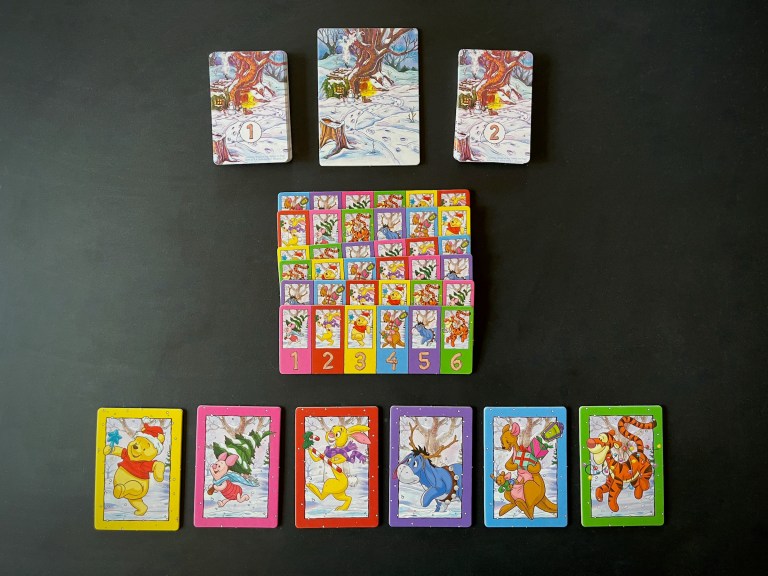
IN THE BOX
Home tile
6 character tiles
6 parade tiles
40 cards
INSTRUCTIONS
This is a cooperative game, you will all win or lose together! Play cards to move or swap the order of the character tiles in the parade. If you can complete the goal number of parade tiles without running out of cards, you all win the game!
Easy – Complete 3 parade tiles
Medium – Complete 4 parade tiles.
Hard – Complete 5 parade tiles.
Place all the tiles in the middle, where everyone can reach them.
Place the six character tiles face up in a line to the right of the home tile in order from 1 to 6 (the numbers are on the backs). This is the parade!
Separate the cards into two piles by the numbers on the backs (1 or 2). Shuffle each pile.
Place the number 1 pile of cards on top of the number 2 pile, then place this single deck on top of the home tile.
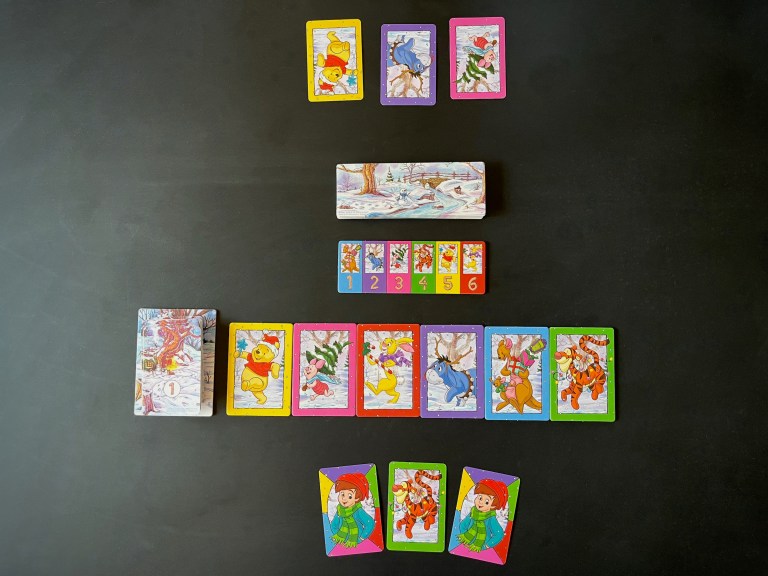
Each player draws a number of cards based on the number of players. Place your cards face up so all the players can see them.
2 players: 3 cards each
3 to 4 players: 2 cards each.
Mix the parade tiles and place them in a pile above the character tiles, face-down. Flip one tile face-up.
Starting with the youngest player and moving clockwise, you can do one of these 3 actions on your turn:
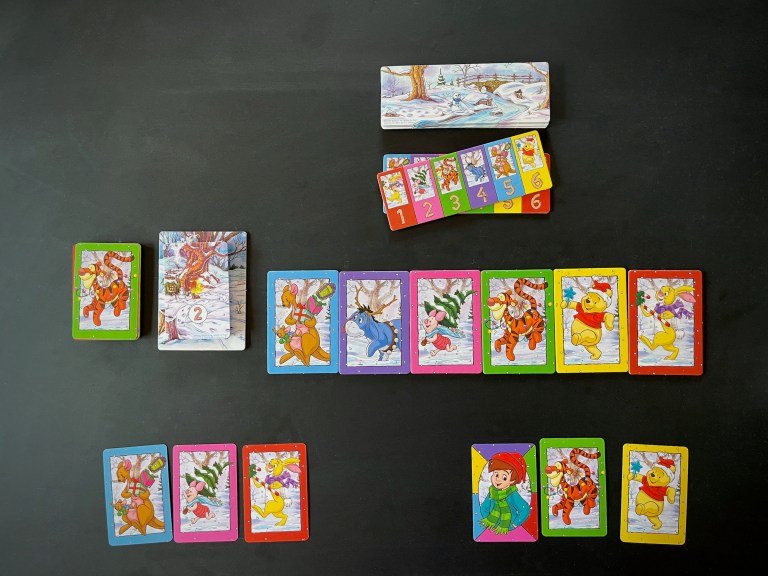
Move a character: Play a card to move the matching character tile forward or backward one spot in the parade. Character tiles at the front of the parade can only be moved backward and character tiles at the back of the parade can only be moved forward.
Swap: Play a card and choose another player to also play a card. Swap the spots of those two matching character tiles in the parade.
Discard: Discard your cards and draw all new cards from the deck.
Christopher Robin: The Christopher Robin card is wild and can be played as any character.
If all character tiles in the parade match the order on the current parade tile, you’ve completed it! Set it aside and flip the next parade tile over!
At the end of your turn, if you played a card, draw a new one from he deck. If another player helped you swap, you each draw a card.
If the deck runs out, keep taking turns until players have no cards left to play.
If you complete the goal number of parade tiles before you run out of cards to play, all the players win!
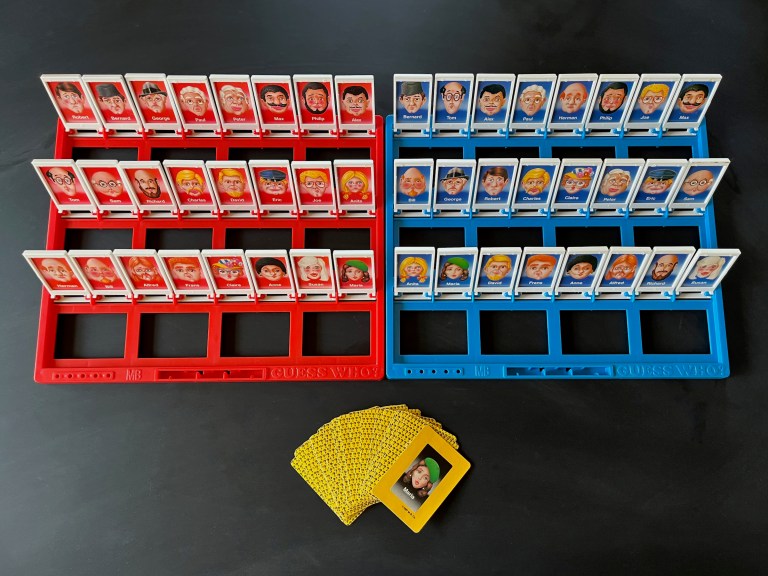
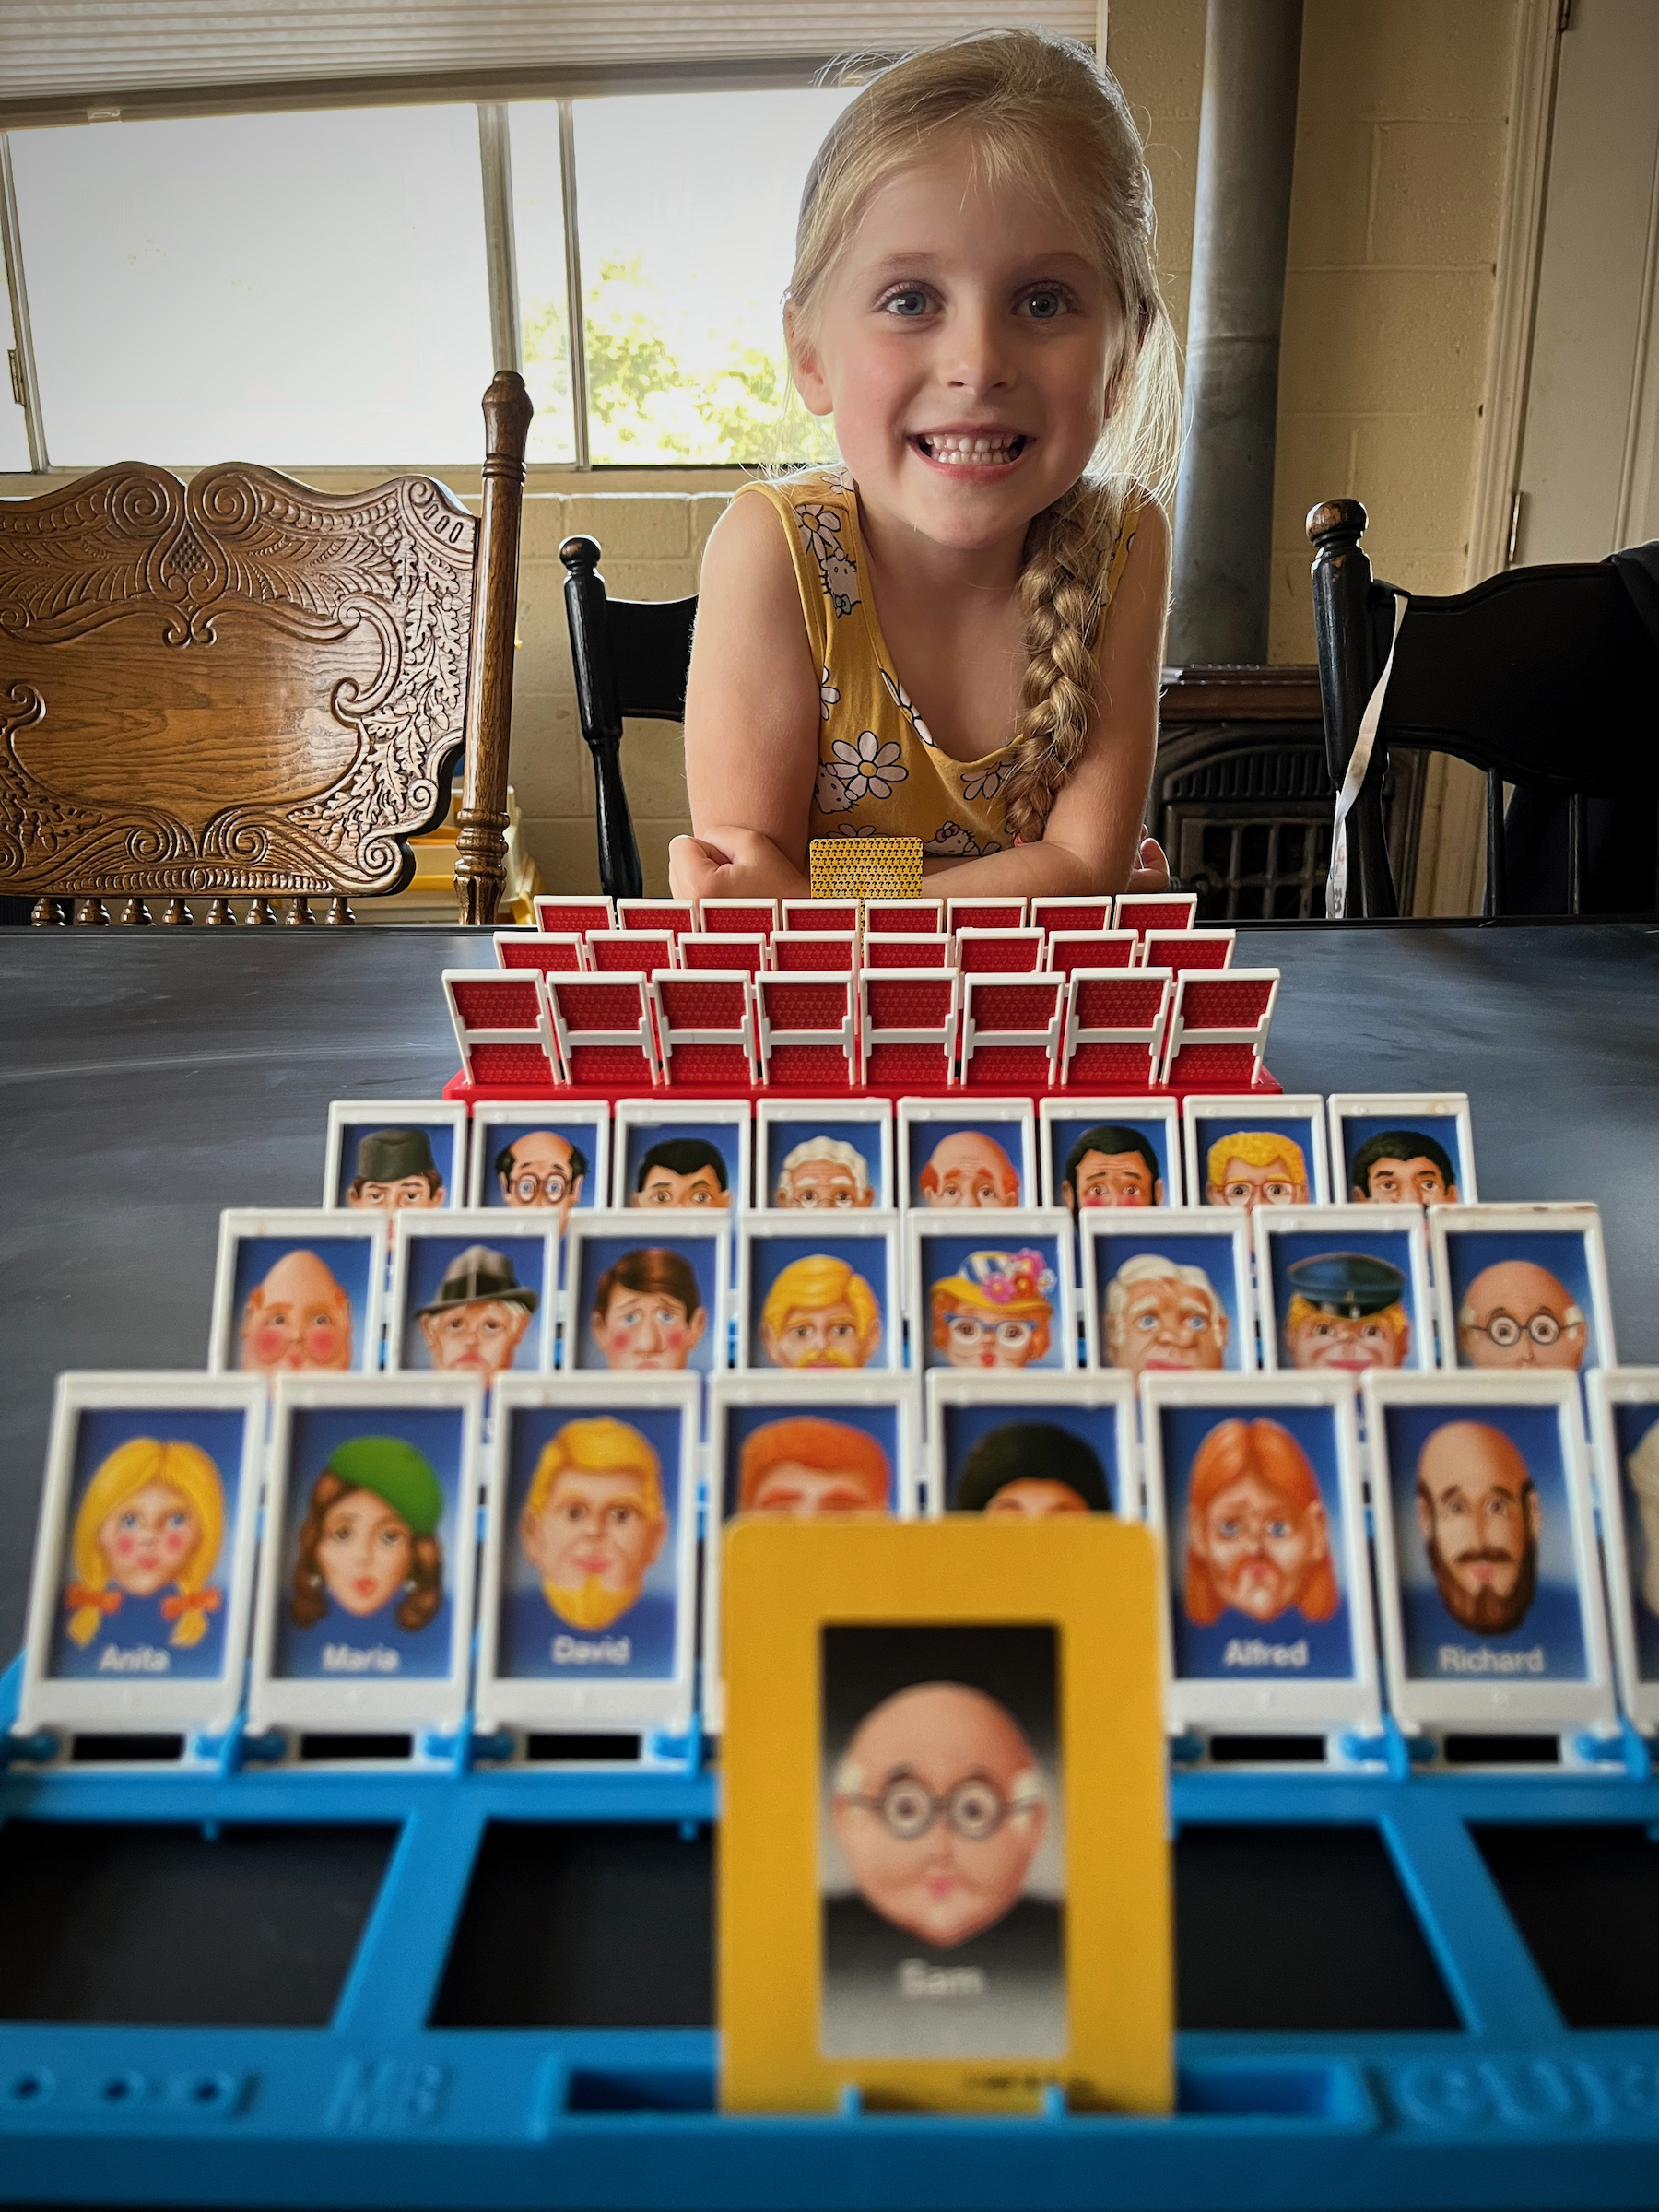
Part of the fun in raising Zoey is finding things that delight and educate her; I want to find fun, creative board games to play with her during our family game nights! This week we played Guess Who? for 2 players!
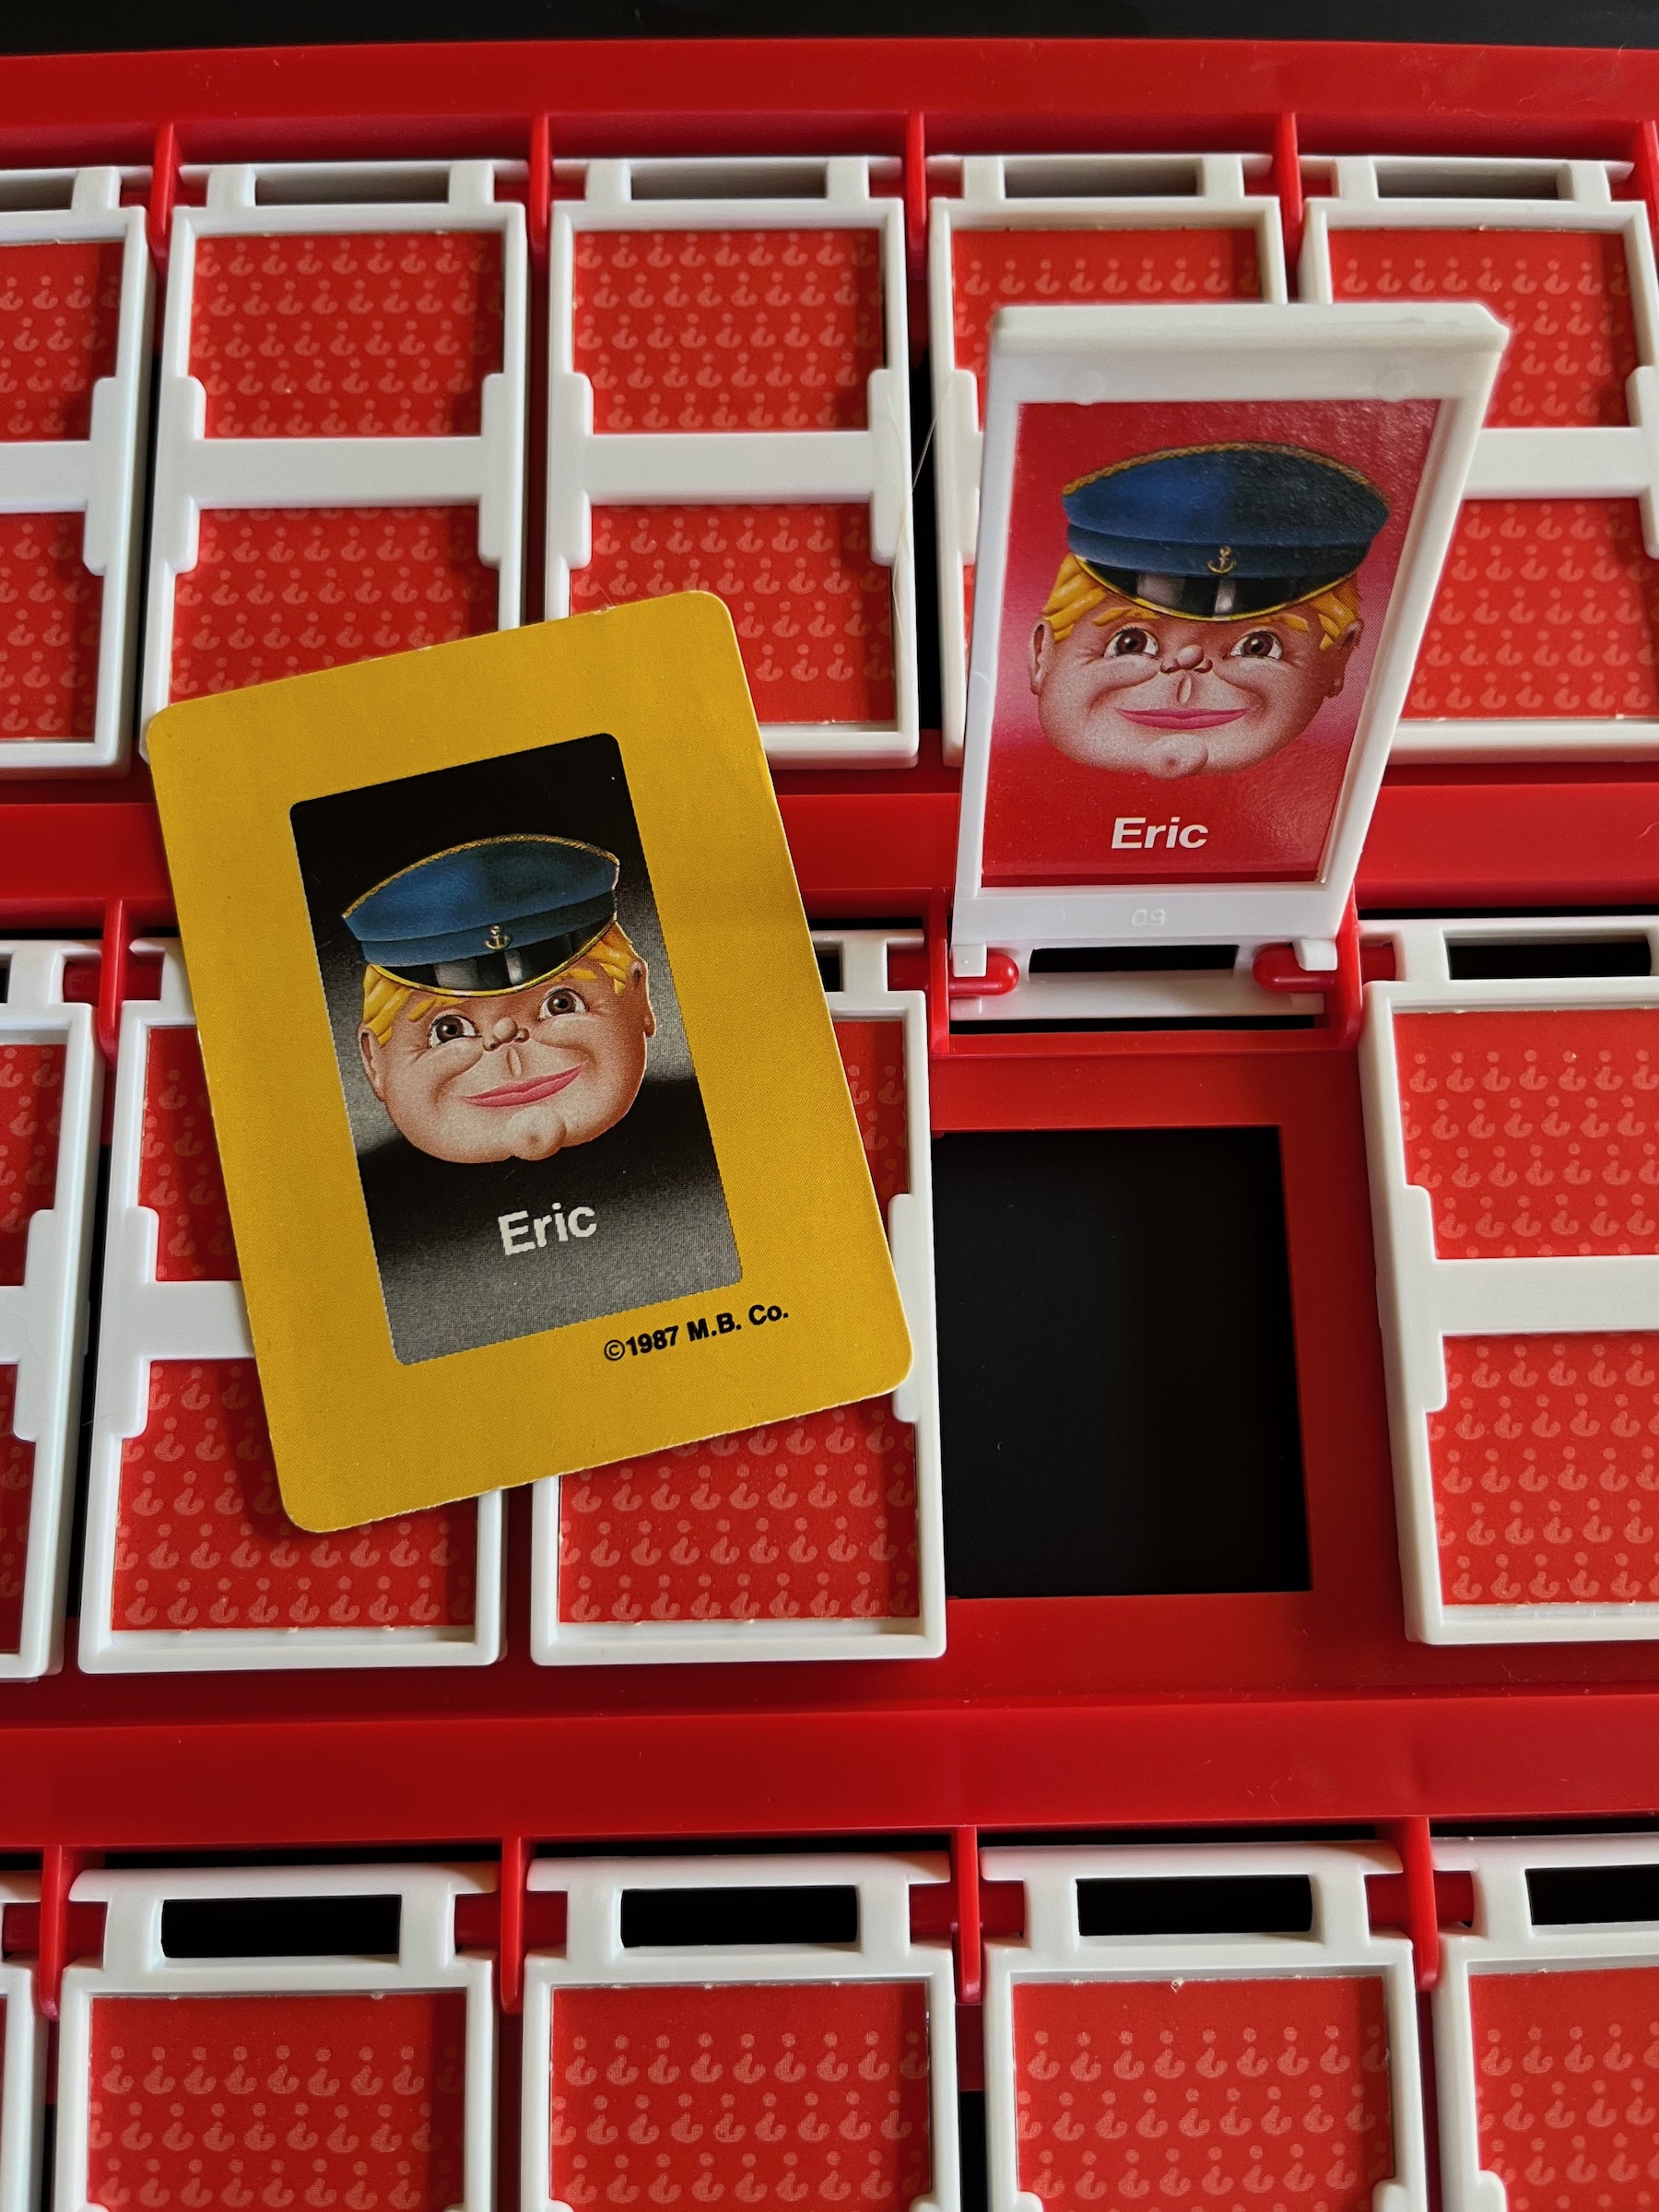
This game was a little tougher for Zoey because she is just learning to read, but she wanted to play and when there’s a will there’s a way! She ended up winning our second game together after she got the hang of asking questions and flipping down faces. She made her guess by asking if he was a ship captain with a name that starts with an “E” (for Eric); she was correct!
So let’s play!
IN THE BOX
2 plastic game boards
48 plastic frames
48 face cards
24 mystery cards
Scoring pegs
INSTRUCTIONS
The object of the game is to guess the mystery person on your opponent’s card by asking one question per turn, and eliminating any game board faces that don’t fit the mystery person’s description.
Each player chooses a game board and places it on a flat surface with the mystery card slot facing them.
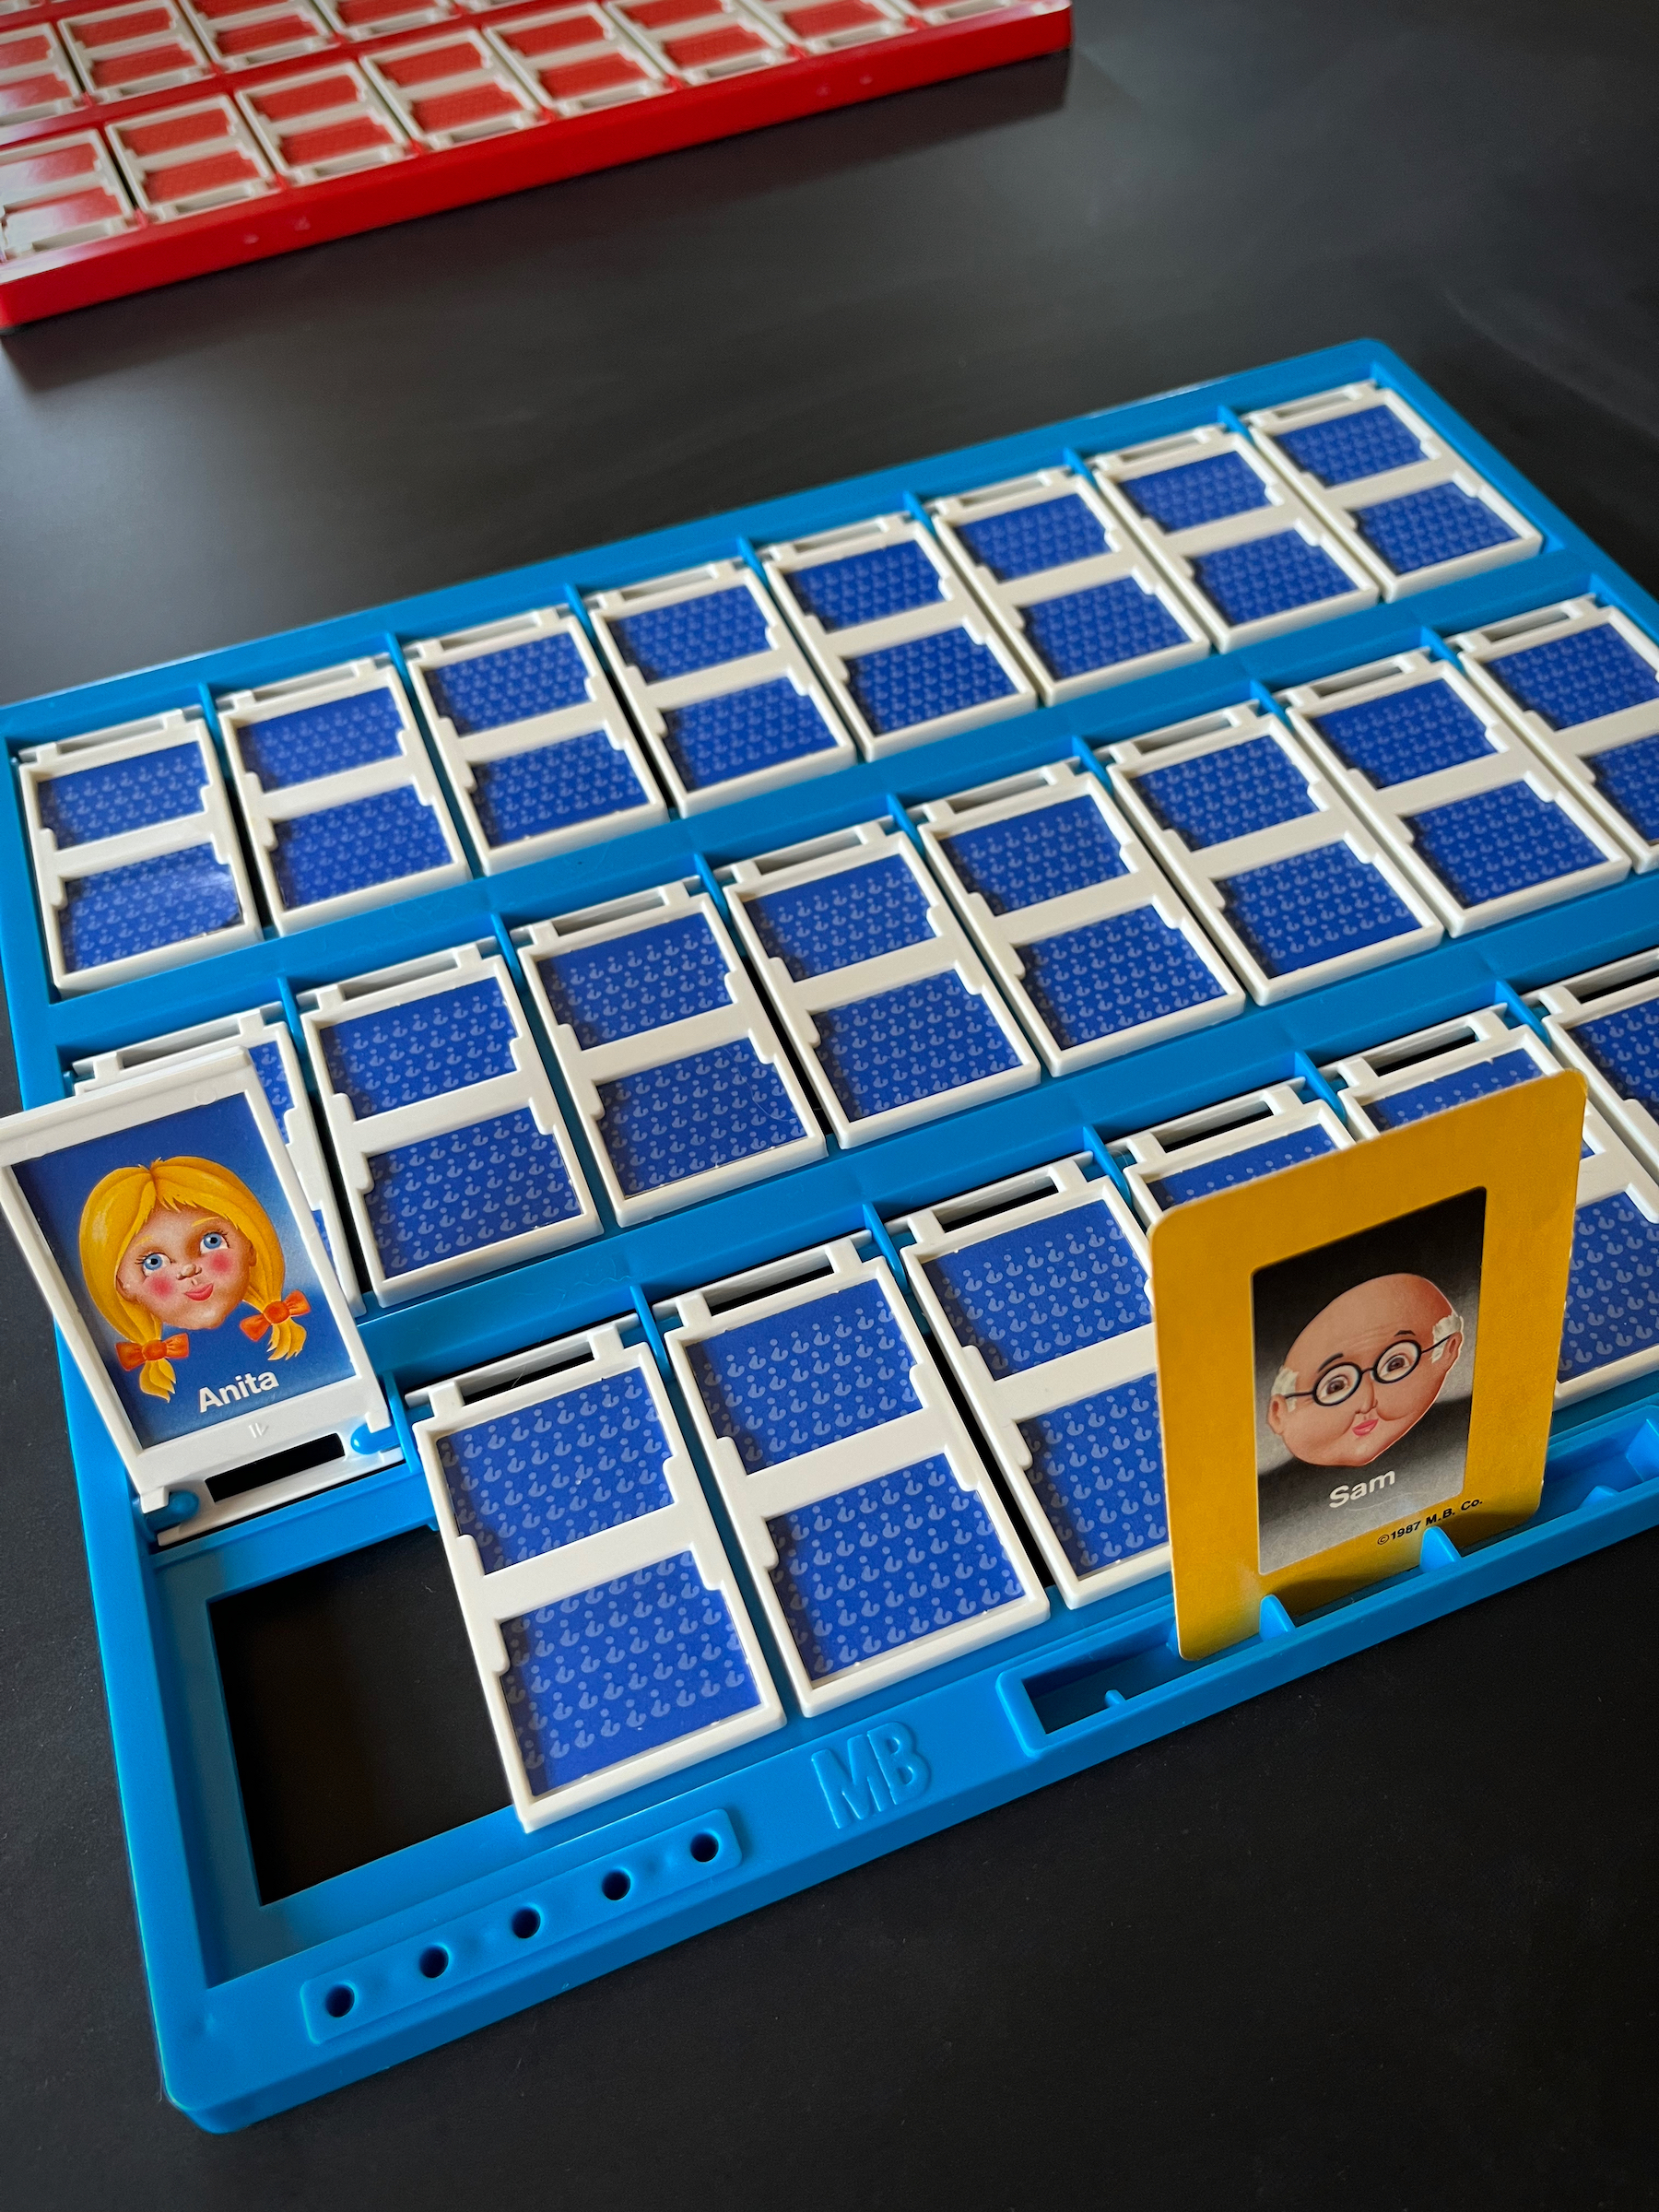
Both players flip all the frames upright by tipping the game board away from themselves, then settling their game board flat again.
Notice the differences among the 24 faces on your game board. Hair, facial hair, eye color, hats and glasses. As you play you’ll notice several other differences among your “suspects”.
Shuffle the mystery cards, then each player chooses one card at random and places it into their mystery card slot so that the mystery person faces you (do not let your opponent see your card)! Set the unused mystery cards aside.
The youngest player always goes first.
Ask your opponent one question per turn and each question must have either a “yes” or “no” answer.
For example, “does your person have white hair?”
After your opponent answers, you may be able to eliminate one or more suspects.
For example, if their mystery person has white hair, flip down all the faces that have black, brown, red and yellow hair. That leaves only the white haired people as suspects after your question.
After you ask a question (and flip down as many faces as you can), your turn is over.
When you’re ready to guess who the mystery person is, make your guess on your turn, instead of asking a question. Don’t use your turn to guess the mystery person until you’re ready! If you guess wrong, you lose the game!
To guess the mystery person, say (for example), “The mystery person is Paul.” Your opponent must then tell you whether or not your guess is correct.
If you guess correctly, or your opponent guesses incorrectly, you win the game!
Welcome back friends! Do you crochet? I do! I feel calm and cozy when I’m crocheting, and fiercely proud whenever I complete a project.
My daughter is entering Kindergarten this year and, while I’m sure she’ll love it, I believe she’ll need a little comfort while she’s away. Pocket hugs are a small token that can be tucked into a pocket to remind someone we love that we care for them, even if we’re apart. Zoey carries hers in a pocket of her backpack.
I created two different sized pocket hugs and when I held them together, I admired how much they looked like a cookie with frosting so I had the idea to attach them together. Et voila! Now we have a double pocket hug that looks like a cookie! You could use any color of yarn for this, the possibilities are endless!
Let’s get started!
SUPPLIES
Two different crochet hooks (I used sizes 3.75mm and 4.50mm)
Two different yarns (I used sizes 2 and 4)
Scissors
Yarn needle or small crochet hook
Hot glue gun
INSTRUCTIONS
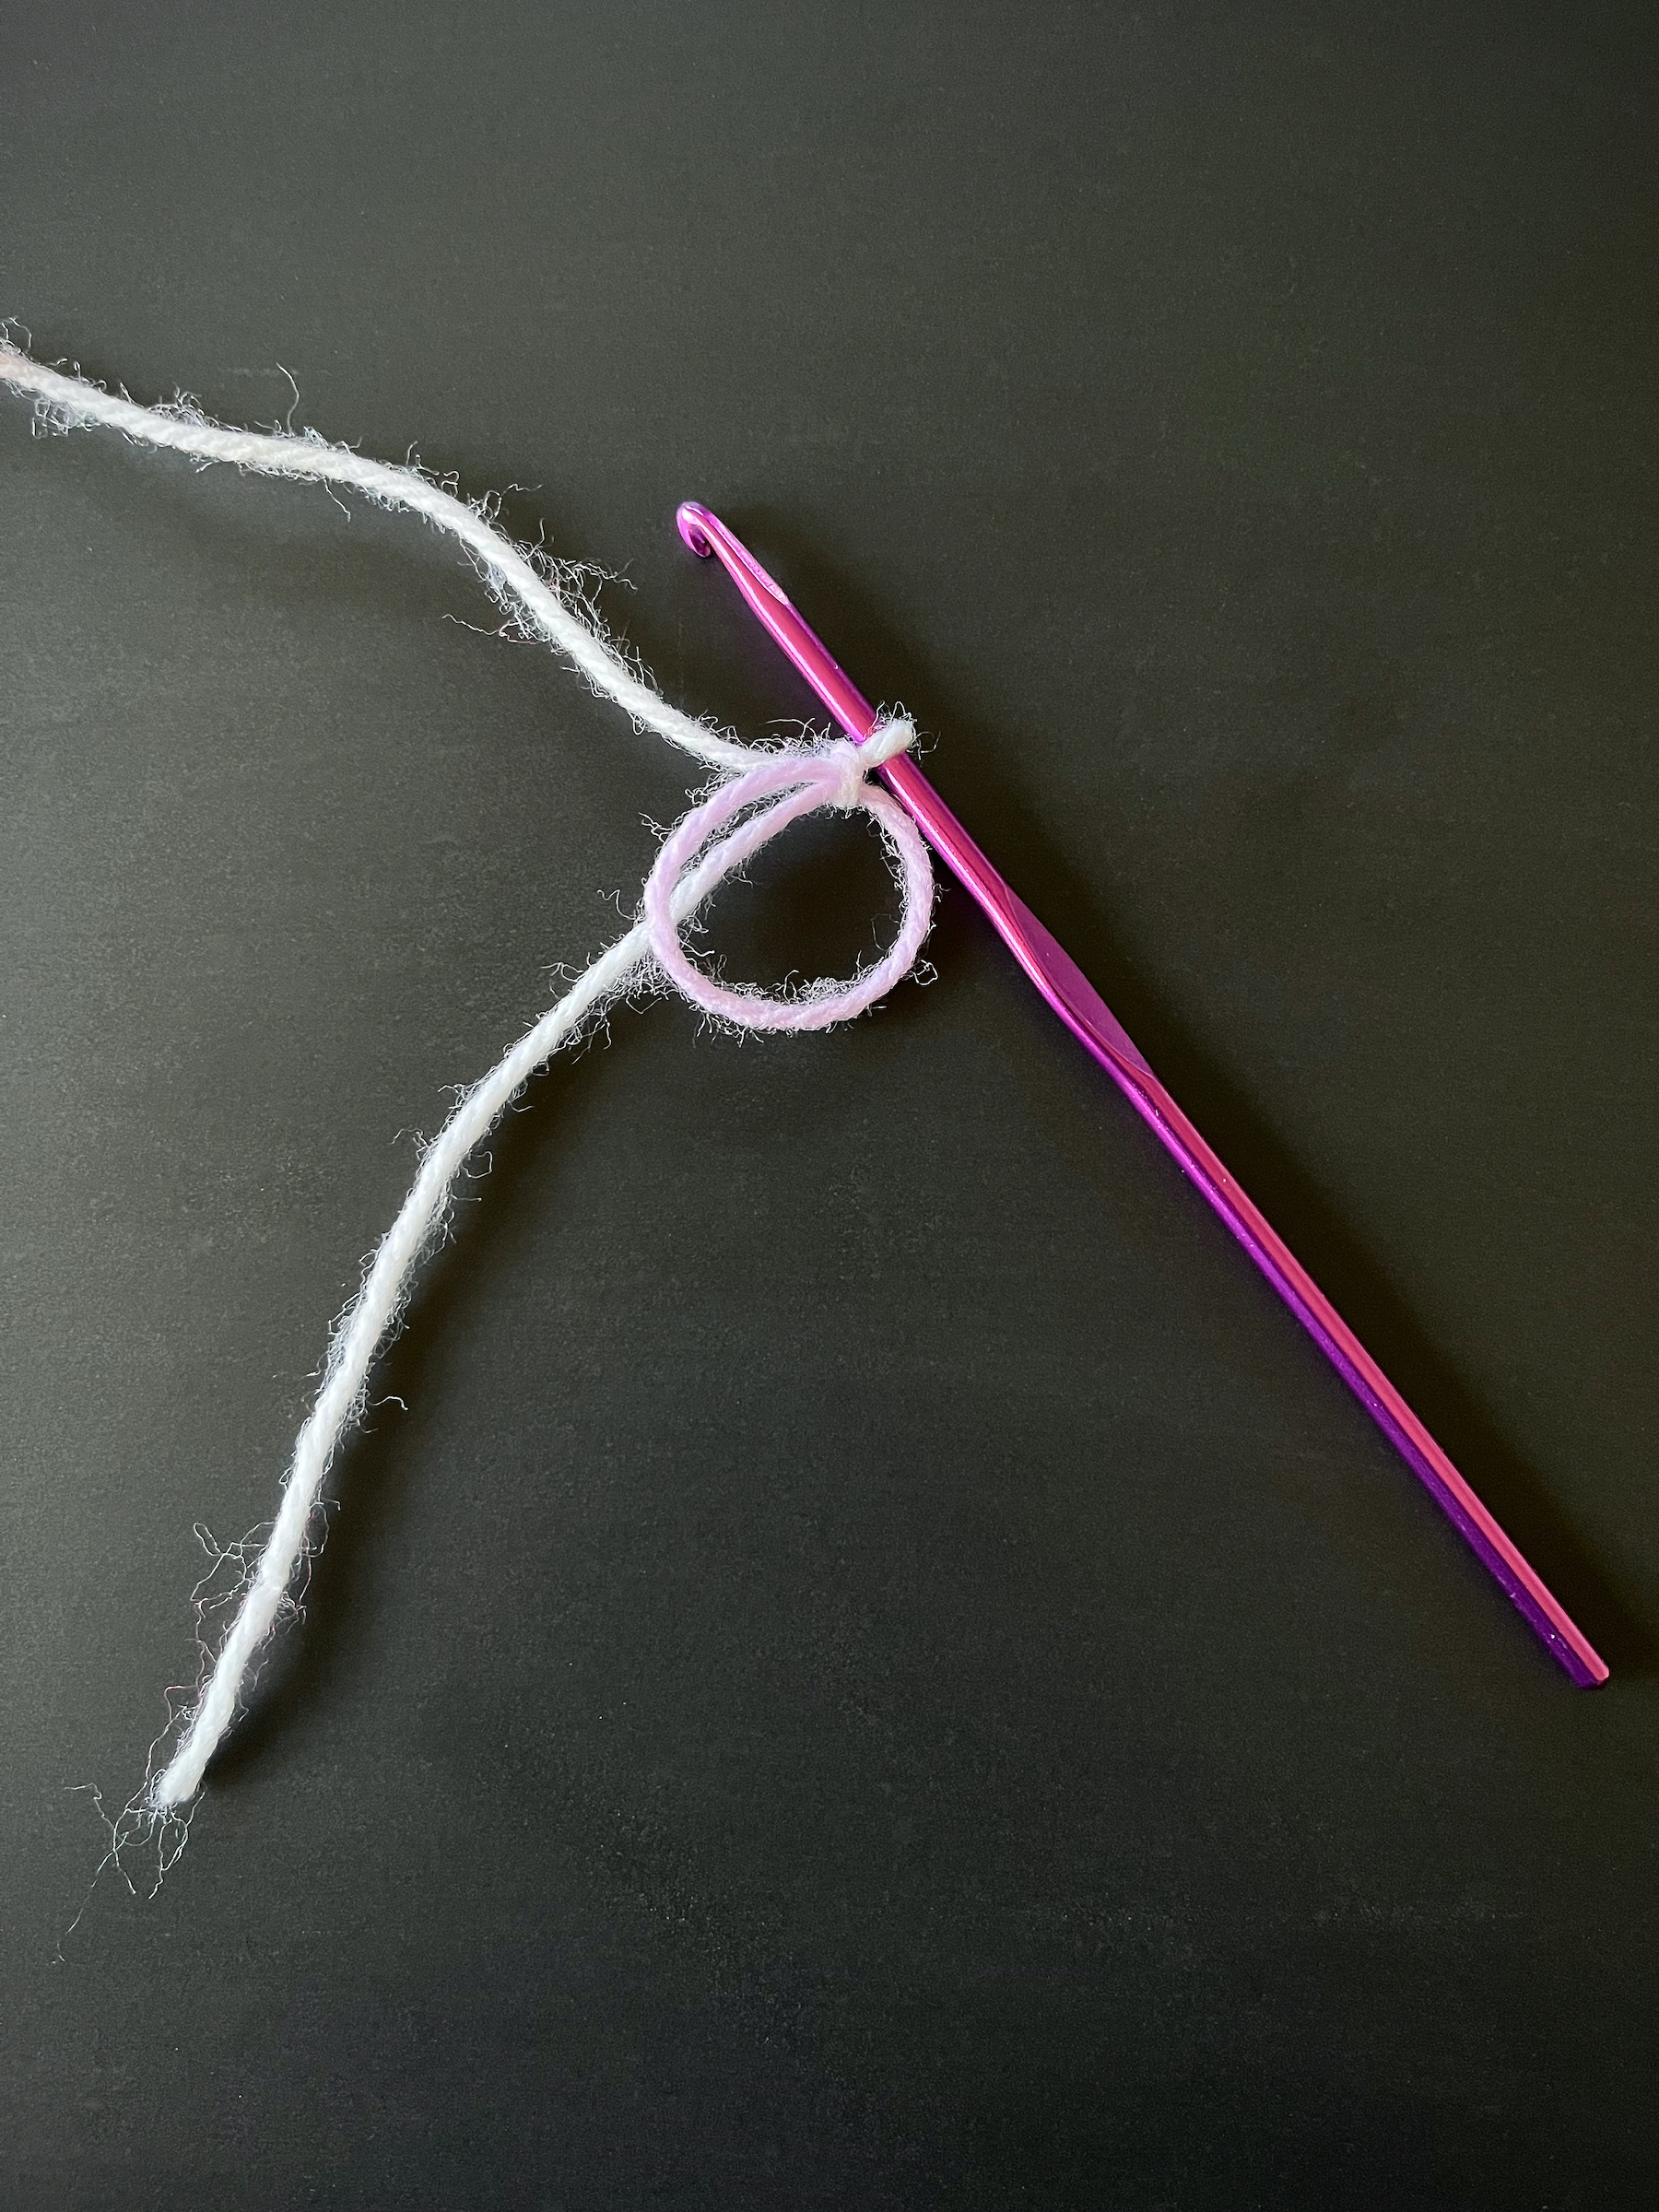
Using the smaller yarn and hook create a magic ring and chain two.
Stitch one triple crochet into the magic ring, then repeat twice more for a total of three triple crochets.
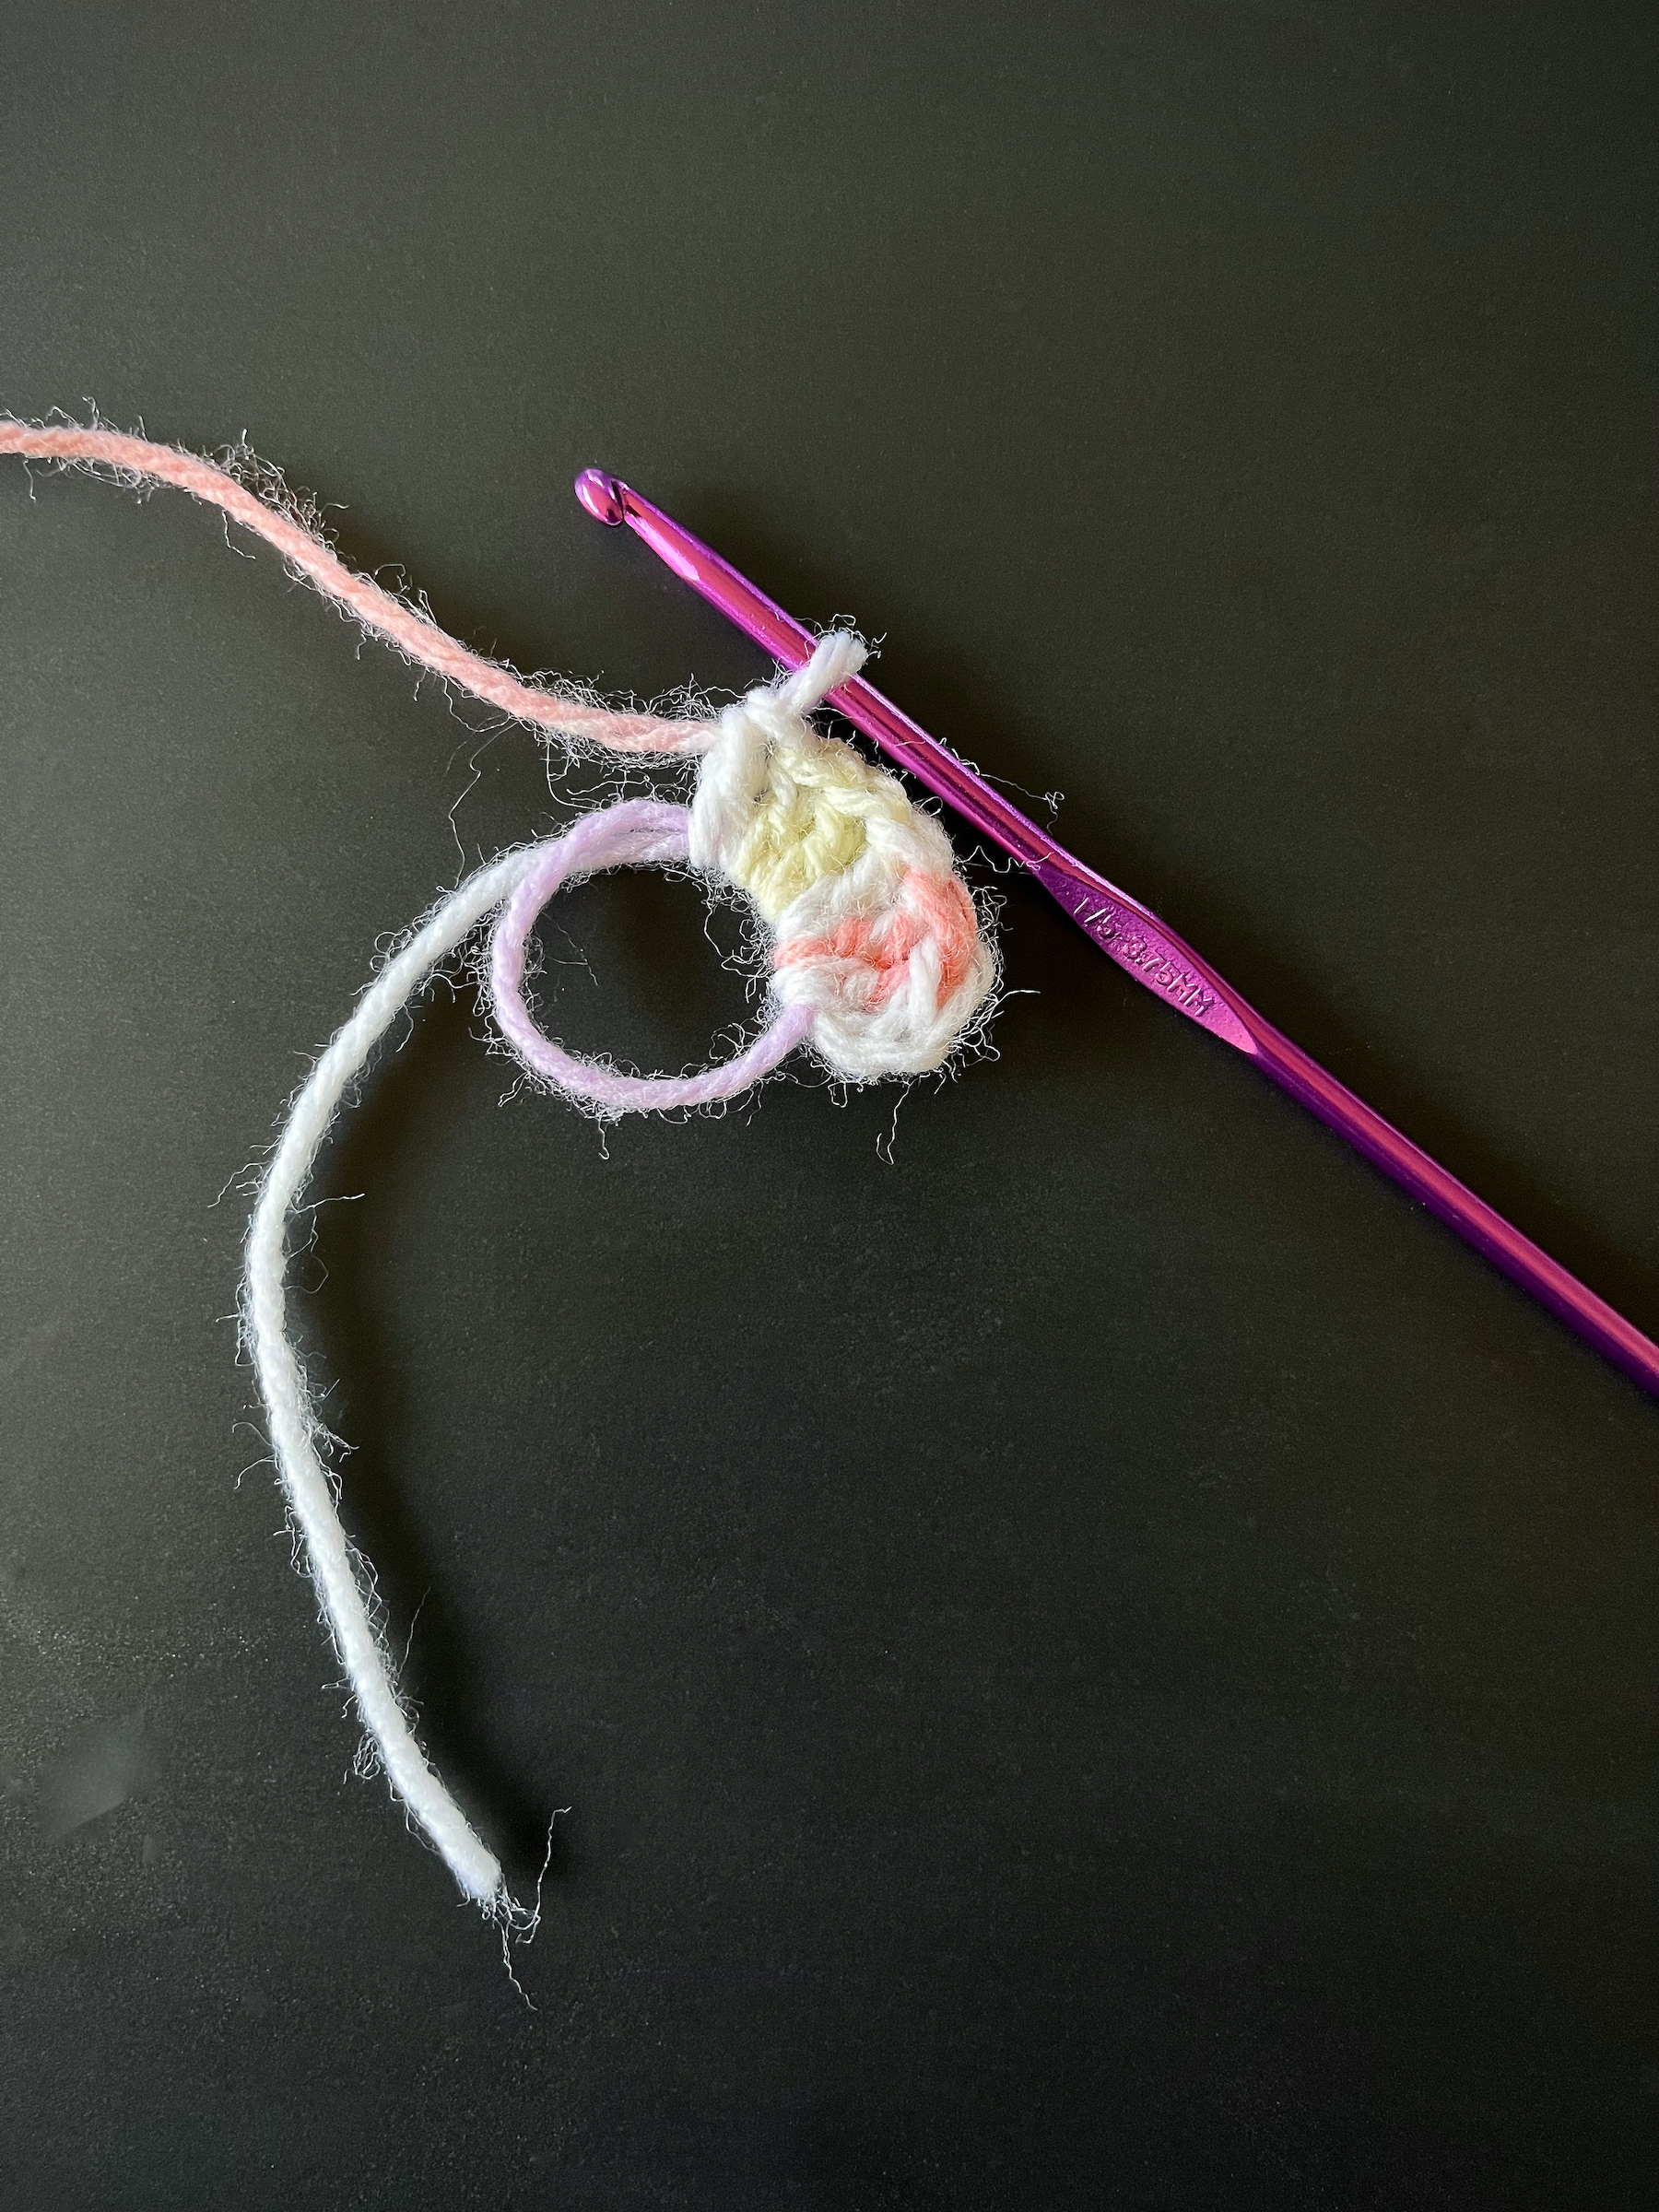
Stitch one double crochet into the magic ring, then repeat twice more for a total of three double crochets.
Chain one, then stitch one triple crochet into the magic ring for the heart’s point, then chain one again.
Stitch one double crochet into the magic ring, then repeat twice more for a total of three double crochets.
Stitch one triple crochet into the magic ring, then repeat twice more for a total of three triple crochets.
Chain three and slipstitch into the magic ring.
Slipstitch into the back loop of the beginning three chains of the heart.
Single crochet under both loops of the first triple crochet from the first round, then single crochet again into the same stitch.
Repeat step 9 on the second and third triple crochets of the first round.
Single crochet under both loops of the first double crochet of the first round.
Repeat step 11 on the second and third double crochets of the first round.
Single crochet under the chain.
Single crochet under both loops of the triple crochet, chain one and then single crochet back into the same stitch.
Single crochet under the chain
Single crochet under both loops of the double crochet.
Repeat step 16 on the next two double crochets of the first round.
Single crochet under both loops of the triple crochet from the first round, then single crochet again into the same stitch.
Repeat step 18 on the next two triple crochets of the first round.
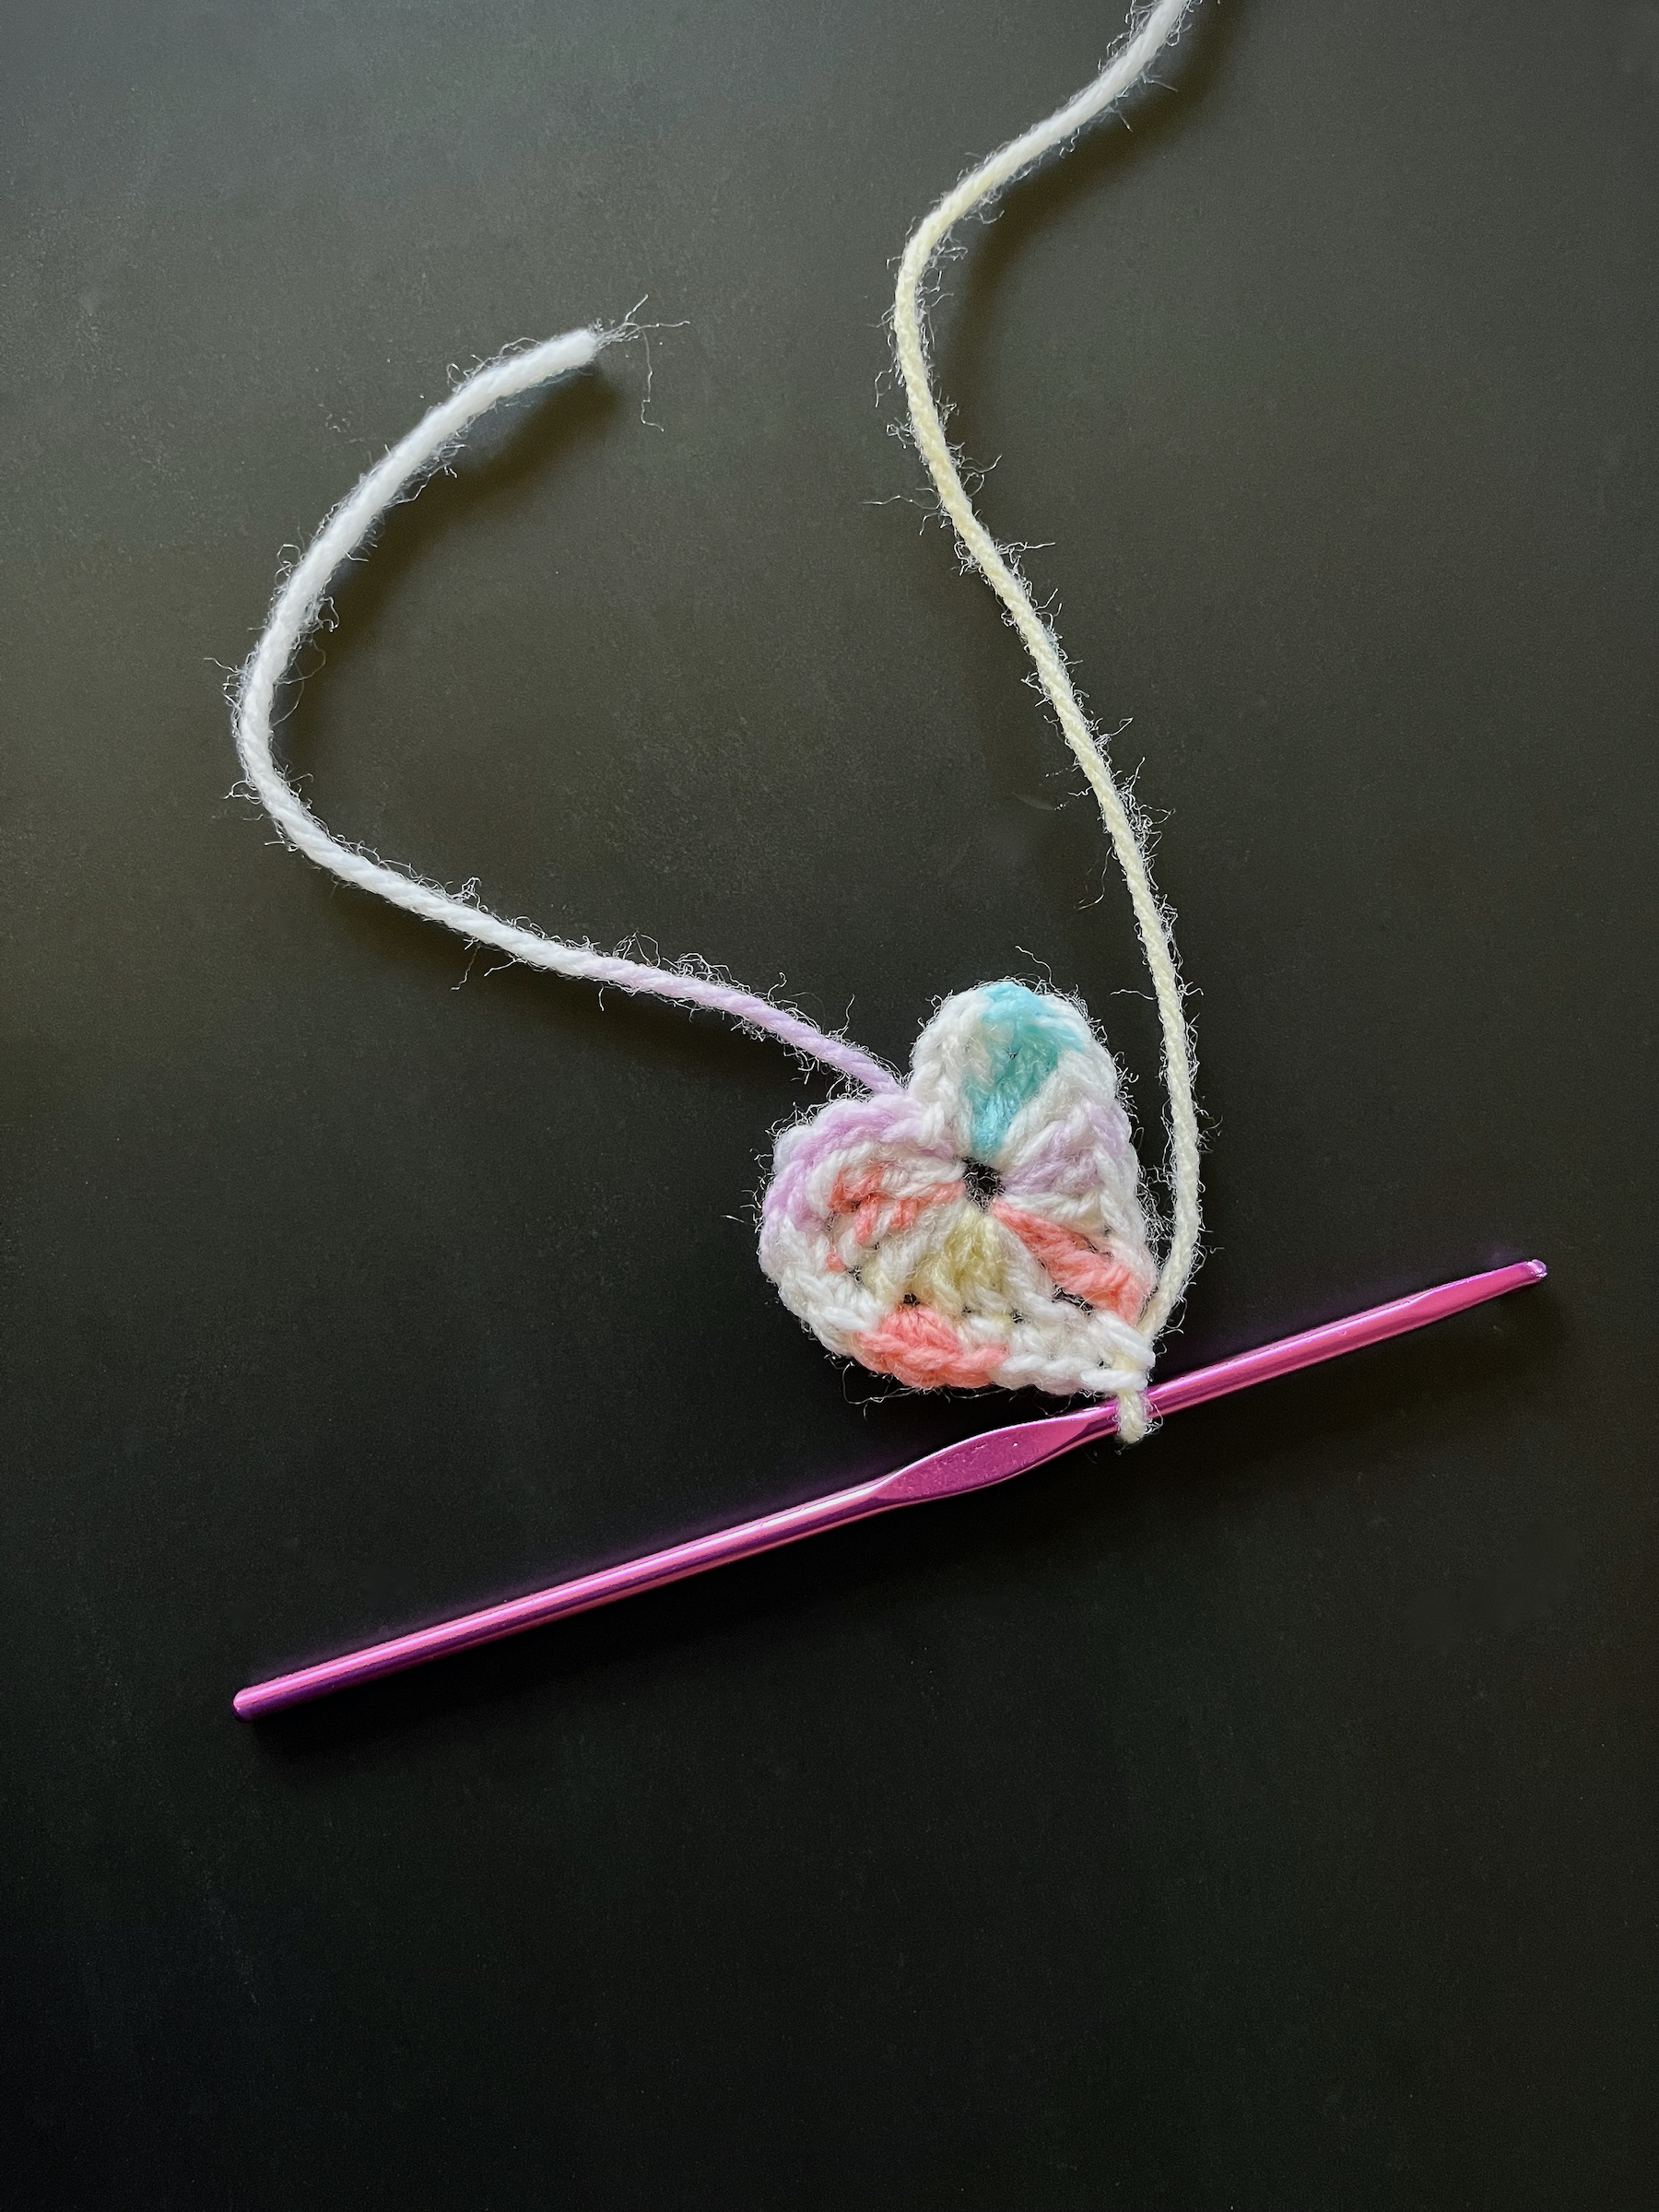
Slipstitch into the back loop of the ending three chains of the heart.
Slipstitch into the magic ring one more time, snip off the yarn and pull the loose end through the final stitch tightly to secure it.
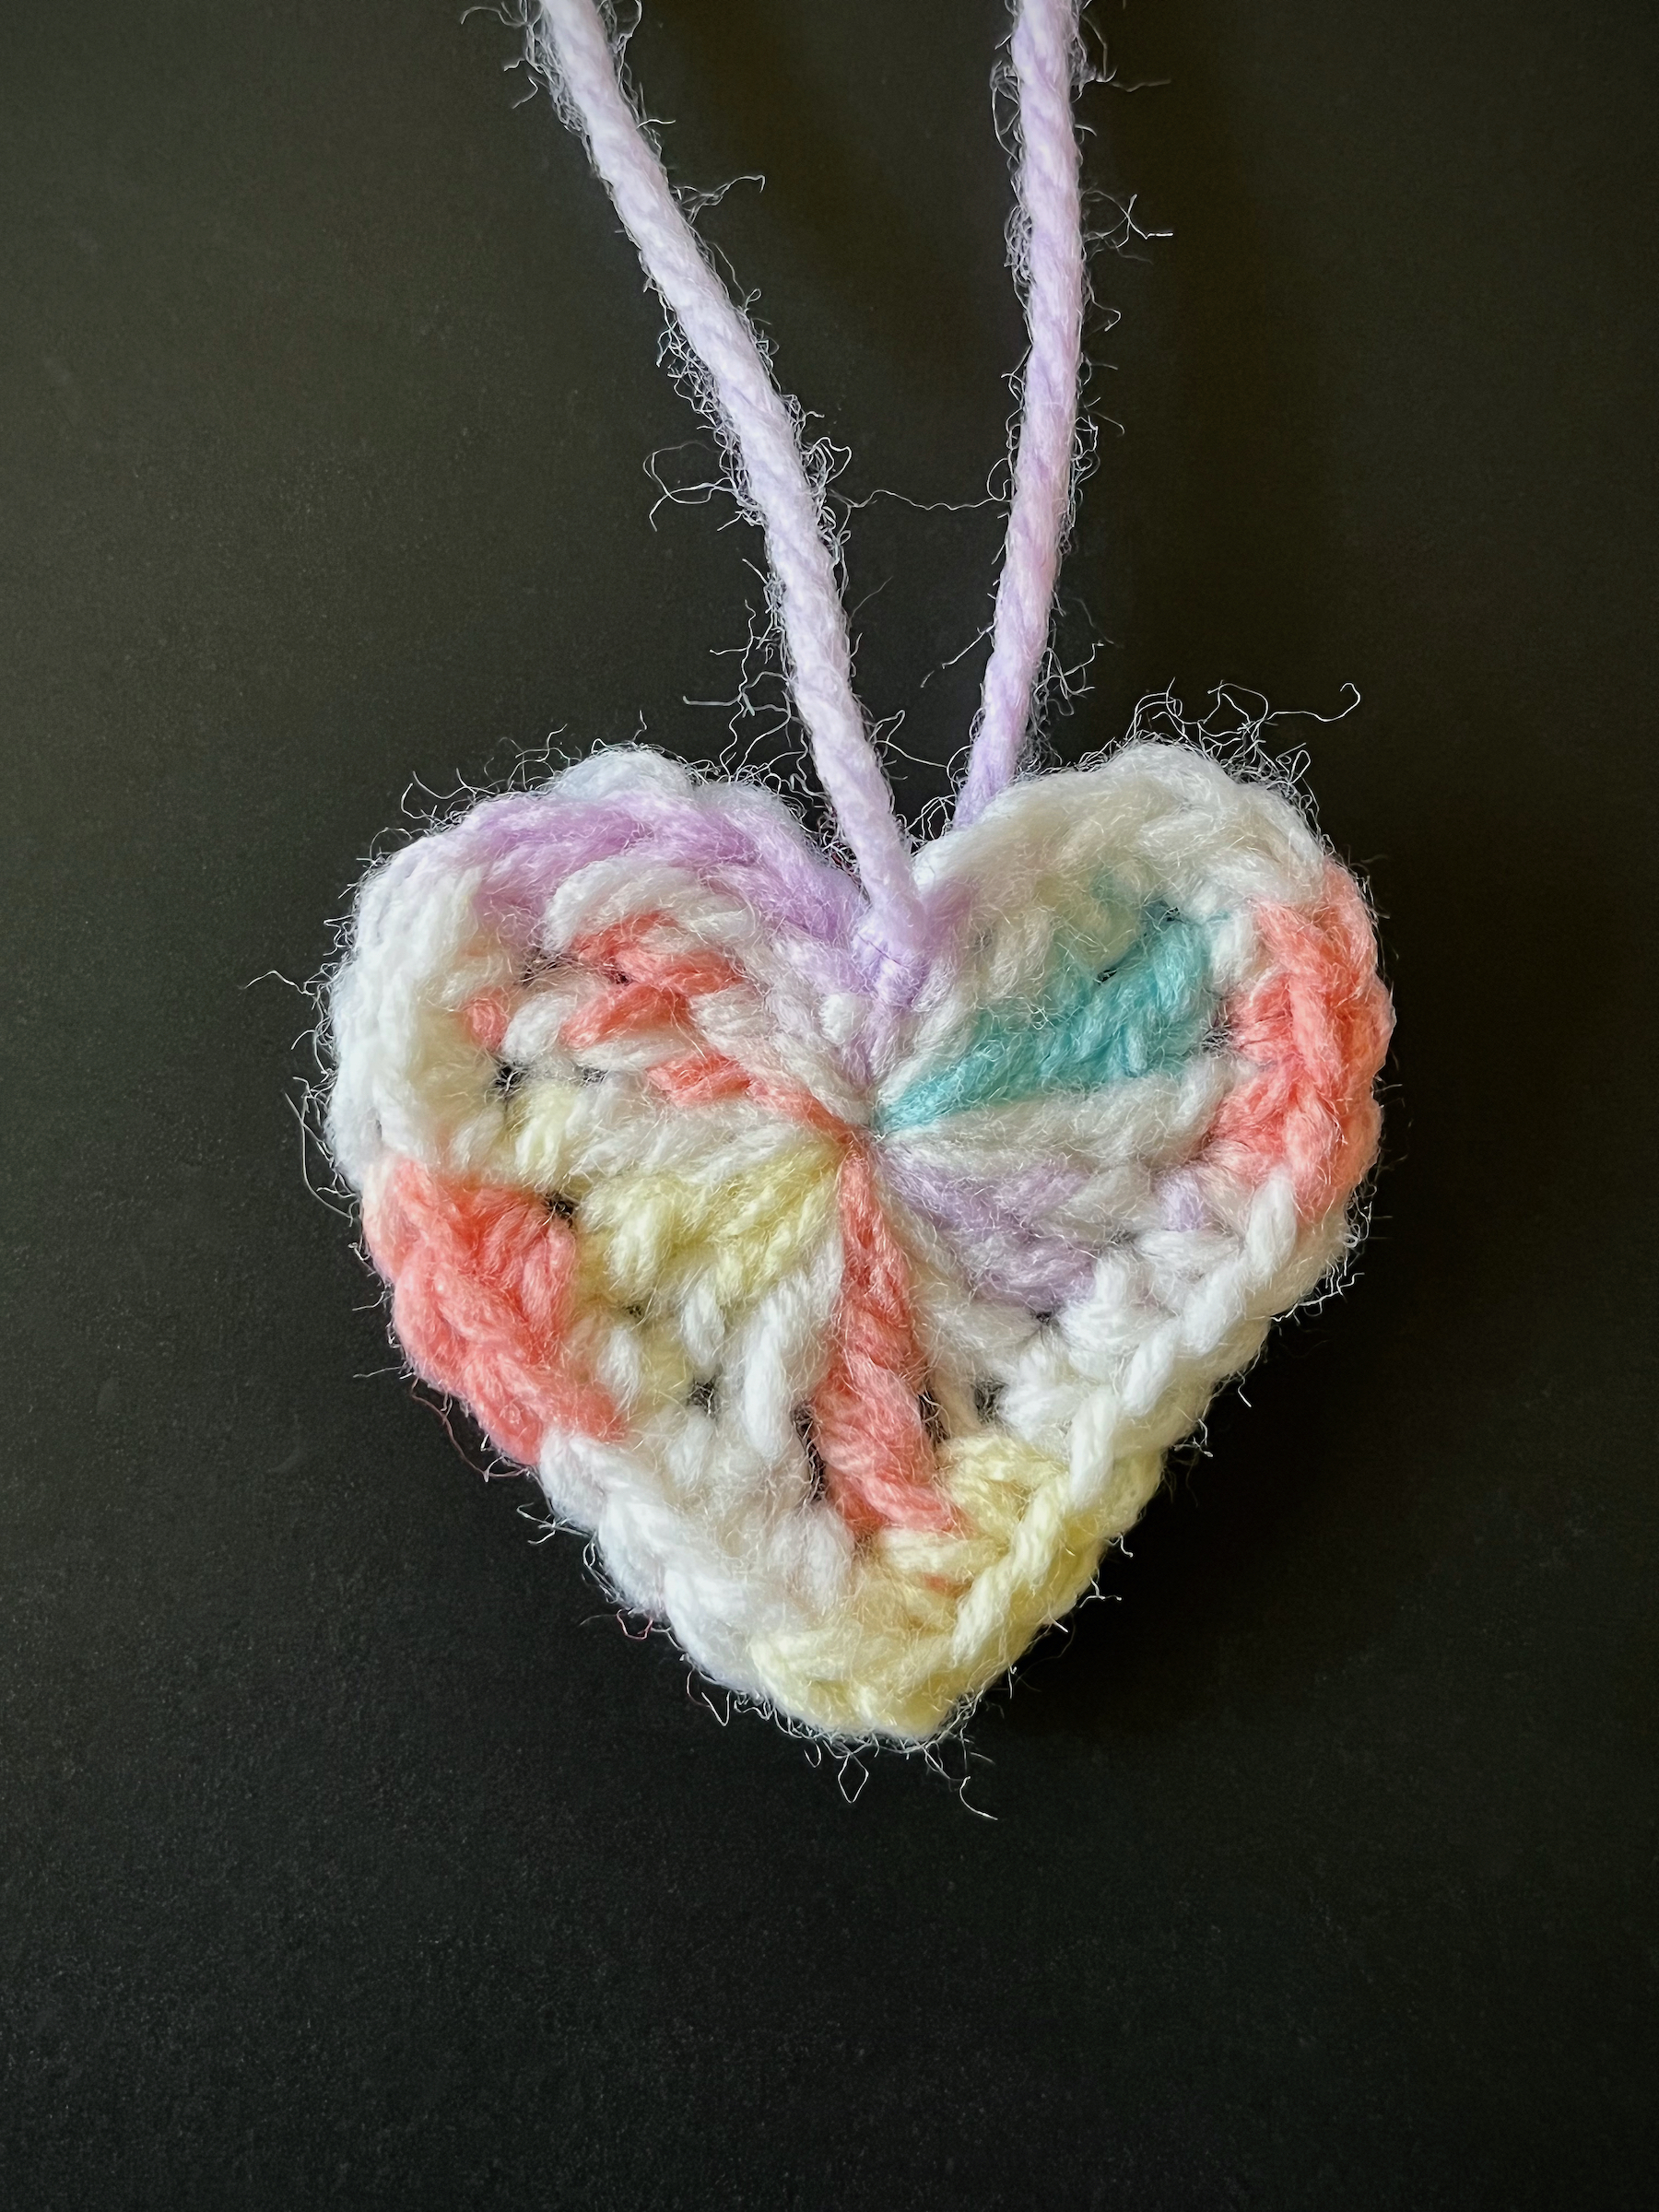
Pull the loose end of the starting yarn to pull the center of the heart in tightly.
Using a smaller crochet hook, weave the starting yarn and ending yarn into the heart.
Repeat steps 1 through 23 again with the larger yarn and hook.
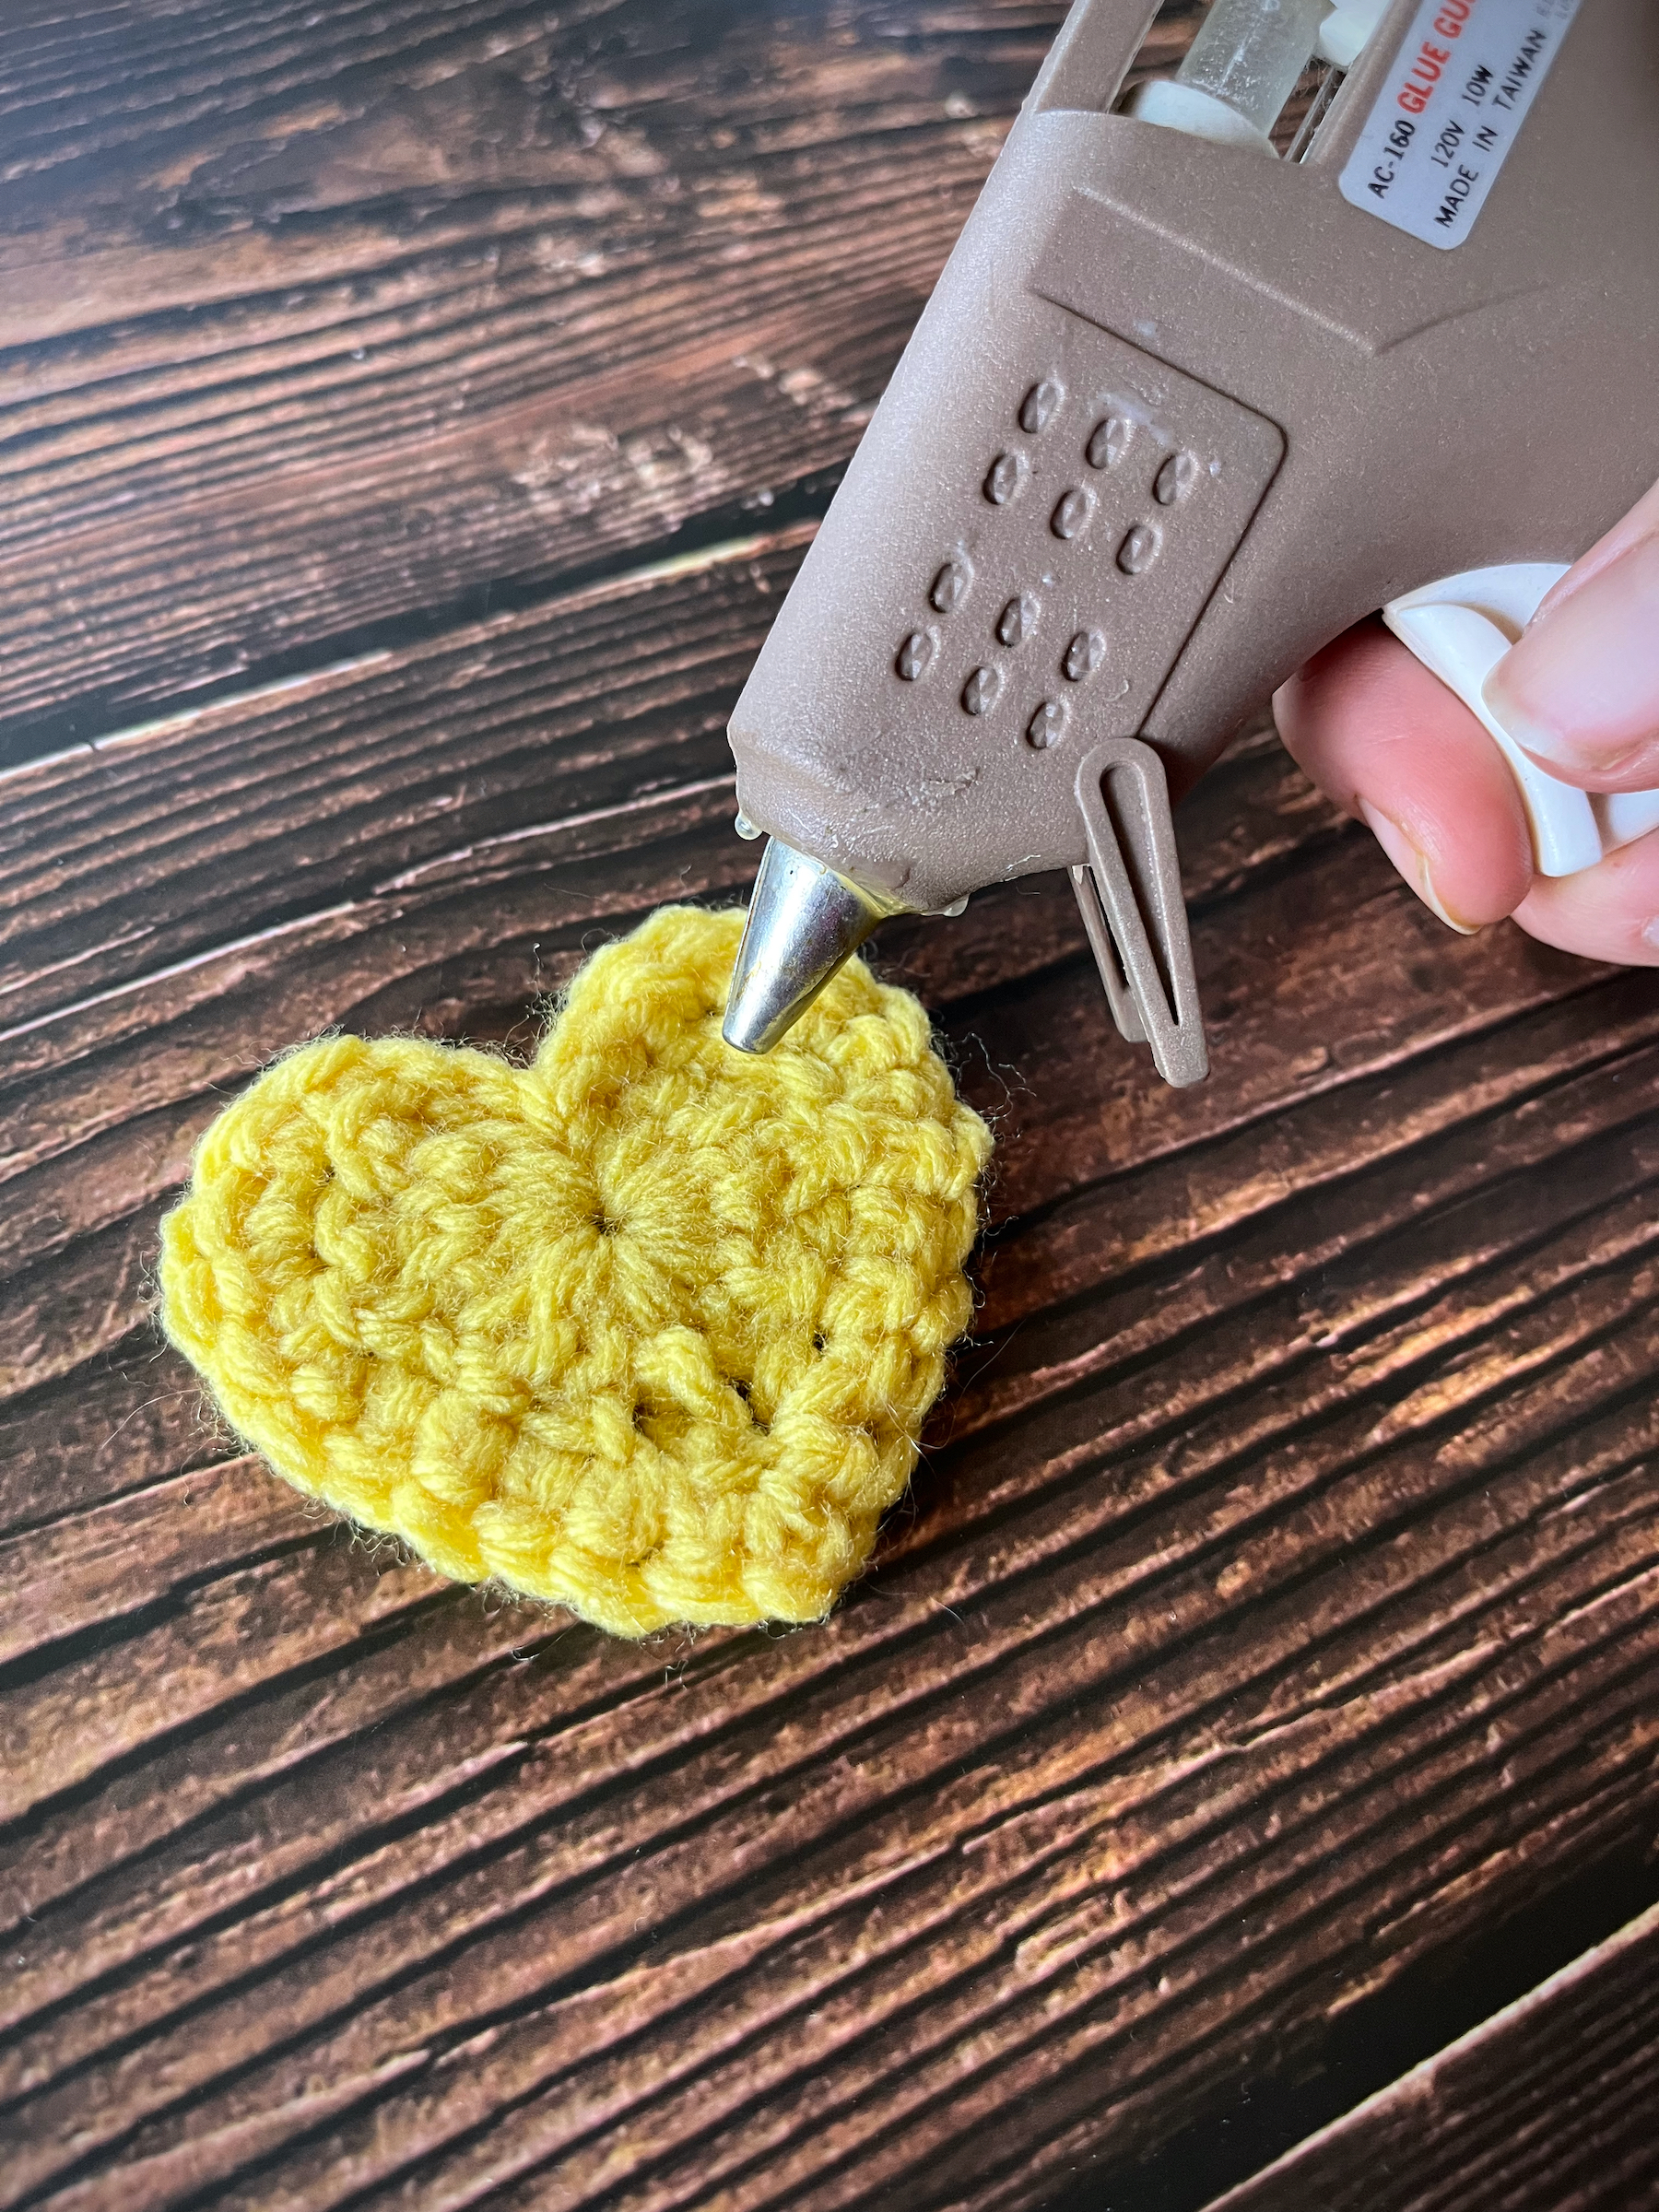
Once both hearts are done, heat up your glue gun and apply a steady amount of glue to the back of the larger heart, within the confines of where the smaller heart will lay, then press the back of the smaller heart to it. If there are any loose edges gently lift them up, apply glue underneath and press it back.
Once cool, give your pocket hug to someone who needs it!
Part of the fun in raising Zoey is finding things that delight and educate her; I want to find fun, creative board games to play with her during our family game nights! This week we played Uno for 2 to 10 players!
When I’m researching the rules for these games I’ve played since childhood, I am discovering that I’ve been playing them differently for years! For example, when we didn’t have a playable card to match the one on the discard pile, we kept drawing until we found one, but apparently you are only supposed to draw once and move on! It does make for some funny game moments and prolongs the game; either way is fun!
So let’s play!
IN THE BOX
112 cards
INSTRUCTIONS
Each player draws a card; the player that draws the highest number deals (count any action card as a zero).
The dealer shuffles the deck and deals each player 7 cards.
Place the remainder of the deck facedown to form the “Draw” pile.
The top card of the “Draw” pile is turned over to begin the “Discard” pile. If any of the action cards are turned over to start the “Discard” pile (see the function of each action card for special instructions).
Action cards:
Draw Two card– When you play this card, the next player must draw 2 cards and miss their turn. This card may be played on a matching color or another Draw Two card. If turned up at the beginning of play the same rule applies.
Reverse card – When you play this card, the direction of play reverses (if play is currently to the left, the play changes to the right, and vice versa). This card may only be played on a matching color or another Reverse card. If this card is turned up at the beginning of of play, the dealer goes first, then play moves to the right instead of left.
Skip card– When you play this card, the next player is “skipped” or loses their turn. This card may only be played on a matching color of another Skip card. If turned up at the beginning of play, the player to the left of the dealer is “skipped”, and the player to the left of that player starts play.
Wild card – When you play this card, you get to choose the color that continues play (any color including the color in play before the Wild card was laid down). You may play a Wild card on your turn even if you have another playable card in your hand. If a Wild card is turned up at the beginning of play, the person to the left of the dealer chooses the color that continues play.
Wild Draw 4 card – When you play this card, you get to choose the color that continues play PLUS the next player must draw 4 cards from the “Draw” pile and lose their turn. You may only play this card when you do NOT have another card in your hand that matches color on the “Discard” pile (but it is acceptable to play this card if you have matching number or Action cards). If turned up at the beginning of play, return this card to the deck and pick another card.
The person to the left of the dealer starts play.
On your turn, you must match a card from your hand to the card on the top of the “Discard” pile, either by number, color or action card symbol.
If you don’t have a card that matches the one on the “Discard” pile, you must take a card from the “Draw” pile. If the card you picked up can be played, you are free to put it down on the same turn. Otherwise, play moves to the next person.
You may also choose NOT to play a playable card from your hand. If so, you must draw a card from the “Draw” pile. If playable, that card can be put down in the same turn, however you may not play any other card from your hand after the draw.
If no player is out of cards by the time the “Draw” pile is depleted, the “Discard” pile is reshuffled and play continues.
When you play your next-to-last card, you must say “Uno” to indicate that you only have one card left. If you don’t say “Uno” and you’re caught before the next player begins their turn, you must draw two cards.
If the last card played in a round is a Draw Two or a Wild Draw Four card, the next player must draw 2 or 4 cards respectively. These cards are counted when the points are totaled.
Once a player has no cards left, the round is over and the first player to get rid of their cards in a round receives points for all the cards left in their opponents’ hands as follows:
All number cards (0-9) = face value
Draw Two = 20 points
Reverse = 20 points
Skip = 20 points
Wild = 50 points
Wild Draw Four = 50 points
Once the score for the round has been tallied, if no player has reached 500 points, reshuffle the cards and begin a new round. Players retain their points from previous rounds.
The winner is the first player to reach 500 points.
Welcome back friends! Do you crochet? I do! I feel calm and cozy when I’m crocheting, and fiercely proud whenever I complete a project.
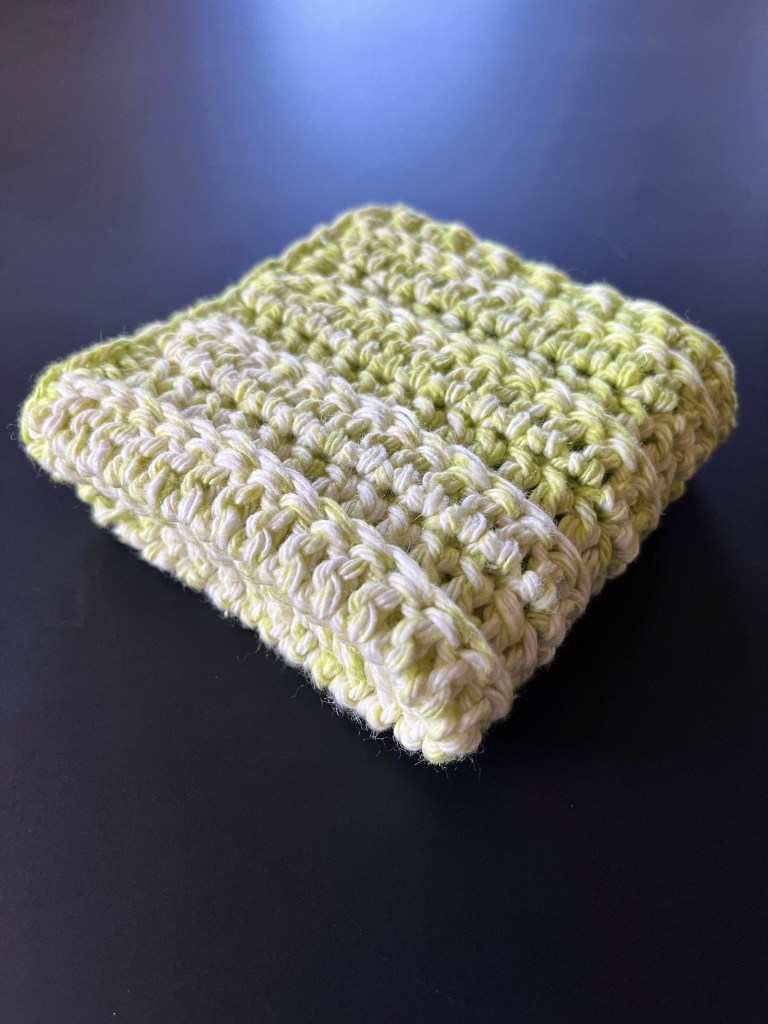
I’ve always wanted to crochet some of my own dish cloths and now is the perfect time! This pattern is simple, textured and ideal for any level of crocheter (beginners included)! Any cotton yarn can be used for this dish cloth.
Let’s get started!
SUPPLIES
Crochet hook (size 5 mm)
Cotton yarn
Scissors
Yarn needle or small crochet hook
INSTRUCTIONS
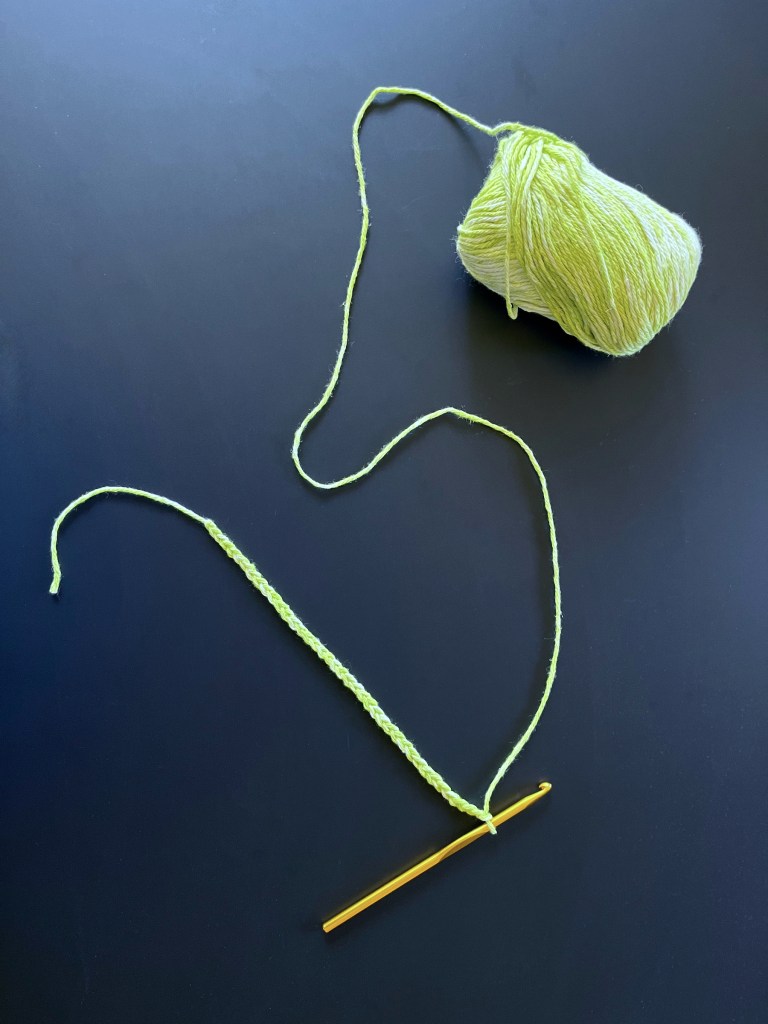
Create a slip knot and then 30 chain stitches.
Turn your chain around and double crochet (dc) into the third stitch from the hook, then continue to dc all the way across your chain.
Chain 2 and turn your work. Dc into the back loop of the third stitch from the hook, then continue to dc in the back loops of each stitch all the way across your project.
Repeat step 3 for the next fourteen rows for a total of 16 dc rows.
After the last dc of your last row, chain 1 and rotate the dish cloth 90 degrees to the right.
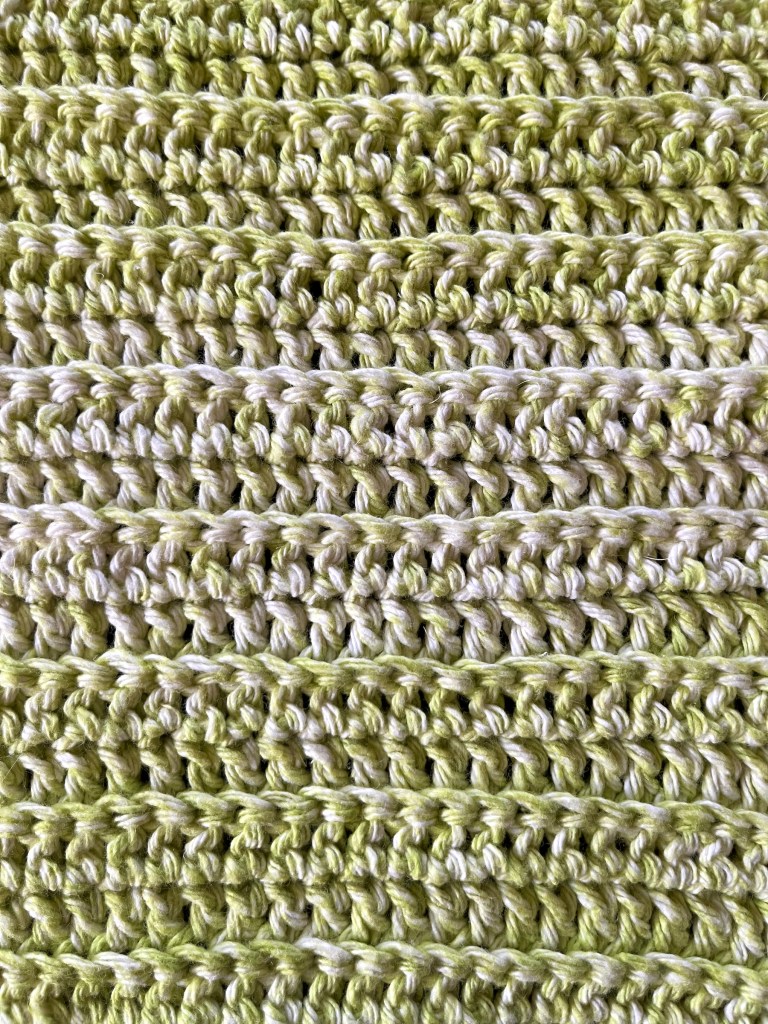
Single crochet across this side of the dish cloth to give it a more finished look. There will be no distinct loops to follow, but try to stitch in regular intervals, your hook will know where to go!
Chain 1 and rotate the dish cloth 90 degrees to the right again, lay the original tail along the original chain, then single crochet around it (to weave it in) as we single crochet all the way down the original chain.
Chain 1 and rotate the dish cloth 90 degrees to the right again, then single crochet across this side of the dish cloth to give it a more finished look. There will be no distinct loops to follow, but try to stitch in regular intervals, your hook will know where to go!
After the last single crochet, use the scissors to disconnect the yarn from the skein and pull the loose end in through your crochet loop.
Using the yarn needle, weave the loose end into the dish cloth and cut off any extra.
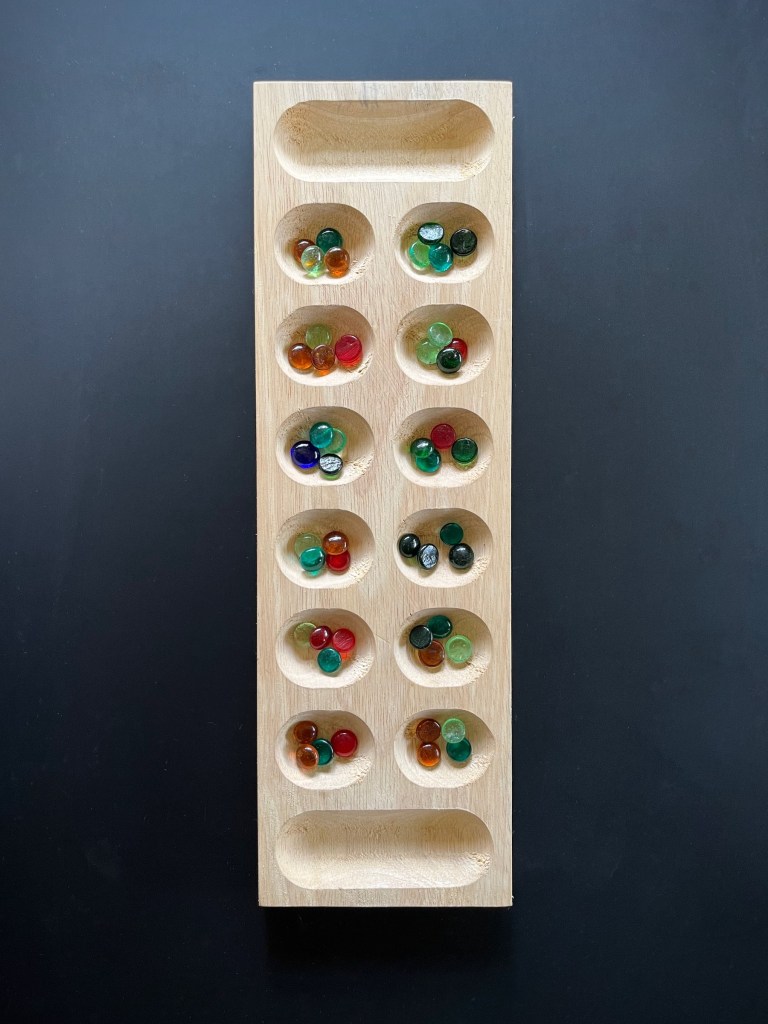
Part of the fun in raising Zoey is finding things that delight and educate her; I want to find fun, creative board games to play with her during our family game nights! This week we played one of my all-time favorites, Mancala!
Zoey needed a little guidance, but she was able to grasp this game even though she’s under the age recommendation of 6 and up! And she won! Go Zoey!
When I’m researching the rules for these games I’ve played since childhood, I am discovering that I’ve been playing them differently for years! For example, I had not put the “captured” stones in our stores, just continued playing with them! Either way is still fun though!
So let’s play!
IN THE BOX
48 stones
A game board
INSTRUCTIONS
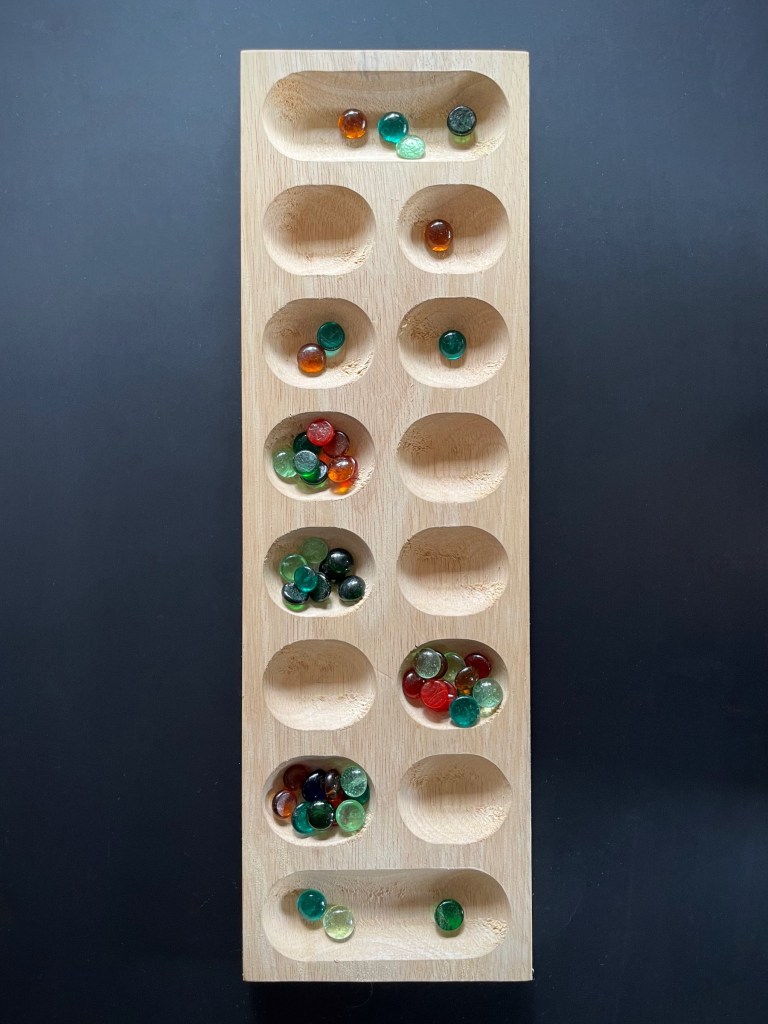
Place four stones in each of the 12 pockets on the game board.
Each player has a store (or Mancala) to the right, on their side of the Mancala board.
The game begins with one player picking up all of the stones in any one of the pockets on their side.
Moving counter-clockwise, the player deposits one of the stones in each pocket until the stones run out.
f you run into your own Mancala (store), deposit one stone in it. If you run into your opponent’s Mancala, skip it and continue moving to the next pocket.
If the last stone you drop is into your own Mancala, you take another turn.
If the last stone you drop is in an empty pocket on your side, you “capture” any stones in the pocket directly opposite. Place these captured stones into your Mancala.
The game ends when all six pockets on one side of the Mancala board are empty.
The player who still has stones on his/her side of the board when the game ends captures all of those stones into their Mancala.
Count all the stones in each Mancala, the player with the most stones wins!
Part of the fun in raising Zoey is finding things that delight and educate her; I want to find fun, creative board games to play with her during our family game nights! This week we played Walt Disney’s Fantasyland Game for 2 to 5 players.
This adorably nostalgic game was originally released in 1956, but I picked up the re-release in 2005 and now wish I had bought the whole set! There are also Adventureland, Frontierland, Tomorrowland and a straight Disneyland one! Zoey was a little under the age range for this one, but could still grasp the numbers and movement. It also helped to point out the artwork for the different rides she saw when we visited Disneyland!
So let’s play!
IN THE BOX
5 game pieces
A game board
Star cards
Ticket cards
INSTRUCTIONS
Each player selects a game piece and places it on the “Start” space.
Shuffle the ticket cards and place them in a pile with the number sides down.
Shuffle the star cards and place them in a pile with the number sides down.
To start the game, the youngest player draws the top ticket card and moves the number of spaces indicated on it.
This first ticket is a “free” ticket to begin the game, after each player has had their first turn, tickets can then only be obtained by landing on the spaces marked “ticket”.
Play then passes to the player on the left, and so on (a player may land on the same space occupied by another player).
On a player’s second turn and thereafter in the game, they move their piece as shown on the space on which their piece rests at the start of this turn. They do not draw a ticket or a star unless they land on a ticket or star space.
The star and ticket spaces are special spaces. A player landing on one of these spaces draws a top ticket or star as indicated and immediately moves the number spaces shown. They continue to move in this manner as long as they land on either star or ticket spaces, and their turn does not end until they land on one of the regular numbered spaces.
A player always keeps their tickets and stars, as they determine the winner of the game.
There are two places on the board where the player may follow the regular path or may turn off on a side track to collect extra stars which will give them additional points.
Once a player has turned off the main track, they must continue on the turn off until they get a star, and then must return to the regular track by the same route.
A player reaching the space which gives them two stars entitles them to move the total number shown on the two stars they draw.
The game ends when a player reaches the “Finish” space; the player with the highest number of stars and tickets wins!