
The First 60 Minutes of Hades

Have you ever been undecided on what to play next? 

Should you buy that game? Should you install that game?

I’ve been there, and sometimes you just need to take a look at the graphics, hear the music, and learn a little about the plot to see if it resonates with you before taking the next step. I’m here to help! I am creating the first 30 to the first 60 minute videos of games; indie and mainstream, new and old!

This week let’s take a look at the first 60 minutes of Hades from SuperGiant Games…

Do you want to play the rest? 

How to Play – Crazy 8’s

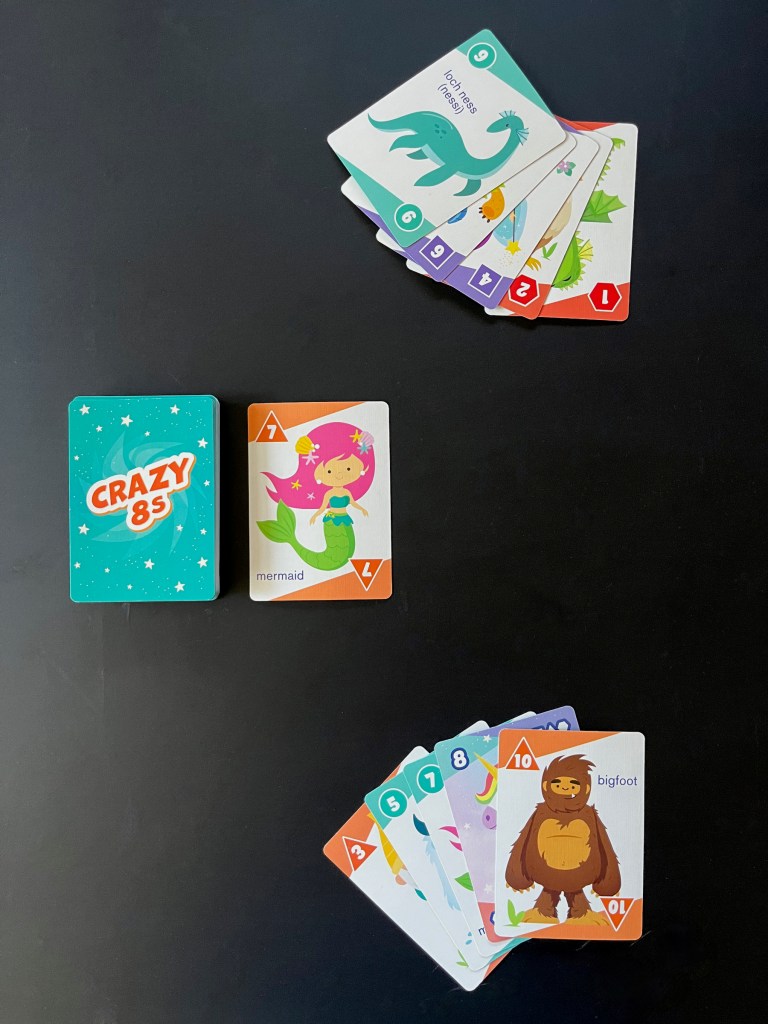
Part of the fun in raising Zoey is finding things that delight and educate her; I want to find fun, creative board games to play with her during our family game nights! This week we played Crazy 8’s the LotFancy version for 2 to 5 players.

This specific Crazy 8’s game is designed for kids and does a great job at reminding Zoey of the shapes she’s already learned and introducing her to strategy! The graphics are adorable and gameplay is fun and engaging; very reminiscent of Uno!

So let’s play!

IN THE BOX
  • 40 cards
INSTRUCTIONS

  1. Shuffle all the cards and deal 5 to each player.
  2. Place the remaining cards face-down in a draw pile, turn over the top card and place face-up next to the draw pile (if it’s an 8 draw another card and put the 8 back in the middle of the deck).
  3. Players take turns. On a turn, play a card face up on the card next to the draw pile (it must be the same number or shape).
  4. If you can’t play a card from your hand, you must draw cards from the draw pile one at a time until you can play one. Any cards you pick up are now part of your hand.
  5. All 8’s (unicorns) are wild and can be played on any card. If you play a unicorn, you then declare which shape the next player must play.
  6. Once you play a card, your turn is over.  The person on your left goes next.
  7. If the draw pile runs out of cards, leave the top card and shuffle the cards from the common pile into a new draw pile.
  8. The first player to get rid of all their cards is the winner!
*Bonus rules for a twist!
  • When a 4 is played, wave your magic wand and skip to the next player.
  • When a 6 is played, the monster has spooked you and the order of play reverses.

ENJOY!

The First 60 Minutes of Immortals Fenyx Rising

Have you ever been undecided on what to play next? 

Should you buy that game? Should you install that game?

I’ve been there, and sometimes you just need to take a look at the graphics, hear the music, and learn a little about the plot to see if it resonates with you before taking the next step. I’m here to help! I am creating the first 30 to the first 60 minute videos of games; indie and mainstream, new and old!

This week let’s take a look at the first 60 minutes of Immortals Fenyx Rising…

Do you want to play the rest? 

Spiritfarer – Food Recipes Guides

If there’s one thing I do when I play a game (besides trying to relax and enjoy myself), it’s look up information. I get curious or stuck, and I find myself turning to the internet for answers. There are a lot of good guides out there that are super helpful, but what I don’t see are an abundance of simple and clean visual guides that lay out all the information in one place.

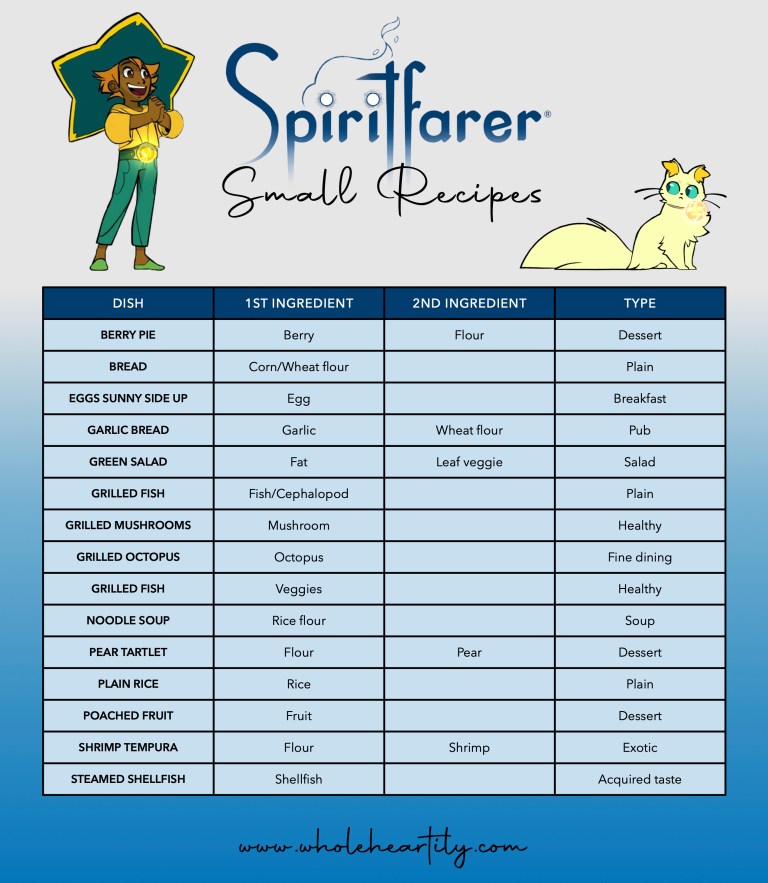
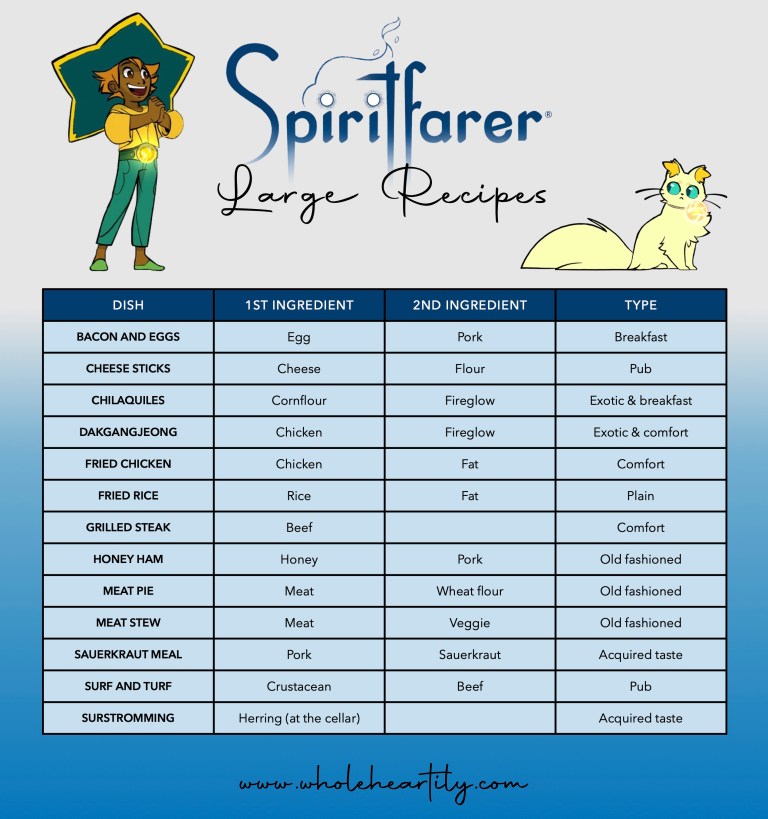
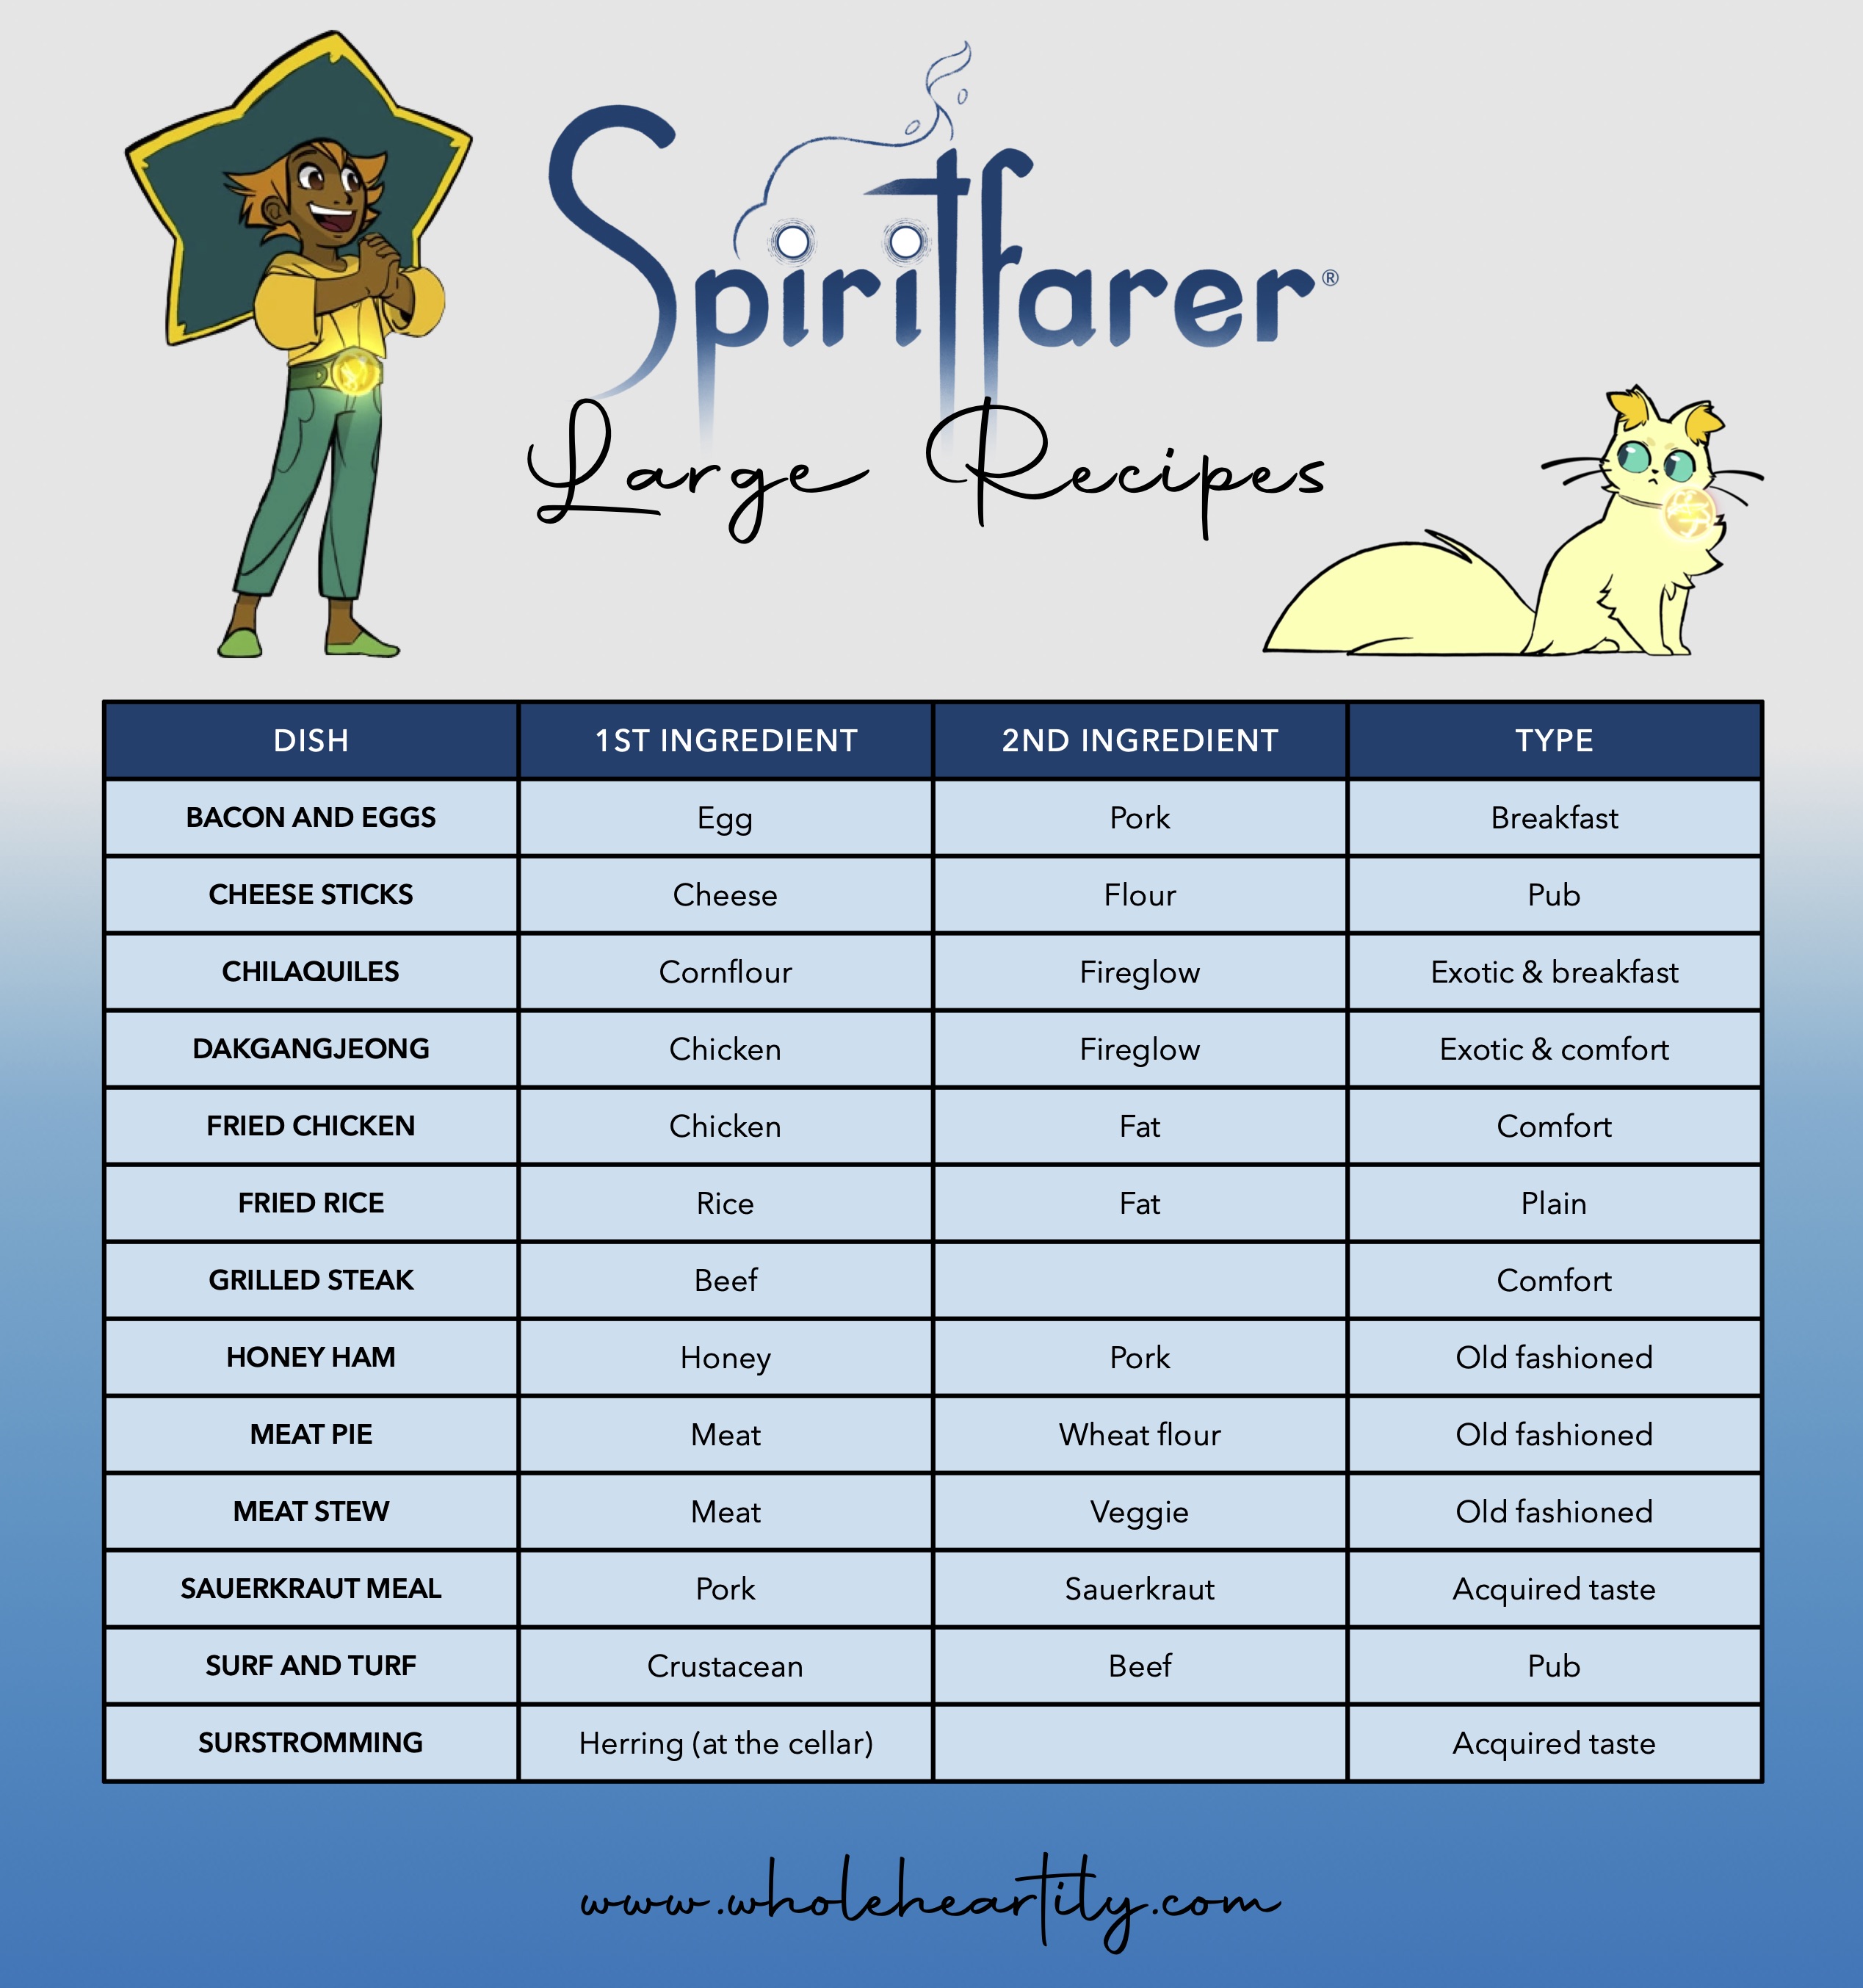
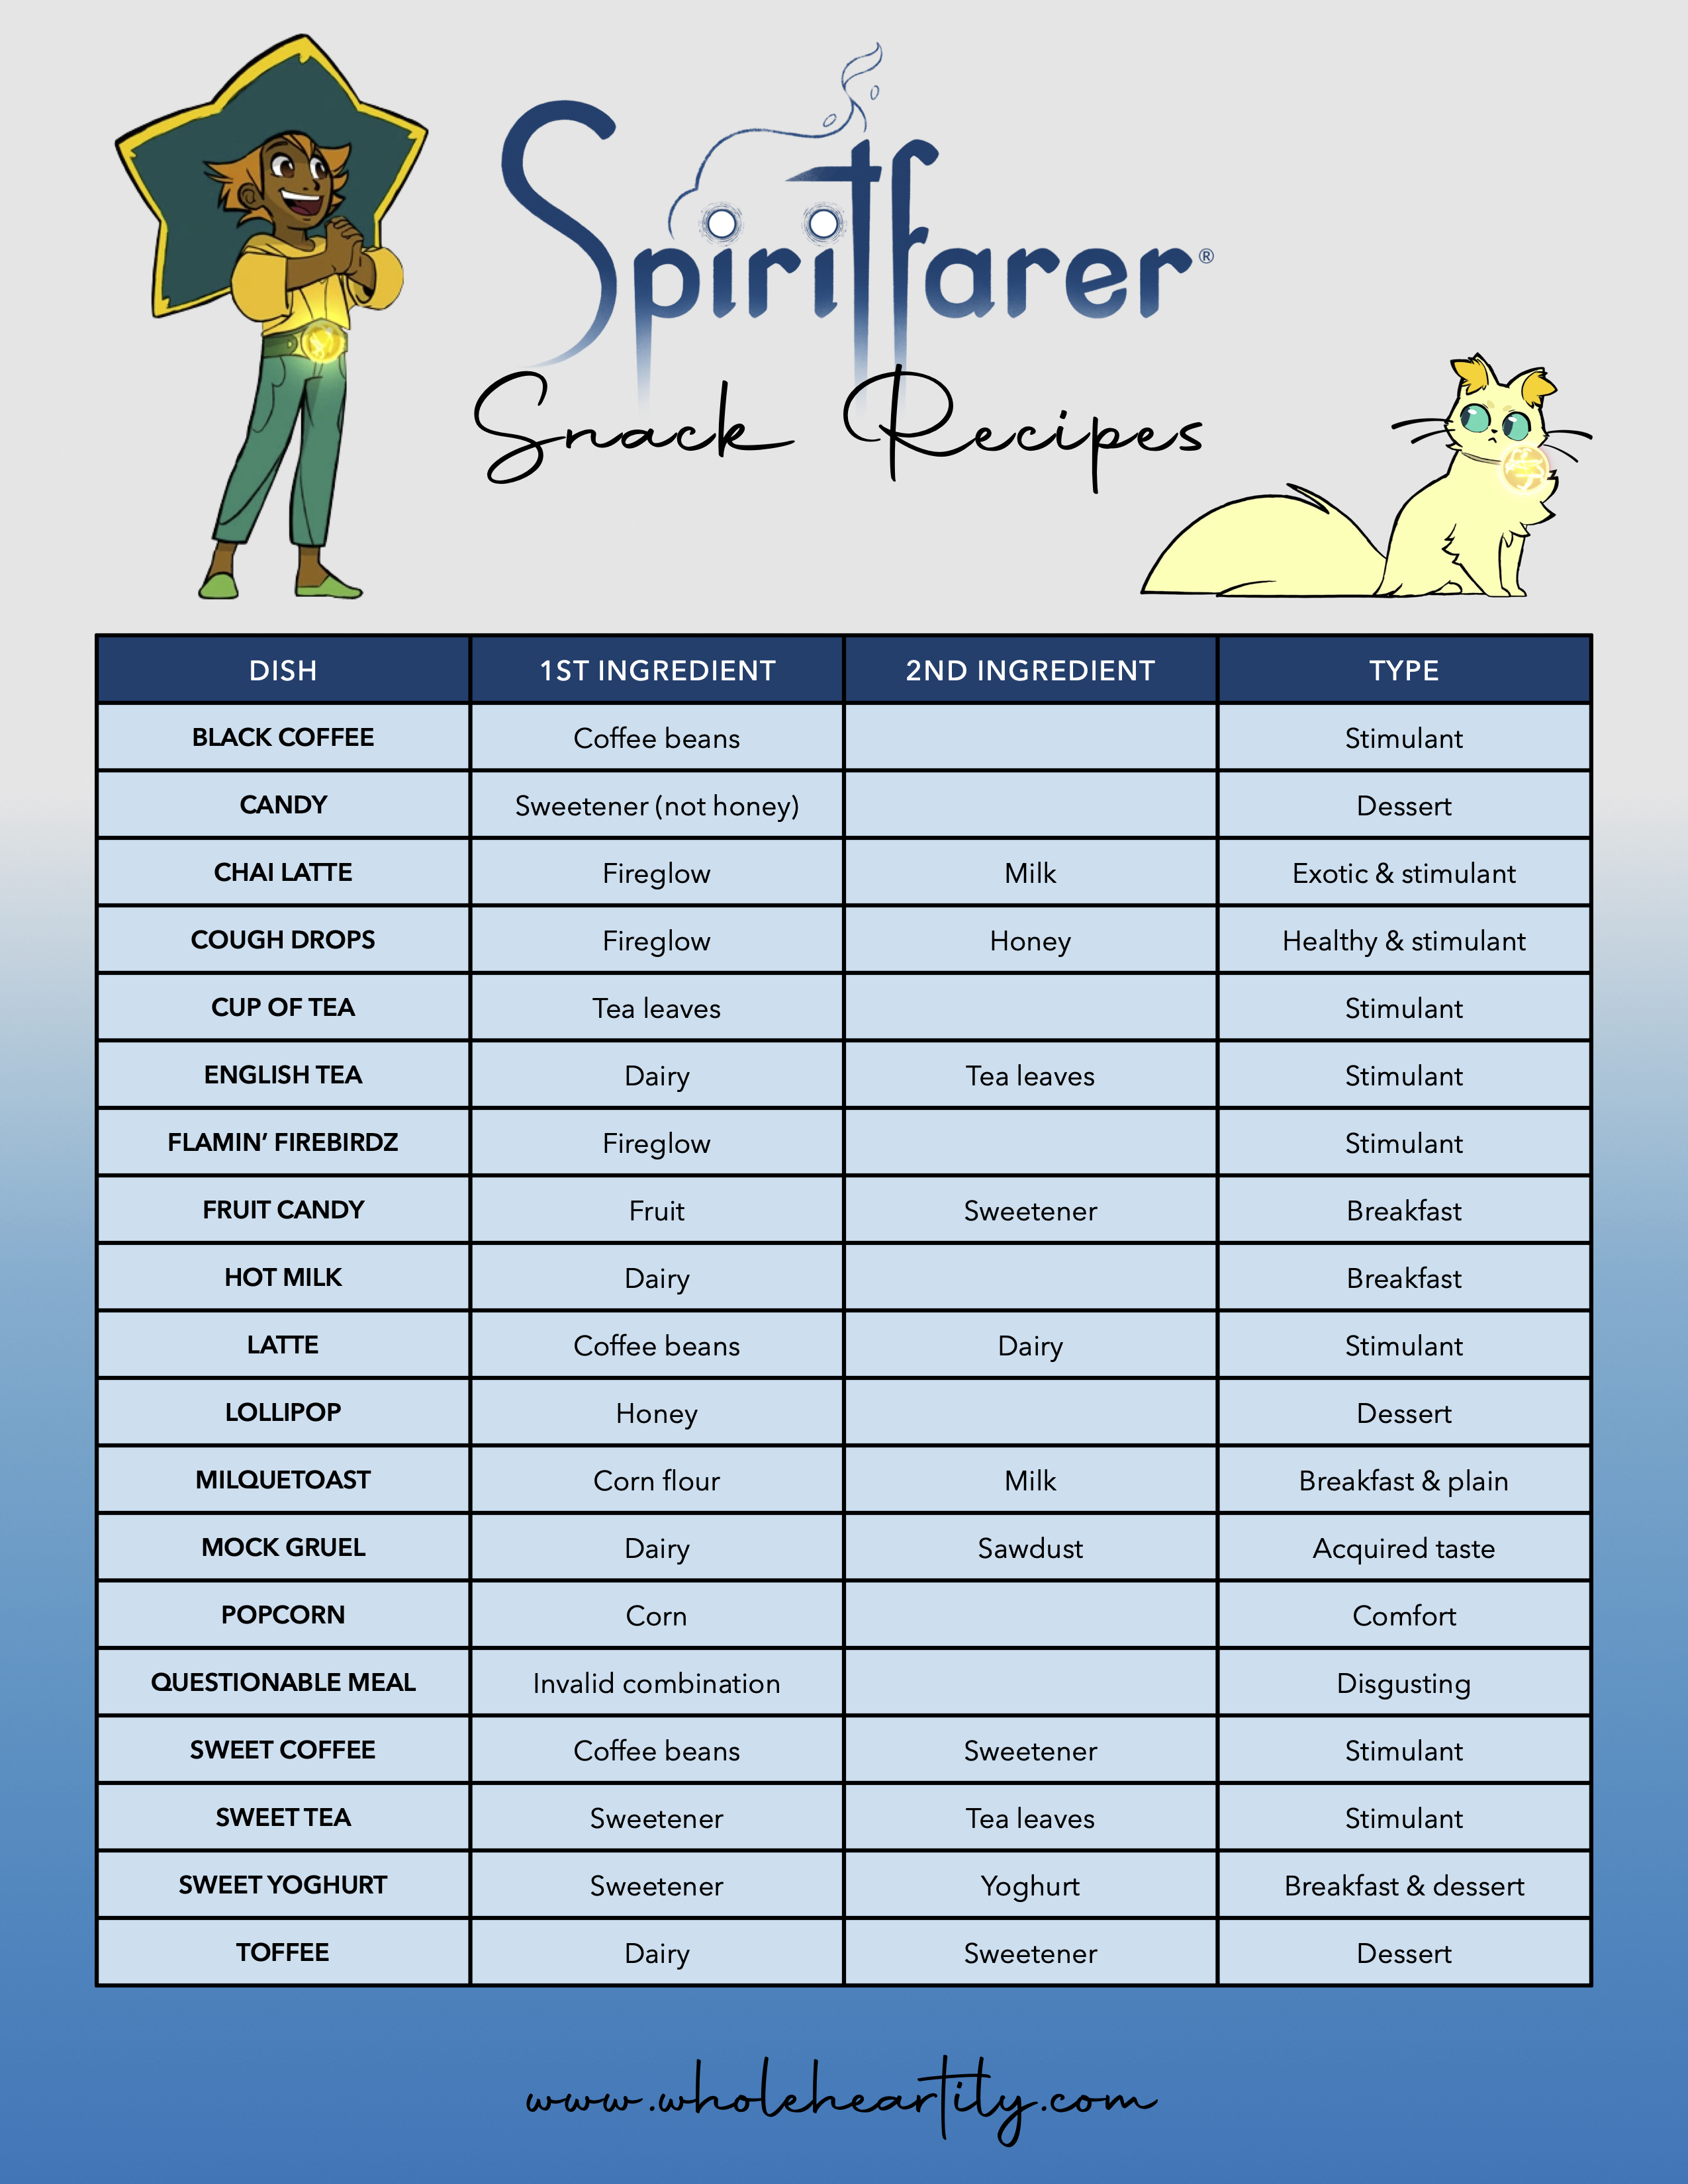
I recently posted the first 60 minutes of Spiritfarer and in conjunction with that I wanted to create a cooking guide for all the food you can create in the game!

These visuals (or infographic guides) are categorized by the size of the meal created, and then organized alphabetically into helpful sections, and downloadable so you don’t need to keep hopping back online to check on the information.

Please let me know if you would like me to work on a guides for anything else within Spiritfarer or if there are any games you would like to see visual information or guides for in the future! I love helping people, discussing games and organizing information!

The First 60 Minutes of Spiritfarer

Have you ever been undecided on what to play next? 

Should you buy that game? Should you install that game?

I’ve been there, and sometimes you just need to take a look at the graphics, hear the music, and learn a little about the plot to see if it resonates with you before taking the next step. I’m here to help! I am creating the first 30 to the first 60 minute videos of games; indie and mainstream, new and old!

This week let’s take a look at the first 60 minutes of Spiritfarer…

Do you want to play the rest? 

The First 30 Minutes of Shadow of the Colossus

Have you ever been undecided on what to play next? 

Should you buy that game? Should you install that game?

I’ve been there, and sometimes you just need to take a look at the graphics, hear the music, and learn a little about the plot to see if it resonates with you before taking the next step. I’m here to help! I am creating the first 30 to the first 60 minute videos of games; indie and mainstream, new and old!

This week let’s take a look at the first 30 minutes of Shadow of the Colossus…

Do you want to play the rest? 

DIY Crochet – Bee Plush

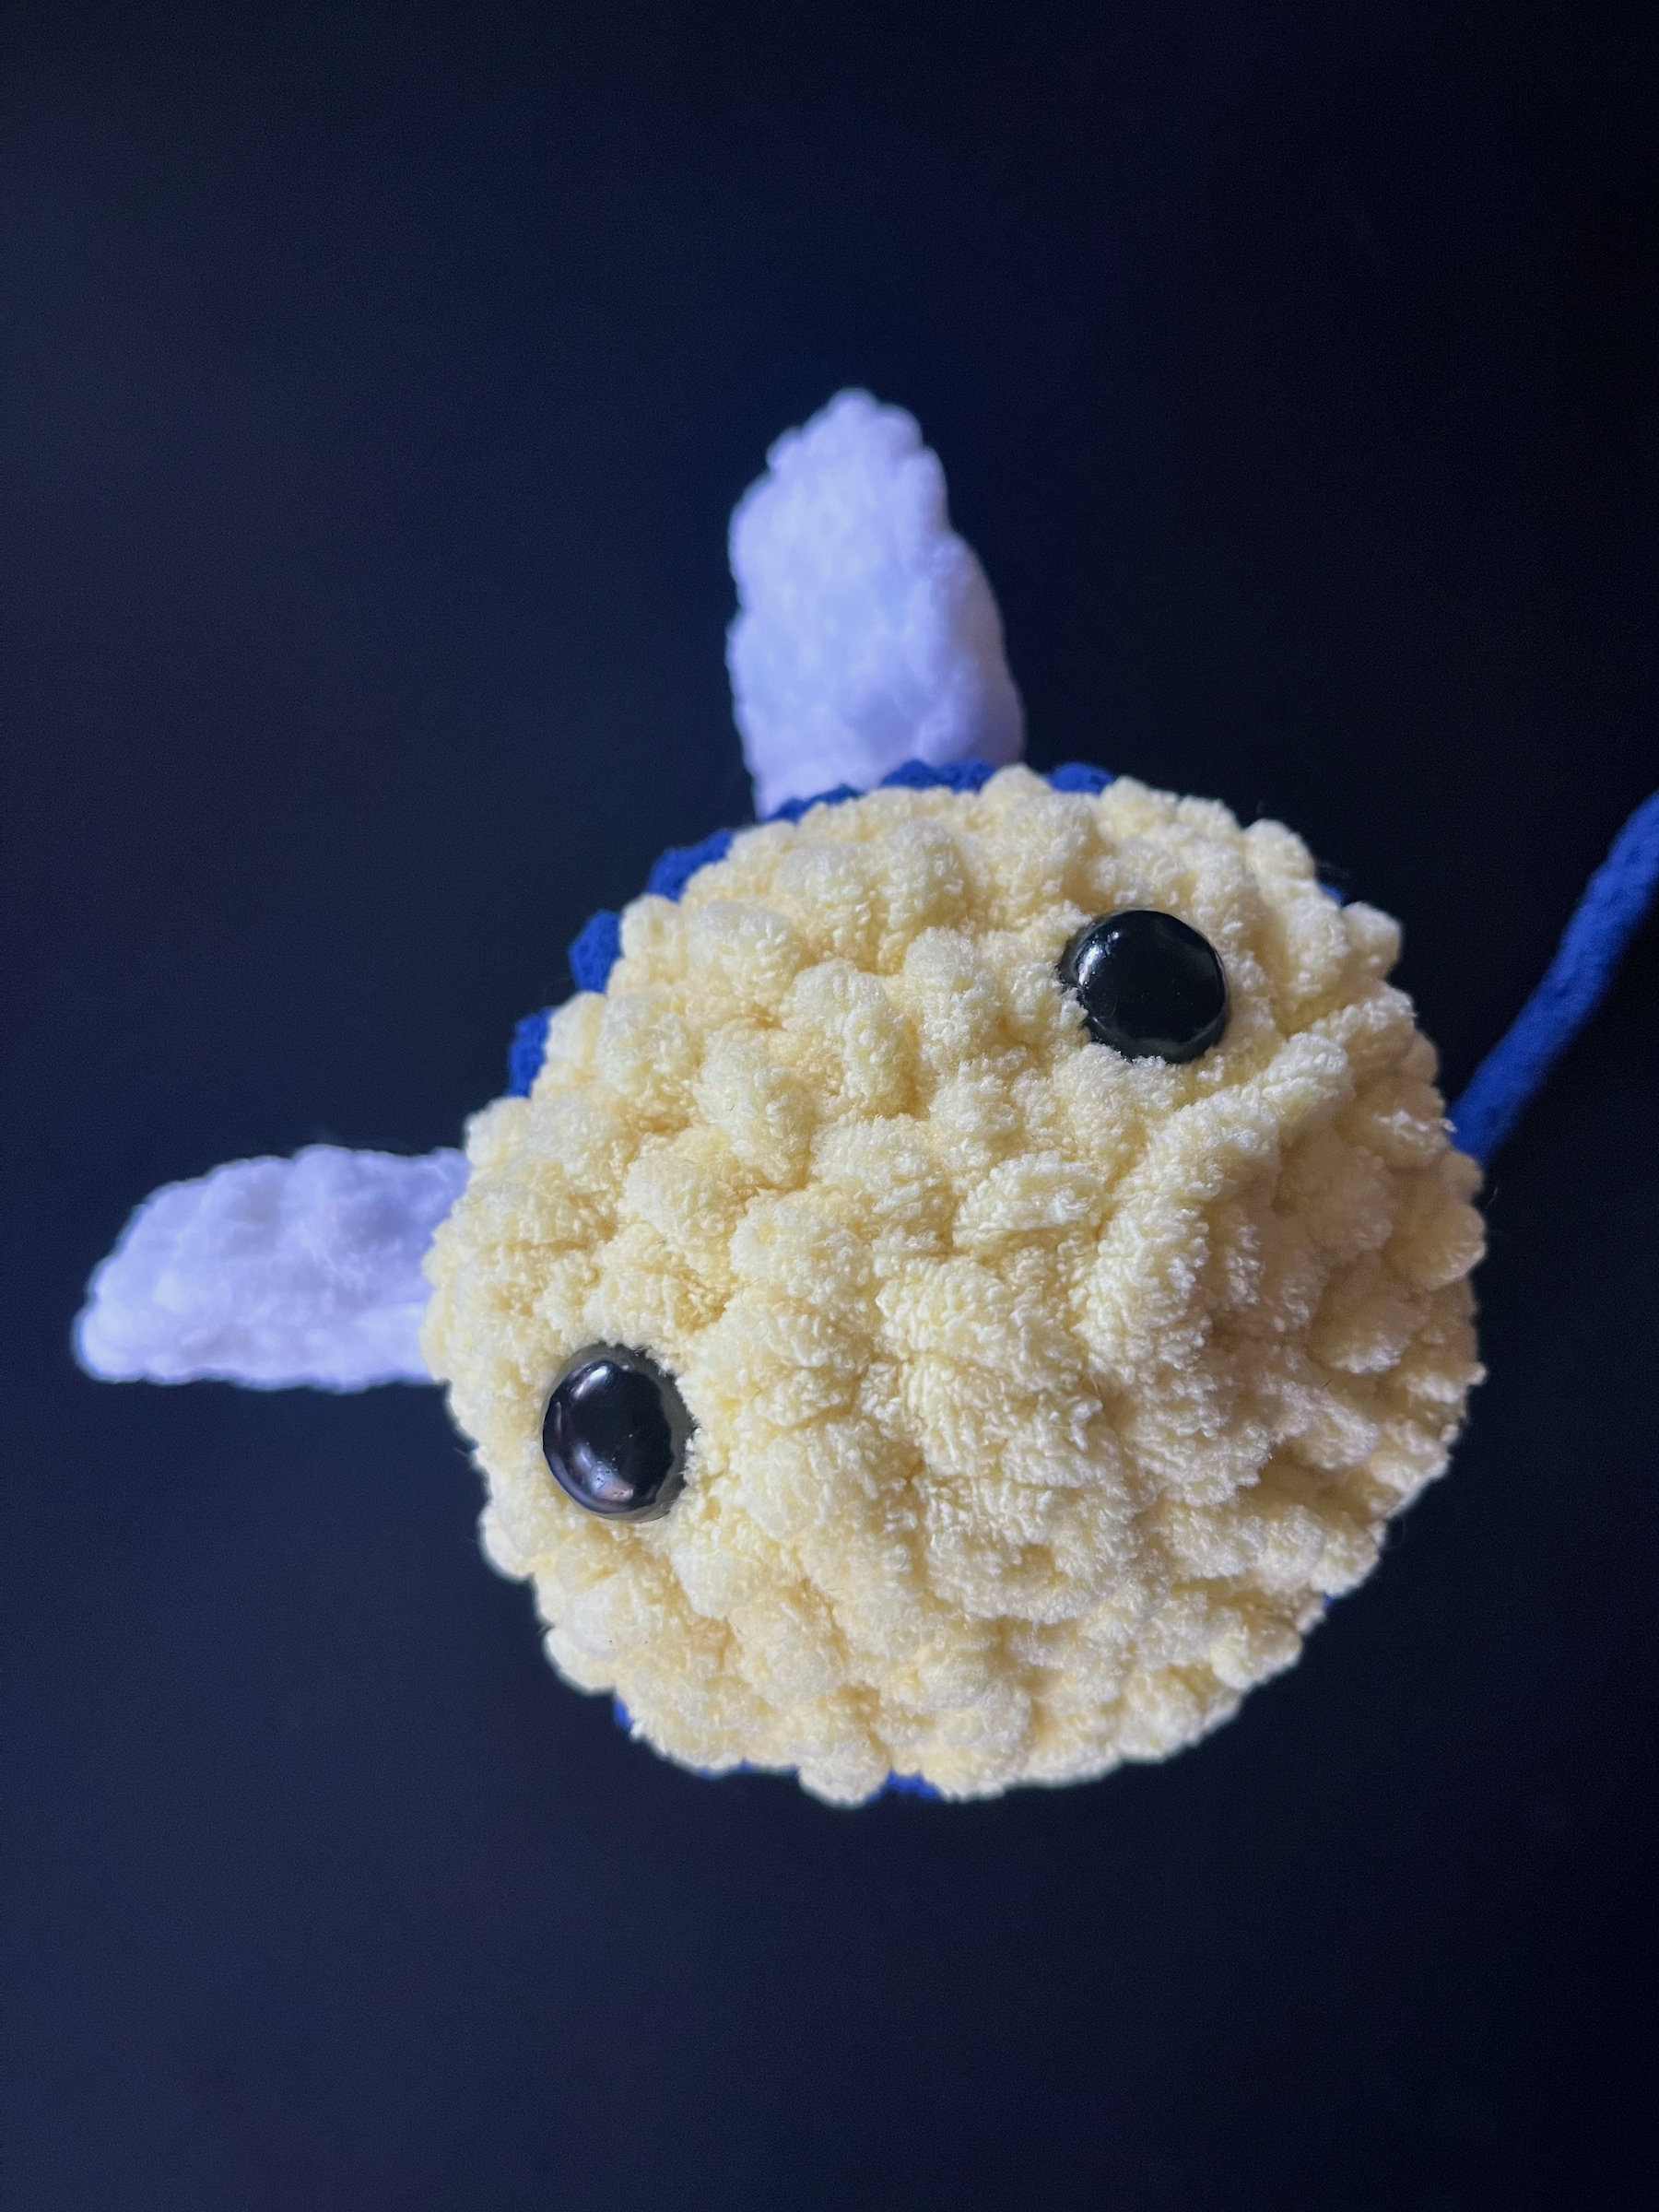
Welcome back friends! Do you crochet? I do! I feel calm and cozy when I’m crocheting, and fiercely proud whenever I complete a project.

I’ve seen some adorable bee plushies in the animated shows my daughter watches, and I wanted to create one for her!

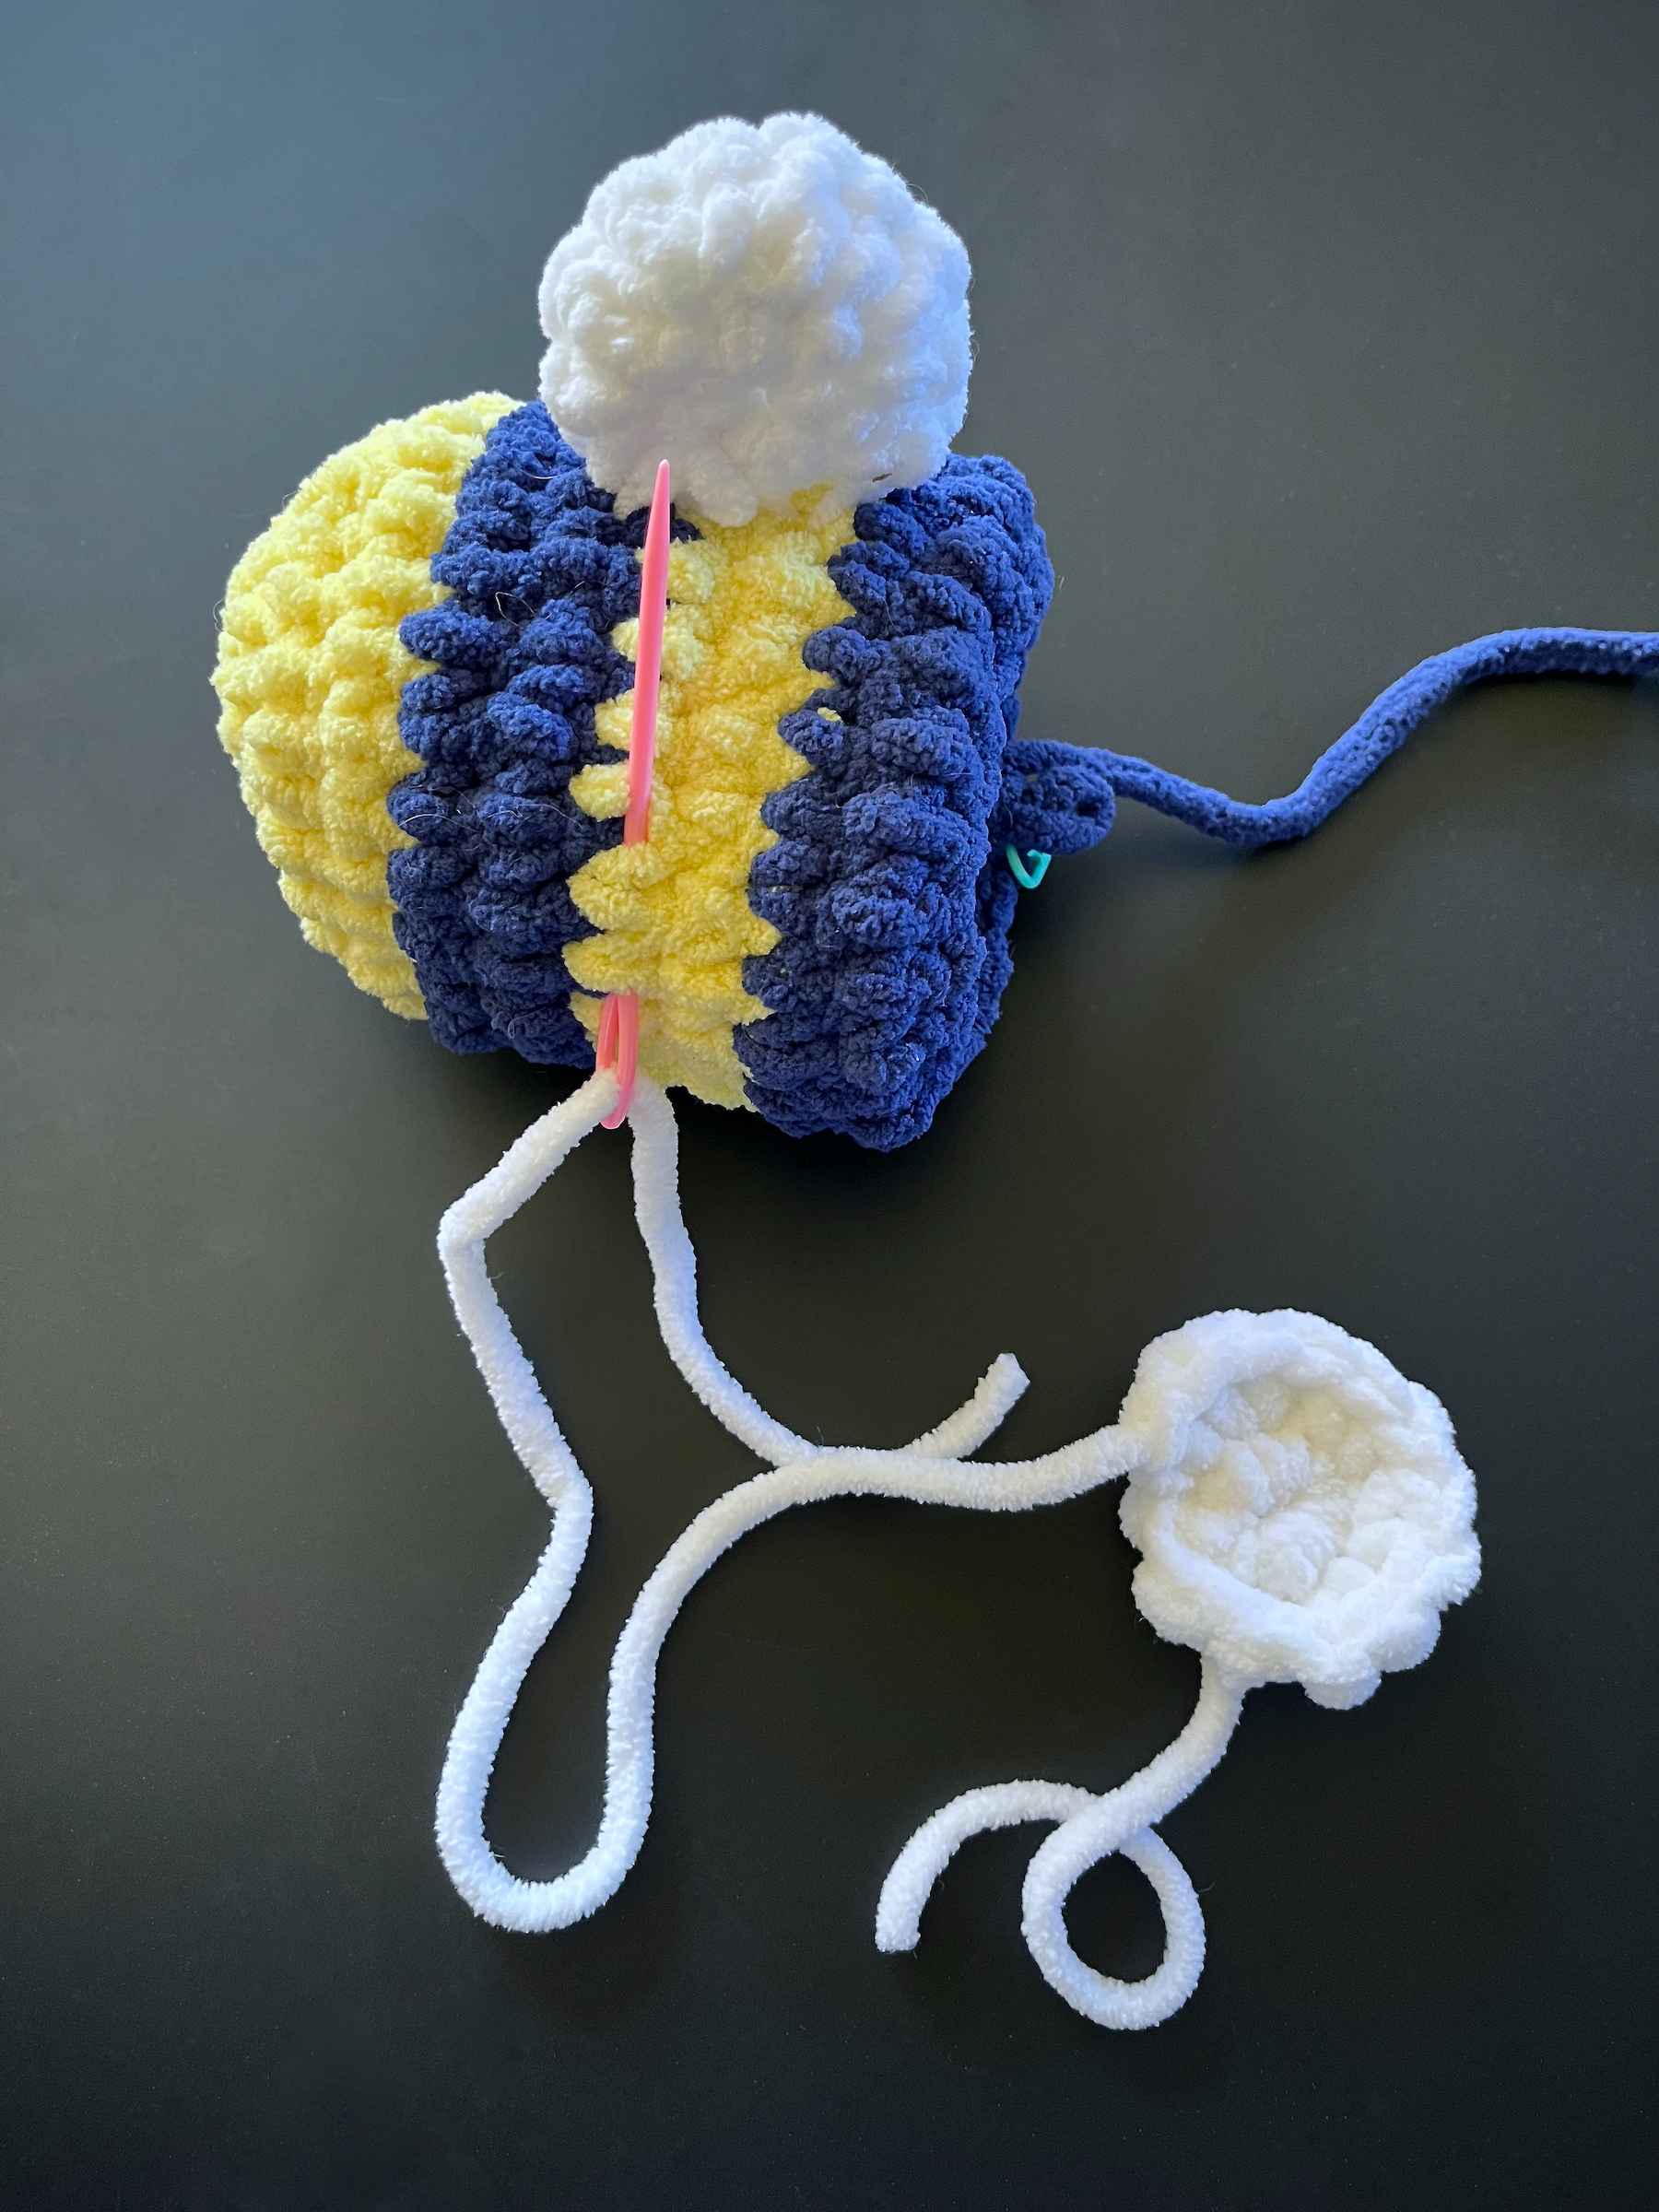
This bee is soft and cuddly! The pattern is easy, and ideal for any level of crocheter (beginners included)! Any size 6 chenille-style yarn can be used in this pattern, but I used Bernat Baby in buttercup yellow and lapis blue, and for the white of the wings. You can use whatever color combination you prefer!

Let’s get started!

SUPPLIES
  • Crochet hook (size 6.50 mm)
  • Chenille-style yarn (size 6)
  • Scissors
  • Yarn needle or small crochet hook
  • Fiber fill
INSTRUCTIONS
  1. Round 1: With the yellow yarn, create a magic ring with 6 single crochets (total of 6 stitches). Place a stitch marker in the last stitch of this round.
  2. Round 2: Increase in each stitch around (total of 12 stitches). Place a stitch marker in the last stitch of this round (henceforth remove it and move it up to the last stitch in each round after this one).
  3. Round 3: 1 single crochet, 1 increase, alternating around the round (18).
  4. Round 4: 2 single crochet, 1 increase, alternating around the round (24).
  5. Round 5: Single crochet in each stitch around (24).
  6. Round 6: Switch colors to blue (or whatever color you choose for the bee’s stripes), then single crochet in each stitch around (24). 
    • To switch colors insert your hook into the first stitch, yarn over and pull through so there are two loops of yellow on your hook. Hook onto the blue and pull in through the two loops of yellow to create the first stitch of Round 6 (for extra security, bring the two loose ends together inside the project and double knot).
  7. Round 7: Single crochet in each stitch around (24).
  8. Round 8: Switch colors back to yellow then single crochet in each stitch around (24).
  9. Round 9: Single crochet in each stitch around (24).
  10. Round 10: Switch colors back to blue then single crochet in each stitch around (24).
  11. Round 11: Single crochet in each stitch around (24).
  12. Set the main body aside for now and begin the wings.
  13. Wings Round 1: With the white yarn, create a magic ring with 6 single crochets (total of 6 stitches). Place a stitch marker in the last stitch of this round.
  14. Wings Round 2: Increase in each stitch around (total of 12 stitches). Place a stitch marker in the last stitch of this round.
  15. Cut the yarn about 8 to 10 inches from your hook and pull the loose end through the last stitch, then set it aside.
  16. Repeat steps 13 through 15 to create a second wing.
  17. Thread your yarn needle with the loose end of one wing, position it where you would like (somewhere on the band of yellow between the two black stripes), and insert your needle through one of the stitches. Pull through until the wing stops at the body of the bee. Position wing and stitch through the bottom of the wing where it comes into contact with the body of the bee. Repeat this stitching process along the bottom of the wing.
    • If there is a tail from creating the magic ring, conceal it by stitching it into the wing and/or into the body of the bee.
  18. Repeat for the second wing.
  19. Attach the safety eyes.
  20. Body Round 12: Switch colors back to yellow, then 2 single crochet, 1 decrease, alternating around the round (18).
  21. Body Round 13: 1 single crochet, 1 decrease, alternating around the round (12).
  22. Begin stuffing the bee to your preference.
  23. Body Round 14: 6 decreases around (6).
  24. Cut the yarn off 8 to 10 inches from the project and pull it through the last stitch.
  25. Stuff the bee a little more if necessary.
  26. Thread the needle and insert the needle through each stitch, then pull tight.
  27. Knot and sew the remaining tail of yarn into the yellow stitches around.
  28. Enjoy!

The First 60 Minutes of The Last Guardian

Have you ever been undecided on what to play next? 

Should you buy that game? Should you install that game?

I’ve been there, and sometimes you just need to take a look at the graphics, hear the music, and learn a little about the plot to see if it resonates with you before taking the next step. I’m here to help! I am creating the first 30 to the first 60 minute videos of games; indie and mainstream, new and old!

This week let’s take a look at the first 60 minutes of The Last Guardian…

Do you want to play the rest? 

How to Play – Go Fish

Part of the fun in raising Zoey is finding things that delight and educate her; I want to find fun, creative board games to play with her during our family game nights! This week we played Go Fish the LotFancy version for 2 to 4 players.

This specific Go Fish game is designed for kids and does a great job at reminding Zoey of the numbers she’s already learned and recognizing /collecting matching sets! I remember when I used to play this with regular playing cards, which could be fun to introduce her to at a later date! I remember we would sometimes combine two decks of playing cards so more people could play and/or we could play for longer! Good times!

So let’s play!

IN THE BOX
  • 40 cards
INSTRUCTIONS
  1. Players take turns trying to collect sets of 4 sea creatures and whomever collects the most sets, wins!
  2. Shuffle the cards and deal 5 to each player.
  3. Place the remaining cards face-down in a pile between the players. This is your “pool of aquatic animals”.
  4. The youngest player goes first, then play continues clockwise.
  5. On your turn, pick any player and ask them if they have a specific number card (it must be one you already have in your hand). If they do, they must give you all their cards with that number. You then get to take another turn! If they do not have that card, then they tell you to “Go Fish!” And you draw 1 card from the pool of aquatic animals. If you happen to draw a card with the number you asked for, show the card to the group, place it in your hand and you get another turn! Otherwise place the card in your hand and your turn is over.
  6. When a player collects 4 of the same sea creatures, they place them face up in front of them.
  7. If a player runs out of cards at any point, they draw one card from the pool of aquatic animals at the end of the current turn.
  8. When the pool of aquatic animals is empty, the game is over. The player with the most set of matching cards wins!

ENJOY!

The First 60 Minutes of Kena: Bridge of Spirits

Have you ever been undecided on what to play next? 

Should you buy that game? Should you install that game?
I’ve been there, and sometimes you just need to take a look at the graphics, hear the music, and learn a little about the plot to see if it resonates with you before taking the next step. I’m here to help! I am creating the first 30 to the first 60 minute videos of games; indie and mainstream, new and old!

This week let’s take a look at the first 60 minutes of Kena: Bridge of Spirits…

Do you want to play the rest?