Refurbished Fisher-Price Ready Steady Rider

Refurbished Fisher-Price Ready Steady Rider

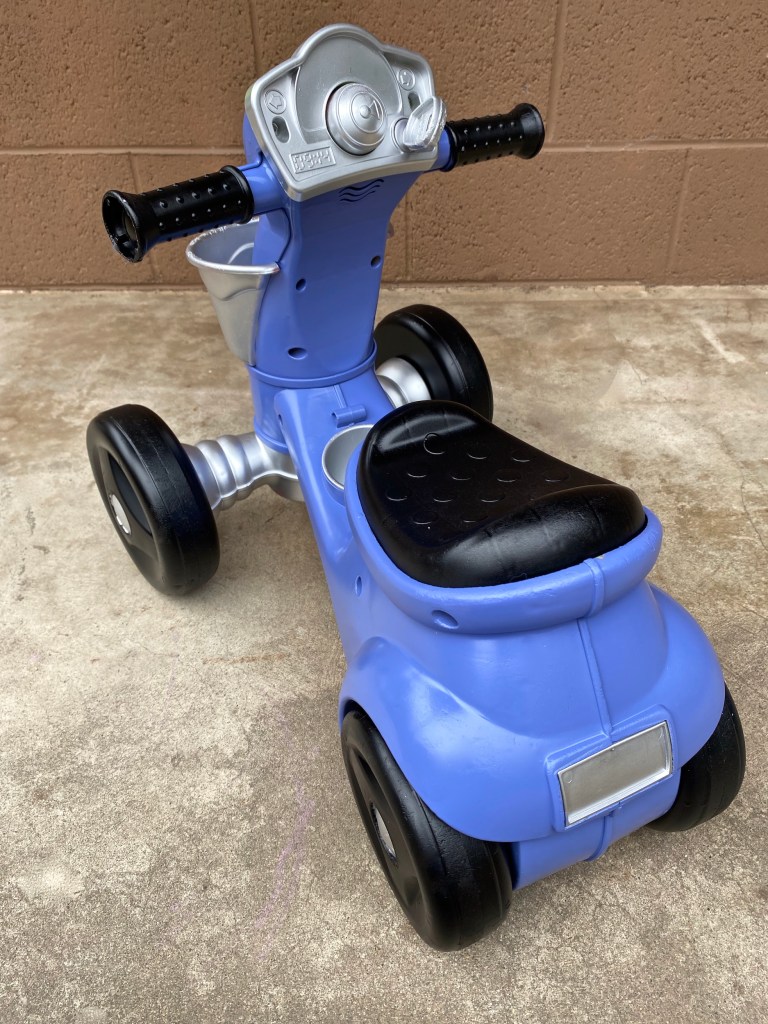
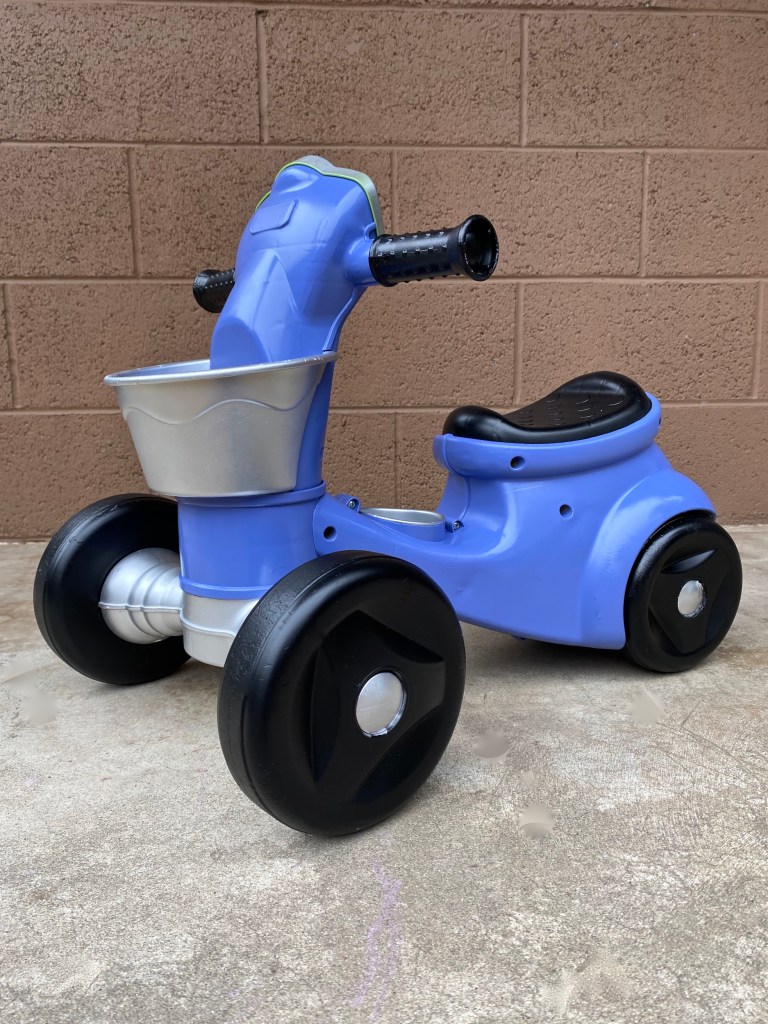
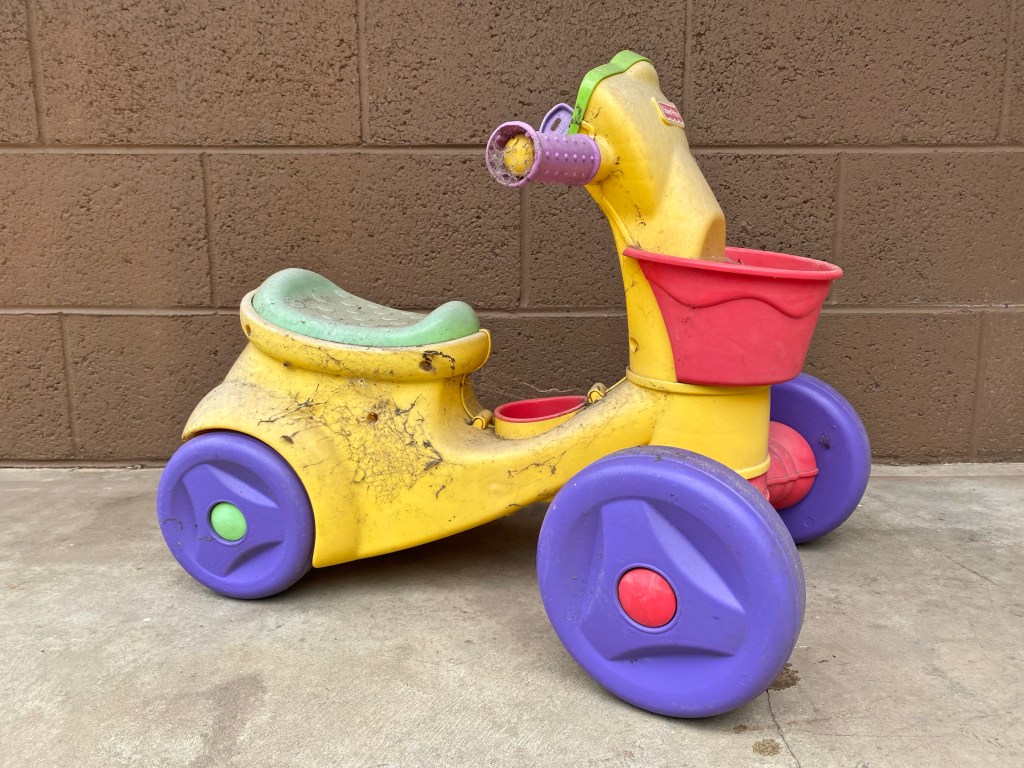
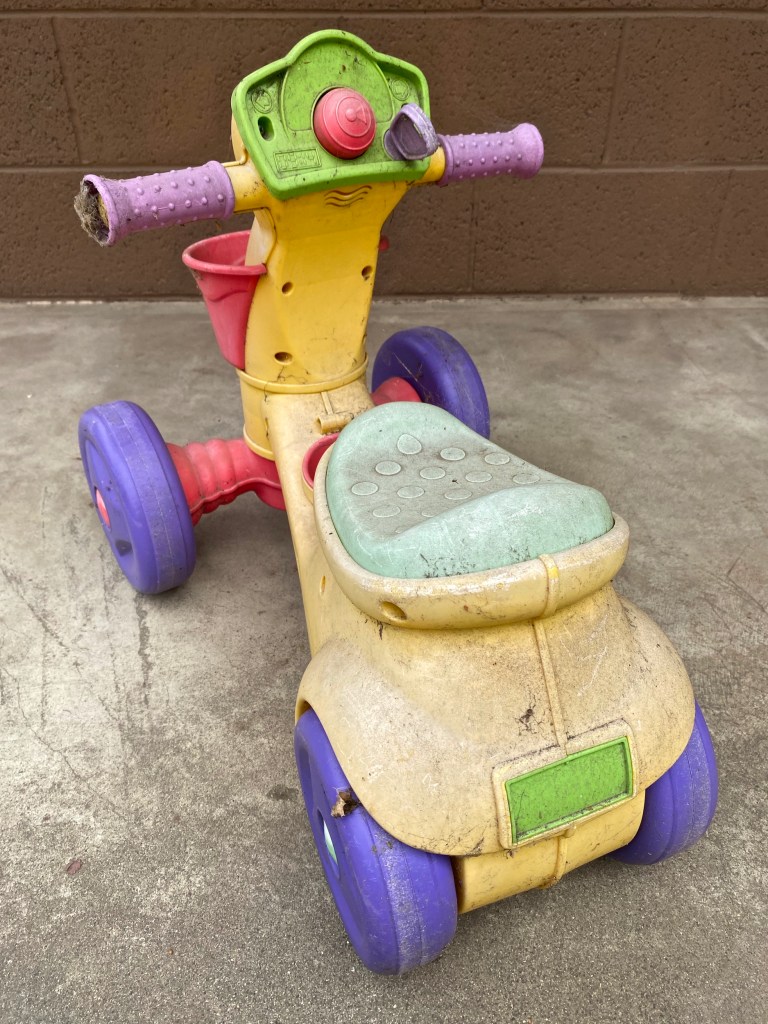
This little Fisher-Price Ready Steady Ride On has seen better days! It was ridden hard and well-loved by its previous owner. Once outgrown, it was set to the side of the road for my Aunt to find and bring to me for my daughter. Zoey wasn’t quite ready for it yet, so I left it sitting outside for another year, yikes! Now she’s ready to scoot, and it’s time to give this toy a makeover!

Please feel free to use this information to breathe new life into an old toy and, if you have any new tips, please feel free to share!

SUPPLIES
  • Fisher-Price Ready Steady Ride On or similar
  • Krylon Fusion All-in-One spray paint
  • Cardboard (optional)
  • Newspaper or scratch paper
  • Disposable bags
  • Painter’s tape
  • Screwdriver
  • Sandwich bag (to hold the screws)
INSTRUCTIONS
  1. Using a screwdriver, dismantle the toy as much as possible without breaking anything. The Ready Steady Ride On was mostly made to click together and stay there! I was only able to remove the bottom of the front axle with the front wheels, the cupholder, the dashboard and the seat.
  2. Completely wash and clean the plastic toy, then allow it to dry.
  3. Wipe the toy down with rubbing alcohol to prepare the surfaces before painting, then allow it to dry.
  4. Spread flattened cardboard (or something similar) in a well ventilated space to protect the floor.
  5. Paint base layers first (where any surrounding paint can be covered with top layers) and allow to dry completely. This may take a few layers so be patient and wait for each coat to dry before painting another. I started with the chrome pieces: the axles, basket, cupholder, dashboard and wheel hubcaps. 
  6. Using painter’s tape, bags and/or paper, cover the painted items that cannot be removed. I covered the basket with paper and tape, wheel hubcaps with painter’s tape, and the top of the front axle with bags and tape.
  7. Once this layer is covered, paint the next layer up and allow to dry completely. This may take a few layers so be patient and wait for each coat to dry before painting another. For me, this was painting the handlebars, seat, and tires black.
  8. Using painter’s tape, bags and/or paper, cover everything painted that cannot be removed. In addition to the previously covered items, I also covered the handlebars with paper and tape, and the wheels with bags and painter’s tape.
  9. Once everything is covered, paint the body of the toy and allow it to dry completely. This may take a few layers so be patient and wait for each coat to dry before painting another.
  10. 10.Gently remove all of the coverings and reassemble the Fisher-Price Steady Ride On.
  11. Scoot, scoot and enjoy!

*This was my first time painting plastic and a learning experience. Heavily used pieces like the wheels normally would not be painted because the paint is much more likely to chip and flake off. I did this for aesthetic reasons and my daughter is only using the scooter indoors. Even so, the paint on the wheels is working its way off slowly in some places. There are other methods (suggested to me after I finished the paint) that may help paint adhere to the plastic better, but I have yet to try them and want to test them before recommending.

Refurbished Fisher-Price Ready Steady Rider

A Classic Berenstain Bears Bibliography

Berenstain Bear Classics Bibliography List

The Berenstain Bear Classics, originally classified as the Berenstain Bear First Time Books, are staple series of my childhood.

I fondly remember my mom reading this series to me. Each story taught life lessons and felt so relatable. But the artwork? I loved the artwork and I still do! It’s very unique, warm and welcoming.

I realize now as I research this that as much as I loved the books I knew, there are so many more I’ve never had the pleasure of reading! I am starting to collect these Berenstain Bear books to read to my daughter, so I’ve created this one-page handy dandy bibliography to keep track as I go! Please feel free to use it too if you need it!

Please feel welcome to check out the other bibliography lists I’ve compiled!

Pixar Animation Studios Watch List

Pixar Watch List

I grew up watching a healthy dose of animated Disney and Pixar movies, they had a positive impact on me, and I would love to continue the tradition with my daughter. We’ve already watched a few and as her attention span grows I’d like to watch more. Let’s be honest though, child(ren) or not, you’re never too old to love and enjoy these films. I’ve created this handy dandy Pixar watch list to keep track; please feel free to use it as a reference!

  • Toy Story
  • A Bug’s Life
  • Toy Story 2
  • Monster’s Inc.
  • Finding Nemo
  • The Incredibles
  • Cars
  • Ratatouille
  • Wall-E
  • Up
  • Cars 2
  • Brave
  • Monster’s University
  • Inside Out
  • The Good Dinosaur
  • Finding Dory
  • Cars 3
  • Coco
  • Incredibles 2
  • Toy Story 4
  • Onward
  • Soul
  • Luca
  • Turning Red
  • Lightyear

Walt Disney Animation Watch List

Walt Disney Animation Studios Watch List

I grew up watching a healthy dose of animated Disney and Pixar movies, they had a positive impact on me, and I would love to continue the tradition with my daughter. We’ve already watched a few and as her attention span grows I’d like to watch more. Let’s be honest though, child(ren) or not, you’re never too old to love and enjoy these films. I’ve created this handy dandy Walt Disney Animation Studios watch list to keep track; please feel free to use it as a reference!

  • Snow White and the Seven Dwarves
  • Pinocchio
  • Fantasia
  • The Reluctant Dragon
  • Dumbo
  • Bambi
  • Saludos Amigos
  • The Three Caballeros
  • Make Mine Music
  • Song of the South
  • Fun and Fancy Free
  • Melody Time
  • The Adventures of Ichabod and Mr. Toad
  • Cinderella
  • Alice and Wonderland
  • Peter Pan
  • Lady and the Tramp
  • Sleeping Beauty
  • One Hundred and One Dalmatians
  • The Sword and the Stone
  • The Jungle Book
  • The Aristocats
  • Robin Hood
  • The Many Adventures of Winnie the Pooh
  • The Rescuers
  • The Fox and the Hound
  • The Black Cauldron
  • The Great Mouse Detective
  • Oliver and Company
  • The Little Mermaid
  • The Rescuers Down Under
  • Beauty and the Beast
  • Aladdin
  • The Lion King
  • Pocahontas
  • The Hunchback of Notre Dame
  • Hercules
  • Mulan
  • Tarzan
  • Fantasia 2000
  • Dinosaur (CGI)
  • The Emperor’s New Groove
  • Atlantis: The Lost Empire
  • Lilo and Stitch
  • Treasure Planet
  • Brother Bear
  • Home on the Range
  • Chicken Little (CGI)
  • Meet the Robinsons (CGI)
  • Bolt (CGI)
  • The Princess and the Frog
  • Tangled (CGI)
  • Winnie the Pooh
  • Wreck-It Ralph (CGI)
  • Frozen (CGI)
  • Big Hero 6 (CGI)
  • Zootopia (CGI)
  • Moana (CGI)
  • Ralph Breaks the Internet (CGI)
  • Frozen II (CGI)
  • Raya and the Last Dragon (CGI)
  • Encanto (CGI)

How to Clean – Maple Town Flocked Toys

How to Clean - Maple Town Toys

Have you ever watched Maple Town? It is an animated series from the 1980s featuring anthropomorphic animal characters, within an adorable utopic town, that taught little life lessons in each episode. When I was little, my mom recorded it onto VHS for me and I watched them over and over; I also had several of the toys and I still have them!

These toys have been up in the rafters of our garage for over 20 years! They’ve held up better than my My Little Ponies (see how I cleaned them here), but they are still careworn and very dirty. I want to clean these toys to prepare them for my daughter to love and play with!

If you have any flocked toys, whether they are Maple Town characters, Sylvanians, Calico Critters, So Soft My Little Ponies or another, I’ve created this handy guide to help you give them a good cleaning without removing their flocking. Let’s get started!

FLOCKED TOY
How to Clean - Maple Town Toys
Before cleaning.
How to Clean - Maple Town Toys
After Cleaning.

SUPPLIES

  • Container
  • Powdered OxiClean
  • Toothbrush
  • Paper or dish towels

INSTRUCTIONS

Important! Since flocking is attached to the toys with glue, warm to hot water or air could dissolve the glue and remove the flocking.

  1. If your toy has any clothing, remove it and set it aside (see “Clothing” section below).
  2. In the container, prepare a small batch of the OxiClean per the instructions with warm water. Allow the water to cool completely.
  3. Take the toothbrush, dip it in the OxiClean bath then gently tap the water onto the toy to wet the flocking (this may take several dips and taps to wet the flocking over the whole toy). We are not scrubbing with the toothbrush, just transferring a controlled amount of water onto the toy. 
  4. Use your fingers to rub the OxiClean water into the toy’s fur and set it aside for 10 to 15 minutes. I set mine on a white plate and boy did some dirty water drain off of them (see photo)!
  5. After your toy has sat for 10 to 15 minutes, turn on your tap on the lowest stream it can distribute water, and carefully rinse each character. Take care not to linger too long over joints so water doesn’t leak inside.
  6. With a paper towel or dish towel, gently dab each toy to remove excess water, then set them somewhere safe to dry overnight or longer until they are dry to the touch.
  7. If your toy has any clothing, continue see the “Clothing” section below.
CLOTHING
How to Clean - Maple Town Toys
Maple Town character clothing, before cleaning.

SUPPLIES

  • Container
  • Powdered OxiClean
  • Needle (Optional)
  • Thread (Optional)
  • Scissors (Optional)

INSTRUCTIONS

Important! If you’re worried about a particular article of clothing, please do a spot test first, before soaking the whole item.

  1. In the container, prepare the OxiClean per the instructions with warm water.
  2. Place the toy’s clothing in the warm OxiClean mixture to soak. There are some types of fabric that will not react well in OxiClean.
  3. Keep an eye on the clothing and remove it from the bath once clean. Some of my toy’s clothing was clean within 30 minutes, some of them took a couple of hours.
  4. Remove the articles of clothing from the soak and rinse them thoroughly. Squeeze the out the excess water, smooth out any wrinkles, and set them aside to dry.
  5. If there are any loose threads the clothing that will not unravel the garment if cut, you can use the scissors to snip them off.
  6. If there are any tears in the clothing, select thread that is similar in color and thread your needle. Carefully sew the tears back together using appropriate, simple stitches.
  7. After your toy and its clothing are clean and dry, re-dress, and display or enjoy!
How to Clean - Maple Town Toys

Anna Dewdney’s Llama Llama Bibliography

Anna Dewdney's Llama Llama Bibliography

I fortuitously found our first Llama Llama book at a local library book sale. It was October and I collected what halloween-themed children’s books I could find, then brought them home. Zoey immediately fell in love with Llama Llama Trick or Treat, handing it to us over and over again until both my husband and I could (and still can) recite it from memory. 

Since October, we have collected Llama Llama Gives Thanks, Jingle Bells, I Love You and Easter Egg. As I researched the author, Anna Dewdney, I was deeply saddened to hear that she has passed away. Her stories and her artwork are so heartfelt and beautiful; we love them, and will continue to collect and read all of her books.

As we continue to introduce Zoey to more Llama Llama stories, I’ve created a bibliography of Anna Dewdney’s Llama Llama series. Please feel free to use it too if you need it! Her estate has released some books posthumously and I’ve decided to include those that have the same look and feel as the originals.

Posthumously

Please take a look at other Children’s book author bibliographies I’ve created here:

Mercer Mayer Core Little Critter Bibliography

Mercer Mayer Core Little Critter Bibliography

Mercer Mayer’s core Little Critter books are another staple series of my childhood!

I fondly remember my mom reading All by Myself, Just Me and My Dad, Just Me and My Mom, Just Grandma and Me, and (my personal favorite) Just Go To Bed! The stories felt so relatable and cozy and the artwork, although quirky, was also very warm and welcoming.

As I research this series, I realize that as much as I loved the books I knew, there are so many more I’ve never had the pleasure of reading! I am starting to collect Little Critter books to read to my daughter, so I’ve created this one-page handy dandy bibliography to keep track as I go! Please feel free to use it too if you need it!

See my Bill Peet bibliography here, and my Dr. Seuss bibliography here!

How to dye Easter eggs with food coloring!

Dyeing Easter Eggs with Food Coloring

I had every intention of making naturally dyed eggs this year. Every. Intention. Then I realized I did not leave myself enough time to prepare and create the dyes. Going natural is a labor of love that I would still love to do…next year.

This year, I dyed a small amount of eggs using food coloring, vinegar and water. It was a lot quicker, a lot simpler, and I was pretty happy with the results!

Dyeing Easter Eggs with Food Coloring
SUPPLIES
  • 4 16 ounce mason jars
  • 8 teaspoons of vinegar (2 for each color/jar)
  • 4 cups of water (1 for each color/jar)
  • Food coloring of your choice
  • 8 hard boiled eggs
INSTRUCTIONS
  1. Prepare each mason jar by adding two teaspoons of vinegar to each one.
  2. Boil the four cups of water and carefully pour one cup into each mason jar.
  3. Add drops of food coloring to create the desired shade (don’t be afraid to add a lot, I used 40 drops of blue in one jar) and stir until the color, vinegar and water are well incorporated.
  4. Gently add two eggs to each color, allow the the water to cool slightly, then seal the lids and put them in the refrigerator overnight.
  5. Remove the mason jars from the refrigerator and carefully remove the eggs from the dye, then drain the rest.
  6. Rinse the eggs, gently rubbing with your fingers to remove the darker colored film covering the eggs.
  7. Gently pat the eggs dry with paper towels.

I used the mason jars I had available, which were 16 ounces with regular mouths. I dyed two eggs within each jar; I probably could have crammed 3 eggs into each jar, but I didn’t think that would have given them an even coating of the dye. Please feel free to multiply the recipe and enjoy!

A Sweet and Simple Toddler Easter Basket

Dear Easter Bunny,

Thank you and your helpers for all that you do! Since I was a little girl, your operation has grown into something that could rival Christmas morning! It’s enthusiastic and impressive to say the least, but I don’t think our little girl needs all the bells and whistles this year.

My daughter is a 19th month old toddler this Easter and I would like to request up to six items for her Easter Basket that are simple, sweet and more useful than not!

Thank you for taking a look!

DIY Spring Sensory Bottle

Happy Spring everyone! Spring has now sprung and it’s a time for fresh growth, vibrant colors and new life! Part of the fun in raising Zoey is making things that teach and fascinate her. And, if I’m being completely honest, I find sensory bottles fascinating too, so let’s make one!

SUPPLIES

  • A 16 ounce clear, plastic bottle
  • A funnel
  • 1 1/2 cups of white rice
  • 3/4 teaspoon of white vinegar
  • Green food coloring
  • Miniature insect (or other spring inspired) erasers 
  • Glue (optional)

INSTRUCTIONS

  1. Place the rice in a resealable plastic sandwich bag.
  2. Add the vinegar and food coloring to the rice. You can add however many drops of food coloring you’d like, I added 20 drops.
  3. Seal the bag and shake well until the color is well dispersed throughout.
  4. Spread the rice onto a baking sheet and allow it to dry overnight.
  5. Place the funnel in the mouth of your bottle and use it to fill the bottle with half of the rice.
  6. Remove the funnel and add half of the insect erasers.
  7. Screw the lid back onto the bottle and shake until well incorporated, then remove the lid and replace the funnel.
  8. Add the rest of the rice and the rest of the insect erasers.
  9. Replace the lid onto the bottle and shake well again until well incorporated.
  10. If your child is older and you worry about him/her undoing the lid, you can coat the inside of the lid with glue, then screw it back onto the bottle. This will secure the lid and make it harder for little ones to unscrew the lid and create a leak or spill the bottle’s contents.

Enjoy!