A Stephen King Bibliography of Fictional Works

Today is the birthday of one of my favorite authors, Stephen King! Happy birthday Mr. King!


Once upon a time, I attempted to read all of his books in one year, and failed spectacularly, completing only nine. Something I’ve learned on this journey? Stephen King creates heavy subject matter. From his longest novel to his shortest story, his content can be deeply disturbing or incredibly touching. I continue to make steady progress, and someday soon I will complete them all, but I need a little time after each book to digest what I’ve read.

! Please note, I recommend Stephen King’s books for adults. I would not recommend reading his books to children !

Here is a complete list of Stephen King’s fictional novels, organized in chronological order by earliest publication to the most recent. If my research is correct, he has published 68 complete fictional novels to date, including 12 collections that range from 4 to 24 stories each. I’ve marked the ones I’ve read with an asterisk *.

Stephen King Bibliography of Fictional Works

Have you read any Stephen King novels? What’s your favorite? I have now read 25 of his books, and The Shining is still my favorite!

“Love” Lyric Page from Disney’s Robin Hood

"Love" Lyric Page (Robin Hood)

I love singing to Baby Zoey and she loves being sung to! I used to know all the songs from Disney movies by heart, but I’m a little rusty. I’ve started making lyric pages to refresh my memory or teach me new songs I’ve never known!

This song, “Love”, from Disney’s Robin Hood is calm and soothing. I typically sing this to her or play it for her as we’re winding down before nap-time or bedtime.

Please feel free to save these for quick reference, and let me know if there are any songs you would like to see lyric pages for!

Little John’s Beef Stew Recipe

Little John's Beef Stew Recipe from Disney's Robin Hood

INTRODUCTION

Welcome back friends! This week we’ll be cooking up Little John’s beef stew featured in Disney’s animated feature, Robin Hood!

Little John's Beef Stew Recipe from Disney's Robin Hood
This recipe is featured when Robin Hood and Little John are taking a break in the woods. Unfortunately Little John leaves Robin to tend the stew, and Robin starts daydreaming, effectively burning the stew (don’t worry we won’t burn ours). Friar Tuck shows up while Little John is trying to salvage the food; he tries the stew, coughs a bit, and comments “well done, ain’t it?”

Little John's Beef Stew Recipe from Disney's Robin Hood

Little John's Beef Stew Recipe from Disney's Robin Hood

Little John's Beef Stew Recipe from Disney's Robin Hood
I love a good, hearty stew! I thought burning it would be in poor taste (#momjoke), so I kept an eye on it. I also feel like Little John takes pride in his cooking so I kept it simple based on ingredients they may have been able to obtain, but not so simple as to insult his enthusiasm.

Little John's Beef Stew Recipe from Disney's Robin Hood

Little John's Beef Stew Recipe from Disney's Robin Hood

BEEF STEW
  • 2 tablespoons of butter
  • 1 pound of beef stew meat, cubed
  • 1 large onion, diced
  • 1/2 teaspoon of basil
  • 1 teaspoon of black pepper (plus a few sprinkles more to season the meat)
  • 1/2 teaspoon of oregano
  • 1 teaspoon of rosemary
  • 1 1/2 teaspoons of salt (plus a few sprinkles more to season the meat)
  • 1 teaspoon of thyme
  • 3 cloves of garlic, minced
  • 3 ribs of celery, chopped
  • 1 cup of tomatoes, diced
  • 2 cups of water
  • 4 carrots, peeled and chopped
  • 4 potatoes, chopped
  • 2 tablespoons of flour
  • 1/4 cup of water (additional)
INSTRUCTIONS
  1. Melt the butter in a dutch oven or large pot on medium heat.
  2. Season the stew meat with a little salt and pepper, then add it to the pot and brown all sides.
  3. Once browned, remove the meat and allow it to rest on a plate with its juices.
  4. Add the onions, basil, black pepper, oregano, rosemary, salt, and thyme to the meat drippings within the dutch oven and sauté for about four or five minutes.
  5. Add the garlic and celery, then sauté for another two to three minutes.
  6. Deglaze the pan with a little water (enough to loosen up the food particles left behind from cooking the meat and aromatics) and stir, then allow everything to cook for another five minutes.
  7. Add the beef (and its accumulated juices) back into the pot, along with the diced tomatoes and two cups of water.
  8. Bring everything to a boil, then reduce to a simmer for about an hour to an hour and a half, or until the beef is fork tender.
  9. Add in the carrots and potatoes and bring the liquid back to a boil, then reduce to a simmer for another thirty to forty minutes or until the potatoes are fork tender.
  10. In a separate bowl, mix the flour into 1/4 cup of cold water and add it into the stew.
  11. Continue cooking and stirring the pot until the sauce has thickened (about 10 more minutes).
  12. Serve warm and enjoy!

Paper Mario: The Origami King – Question Block Guides

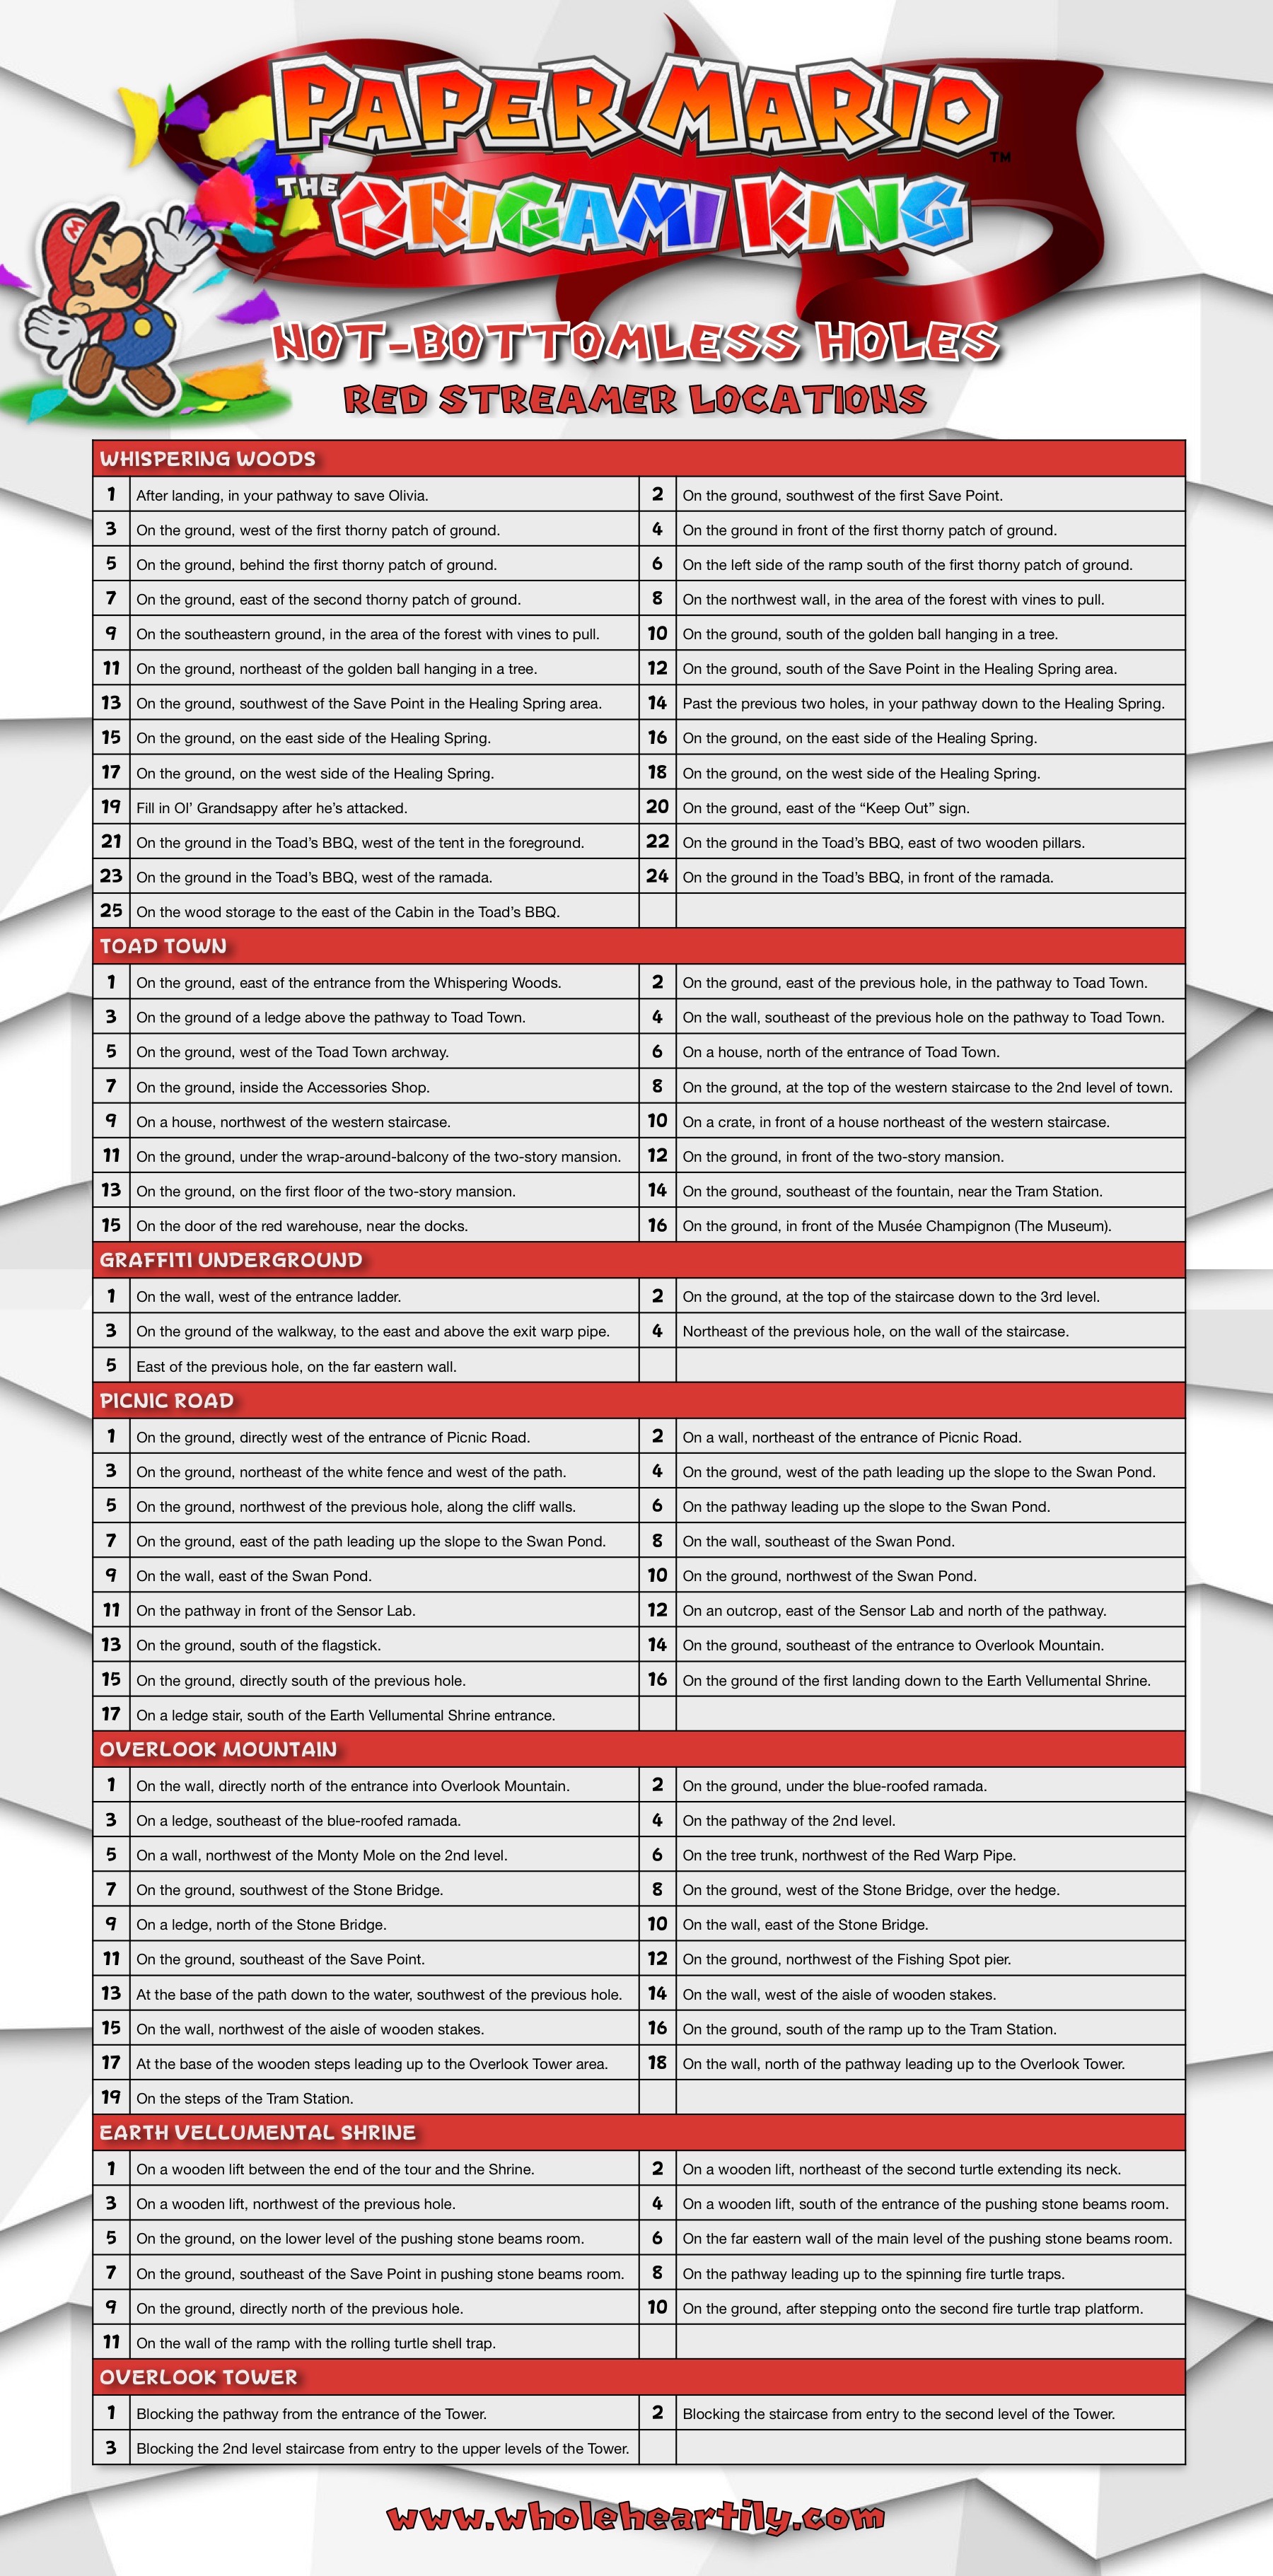
Paper Mario: The Origami King - Red Streamer Question Blocks Guide
If there’s one thing I do when I play a game (besides trying to relax and enjoy myself), it’s look up information. I get curious or stuck, and I find myself turning to the internet for answers. There are a lot of good guides out there that are super helpful, but what I don’t see are an abundance of simple and clean visual guides that lay out all the information in one place.

I’ve finished playing Paper Mario: The Origami King and I loved it! All of the characters are so charming (including those previously considered villains like Kamek) and no one more so than newcomer Olivia. Olivia is such a positive, charming, lovable character in all her naivety…and just like that I’ve realized I have a real soft spot for characters that view the world with wonder.

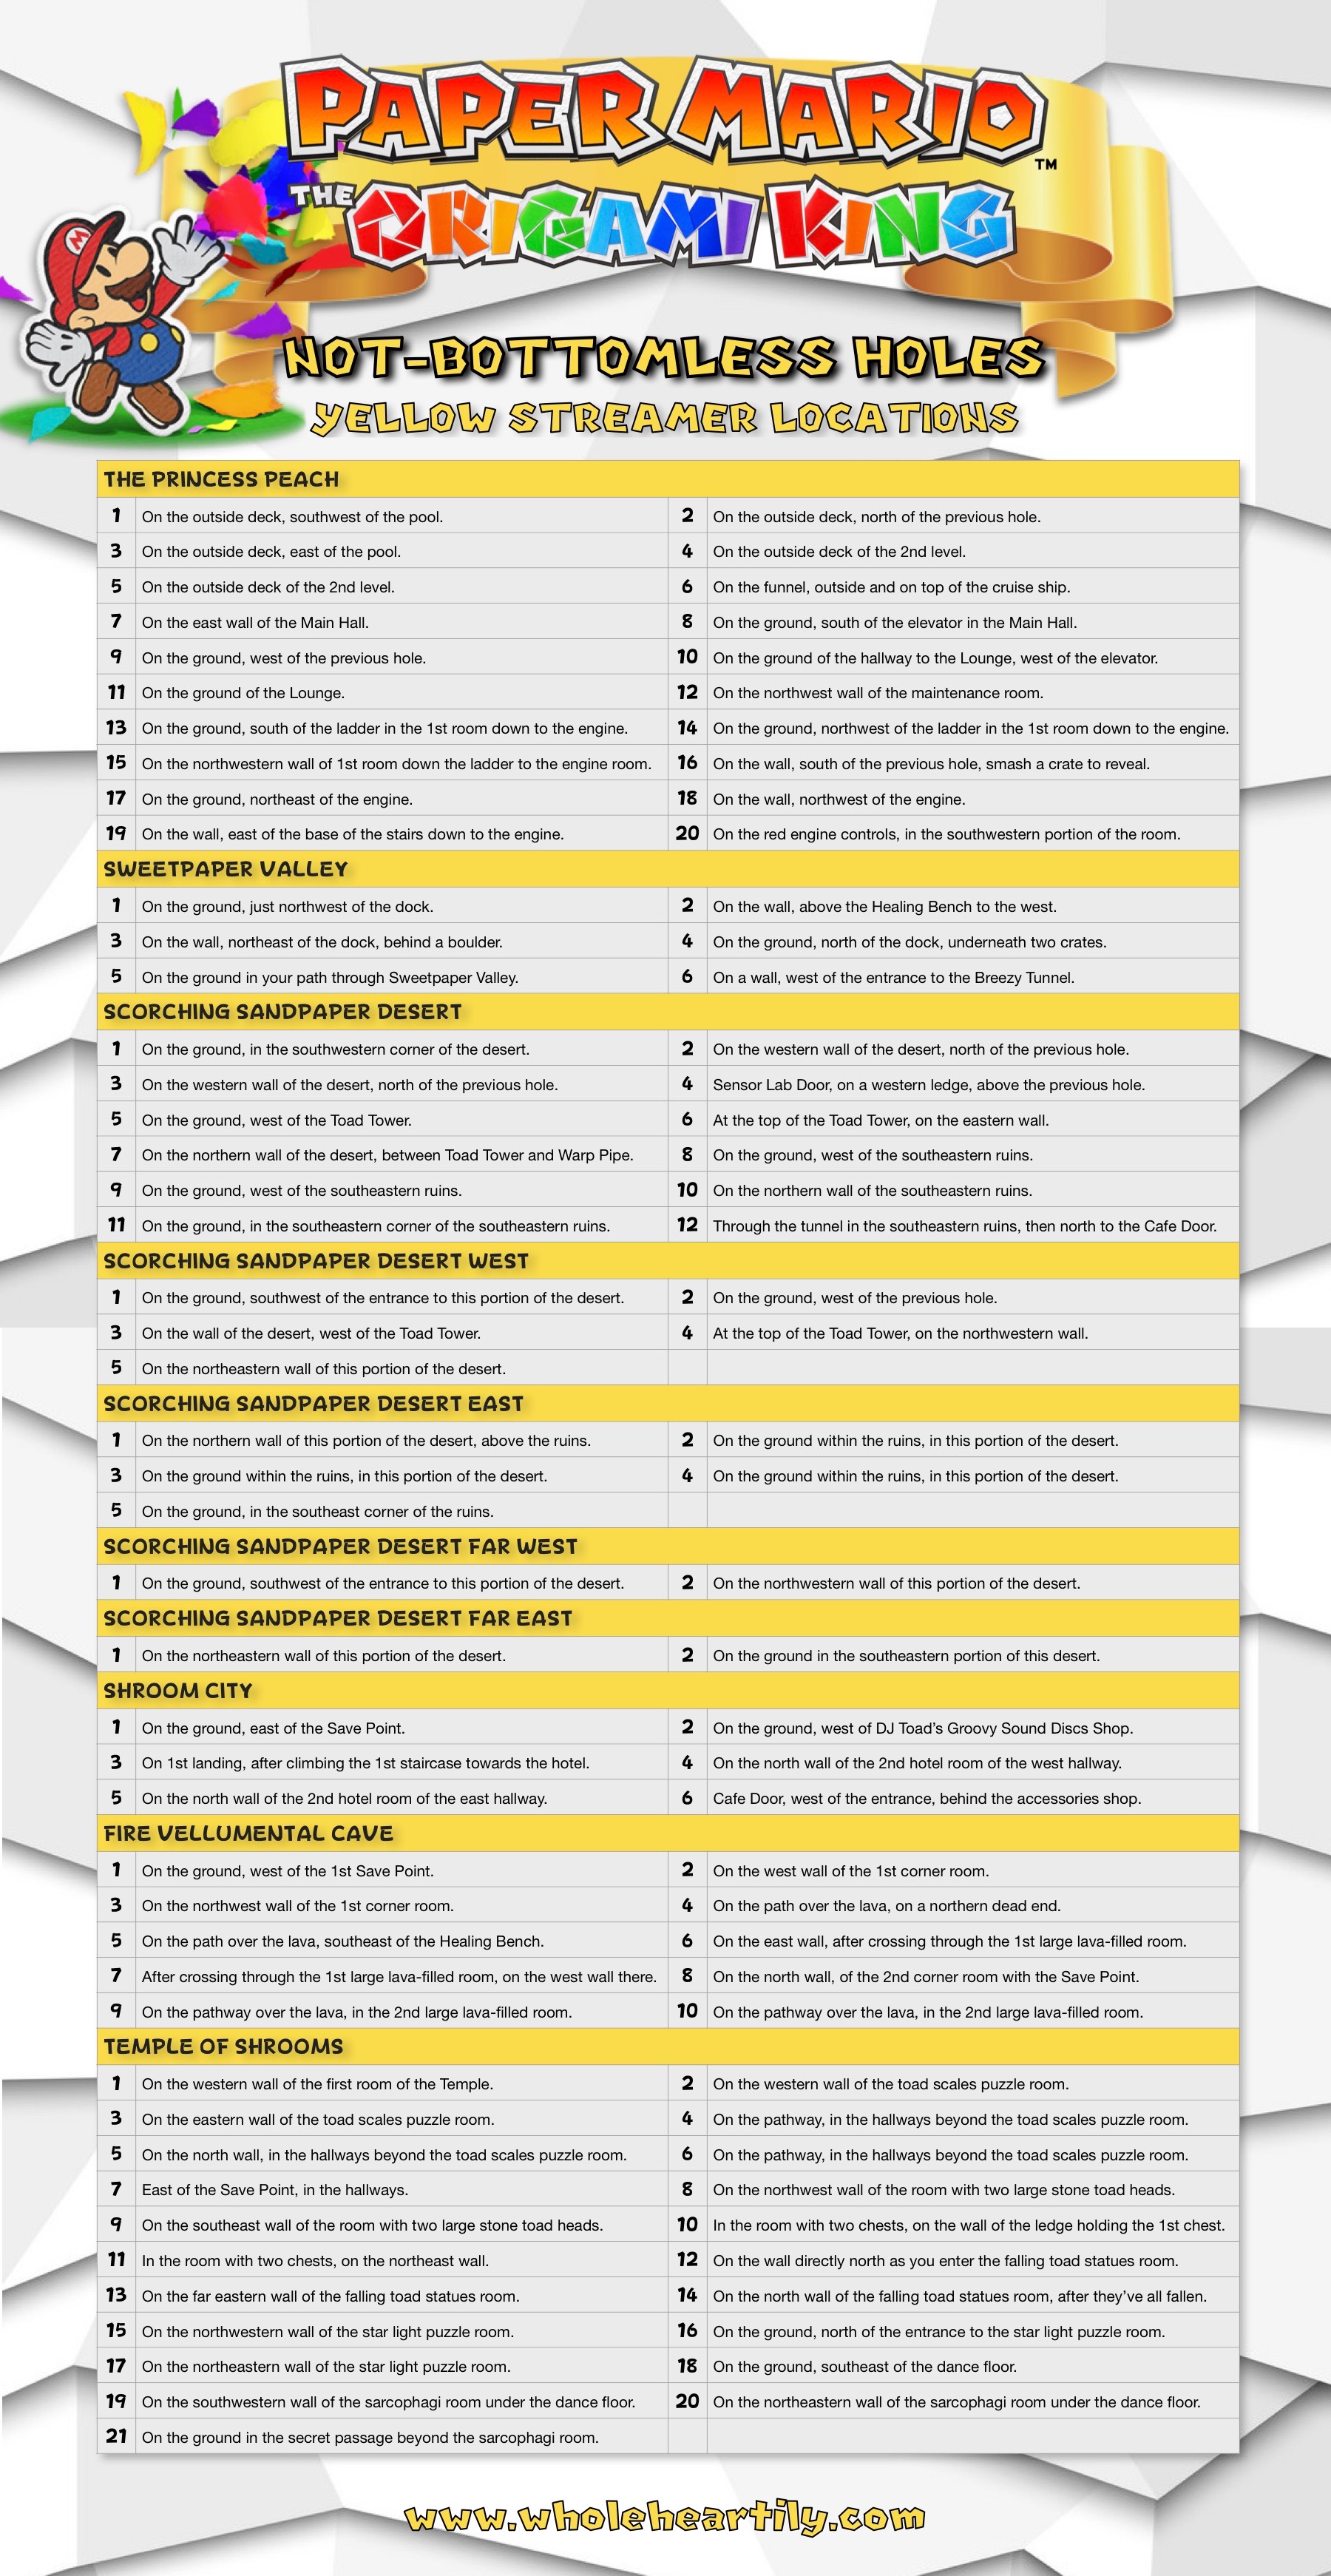
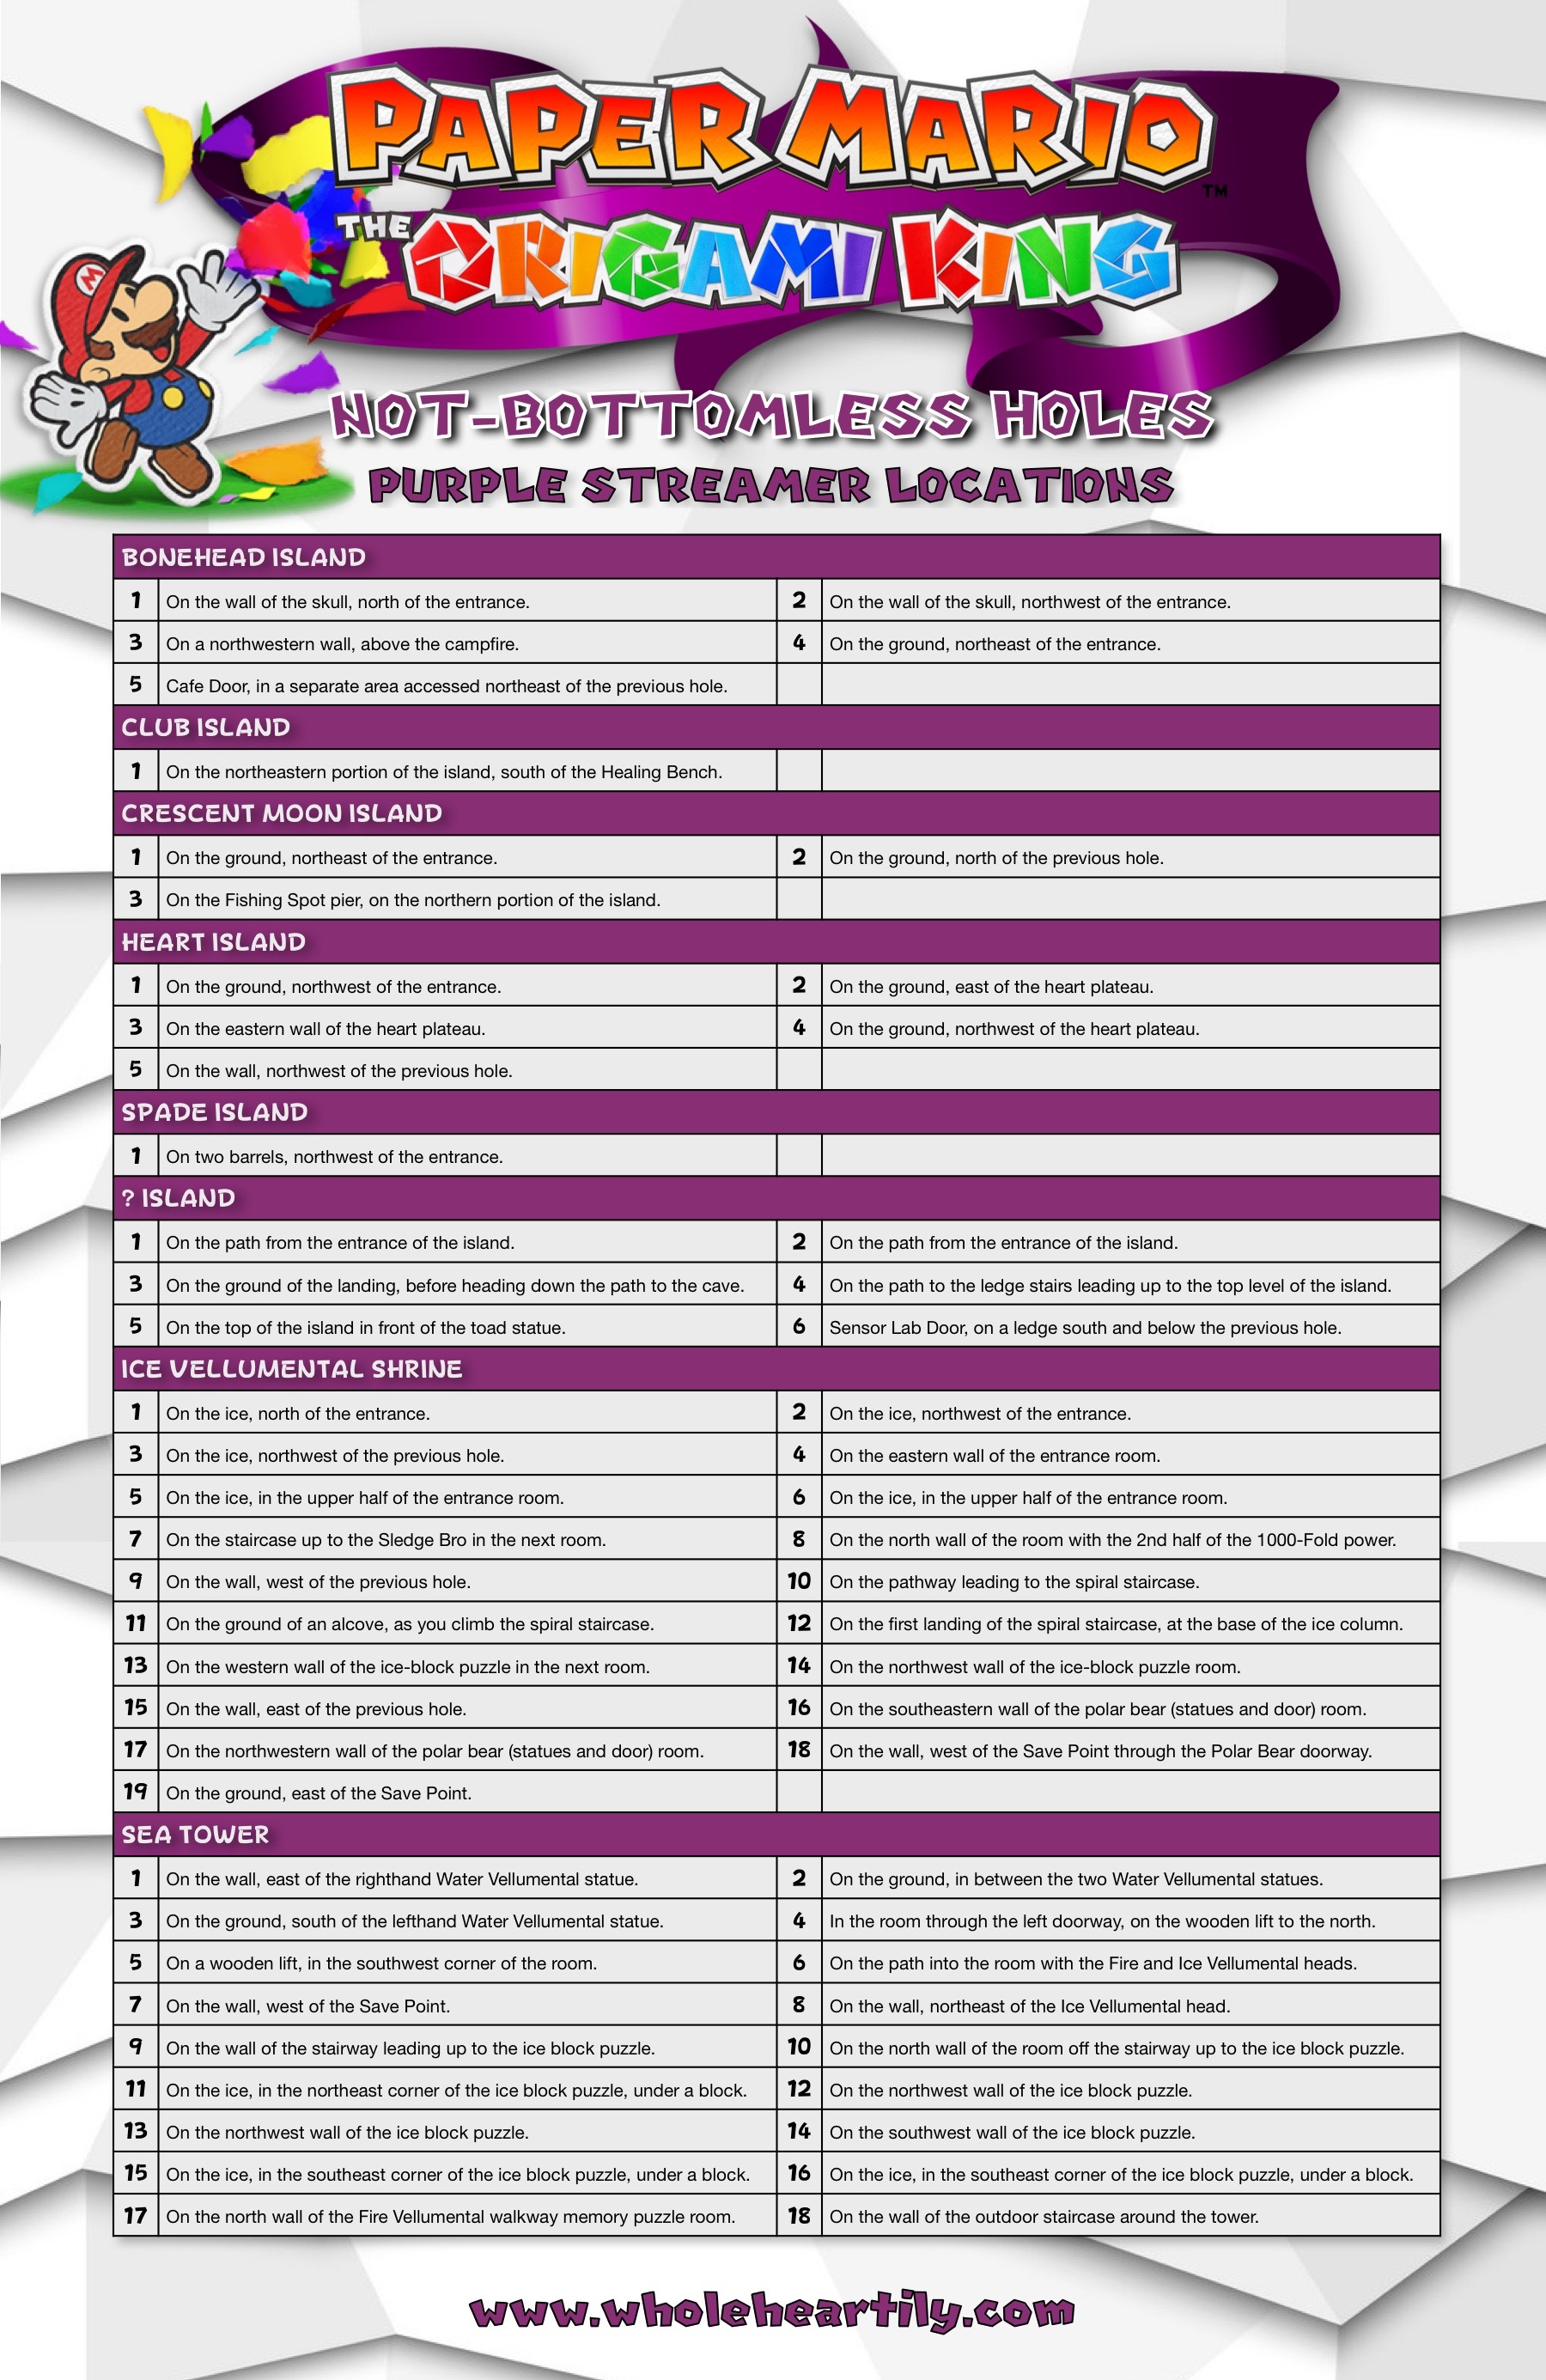
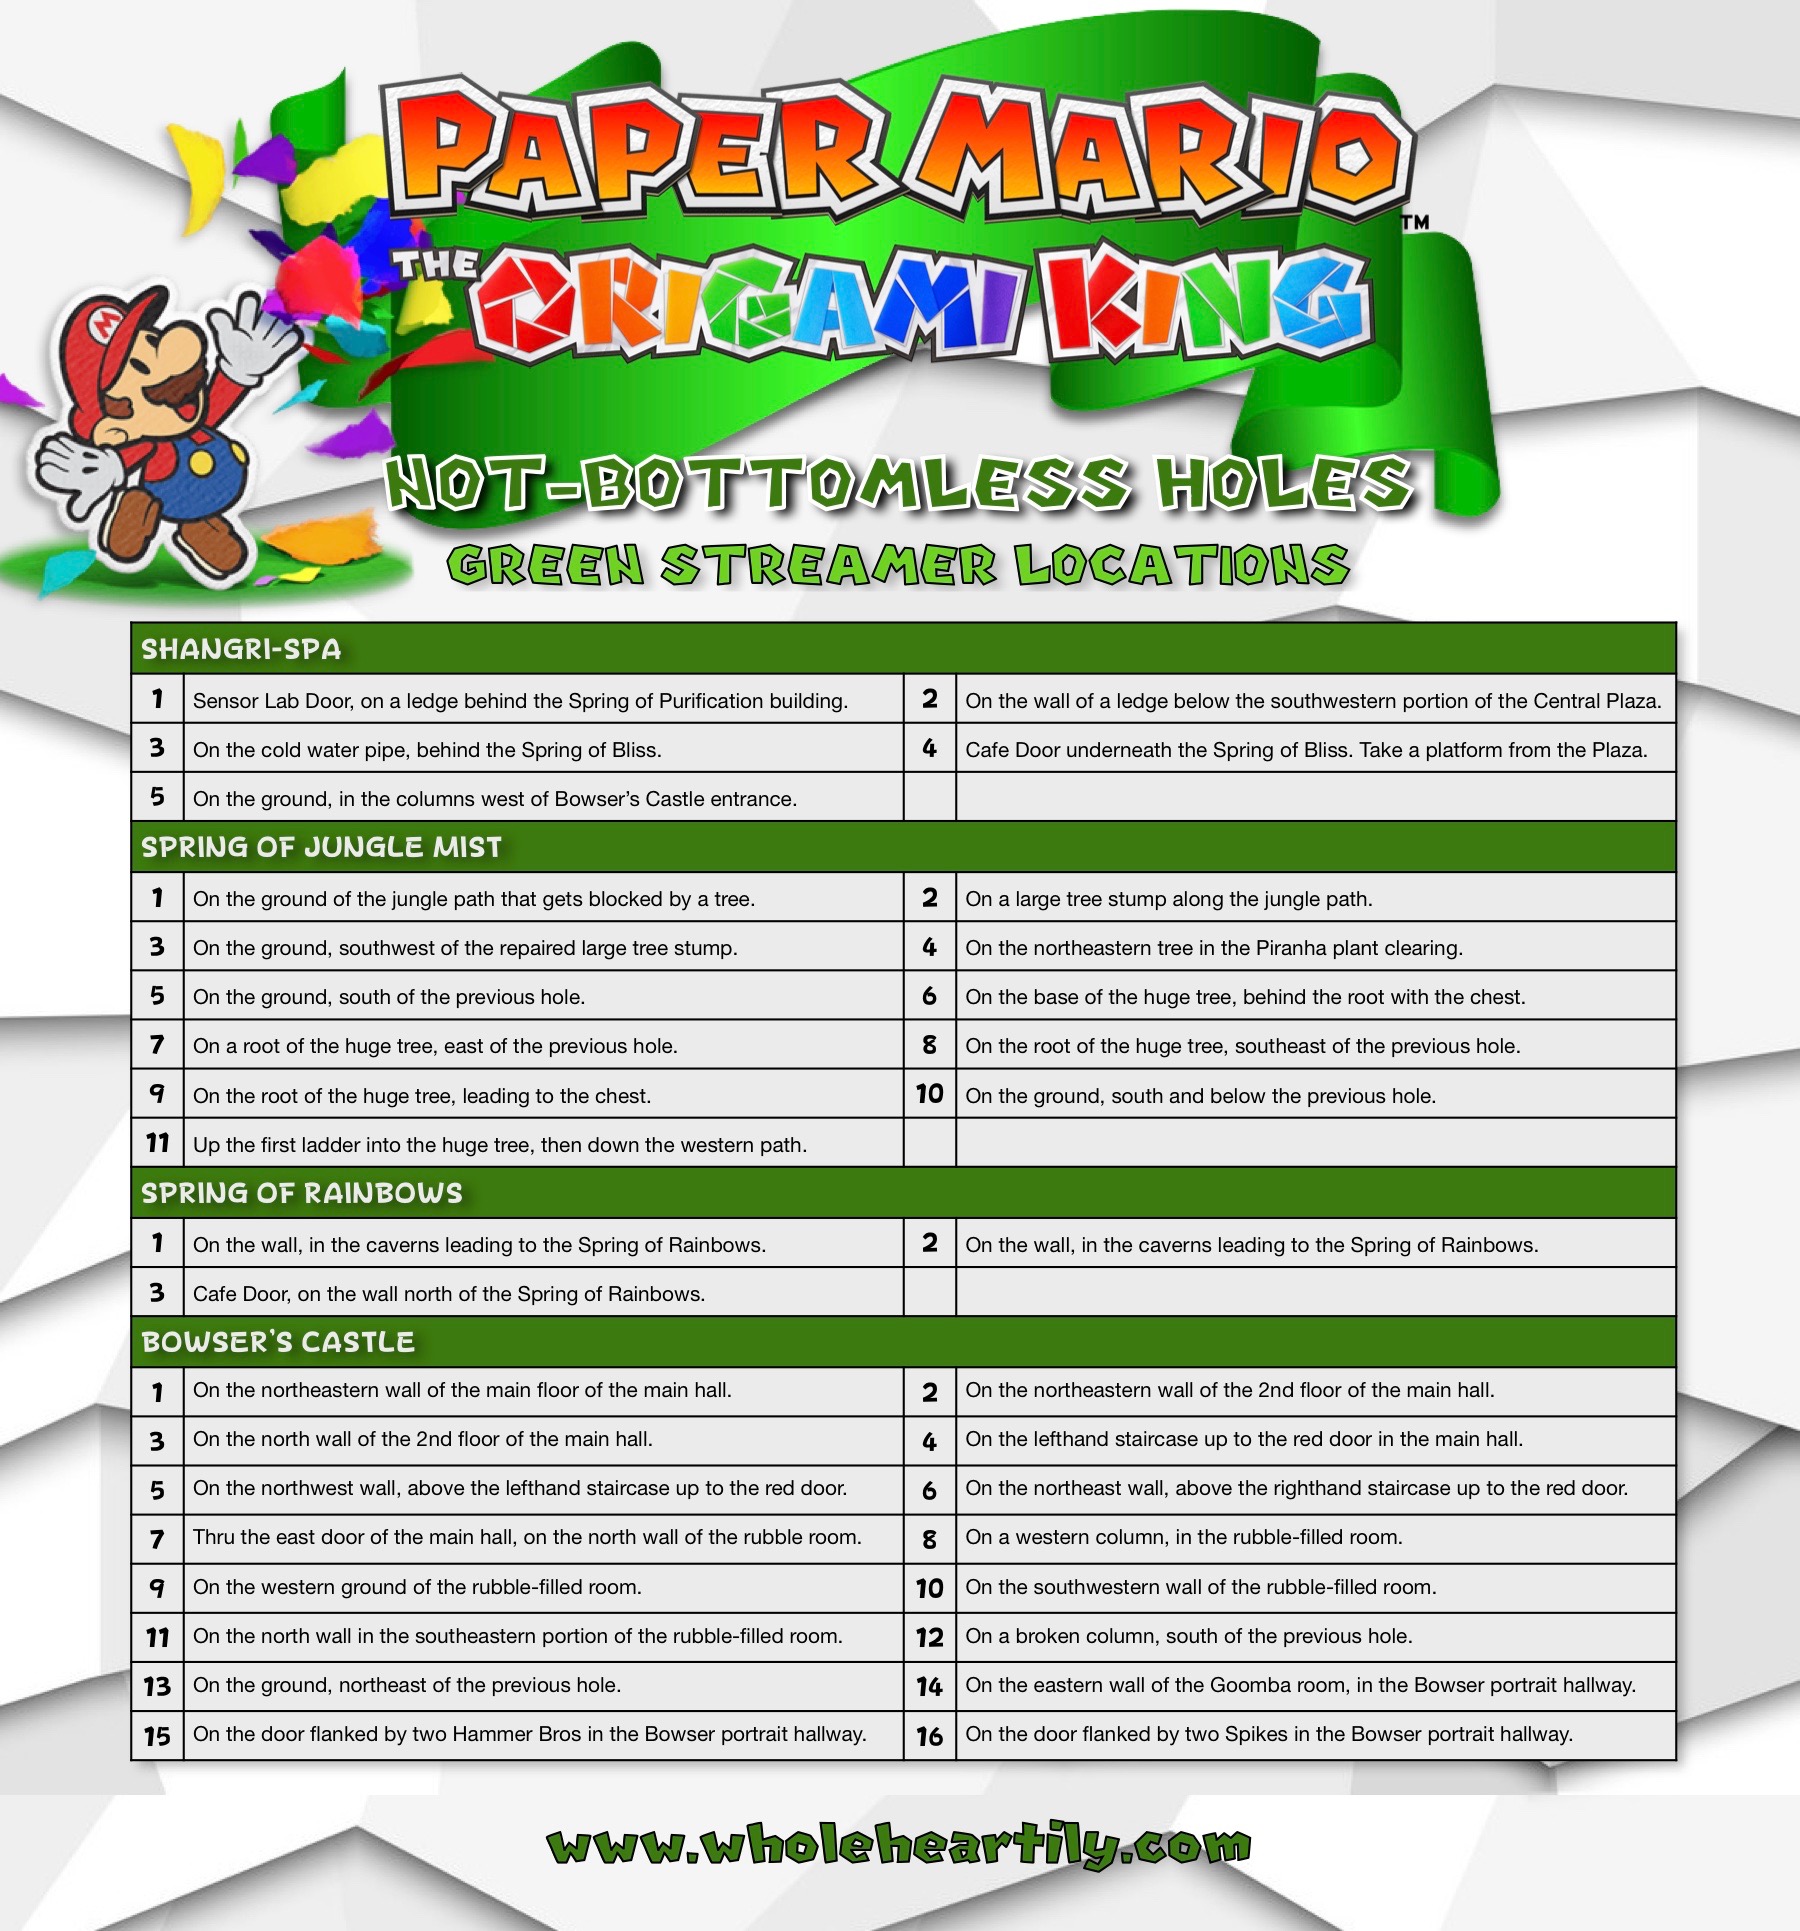
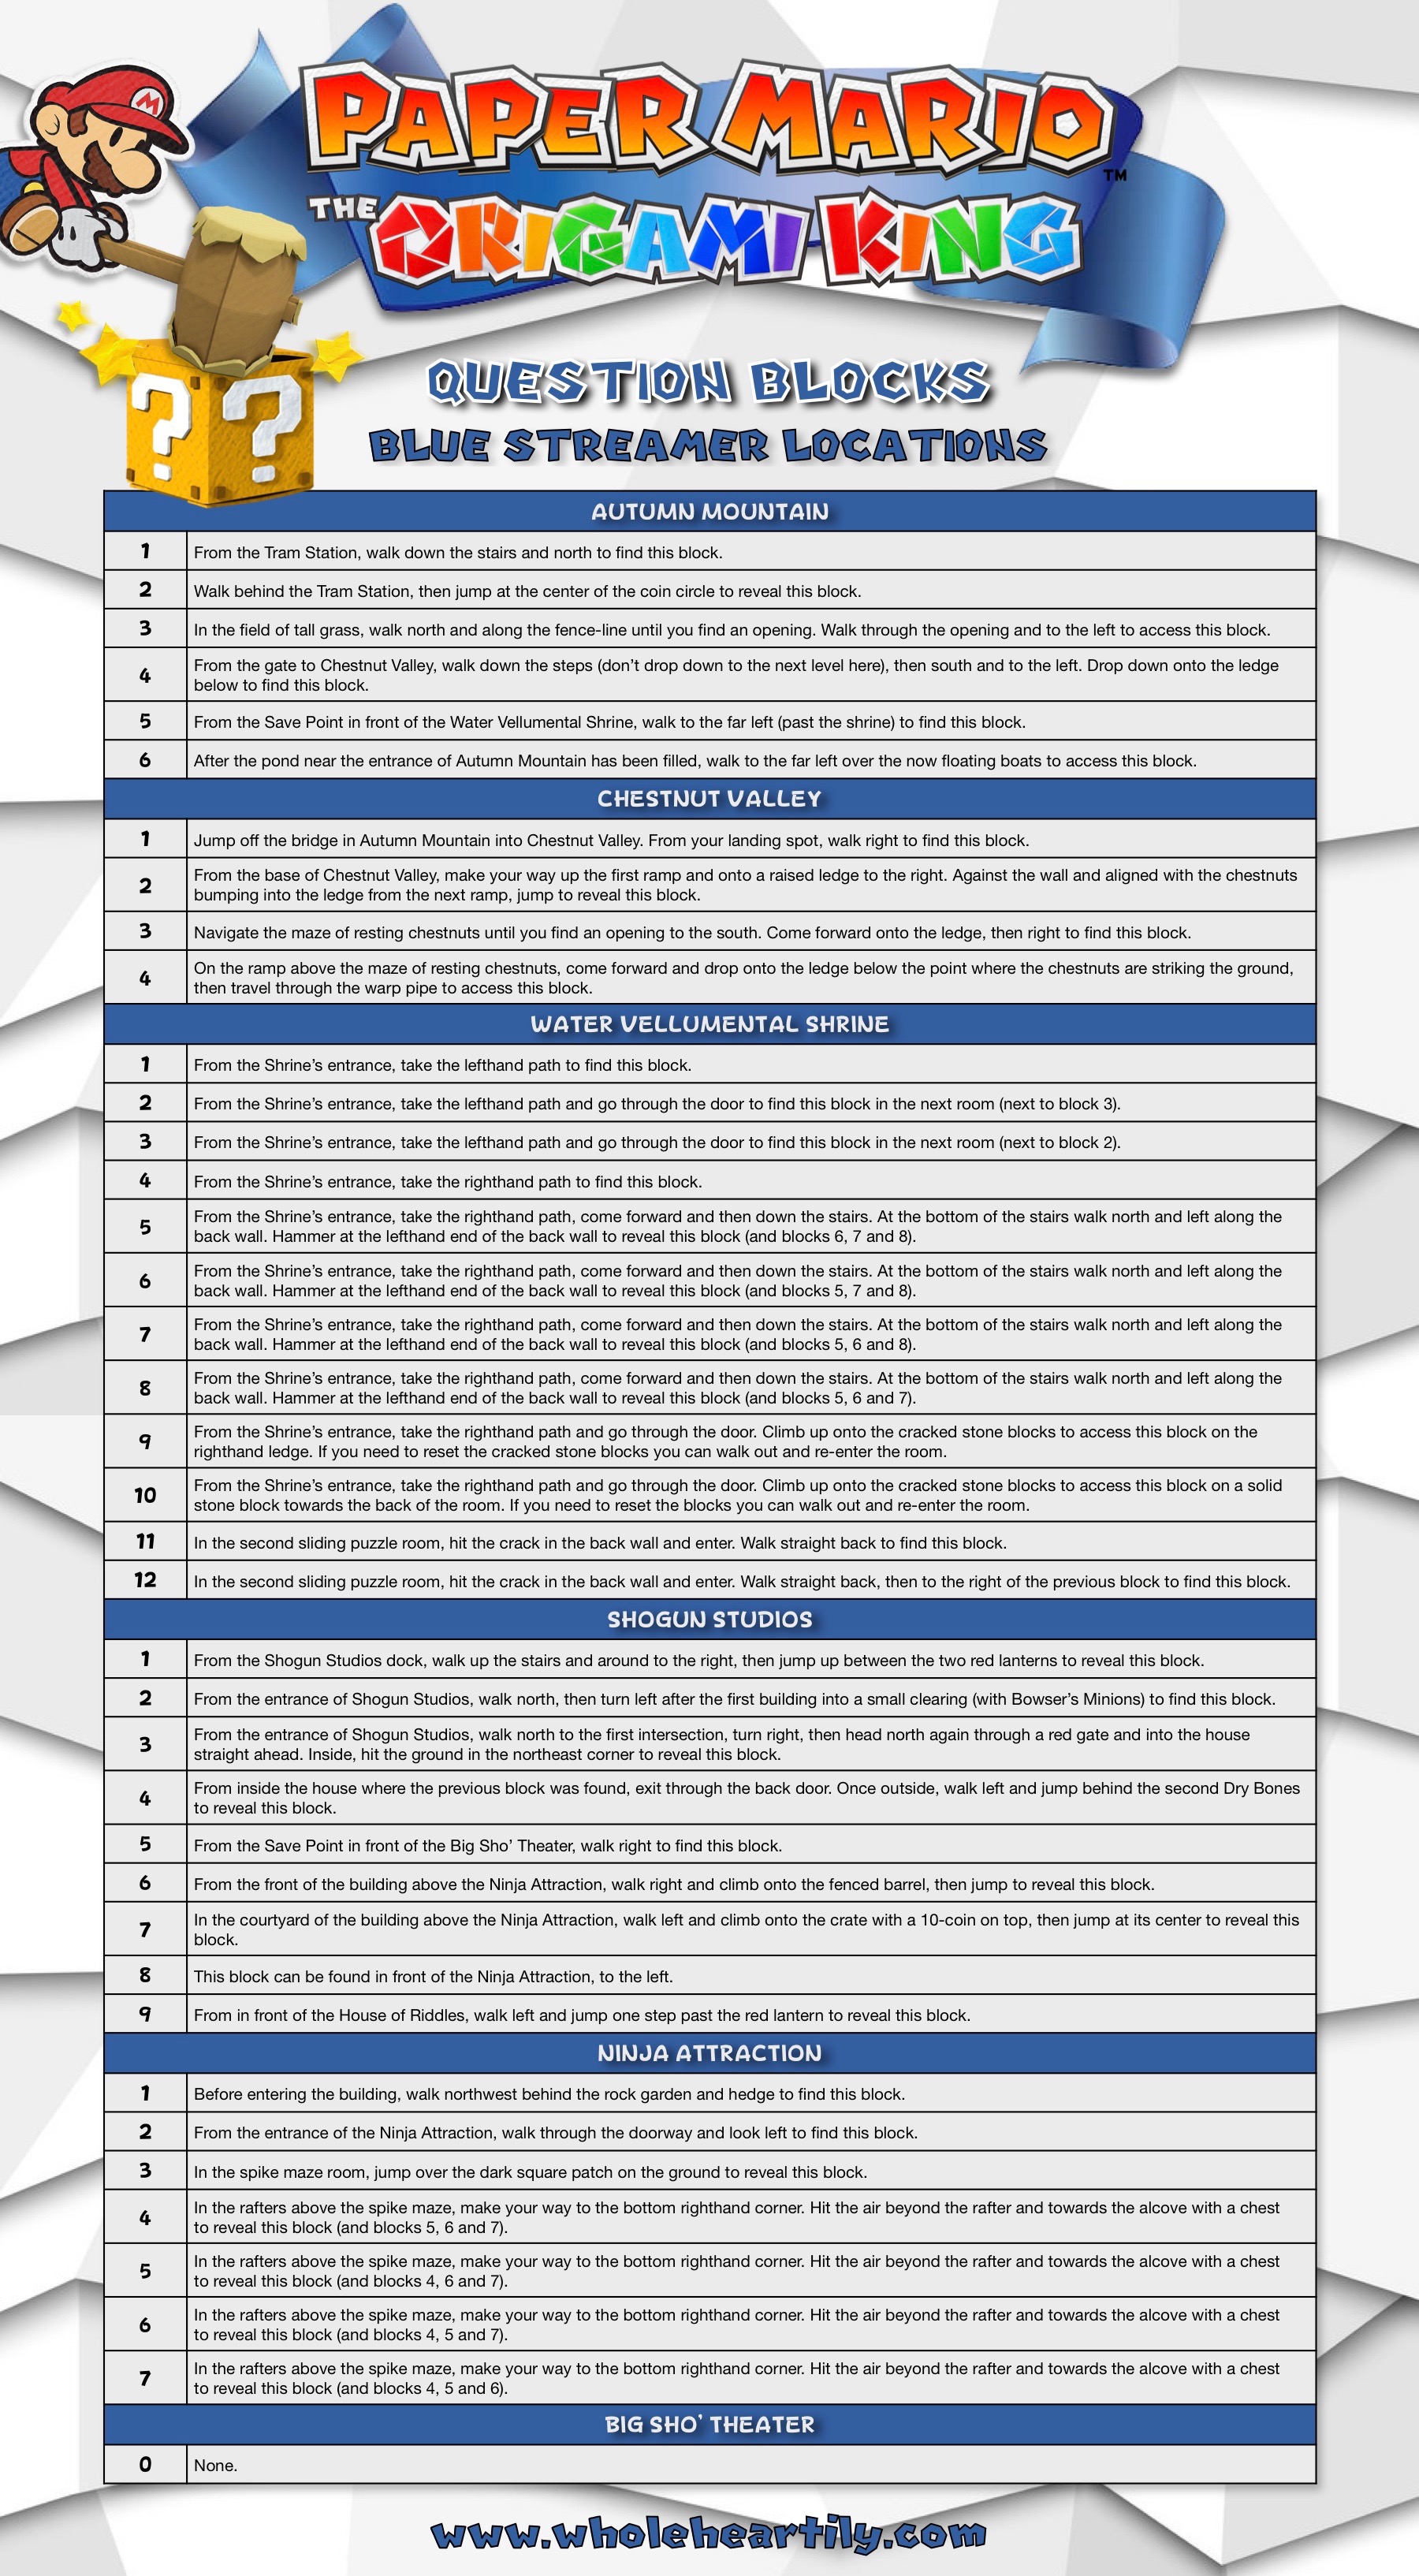
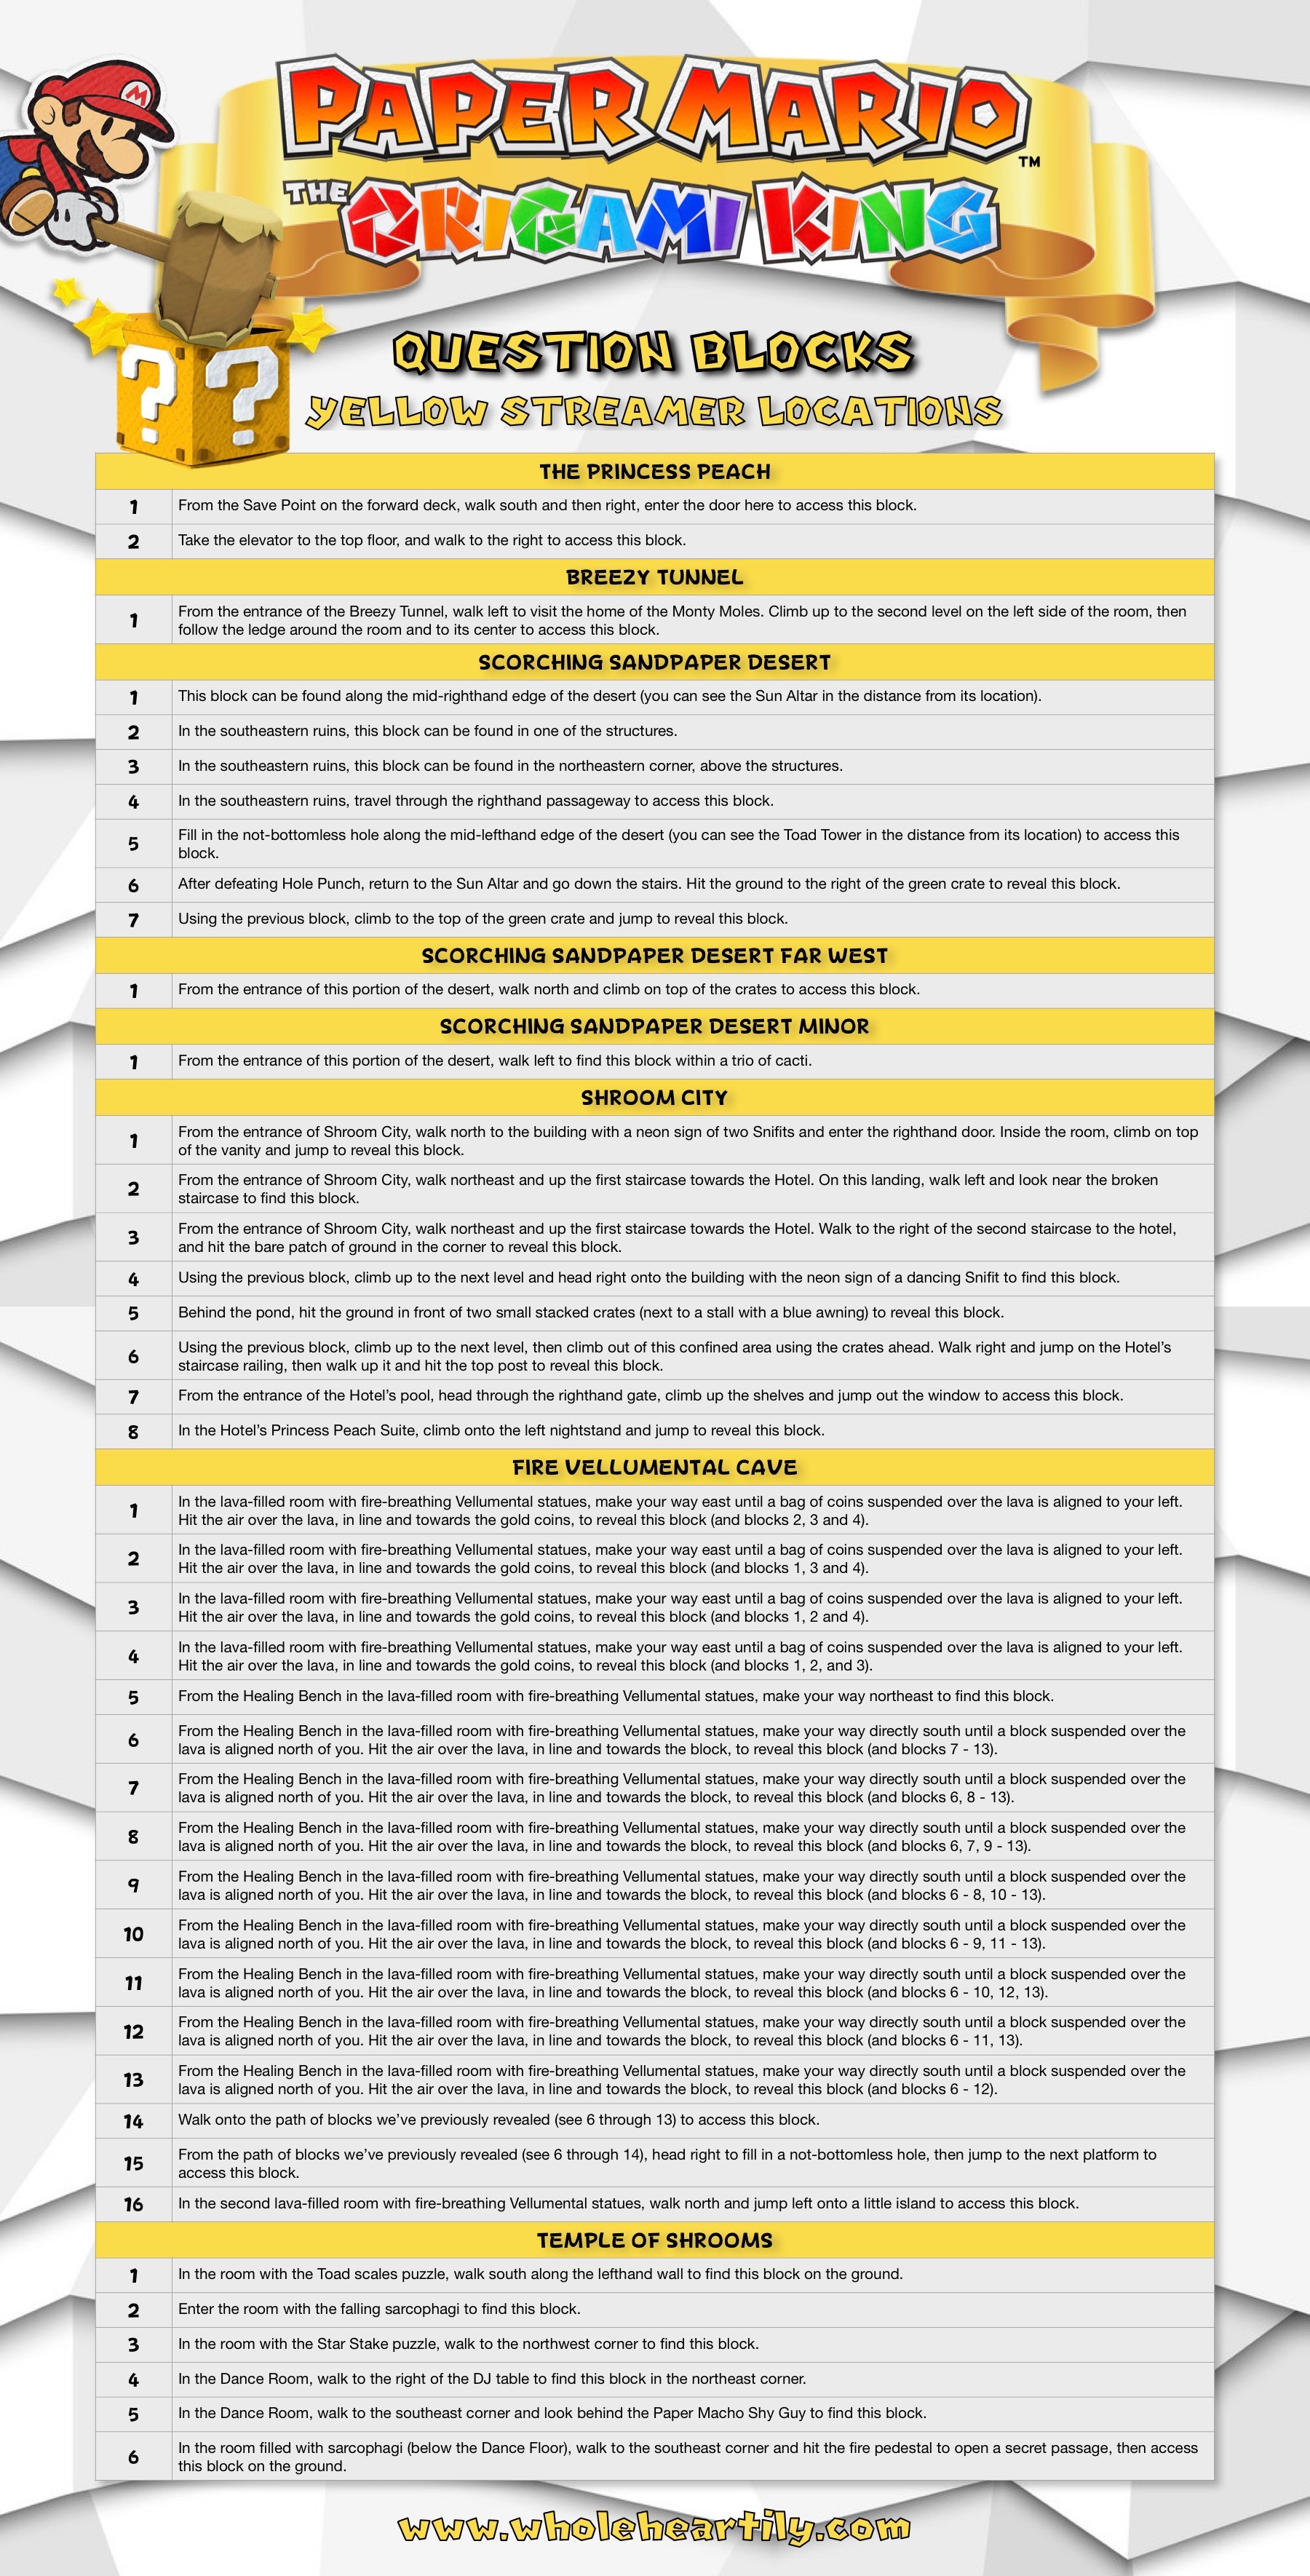
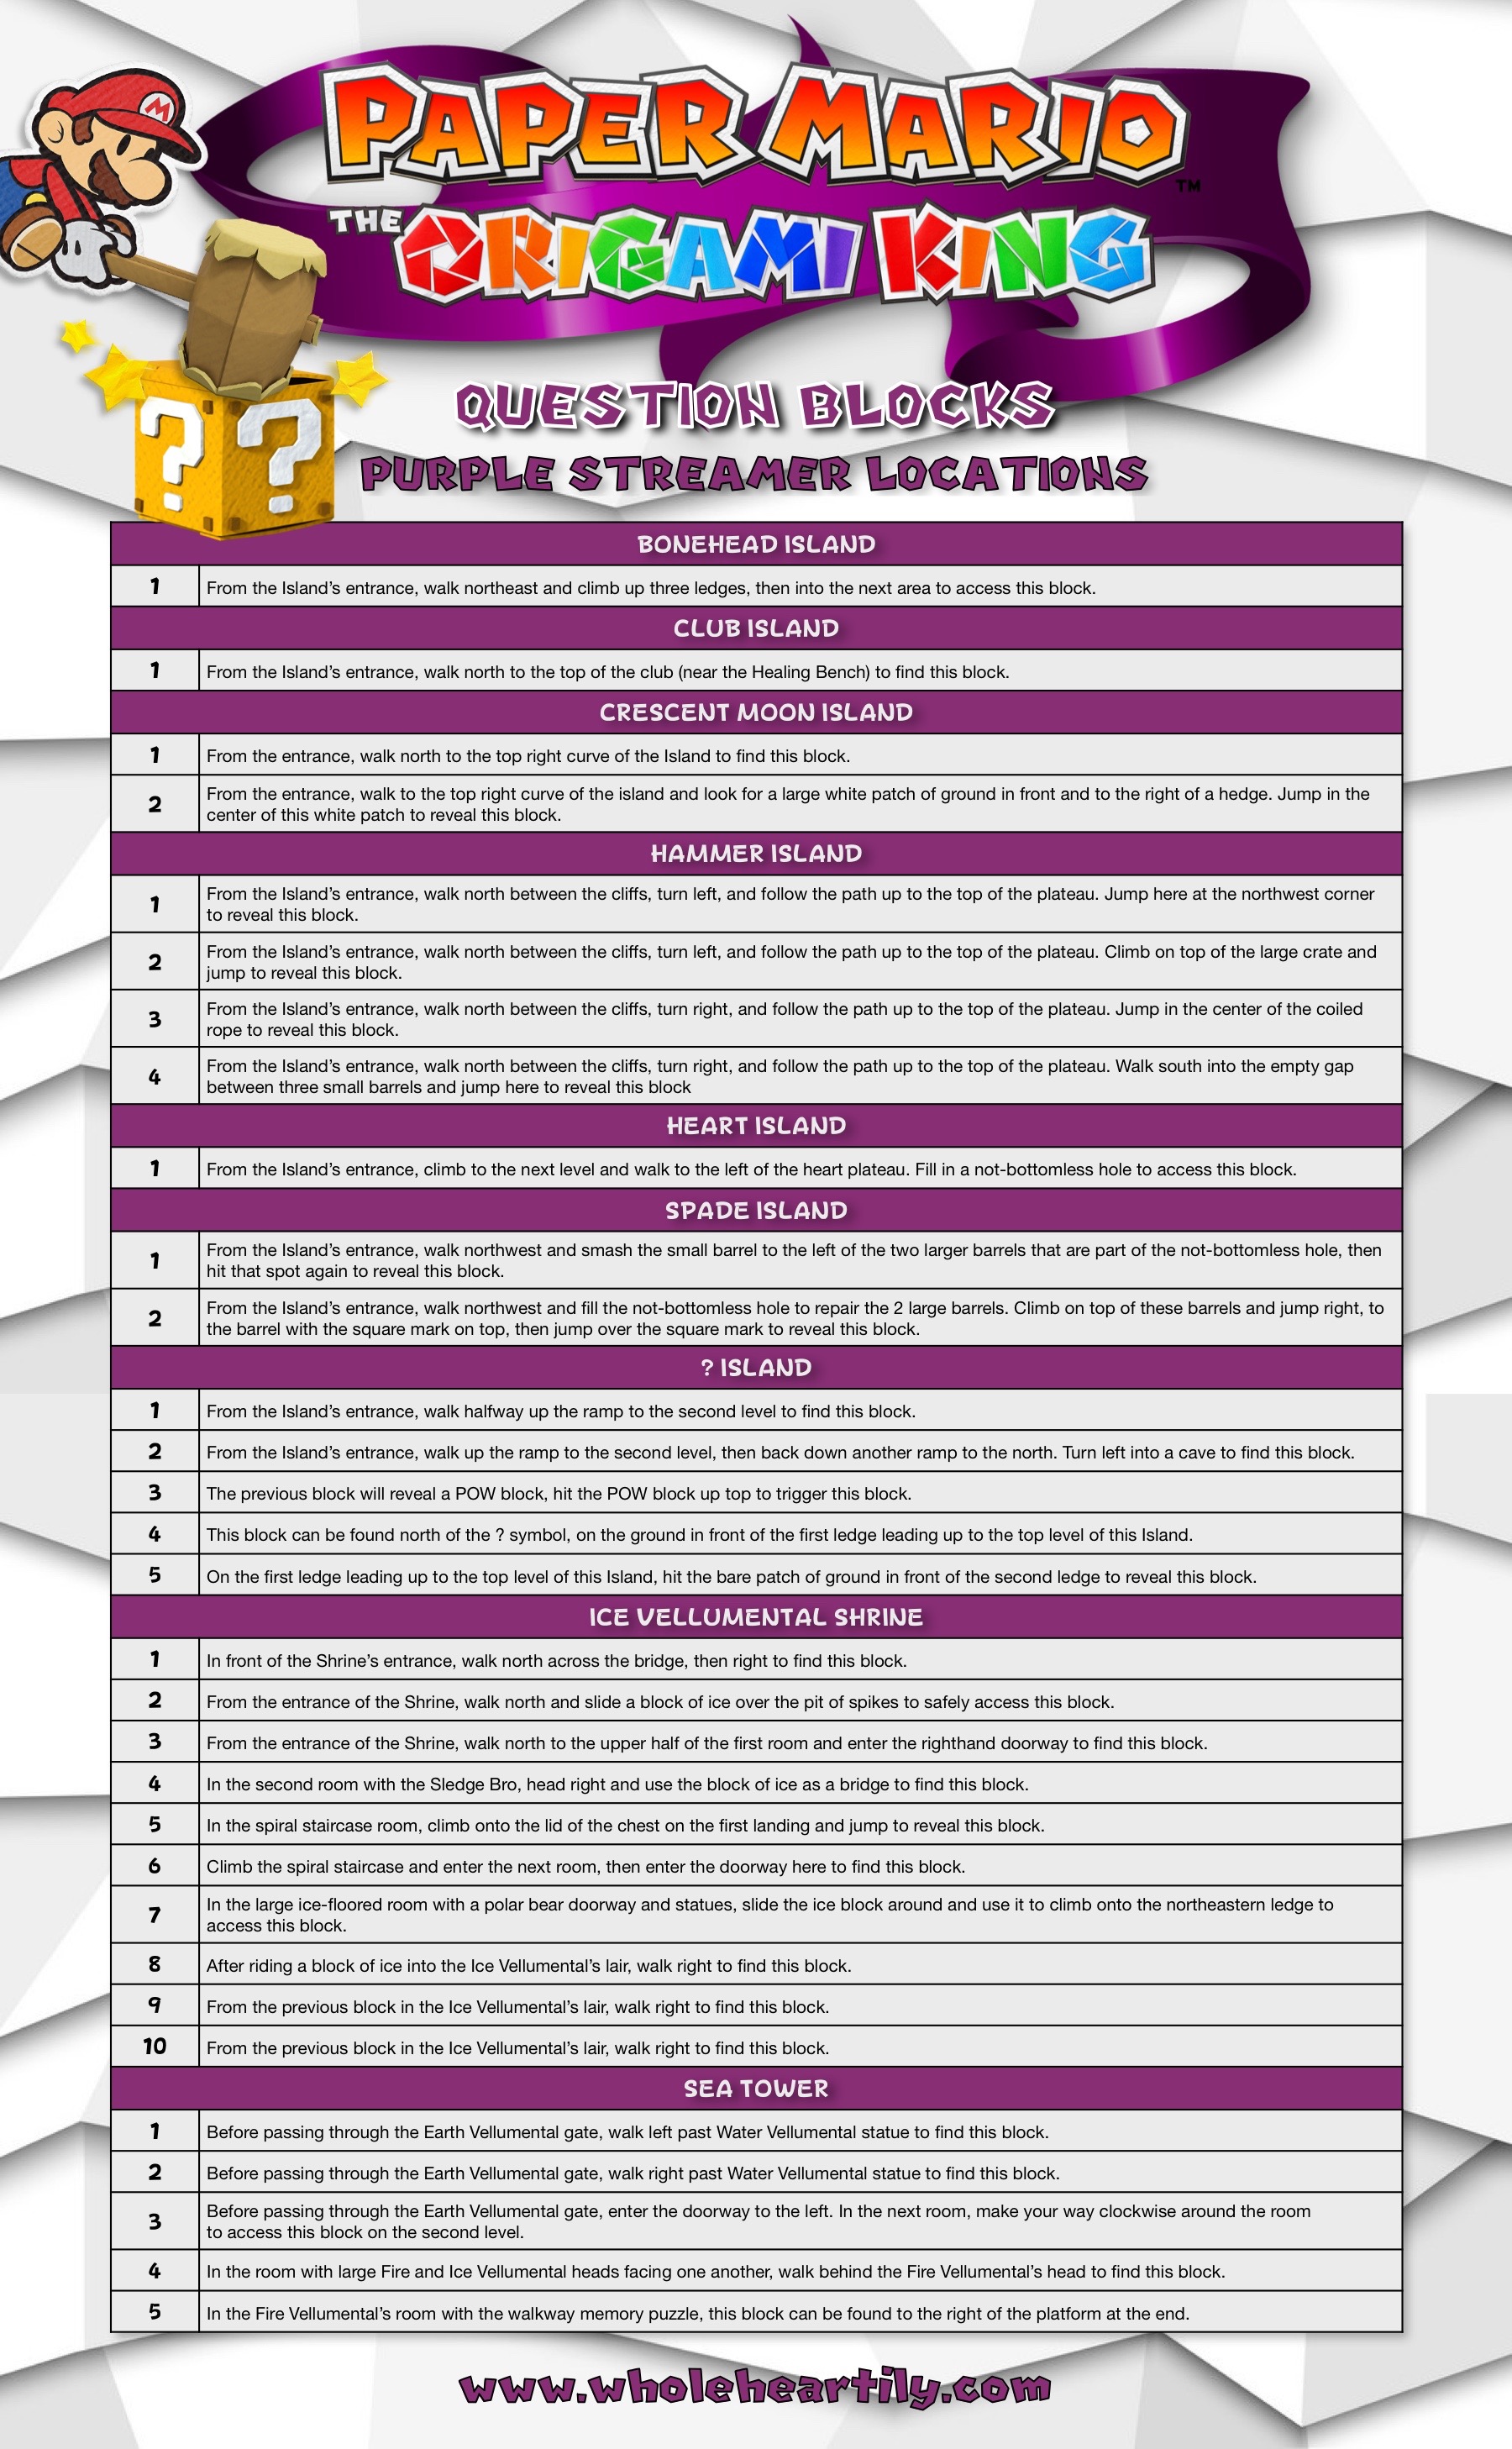
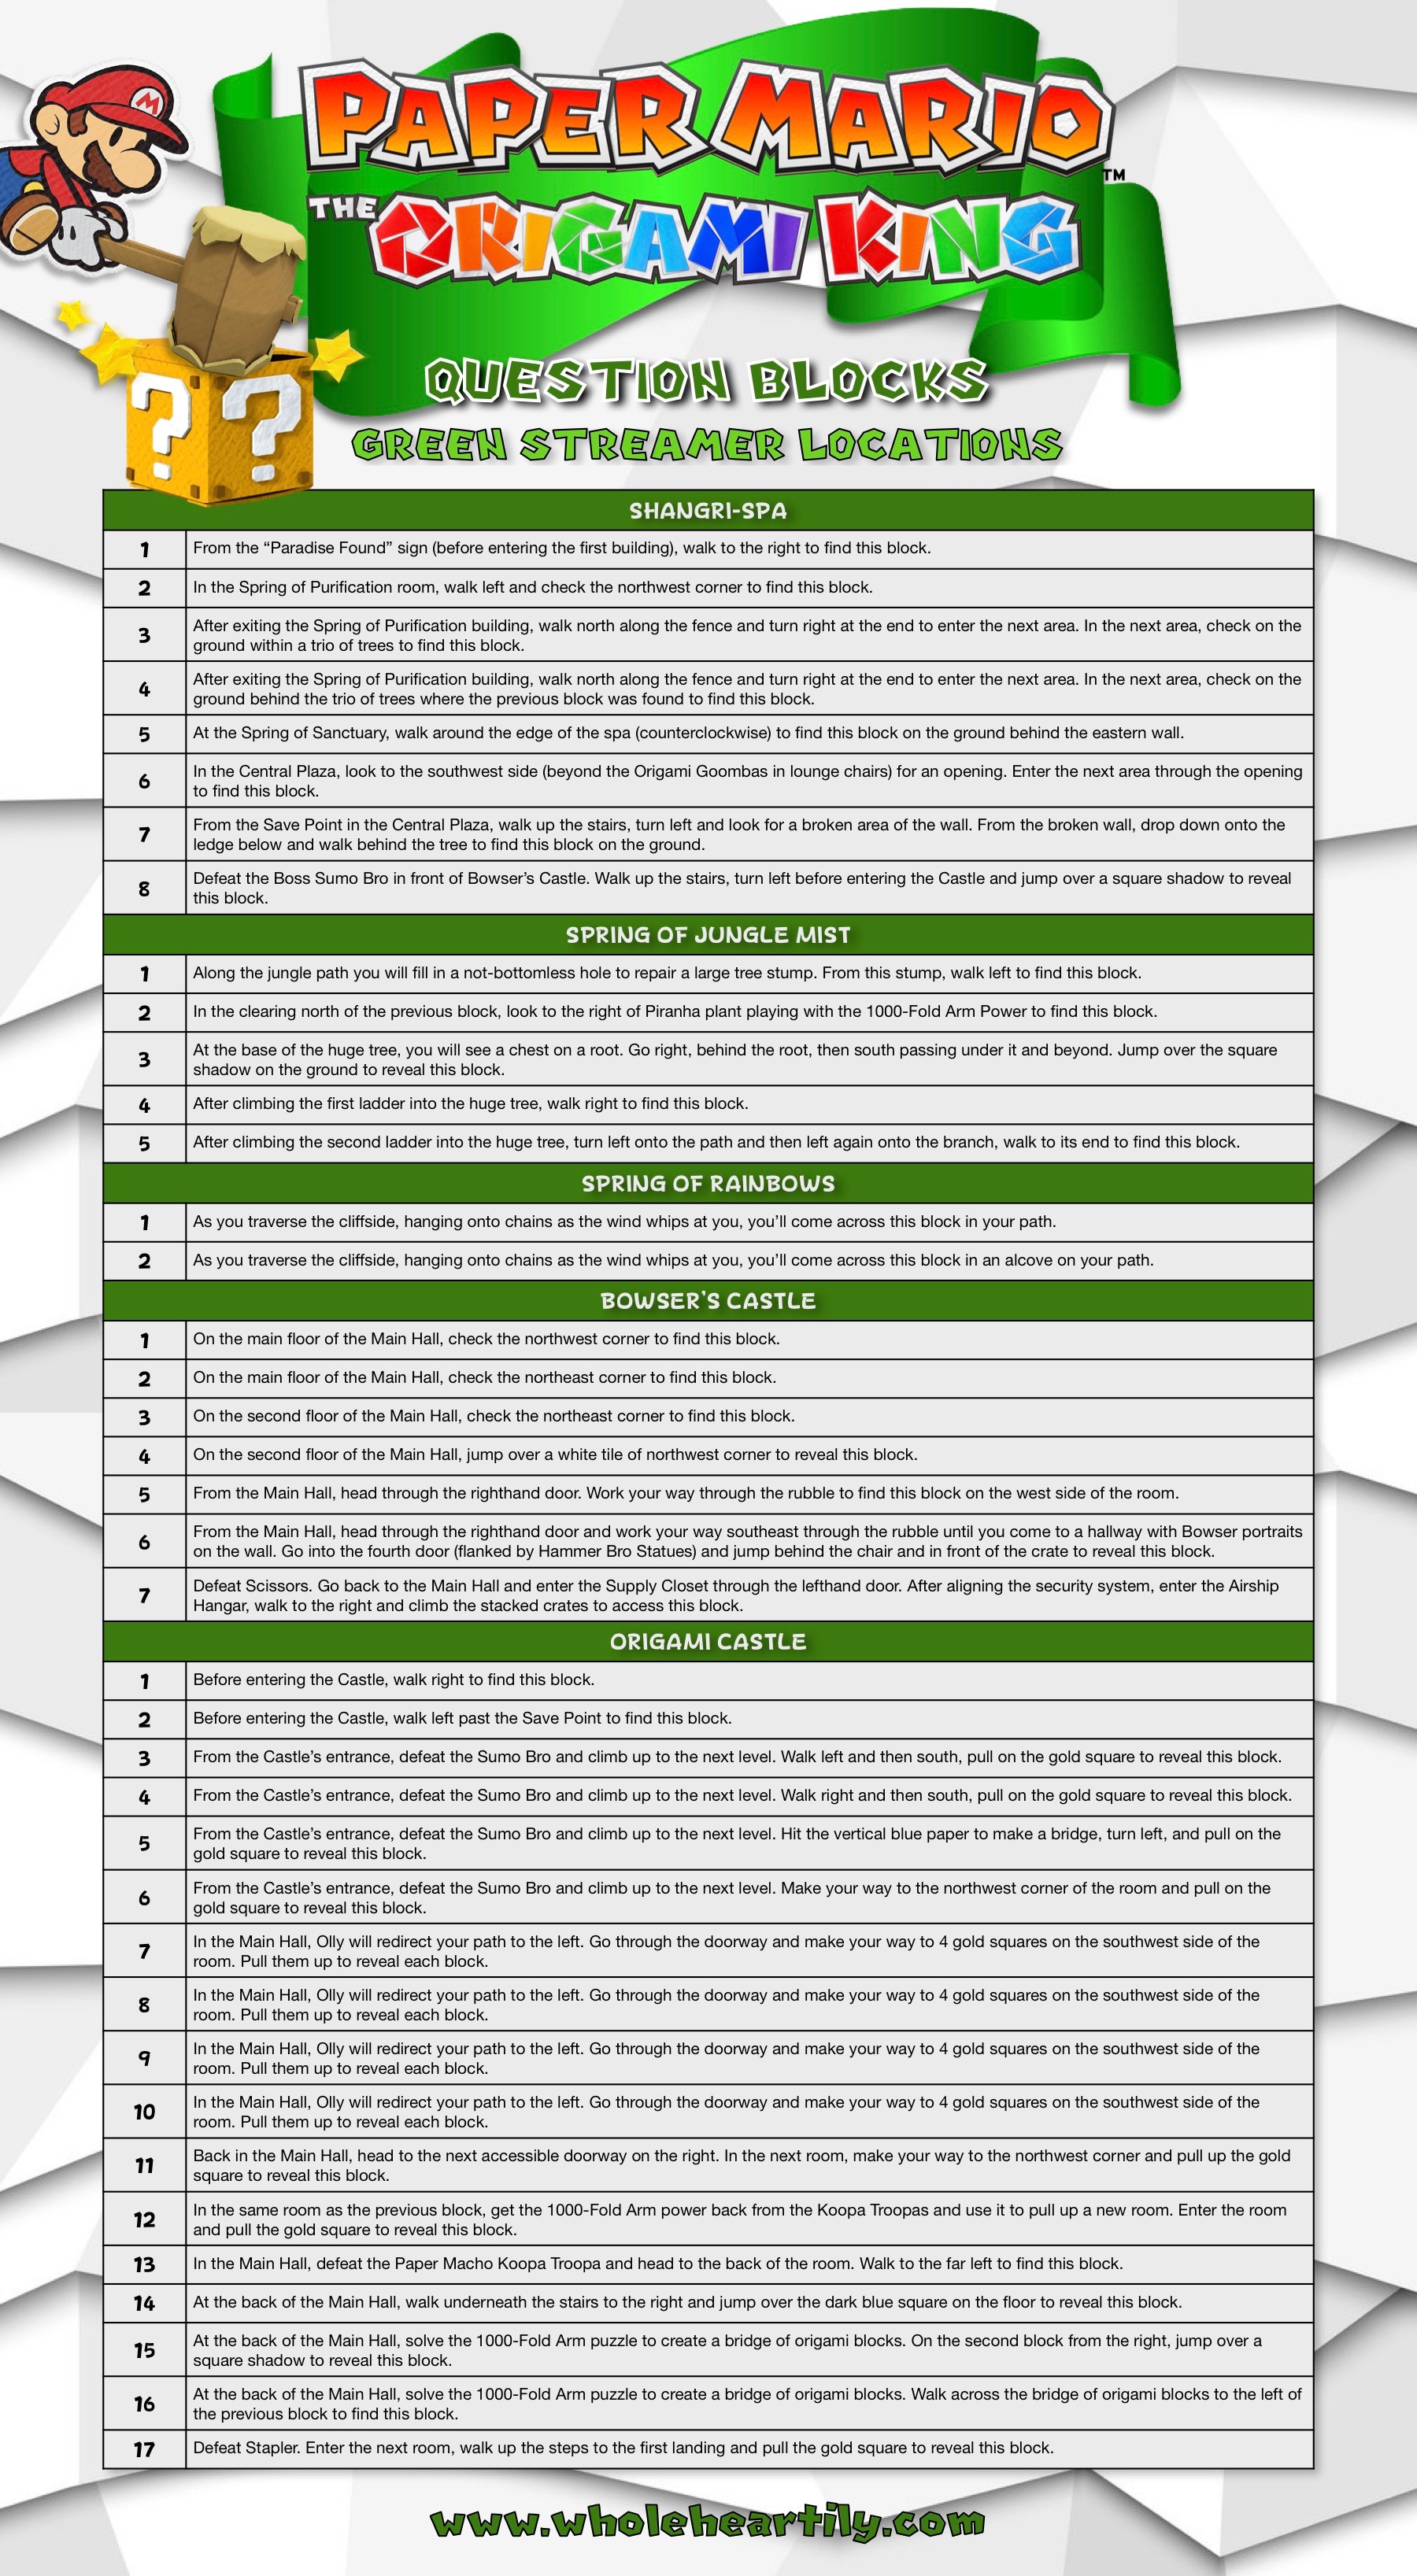
If you want to earn 100% completion and/or score the secret ending there’s a lot of work to do! In an effort to help, I’ve created guides to help you find all of the Question Blocks or ? Blocks.

These visual or infographic guides are separated by Streamer Color and then the areas within. The Question Blocks are in no particular order, though I did my best to list them in a progressive way as you move through an area. I numbered them to clearly show how many are in each area with a detailed description on where to find them.

Please let me know if you would like me to work on a guide for the other collectibles within Paper Mario: The Origami King or if there are any games you would like to see visual information or guides for in the future! I love helping people, discussing games and organizing information!

Paper Mario: The Origami King - Blue Streamer Question Blocks Guide
Paper Mario: The Origami King - Yellow Streamer Question Blocks Guide
Paper Mario: The Origami King - Purple Streamer Question Blocks Guide
Paper Mario: The Origami King - Green Streamer Question Blocks Guide

Let’s try Oak – Meditation and Breathing Application

Let's Try Meditation with The Free Oak - Meditation and Breathing ApplicationLet’s be real, this year has been rough; we’re all just trying to adjust and survive the best we can. Current events have really revealed that there are some pretty rude, self-entitled people out there and I for one am way too sensitive to people’s actions and emotions. I’ve found myself absorbing and/or responding to their vibes, which results in living day to day with too many negative thoughts and feelings.

In an effort to bring the tranquility and positivity back to my life, I have begun meditating and it feels good! If you’re feeling anything but tranquil, I highly recommend taking some time to meditate each day or, if every day isn’t for you, less frequently yet consistently; you will feel better!

Interested, but not sure where to start?

I am using the Oak – Meditation and Breathing application. It is simple and straightforward, with enough content to get you started without becoming overwhelming.  It is also the only meditation app. I’ve found that is truly free. Other applications, like Calm and Headspace (both fantastic), are free to download and offer some free content and/or free trials, but if you want more you’ll have to pay for a monthly or yearly premium membership. After Oak, Insight Timer is probably the next application that has the most free classes, but does have a premium membership if you want to access certain practices. We’ll focus on Insight Timer at a later date.

So let’s take a look at Oak!

When opening the app., you are presented with three categories: Meditation, Breathing and Sleeping. Each category has two or three practice options.

Let's Try Meditation with The Free Oak - Meditation and Breathing Application

Once you’ve selected a category and practice, you can customize a few more details depending on the practice. For example, if you want to practice Mindful Meditation, you can select the duration, instructor’s voice, background noise and a warmup duration.

Let's Try Meditation with The Free Oak - Meditation and Breathing Application Let's Try Meditation with The Free Oak - Meditation and Breathing Application

The breathing practices do not give you customization options, but they will give you details about how long you will be inhaling, holding and exhaling.

Let's Try Meditation with The Free Oak - Meditation and Breathing Application

If you’re looking for something deeper, there is a Courses tab which (so far) offers one course on Mantra Meditation. You will be prompted to “Buy” the course for $0.00. I’ve “purchased” it (yes it is free) and I am very pleased with the quality and length. I hope there will be more free courses in the future.

Let's Try Meditation with The Free Oak - Meditation and Breathing Application Let's Try Meditation with The Free Oak - Meditation and Breathing Application

I will be testing out other options for meditation and let you know what I discover!

How do you meditate? Do you use an application, or something else? If you do use an application, what is your favorite and why? I’d love to know!

Paper Mario: The Origami King – Collectible Treasure Guides

Paper Mario: The Origami King - Red Streamer Treasure Guide

If there’s one thing I do when I play a game (besides trying to relax and enjoy myself), it’s look up information. I get curious or stuck, and I find myself turning to the internet for answers. There are a lot of good guides out there that are super helpful, but what I don’t see are an abundance of simple and clean visual guides that lay out all the information in one place.

I’ve finished playing Paper Mario: The Origami King and I loved it! All of the characters are so charming (including those previously considered villains like Kamek) and no one more so than newcomer Olivia. Olivia is such a positive, charming, lovable character in all her naivety…and just like that I’ve realized I have a real soft spot for characters that view the world with wonder.

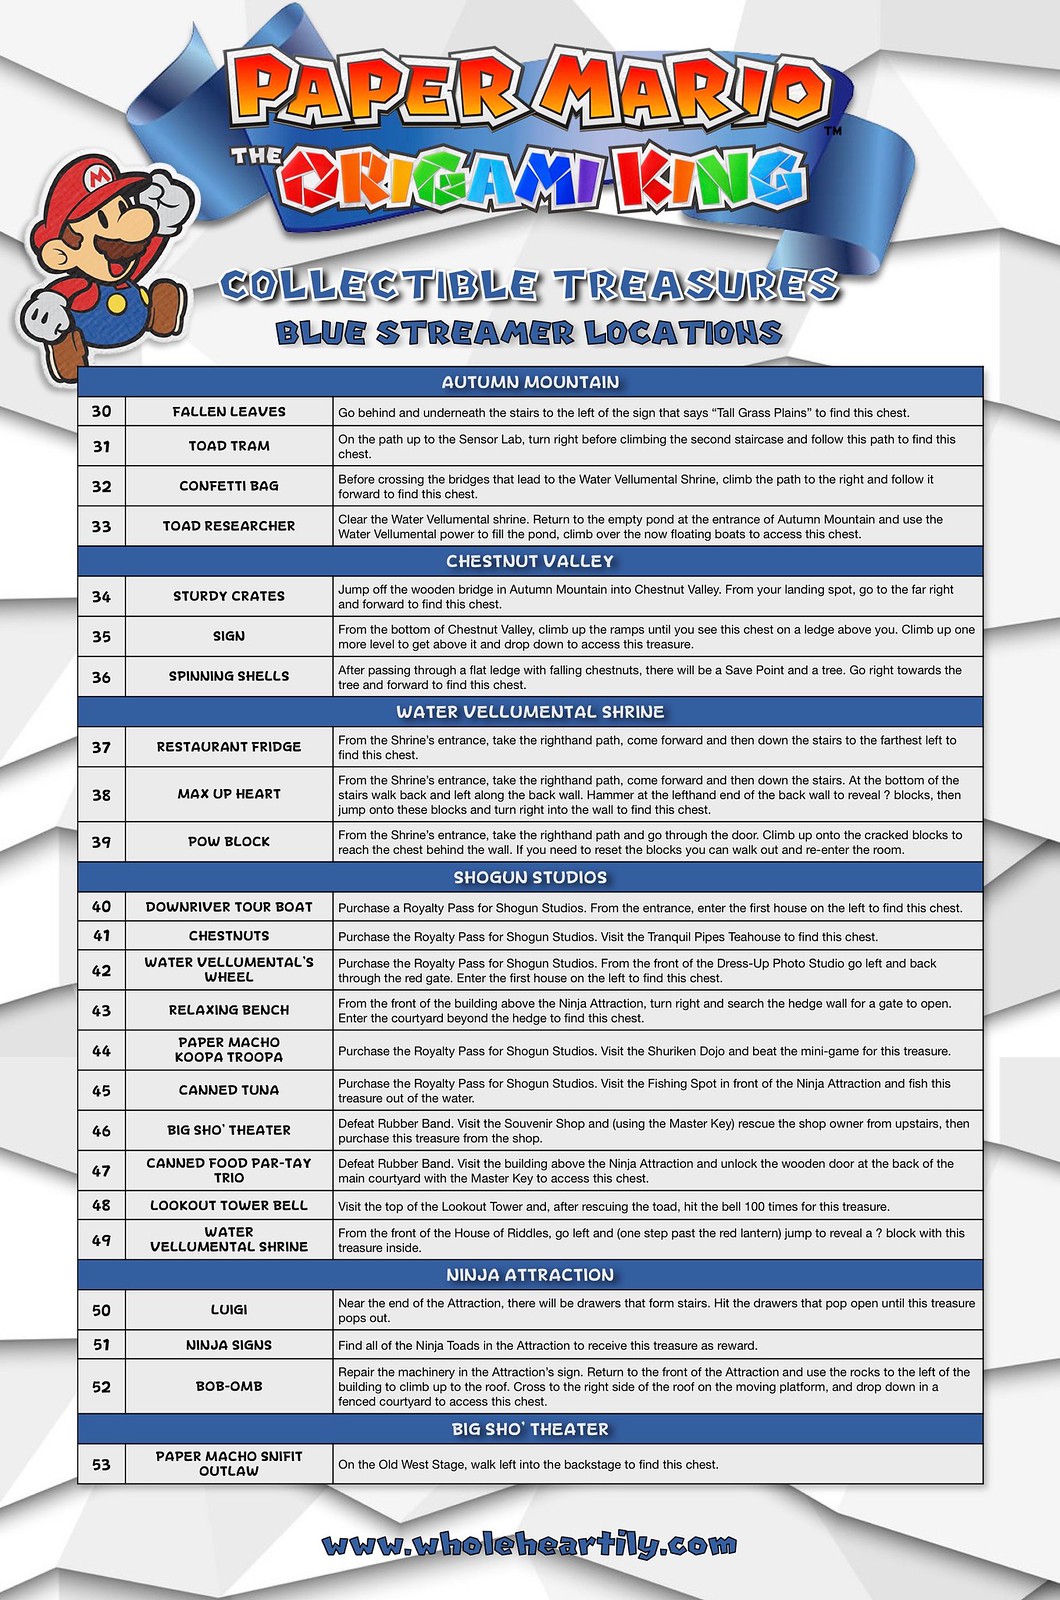
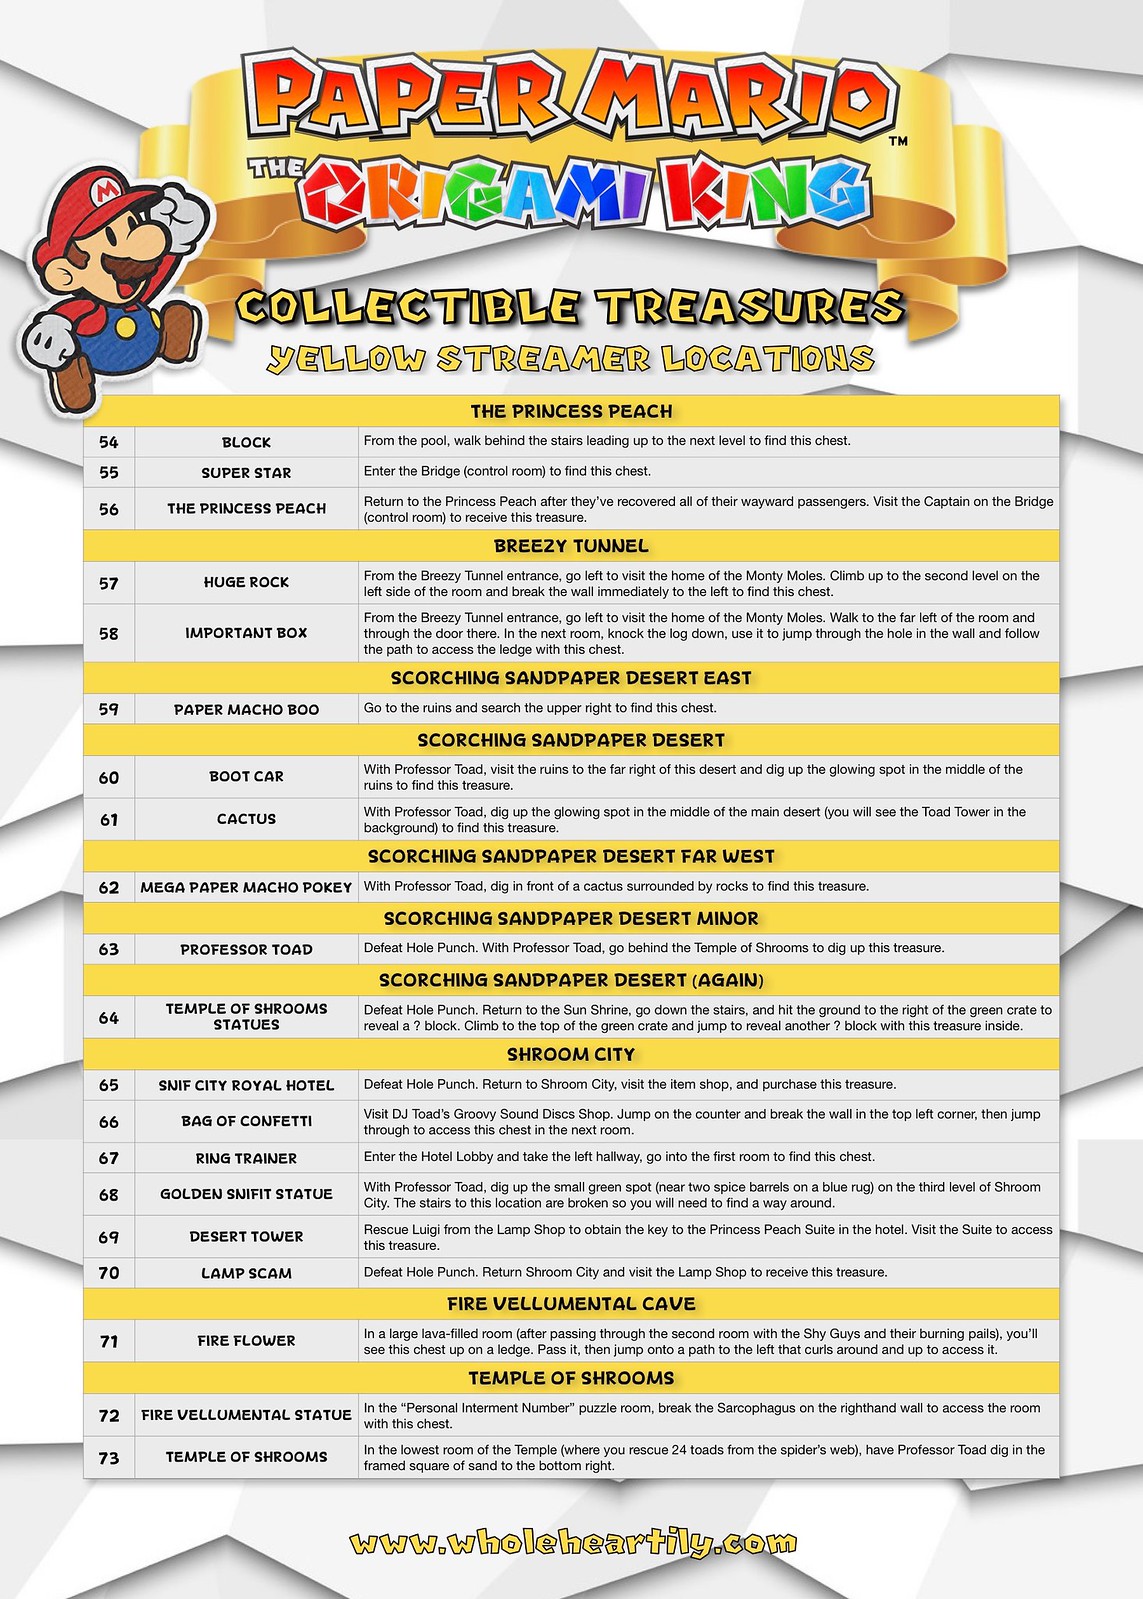
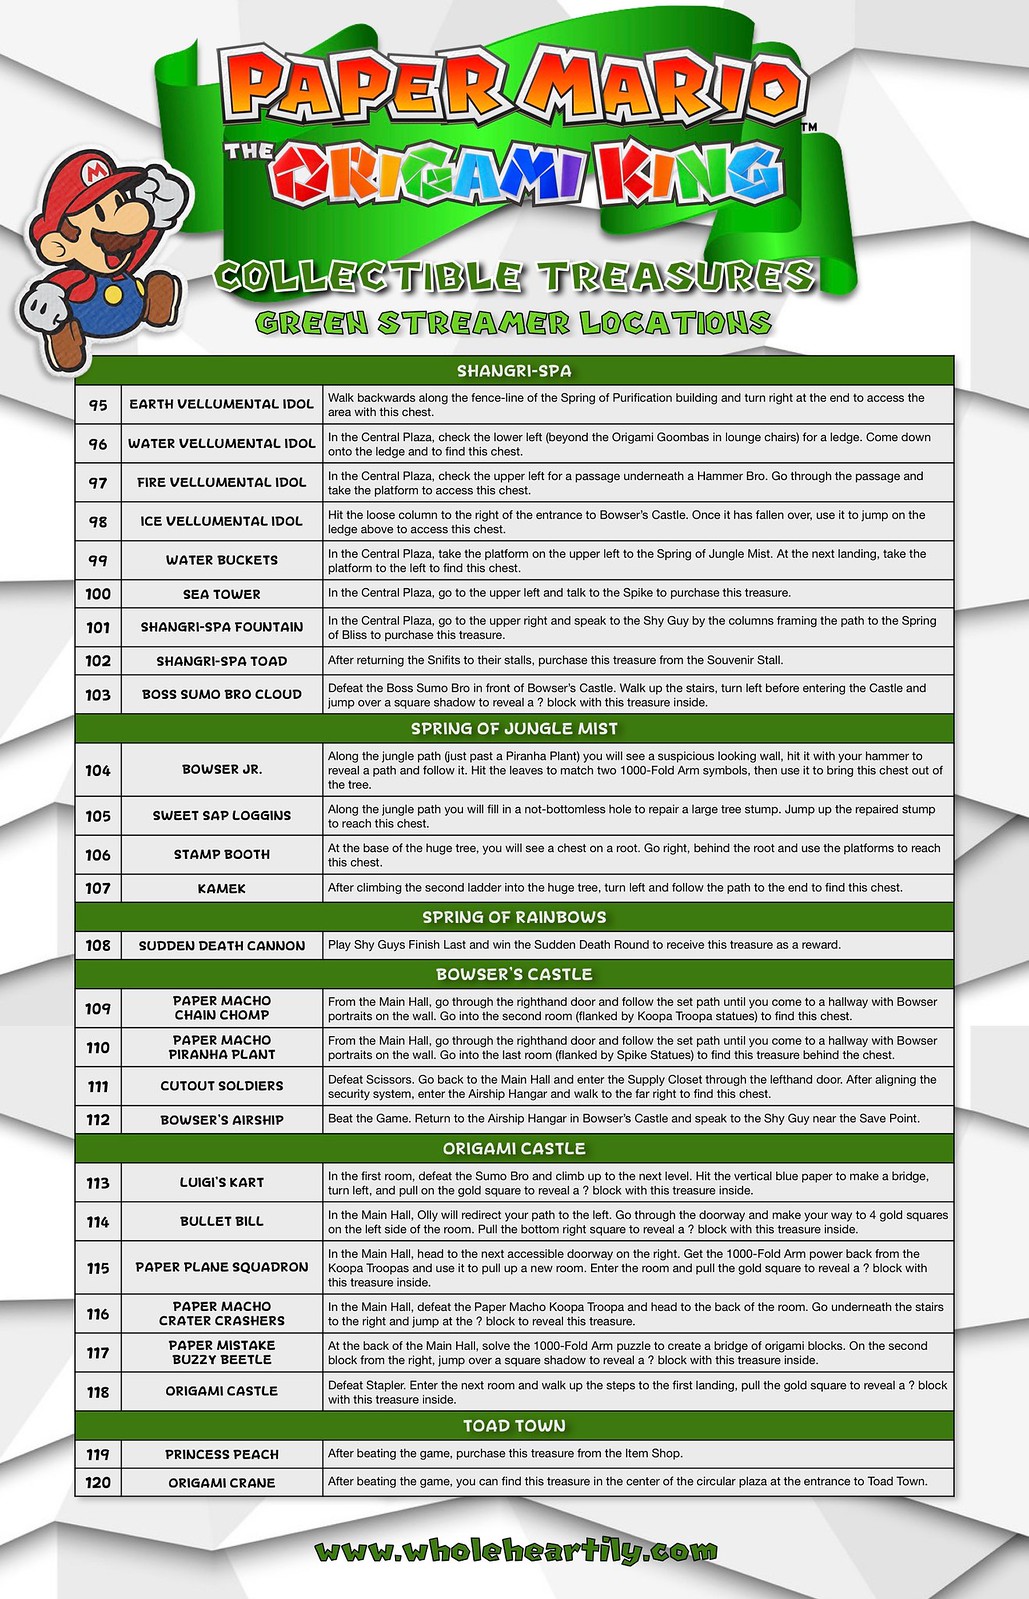
If you want to earn 100% completion and/or score the secret ending there’s a lot of work to do! In an effort to help, I’ve created guides to help you find all 120 Collectible Treasures.

These visual or infographic guides are separated by Streamer Color and then the areas within. The Collectible Treasures are organized by their numbers, names, and a detailed description on where to find them.

Please let me know if you would like me to work on a guide for the other collectibles within Paper Mario: The Origami King or if there are any games you would like to see visual information or guides for in the future! I love helping people, discussing games and organizing information!

Paper Mario: The Origami King - Blue Streamer Treasure Guide

Paper Mario: The Origami King - Yellow Streamer Treasure Guide

Paper Mario: The Origami King - Purple Streamer Treasure Guide

Paper Mario: The Origami King - Green Streamer Treasure Guide

Thank you Ring Fit Adventure, I’ll Take it From Here!

Ring Fit Adventure

In my Ring Fit Adventure Challenge – Reboot post, I posed the question: Can playing a video game really help you and I get fit? More specifically, can Ring Fit Adventure help you and I get fit?

For three months now, I have played 30 to 40 minutes of Ring Fit Adventure a day and my conclusion is: yes, but it takes a lot of time.

Fit Ring Adventure 1
Fit Ring Adventure 2

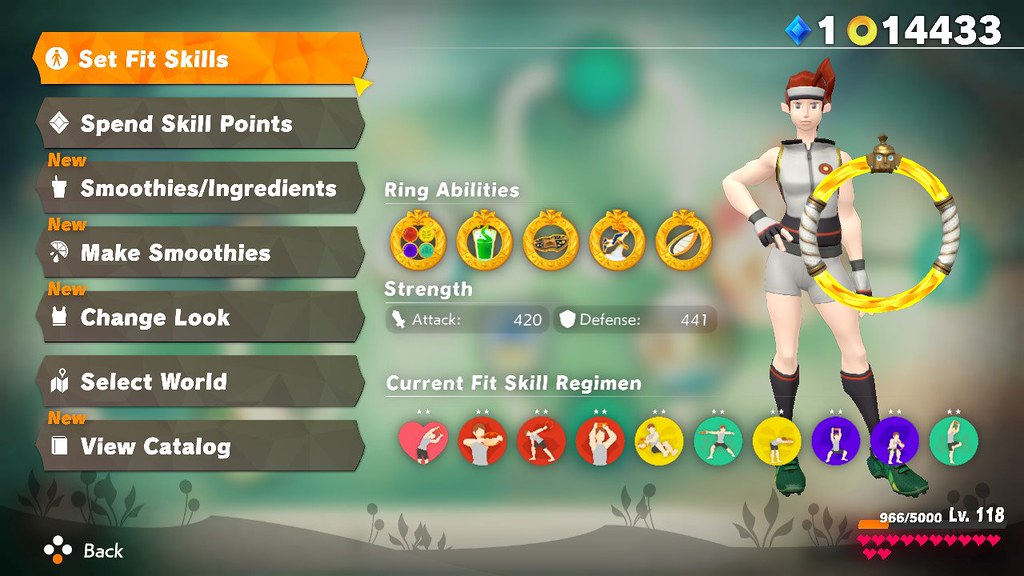
Ring Fit Adventure was released Saturday October 18th, 2019 for the Nintendo Switch. It comes with a squeezable pilates ring to hold and an elastic leg strap for leg movement. It piqued my interest because the main part of the game is a story where you need to travel across maps and defeat monsters to get to the boss who you also have to fight using different work out moves. The more you experience you get, the more you level up and acquire new workout moves to complete your journey. It is delightfully entertaining, adding plot and challenges or battles to cleverly distract the player from their workout, but if you’re looking to get down to business and workout quickly and efficiently, this is not the experience you’re looking for.

Ring Fit Adventure
Ring Fit Adventure

Ring Fit Adventure

If someone were to play this every day for a long period of time they could make progress, I have lost six pounds since May and the exercises have become easier to perform and sustain, but the amount of time spent playing does not equal the amount of time spent exercising. When I say I played for 30 to 40 minutes a day, that equaled out to about 10 minutes of active workout time (which the game will track for you). The rest of the time is spent going through setup, menus, preparation, and story dialog. Calculating from my experience, you would need to play about 3 hours to reach 60 minutes of active workout time. Unfortunately a lot of people do not have the time for that, including myself.

Ring Fit Adventure
Ring Fit Adventure
Ring Fit Adventure
Ring Fit Adventure

I want to thank the game for its ingenuity and beauty, and for getting me started. I believe it inspired me to get up and get moving, but now I feel I would be more effective working out on my own.

Have you played Ring Fit Adventure? How is your progress? I would love to know!

How to Clean – Classic My Little Pony Toys

Growing up reading The Velveteen Rabbit and then watching the Toy Story films, I became convinced (as I’m sure many children do) that toys are alive, and they have feelings. This made giving them up extra hard, and although I had to say goodbye to a lot of them over the years to keep my room and storage from overflowing, I did save many that were meaningful to me in the hopes I could pass them on to my future child (like I believe Andy should have done in Toy Story 3). Now our daughter is here and I cannot wait to share some of my beloved toys with her in the hopes that they will be beloved to her too!

I dug through my parent’s garage and found my classic My Little Ponies from the 1980s and 90s! In my memory they were in perfect condition, in reality they had been kept in a cardboard box way up in the rafters of a hot garage for about 25 years; they were all covered in grime and in need of a good cleaning.

How to Clean My Little Pony ToysHow to Clean My Little Pony Toys

I set to work cleaning and styling my My Little Ponies for Zoey and, after a fair amount of effort, they are ready! Now I want to help you restore your Little Ponies so you can share them with your little ones, or collect them for yourself, the choice is yours!

First thing’s first let’s assess these ponies! Separate them into two groups based on these questions. Are they superficially dirty and just need a good wash? Or do they need to be taken apart for a deep clean? The best way to tell if they need a deep clean is discoloration at the base of their tail that indicates rust growing from the metal washer inside. There is also a chance you’ll wash a superficially dirty pony and realize it needs a deeper clean so it’s best to start cleaning these ponies first.

*These are not methods to use on a flocked pony. I do not own any flocked ponies so I was not able to test cleaning out on them.*

SUPERFICIAL CLEANING

How to Clean Classic My Little Pony Toys - Streaky Before and After

SUPPLIES
  • Magic Eraser sponge
  • Castile soap or shampoo
  • Toothbrush
  • Conditioner
  • Comb or wet brush
  • Paper towels
  • Hand towel
  • Drinking straws (curly haired ponies)
  • Bobby pins (curly haired ponies)
INSTRUCTIONS

*Do not submerge this pony in water, you are not taking the superficially dirty ponies apart so you do not want to get water trapped inside. Use a small stream of water from your faucet to first wet the pony and then to rinse the soap, shampoo and conditioner off.*

  1. Wet a Magic Eraser sponge and use it to gently clean the pony’s body. Use more scrubbing force on any stubborn marks, but avoid scrubbing too hard on the eyes and cutie marks (symbols).
  2. Use a small stream of water from your sink’s faucet to lightly rinse the pony.
  3. With a toothbrush and Castile soap or shampoo, gently clean the pony’s body, then lightly rinse.
  4. At this point if you feel the pony needs a deeper clean see DEEP CLEANING below.
  5. After you’re satisfied with the condition of the pony’s body, wet the mane and tail with a small stream of water from your faucet. Avoid saturating the base of the mane or tail.
  6. Using Castile soap or shampoo, wash your pony’s mane and tail, and rinse.
  7. Apply conditioner to the mane and tail. Allow it to sit for a minute or two, then use a wet brush or a comb to gently brush through any tangles.
  8. Allow the combed and conditioned mane and tail to sit longer. How long depends on how smooth or coarse your pony’s hair is to begin with. I let one pony’s coarse hair sit in conditioner overnight, it did help, but at a certain point their synthetic hair may be damaged beyond full repair.
  9. Gently rinse the hair out when you feel it’s time. Use a hand towel to dry the body and give the hair a couple of squeezes to remove any excess water.
  10. While the pony’s hair is still damp, comb through it again so it’s smooth and set its hair.
  11. For straight-haired pony manes – cut a strip of paper towel about an inch to an inch and a half thick. Wrap the pony’s mane around its neck and secure it by wrapping the paper towel over the damp mane, around the neck, and tying it in a knot.

    How to Clean My Little Pony Toys

  12. For straight-haired pony tails – cut a strip of paper towel about an inch to an inch and a half thick and place it between the pony’s legs in preparation. Wrap the tail around one of the pony’s hind legs and secure it with the paper towel.

    How to Clean My Little Pony Toys

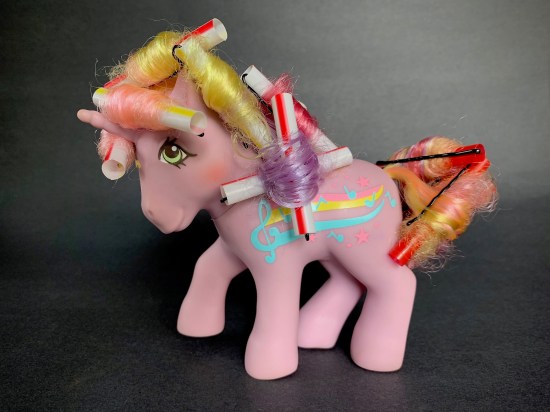
  13. For curly-haired pony manes and tails – cut up several drinking straws into fourths (roughly 2 inches a piece) for curlers. Separate out your pony’s mane and tail by how many curls you want and use each piece of straw to curl a strand of hair from the tip to the base and secure it with a bobby pin over the hair, and through the straw. You can curl it over or under, dependent on your preference.

    How to Clean My Little Pony Toys

  14. Allow your pony to completely air dry (overnight or 24 hours) then remove the paper towels or curlers. For the straight-haired ponies,  I usually run a comb through the mane to give it just a little bounce, but I leave the tail alone. If you comb the hair too much it will lose its curl. For the curly-haired ponies you can leave the curls as they are, or using a loose toothed comb, gently comb through them to loosen them up, again if you comb the hair too much it will lose its curl.How to Clean My Little Pony ToysHow to Clean My Little Pony Toys

DEEP CLEANING

How to Clean Classic My Little Pony Toys - Blueberry Baskets Before and AfterSUPPLIES
  • Hobby knife
  • Needle nose pliers
  • White vinegar
  • Bucket/container
  • OxiClean
  • Magic Eraser sponge
  • Castile soap or shampoo
  • Pipe cleaner
  • Toothbrush
  • Conditioner
  • Comb or wet brush
  • Paper towels
  • Hand towel
  • Drinking straws (curly haired ponies)
  • Bobby pins (curly haired ponies)
INSTRUCTIONS

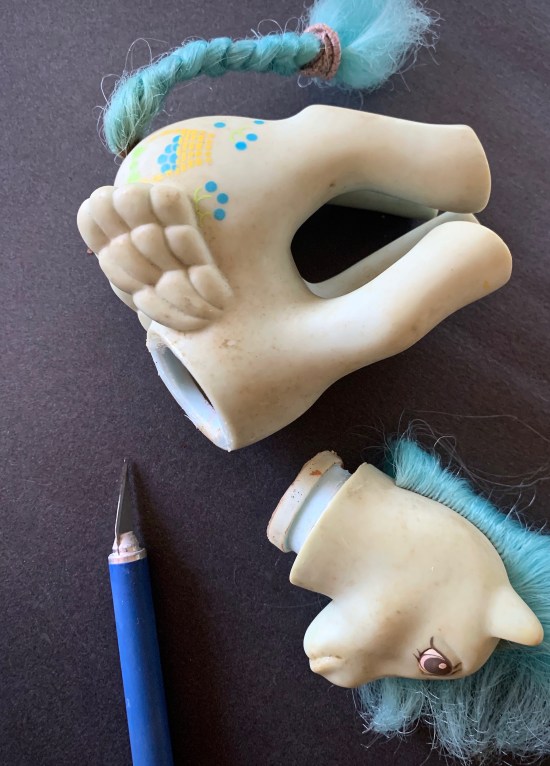
*It is OK to submerge this pony in water, you are taking the deeply dirty ponies apart so everything will be allowed to dry inside and out. To deep clean the really dirty ponies you’ll need to remove their heads and then tails.*

  1. Lean the head from side to side to see how attached it is and where. Carefully insert the tip of a hobby knife into the glue spots and cut them loose. BE CAREFUL not to slice into the inner rim of the neck that holds the head in place without the glue. If you do (and I accidentally did it) be extra careful when removing the head so you do not rip the inner rim open more or completely off.

    How to Clean My Little Pony ToysHow to Clean My Little Pony Toys

  2. Once the head has been removed take a pair of needle nose pliers, reach into the pony, grasp and pull the tail out through the neck.

    How to Clean My Little Pony Toys

  3. Place the metal clamp holding the tail together and the washer into a bowl or cup of white vinegar and allow them to soak for at least 30 minutes or longer depending on how much rust there is.
  4. Remove them periodically to rub them with a toothbrush to see how much rust can be removed. When you’re satisfied the rust has been removed from the metal clamp of the tail and the washer, take them out, rinse the vinegar off and dry the metal thoroughly.
  5. With a toothbrush and Castile soap or shampoo, completely clean inside and outside of the pony’s body. If the toothbrush cannot reach into the legs, fold a pipe cleaner in half and twist it together, then clean down into the legs. Rinse thoroughly.

    How to Clean My Little Pony Toys How to Clean My Little Pony Toys

  6. In a container or bucket, mix OxiClean with warm water and place the pony (head, tail and body) into the mix to soak overnight.

    How to Clean My Little Pony ToysHow to Clean My Little Pony Toys

  7. Once done soaking, rinse and drain the ponies. 
  8. Wet a Magic Eraser sponge and use it to gently clean the pony’s body. Use more scrubbing force on any stubborn marks, but avoid scrubbing too hard on the eyes and cutie marks (symbols).
  9. Wash the pony again, see step 5.
  10. Allow all the components of the pony to completely dry before reassembling. This could take up to 24 hours.
  11. Reassemble the pony starting with the tail, poke one side of the tail’s metal clamp into the hole and use the pliers to pull it all the way in. I decided to leave the washer’s out of the tail, but if you want to replace them you will need to use the same method to pull the tail through the hole in the washer within the body.

    How to Clean My Little Pony Toys

  12. Washer or not, center the metal clamp and pull the tail taught.
  13. Replace the pony’s head. I am not replacing the glue at this time, but if you wanted to secure the head, you can use super glue. BE CAREFUL! Do not get too much glue on the neckline or it will seep out the sides, creating problems for your hands and the pony’s body and hair. I recommend applying the glue around the rim of the neck with a toothpick and then inserting the head, holding it’s hair and your hands out of the way.
  14. Once your pony has been reassembled and the super glue (if you used it) has dried you can style the hair.
  15. Using Castile soap or shampoo, wash your pony’s mane and tail, and rinse.
  16. Apply conditioner to the mane and tail. Allow it to sit for a minute or two, then use a wet brush or a comb to gently brush through any tangles.
  17. Allow the combed and conditioned mane and tail to sit for longer. How long depends on how smooth or coarse your pony’s hair is to begin with. I let one pony’s coarse hair sit in conditioner overnight, it did help, but at a certain point their synthetic hair may be damaged beyond full repair.
  18. Gently rinse the hair out when you feel it’s time and use a small towel to dry the body and give the hair a couple of squeezes with the hand towel to remove any excess water.
  19. While the pony’s hair is still damp, comb through it again so it’s smooth and set its hair.
  20. For straight-haired ponies manes – cut a strip of paper towel about an inch to an inch and a half thick. Whichever way you want the pony’s mane to fall (sometimes it’s already decided for you) wrap the pony’s mane around its neck in that direction and secure it with the paper towel, by wrapping the paper towel around the neck and over the damp mane and tying it with a small knot.
  21. For straight-haired ponies tails – cut a strip of paper towel about an inch to an inch and a half thick. Place the paper between the pony’s legs in preparation, then take the tail and wrap it around one of the pony’s hind legs. Secure the wrapped tail with the paper towel and tie a knot.
  22. For curly-haired ponies manes and tails – cut up several drinking straws into fourths (roughly 2 inches a piece) for curlers. Separate out your pony’s mane and tail by how many curls you want and use each piece of straw to curl a strand of hair from the tip to the base and secure it with a bobby pin over the hair, and through the straw. You can curl it over or under, dependent on your preference.
  23. Allow your pony to completely air dry (overnight or 24 hours) then remove the paper towels or curlers. For the straight-haired ponies,  I usually run a comb through the mane to give it just a little bounce, but I leave the tail alone. If you comb the hair too much it will lose its curl. For the curly-haired ponies you can leave the curls as they are, or using a loose toothed comb, gently comb through them to loosen them up, again if you comb the hair too much it will lose its curl.

How to Clean Classic My Little Pony Toys - Firefly Before and AfterWhat My Little Ponies do you have?  How did they turn out? I hope you and your loved ones enjoy them! I plan on giving mine to Zoey within the next year, after she stops sticking absolutely everything in her mouth !*face palm*

Homemade Tinker Bell Smash Cake Recipe (No Added Sugar)

Disney Tinker Bell Smash Cake RecipeZoey, our little Tinker Bell, is one year old! This year has been an unusual one (understatement of the century), but it has flown by faster than I could have imagined and I have been fortunate enough to spend the majority of it at home with her; grateful for every moment.

Like many one year birthday boys and girls, Zoey has not been exposed to much sugar. Now I don’t mind a little sugar, but I did not want to sugar bomb her all at once so I created a homemade smash cake with frosting for her without adding extra sugar.

This Tinker Bell petal smash cake is a variation of a banana bread recipe my family has made for years without added sugar and a variation of cream cheese frosting without powdered sugar. I would consider the cake a tame banana flavor and the frosting a tangy cream cheese flavor, smoothed out with the addition of a natural sweetener (I used agave nectar). I purchased a used Disney Infinity Tinker Bell figurine off of Mercari, gave it a good cleaning, and used it as a cake topper with the obligatory “1” candle.

Disney Tinker Bell Smash Cake Recipe Disney Tinker Bell Smash Cake RecipeShe was very tentative about smashing  her smash cake, almost like she wasn’t sure if she was allowed to. Even with her audience coaxing her she only tasted a little bit of cake I broke off for her and mostly just played around in the frosting. Her favorite part of the cake was the Tinker Bell figurine up top and she ended up fixating on that. And what the hey, as long as she had fun!

So let’s make a smash cake for the little Tinker Bell in your life!

Disney Tinker Bell Smash Cake Recipe

BANANA SMASH CAKE
  • 3 bananas, overripe
  • 1/2 cup of butter, softened
  • 2 eggs
  • 1 1/4 cup of flour
  • 3/4 teaspoon of baking soda
  • 1/2 teaspoon of salt
INSTRUCTIONS (CAKE)
  1. Preheat the oven to 350F.
  2. Grease two 6-inch cake pans, or line them with parchment paper.
  3. Cream the butter and bananas together with a (hand) mixer.
  4. Add the eggs in one at a time, beating each in with the (hand) mixer.
  5. In a separate bowl, combine the flour, baking soda and salt.
  6. Add the dry ingredients to the wet ingredients a little at a time, mixing and scraping down the sides of the bowl in between each addition.
  7. Pour the mixed batter into the prepared cake pans about half to 3/4 of the way full.
  8. Bake for about 30 to 35 minutes until a toothpick inserted into the centers comes out clean. The timing may vary depending on your oven so keep an eye on them!
  9. Remove the cakes from the oven and allow them to cool in their pans for about 10 minutes, then remove them from the pans and allow them to cool completely on a wire rack.
  10. Mine were pretty flat. If yours do not turn out flat, cut the very tops off of the cakes to create flat tops for stacking and frosting.
  11. Frost your cake (see below).

Disney Tinker Bell Smash Cake Recipe

CREAM CHEESE FROSTING (NO ADDED SUGAR)
  • 5 tablespoons of butter, room temperature
  • 1 1/2 packs of cream cheese (8 ounce), room temperature
  • A pinch of salt
  • 2 to 3 tablespoons agave nectar, honey or maple syrup
  • 1 to 2 tablespoons whole milk
  • 2 teaspoons of vanilla extract
  • 1 to 2 tablespoons corn starch
  • Green food coloring
INSTRUCTIONS (FROSTING)

*You can make the frosting up to several days in advance and store it in the refrigerator. Bring it to room temperature before frosting.*

  1. Whip the butter and cream cheese together in a large bowl until well combined.
  2. Add the agave nectar (or sweetener of choice), milk, salt and vanilla extract. Whip again, scraping down the sides of the bowl as needed.
  3. Add 1 tablespoon of corn starch and whip until well incorporated. If at this point the consistency is right for you, you can move on to the next step. If not you can add cornstarch one teaspoon at a time until it reaches the desired thickness (careful not to exceed 2 tablespoons total).
  4. Divide the frosting four equal parts in separate bowls. Add green food coloring to each bowl of frosting, ranging from dark to light green. Put each shade of green frosting into a pastry bag.
  5. Pipe and smear frosting on the top of the first layer of cake and gently place the second layer on top of this.
  6. Begin the petals by piping a dollop of dark green frosting on the side of the cake at the base. Take a flat slender spatula or butter knife press gently into the dollop and smear it to the right. Pipe another dollop of dark green near the end of the smear and repeat all the way around the cake.
  7. Repeat this process with the next shade of green and repeat, but stop before you reach the lightest shade of green and the top of the cake.
  8. Pipe and smear a healthy dollop of the lightest green frosting onto the top of the cake and smooth it out with a flat spatula, then continue with the last layer of petals in the lightest shade of green around the top of the cake.
  9. Adorn your cake with decorations.
  10. Enjoy!

Disney Tinker Bell Smash Cake Recipe

Kingdom Hearts – Visual 101 Dalmatians Guide

Kingdom Hearts 101 Dalmatian Guide

If there’s one thing I do when I play a game (besides trying to relax and enjoy myself), it’s look up information. I get curious or stuck, and I find myself turning to the internet for answers. There are a lot of good guides out there that are super helpful, but what I don’t see are an abundance of simple and clean visual guides that lay out all the information in one place.

I’ve finished playing Kingdom Hearts as I work my way through the entire series and I’ve created a 101 Dalmatian guide for myself and those who may need it.

This infographic is organized by the dalmatian’s numbers, their locations and the ability needed to reach them. I’ve also included the rewards received per number of puppies returned at the top of the page.

Please let me know if you would like me to work on a guide for the other collectibles within Concrete Genie or if there are any games you would like to see visual information or guides for in the future! I love helping people, discussing games and organizing information!