Family Friendly Halloween Children’s Books – Ages 2 to 8

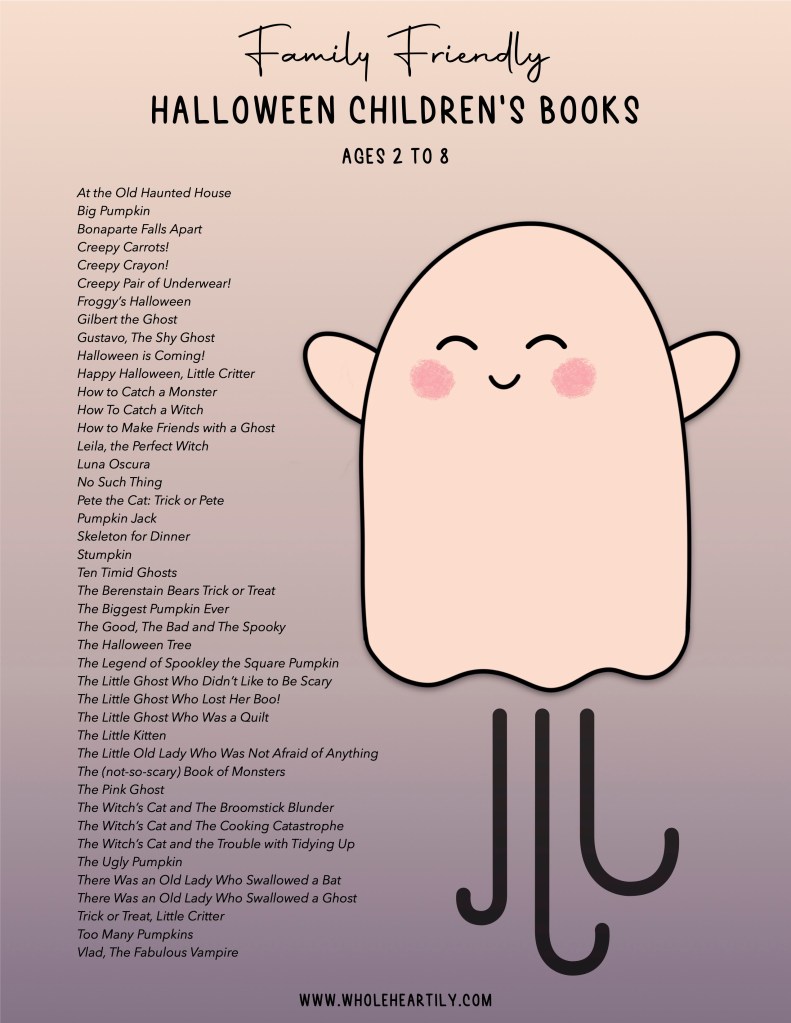
Welcome to the boo-tiful month of October my friends!

To inspire you and your little ones into the Halloween mood, I’ve curated a list of Halloween-themed books for ages 2 to 8! These selections are festive, without frights or scares that could upset a younger audience.

If you’re looking for a list of family friendly halloween children’s books for children under 5 years of age, I’ve created a list for that too! You can find that list here.

If you have a favorite Halloween book for children ages 2 to 8 that you do not see here, please let me know! I would love to add it to this list!

The First 30 Minutes of Hotel Transylvania: Scary-Tale Adventures

Have you ever been undecided on what to play next? 

Should you buy that game? Should you install that game?

I’ve been there, and sometimes you just need to take a look at the graphics, hear the music, and learn a little about the plot to see if it resonates with you before taking the next step. I’m here to help! I am creating the first 30 to the first 60 minute videos of games; indie and mainstream, new and old!

This week let’s take a look at the first 30 minutes of Hotel Transylvania: Scary-Tale Adventures…

Do you want to play the rest? 

DIY Crochet- Halloween Chevron Blanket

Welcome back friends! Do you crochet? I dabbled in crochet off and on for a few years, always fascinated, but never fully catching on. I kept at it, and suddenly, it clicked! I feel calm and cozy when I’m crocheting, and fiercely proud whenever I complete a project.

It’s that time of year for autumn and Halloween decor, so let’s create a chevron Halloween blanket! I thought it would be creative to make a candy corn color pattern framed by black on either side. Mine is the size of a lap blanket, but you can use this pattern to create any size you choose!

SUPPLIES
  • Crochet hook (size 6.5mm)
  • Medium yarn (size 4) in black, yellow, orange and white
  • Scissors
  • Yarn needle or small crochet hook
INSTRUCTIONS
  1. Starting with the black yarn, create a slip knot and then chain stitches in increments of 27, then add 5 extra stitches to whatever amount you choose. I chained 216, plus five came to a total of 221 stitches.
  2. Turn your chain around and single crochet (sc) into the back-loops of the second and third stitch from the hook, then skip the next stitch.
  3. Single crochet into the back-loops of the next 12 stitches.
  4. After completing the 12th sc, put three single crochets together into the back-loop of the next stitch (this will create the peak of our chevron).
  5. Single crochet into back-loops of the next 12 stitches, then skip the following two stitches after that (this will create the valley of our chevron).
  6. Now we’ve reached the start of our next chevron and we are going to repeat steps 3 through 5 until we have 3 stitches left in our chain.
  7. When you have 3 stitches left in the chain, skip the next stitch after your hook and sc into the last two stitches in the chain. Chain 1 and turn your blanket around.
  8. For the rest of the blanket, we will be working in both loops.
  9. Repeat steps 2 through 7, for the next 6 rows, then we’ll change colors.
  10. To change colors, halt halfway through your final single crochet of the row when two loops are over your hook, hook onto your new color (yellow), and pull it through. Cut off the previous color of yarn and weave the tail into the blanket with a yarn needle or small crochet hook to secure it.
  11. Chain 1 with the new color and turn your blanket around.
  12. Repeat steps 2 through 7, for the next 7 rows, then we’ll change colors to orange and do seven rows, then white and then back to black. We’ll keep going in this pattern until we’ve created the length of blanket we desire.
  13. When you’ve reached the end of your last black row, chain two and rotate the blanket 90 degrees. Begin single crocheting down the side of the blanket.
  14. At the end of this side of the blanket, chain 2 and rotate the blanket 90 degrees. Single crochet along the starting chain of the blanket, following the chevron rules from above (steps 3 through 5) over the peaks and valleys.
  15. At the end of the starting chain of the blanket, chain 2 and rotate the blanket 90 degrees. Single crochet down this side of the blanket.
  16. At the end of this side of the blanket, chain 2 and rotate the blanket 90 degrees. Single crochet along the top row of the blanket, following the chevron rules from above (steps 3 through 5) over the peaks and valleys.
  17. Repeat steps 13 through 16 until you are happy with the width of the blanket’s borders (I did 6 passes around).
  18. Cut the yarn and pull the loose end through your last loop, then weave the tail into the blanket with a yarn needle or small crochet hook.
  19. Place in your house, cuddle up under it and enjoy!

The First 60 Minutes of Bear & Breakfast

Have you ever been undecided on what to play next? 

Should you buy that game? Should you install that game?

I’ve been there, and sometimes you just need to take a look at the graphics, hear the music, and learn a little about the plot to see if it resonates with you before taking the next step. I’m here to help! I am creating the first 30 to the first 60 minute videos of games; indie and mainstream, new and old!

This week let’s take a look at the first 60 minutes of Bear & Breakfast…

Do you want to play the rest? 

Cozy Grove – Food Recipe Guide

If there’s one thing I do when I play a game (besides trying to relax and enjoy myself), it’s look up information. I get curious or stuck, and I find myself turning to the internet for answers. There are a lot of good guides out there that are super helpful, but what I don’t see are an abundance of simple and clean visual guides that lay out all the information in one place.

I recently posted the first 60 minutes of Cozy Grove and in conjunction with that I wanted to create a cooking guide for all the food you can create in the game!

These visuals (or infographic guides) are categorized by the size of the meal created, and then organized alphabetically into helpful sections, and downloadable so you don’t need to keep hopping back online to check on the information.

Please let me know if you would like me to work on a guides for anything else within Cozy Grove or if there are any games you would like to see visual information or guides for in the future! I love helping people, discussing games and organizing information!

The First 60 Minutes of Cozy Grove

Have you ever been undecided on what to play next? 

Should you buy that game? Should you install that game?

I’ve been there, and sometimes you just need to take a look at the graphics, hear the music, and learn a little about the plot to see if it resonates with you before taking the next step. I’m here to help! I am creating the first 30 to the first 60 minute videos of games; indie and mainstream, new and old!

This week let’s take a look at the first 60 minutes of Cozy Grove…

Do you want to play the rest? 

The First 30 Minutes of Little Kitty Big City

Have you ever been undecided on what to play next? 

Should you buy that game? Should you install that game?

I’ve been there, and sometimes you just need to take a look at the graphics, hear the music, and learn a little about the plot to see if it resonates with you before taking the next step. I’m here to help! I am creating the first 30 to the first 60 minute videos of games; indie and mainstream, new and old!

This week let’s take a look at the first 30 minutes of Little Kitty Big City…

Do you want to play the rest? 

Wholesome Animated Shows for a Younger Audience!

I think we can all agree that there is an overwhelming amount of content out there to consume for all ages, and that a great deal of the content that is made for children can be incredibly stimulating. Now that’s not always a negative, yet I completely understand the necessity for wholesome and less stimulating shows for your little one(s). 

I’ve created a list of wholesome and less stimulating shows for a younger audience. Please let me know if there are any of your family favorite shows I may have missed; I would love to add more as I find them!

Let’s take a look!

The First 30 Minutes of Yoshi’s Crafted World

Have you ever been undecided on what to play next? 

Should you buy that game? Should you install that game?

I’ve been there, and sometimes you just need to take a look at the graphics, hear the music, and learn a little about the plot to see if it resonates with you before taking the next step. I’m here to help! I am creating the first 30 to the first 60 minute videos of games; indie and mainstream, new and old!

This week let’s take a look at the first 30 minutes of Yoshi’s Crafted World…

Do you want to play the rest? 

DIY – Crocheted Double Pocket Hug

Welcome back friends! Do you crochet? I do! I feel calm and cozy when I’m crocheting, and fiercely proud whenever I complete a project.

My daughter is entering Kindergarten this year and, while I’m sure she’ll love it, I believe she’ll need a little comfort while she’s away. Pocket hugs are a small token that can be tucked into a pocket to remind someone we love that we care for them, even if we’re apart. Zoey carries hers in a pocket of her backpack.

I created two different sized pocket hugs and when I held them together, I admired how much they looked like a cookie with frosting so I had the idea to attach them together. Et voila! Now we have a double pocket hug that looks like a cookie! You could use any color of yarn for this, the possibilities are endless!

Let’s get started!

SUPPLIES
  • Two different crochet hooks (I used sizes 3.75mm and 4.50mm)
  • Two different yarns (I used sizes 2 and 4)
  • Scissors
  • Yarn needle or small crochet hook
  • Hot glue gun
INSTRUCTIONS
  1. Using the smaller yarn and hook create a magic ring and chain two.
  2. Stitch one triple crochet into the magic ring, then repeat twice more for a total of three triple crochets.
  3. Stitch one double crochet into the magic ring, then repeat twice more for a total of three double crochets.
  4. Chain one, then stitch one triple crochet into the magic ring for the heart’s point, then chain one again.
  5. Stitch one double crochet into the magic ring, then repeat twice more for a total of three double crochets.
  6. Stitch one triple crochet into the magic ring, then repeat twice more for a total of three triple crochets.
  7. Chain three and slipstitch into the magic ring.
  8. Slipstitch into the back loop of the beginning three chains of the heart.
  9. Single crochet under both loops of the first triple crochet from the first round, then single crochet again into the same stitch.
  10. Repeat step 9 on the second and third triple crochets of the first round.
  11. Single crochet under both loops of the first double crochet of the first round.
  12. Repeat step 11 on the second and third double crochets of the first round.
  13. Single crochet under the chain.
  14. Single crochet under both loops of the triple crochet, chain one and then single crochet back into the same stitch.
  15. Single crochet under the chain
  16. Single crochet under both loops of the double crochet.
  17. Repeat step 16 on the next two double crochets of the first round.
  18. Single crochet under both loops of the triple crochet from the first round, then single crochet again into the same stitch.
  19. Repeat step 18 on the next two triple crochets of the first round.
  20. Slipstitch into the back loop of the ending three chains of the heart.
  21. Slipstitch into the magic ring one more time, snip off the yarn and pull the loose end through the final stitch tightly to secure it.
  22. Pull the loose end of the starting yarn to pull the center of the heart in tightly.
  23. Using a smaller crochet hook, weave the starting yarn and ending yarn into the heart.
  24. Repeat steps 1 through 23 again with the larger yarn and hook.
  25. Once both hearts are done, heat up your glue gun and apply a steady amount of glue to the back of the larger heart, within the confines of where the smaller heart will lay, then press the back of the smaller heart to it. If there are any loose edges gently lift them up, apply glue underneath and press it back.
  26. Once cool, give your pocket hug to someone who needs it!