Part of the fun in raising Zoey is finding things that delight and educate her; I want to find fun, creative board games to play with her during our family game nights! This week we played Monster Mash by Parker Brothers (and others) for up to 4 players!
If you can’t tell from the packaging, this is a game from my childhood that my mom saved because we loved it so much! There are newer versions being sold now (like this one by Cra-Z-Art), but the premise is the same; press the button on the monster-maker, then find the matching monster and claim it before the other players do!
Let’s play!
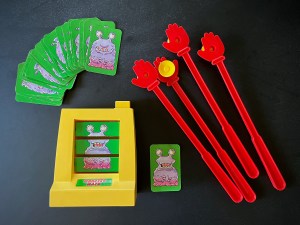
IN THE BOX
- A monster-maker machine
- 27 monster cards
- 4 thwacker hands with suction cups


INSTRUCTIONS
- Remove everything from the game box, and set the monster-maker machine on the playing surface so that everyone can see the monster that appears on it.
- Spread the monster cards face-up in the middle of the playing area so that no cards overlap and everyone can easily reach them.
- Each player takes a thwacker hand and the player closest to the monster-maker machine will press the button to start each new round.
- The monster-maker machine randomly selects and shows one monster for all the monster hunters to mash and capture. Look closely at the monster on the machine when the button pops up!
- Quickly all the players try to find the face-up monster card that matches the monster on the machine and mash it with their thwacker hand so that the suction cup picks up the card (if two players slap the monster card at the same time, the player whose thwacker hand is at the bottom of all the thwacker hands captures the card).
- If a player picks up the wrong monster card, he or she simply returns it face-up to the middle of playing area and everyone keeps hunting.
- The player who picks up and captures the correct monster card places it face-up in front of him or her. This ends the round everyone stops hunting.
- To start a new round, press the button on the monster-maker machine.
- If the monster-maker machine shows a monster that has already been shown and captured, players can try to capture it from the player that has it in front of him or her, unless that player mashes it first with his or her thwacker.
- Game play continues until one player captures 5 monsters, the first player to do this is the monster mash winner!
ENJOY!