DIY – Tissue Paper Flowers

Part of the fun in raising Zoey is making things that delight her; I want to create fun, educational crafts for her that are made with love and will be loved! 

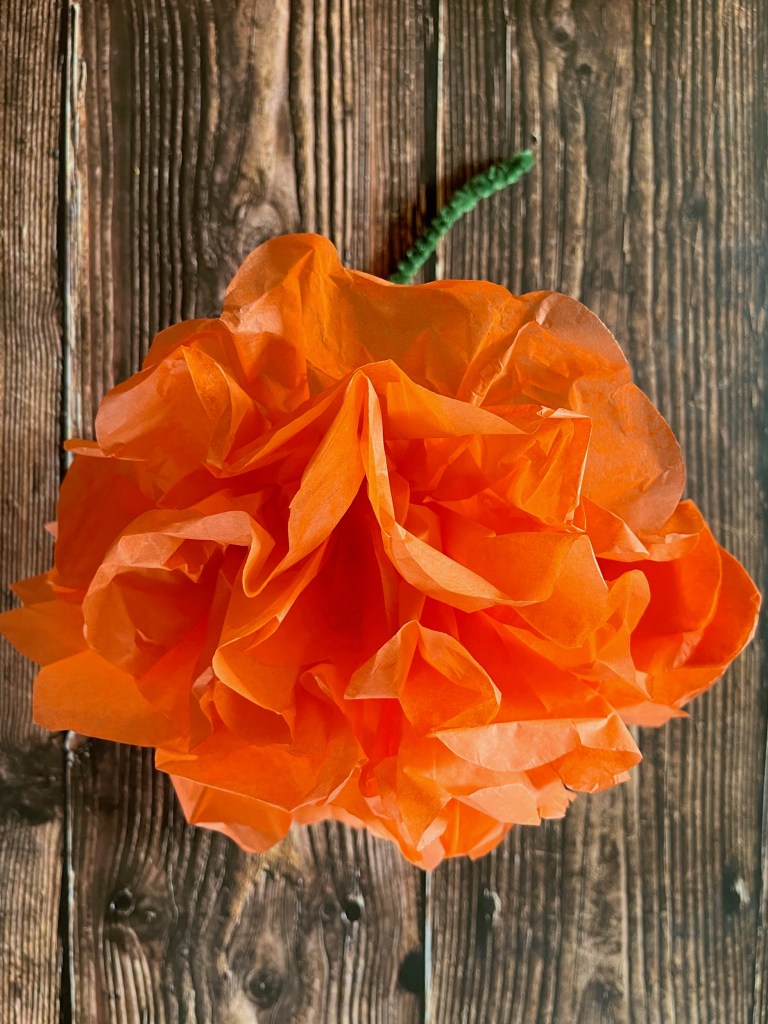
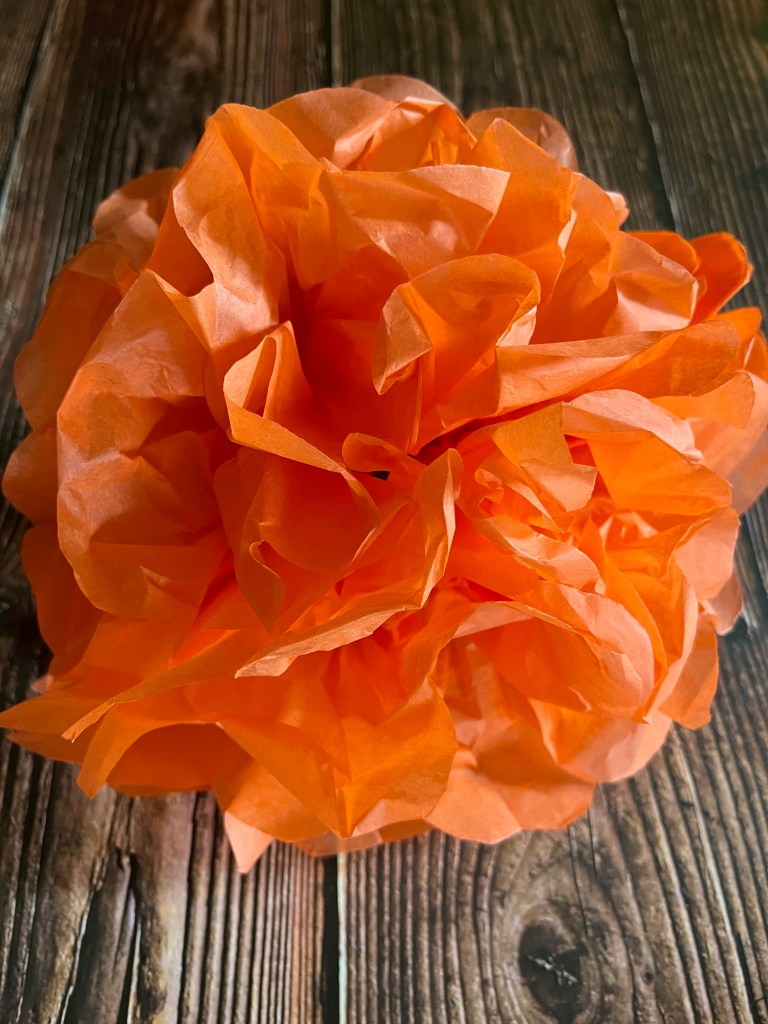
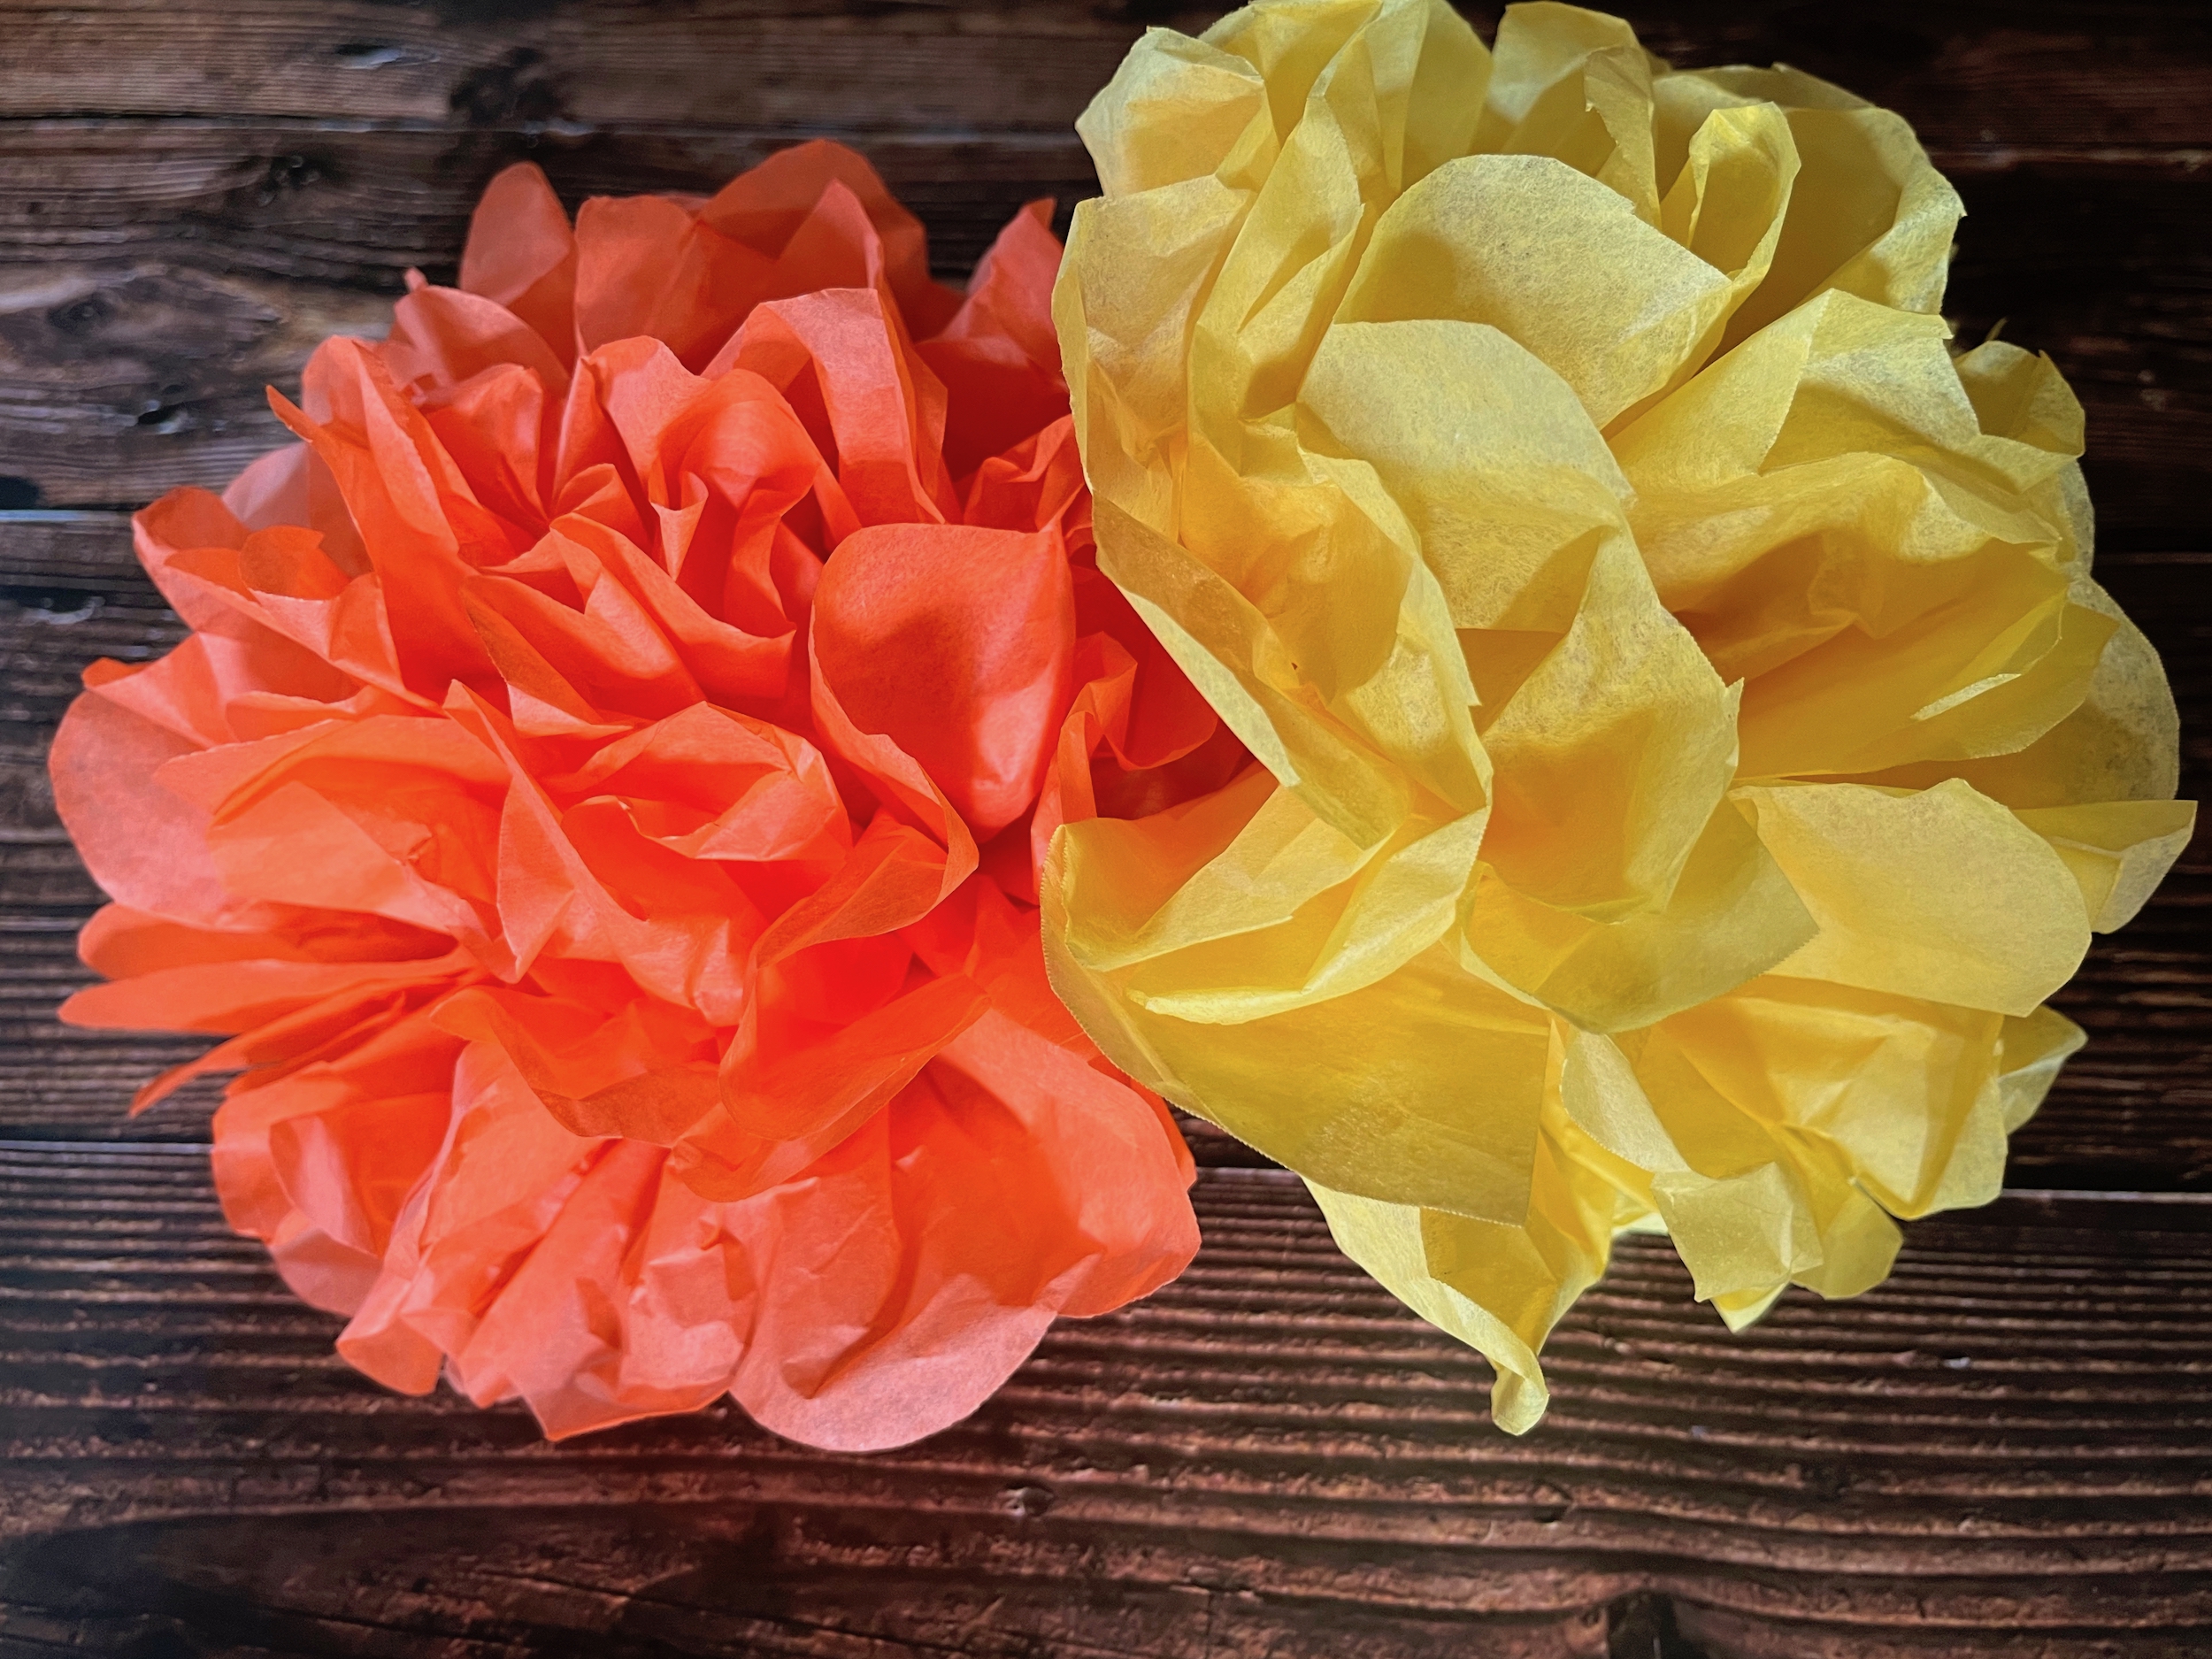
This week we’ll be creating paper marigolds in honor of their color and beauty, but also to begin educating Zoey on their significance this time of year. 

These supplies and instructions create two large paper flowers, but you can multiply and create as many as you like in as many color variations as you like!

SUPPLIES
  • 4 green pipe cleaners
  • 5 sheets of 20” x 20” gift-wrapping tissue paper (or similar)
  • Scissors
INSTRUCTIONS
  1. Layer and align the 5 sheets of tissue paper, then fold them in half and crease.
  2. Cut along the crease line so you now have two groups of tissue sheets, 10” by 20” each.
  3. Keeping each group of tissue sheets layered and aligned, pleat the paper in an accordion fold.
  4. Holding the accordion fold closed, cut a half-circle shape from each end. (You could also cut a point or zig-zag)
  5. Holding the accordion fold closed, wrap the top of a pipe cleaner around the middle of the paper and twist it around itself to hold it in place. This will also act as the stem.
  6. Fan out the paper, then gently separate the first layer of paper from the rest, and move it up to form the top layer of petals.
  7. Gently separate the rest of the paper layers and fluff out your flower.
  8. To bolster the stem a bit more: Secure a second pipe cleaner around the existing pipe cleaner where it meets the flower, and wrap it around the existing pipe cleaner down to the base (start back up if you have extra).
  9. Repeat steps 3 through 8 with the second group of tissue sheets.
  10. Enjoy!

Homemade Pumpkin Bread Recipe

Welcome back friends! 

Who wants some fresh, oven baked pumpkin bread to enjoy on one (or more) of these beautiful autumn mornings? Maybe at a table with some coffee or tea and a good book? 

I know I do, so let’s bake some!

PUMPKIN BREAD
  • 2 cups of all-purpose flour
  • 1⁄2 teaspoon of baking powder
  • 1 teaspoon of baking soda
  • 1 teaspoon of ground cinnamon
  • 1 teaspoon of ground cloves
  • 1 teaspoon of ground nutmeg
  • 1⁄2 teaspoon of salt
  • 3⁄4 cup of unsalted butter, softened
  • 2 cups of sugar
  • 2 large of eggs
  • 1 15-oz can of pumpkin puree
  • Powdered sugar (optional)
INSTRUCTIONS
  1. Set an oven rack to the middle position and pre-heat it to 325F. 
  2. Grease two 8 x 4-inch loaf pans with butter, then dust with flour.
  3. In a medium bowl, combine the flour, baking powder, baking soda, cinnamon, cloves, nutmeg and salt. Whisk until well combined, then set aside. 
  4. In a large bowl, beat the butter and sugar on medium speed until just blended. Add the eggs one at a time, beating well after each addition and continue to beat until very light and fluffy, then incorporate the pumpkin.
  5. Slowly add the flour mixture to the pumpkin mixture and mix on a low speed until well combined. 
  6. Divide the batter evenly into the two prepared pans, and bake for 65 – 75 minutes, or until a cake tester inserted into the center comes out clean. 
  7. Let the loaves cool in the pans for about 10 minutes, then turn out onto a wire rack to cool completely. 
  8. Place powdered sugar into a sifter and lightly dust the top of each loaf.
  9. Enjoy!

DIY – Bat Silhouette Pom Pom Painting

Part of the fun in raising Zoey is making things that delight her; I want to create fun, educational crafts for her that are made with love and will be loved! This week we’ll be creating pom pom paintings of bat silhouettes for halloween! 

I remember when I was a kid we made halloween crafts at school and my mom would bring them out every year as part of our halloween decor. It made me feel super happy and proud that she would take the time to save and display my art every year and that is the feeling I want to inspire in my own daughter.

Let’s get painting!

SUPPLIES
  • Bat silhouette pattern (see above)
  • Printer paper
  • Scissors
  • Scotch tape
  • Black cardstock paper (8.5 x 11”)
  • Clothespin(s)
  • Pom poms
  • Sunset colored paints (I used red, orange, purple and yellow)
INSTRUCTIONS
  1. Print this bat pattern I’ve created and cut the bats out.
  2. Break off several small pieces of tape, roll them into cylinders, and use them to attach the bats where you want them on the black cardstock paper.
  3. Pour non-toxic sunset colored acrylic paints into a pie plate (or something similar) and set out a pom pom for each color.
  4. Use a clothespin to grab one pom pom at a time, or one clothespin per color.
  5. Allow your little one to dab the paint around and over the bats to their heart’s content.
  6. Allow the paint to dry and then gently peel off the bats to reveal their silhouettes!
  7. Hang it up and enjoy! 

Homemade Ghostly Brownie Recipe

Welcome back friends!

Who wants some fresh from scratch, oven baked ghostly brownies to enjoy on one (or more) of these beautiful autumn evenings? Maybe at a movie night, or a game night?

I know I do, so let’s bake some!

GHOSTLY BROWNIES
  • 1/2 cup of butter, melted
  • 2/3 cup of unsweetened cocoa powder
  • 1 1/3 cups of sugar
  • 2 tablespoons of vegetable oil
  • 2 large eggs, room temperature
  • 1/2 teaspoon of salt
  • 1 teaspoon of vanilla extract
  • 1/2 cup of flour
  • 1/2 cup of semi-sweet chocolate chips
  • Powdered sugar (for dusting)
INSTRUCTIONS
  1. Pre-heat the oven to 350F and coat a baking pan with cooking spray (I used a 13×9 pan).
  2. Combine the melted butter, oil, sugar and cocoa powder in a large bowl and whisk until smooth.
  3. Add the eggs, vanilla and salt.
  4. Slowly stir in the flour a little at a time until a thick batter forms, then fold in the chocolate chips.
  5. Spread the batter into a prepared pan and bake for 21 to 25 minutes or until they become glossy around the edges and a toothpick comes out clean.
  6. Place a little powdered sugar into a sifter and lightly sift the tops of the brownies until white.
  7. Using a ghost shape cookie cutter, cut ghost shapes into the brownies (leave them where they are) and add 3 chocolate chips for the eyes and the mouth of each ghost.
  8. Allow the brownies to completely cool and solidify, then carefully remove the ghosts from the pan. I peeled away the edges and extra spaces first, then used a flat metal spatula to lift the ghosts out.
  9. Enjoy!

DIY – Paper Bat Halloween Decorations

I am so bad at decorating my house for the holidays! I want to be better about it, but I’d like to create and/or collect decorations that are my vibe and that I’m proud of!

One of the looks I’ve always loved are colonies of bats flying across doorways and walls of a home. I’ve created my own bat pattern, so let’s create!

SUPPLIES
  • Bat pattern (see above)
  • 8.5 x 11 black cardstock paper
  • Scotch tape (or similar)
  • Scissors
INSTRUCTIONS
  1. Print and cut out these bat patterns I’ve created, then cut each bat shape in half!
  2. Fold each piece of cardstock paper in half horizontally and lightly tape the body of the bat patterns to the fold of the cardstock paper.
  3. Cut out as many bat shapes as you like and attach them to the wall or walls around your home. **For added texture you can fold some or all of the wings up so they aren’t flat against the wall!
  4. Enjoy!

Homemade Baked Pumpkin Doughnut Recipe

Welcome back friends!

Who wants some fresh, oven-baked, cinnamon and sugar coated pumpkin doughnuts to enjoy on one (or more) of these beautiful Autumn mornings? Maybe at a table with some coffee or tea and a good book?

I know I do, so let’s bake some!

PUMPKIN DOUGHNUTS
  • 2 cups of all purpose flour
  • 2 teaspoons of baking powder
  • 1 teaspoon of kosher salt
  • 2 teaspoons of pumpkin pie spice
  • 1 15 oz can of pumpkin puree
  • 3 large eggs
  • 1 1/2 cups of sugar
  • 4 tablespoons of unsalted butter
  • 1 teaspoon of vanilla extract
  • 1/3 cup of vegetable oil
TOPPING
  • 3/4 cup of sugar
  • 2 teaspoons of ground cinnamon
  • 3 tablespoons of unsalted butter, melted
INSTRUCTIONS
  1. Pre-heat the oven to 350F.
  2. Whisk the flour, baking powder, salt, and pumpkin pie spice together in a medium bowl.
  3. Beat the pumpkin puree, eggs, sugar, butter, vanilla and vegetable oil together in a large bowl.
  4. Slowly add the flour mixture to the pumpkin mixture and beat until well combined.
  5. Fill 3, six cup nonstick doughnut pans with batter so each mold is almost full, then smooth the tops with a small spoon.
  6. Bake the doughnuts for about 15 minutes or until a toothpick comes out clean, then remove them from the oven and invert them onto a cooling rack.
  7. While the doughnuts are baking and/or cooling, stir the sugar and cinnamon together in a shallow bowl and melt the topping butter in another bowl.
  8. Once the doughnuts have cooled to a comfortable handling temperature, brush both sides of each one with butter and then dip each side in the cinnamon and sugar to coat.
  9. Enjoy!

DIY – Ghost Pom Pom Painting

Part of the fun in raising Zoey is making things that delight her; I want to create fun, educational crafts for her that are made with love and will be loved! This week we’ll be creating pom pom paintings of a ghost for halloween! 

I remember when I was a kid we made halloween crafts at school and my mom would bring them out every year as part of our halloween decor. It made me feel super happy and proud that she would take the time to save and display my art every year and that is the feeling I want to inspire in my own daughter.

Let’s get painting!

SUPPLIES
  • Ghost pattern (see above)
  • Printer paper
  • Scissors
  • Scotch tape
  • Black cardstock paper (8.5 x 11”)
  • Clothespin
  • Pom pom
  • White paint
INSTRUCTIONS
  1. Print this ghost pattern I’ve created and cut it out of it’s frame, then set the frame aside.
  2. Cut the eyes and mouth out of the ghost shape.
  3. Break off three small pieces of tape, roll them into cylinders, and use them to attach the eyes and mouth where you want them on the black cardstock paper.
  4. Pour non-toxic white acrylic paint into a pie plate (or something similar) and use a clothespin to grab ahold of a pom pom.
  5. Place the ghost pattern’s frame around the edges of your cardstock page and dab the pom pom in the white paint, then dab it around in the edges of the ghost’s shape to create a dotted pattern for your little one.
  6. Remove the frame and allow your little one to dab the paint away to their heart’s content.
  7. Allow the paint to dry and then gently peel off the eyes and mouth to reveal!
  8. Hang it up and enjoy!

Homemade Stovetop Popcorn

Welcome back friends! Who wants some fresh stovetop popcorn to enjoy on one (or more) of these beautiful autumn nights? Maybe cuddled under a blanket, while watching a good movie? I know I do, so let’s pop some!

HOMEMADE STOVETOP POPCORN
  • 3 tablespoons of olive oil
  • 3/4 cup of popcorn kernels
  • 2 to 3 tablespoons of unsalted butter, melted
  • 2 teaspoon of popcorn salt
INSTRUCTIONS
  1. To create popcorn salt, grind it into a fine powder with a mortar and pestle or run 1/2 cup of salt in the food processor until fine.
  2. Place the olive oil and popcorn kernels in a large lightweight pot, then gently shake the pot to distribute the kernels over the bottom of the pan and evenly coat the kernels with oil.
  3. Place the pot on medium heat (or slightly lower depending on the power of your stovetop) and put the the lid on. The kernels will begin popping in about a minute or so and you may need to hold the lid on using the safety handle.
  4. Shake the pot briefly every 30 seconds or so. When the popping stops, immediately pour the popcorn in to a large bowl. You may want to have a bowl set aside to pour excess popcorn into as you go if your pot turns out to be too small.
  5. Melt the butter in a saucepan or microwave, then pour it over the popcorn and sprinkle the salt, shaking well to toss and disperse.
  6. Enjoy!

*This popcorn may look a little dark, but the kernels were toasted in the pan before popping, I did not taste any burnt flavor.

Homemade Play Dough Recipe

Part of the fun in raising Zoey is making things that delight her; I want to create fun, educational crafts for her that are made with love and will be loved! I see much play dough in our future, and while buying it is always a viable option, how fun and cost effective is it to make some on your own?

So let’s make some homemade play dough!

SUPPLIES
  • Large saucepan
  • Wooden spoon
  • Wax paper
  • Gloves
  • Sandwich bags
INGREDIENTS
  • 2 cups of all-purpose flour
  • 3/4 cup of salt
  • 4 teaspoons of cream of tartar
  • 2 cups of warm water
  • 2 tablespoons of vegetable oil
  • Food coloring
INSTRUCTIONS
  1. Place the cream of tartar, flour, and salt in a large saucepan and stir to combine.
  2. Slowly add the oil and water, stirring until well incorporated.
  3. Cook over medium heat, stirring consistently, until the mixture thickens into a dough.
  4. Remove the pan from the heat and allow the dough to cool slightly until it can be handled comfortably.
  5. Divide the dough into equal portions based on how many colors you would like, and roll into balls.
  6. Put on gloves and press an indentation into each ball of dough, then add 15 drops of food coloring to the indentation of each ball to start, you can always add more later. 
  7. Knead each ball of dough until the color is well incorporated. If the color is not as bright as you want, you can add more food coloring and knead again.
  8. Enjoy!

*This can be stored in sandwich bags, one for each color. Just be sure to remove all the excess air for longevity of the dough!

Family Friendly Autumnal Activity Ideas

Welcome back Autumn! Every year I look forward to the Autumn and the warmth it generates inside my home and soul. Where I live, September and October are still rather warm on some days, and turn wet and cold as the months progress toward Winter.  I cannot get enough of the rain this time of year. The cold, wet weather begins to take over outside, driving us all inside to be together and warm. There’s nothing like cuddling up with people you love, reading a good book, watching a movie or playing a video game while the weather misbehaves outside.

I intend to spend a lot of time with my family this year and came up with some family friendly ideas I’d like to experience with Zoey! Follow along and try some of these activities for yourself, this is a time we should all enjoy!

We intend to:

  • Bake bread.
  • Bake cookies for family and/or friends.
  • Collect acorns and make art.
  • Collect leaves and make art.
  • Collect rocks and make art.
  • Make nature pressings or rubbings.
  • Donate to a food bank.
  • Go on a hayride.
  • Go puddling in the rain.
  • Have an indoor picnic on a stormy day.
  • Make a bird feeder.
  • Make Halloween decorations.
  • Go trick or treating!
  • Make fresh tortillas.
  • Make homemade play dough.
  • Make stovetop popcorn.
  • Pick apples.
  • Bake apple pie.
  • Drink apple cider.
  • Make caramel apples.
  • Pick out pumpkins at a pumpkin patch.
  • Give pumpkins a bath.
  • Carve, decorate and/or paint pumpkins.
  • Bake pumpkin bread. 
  • Roast pumpkin seeds.
  • Roast s’mores.