The Reluctant Dragon’s Pineapple Upside Down Cake Recipe

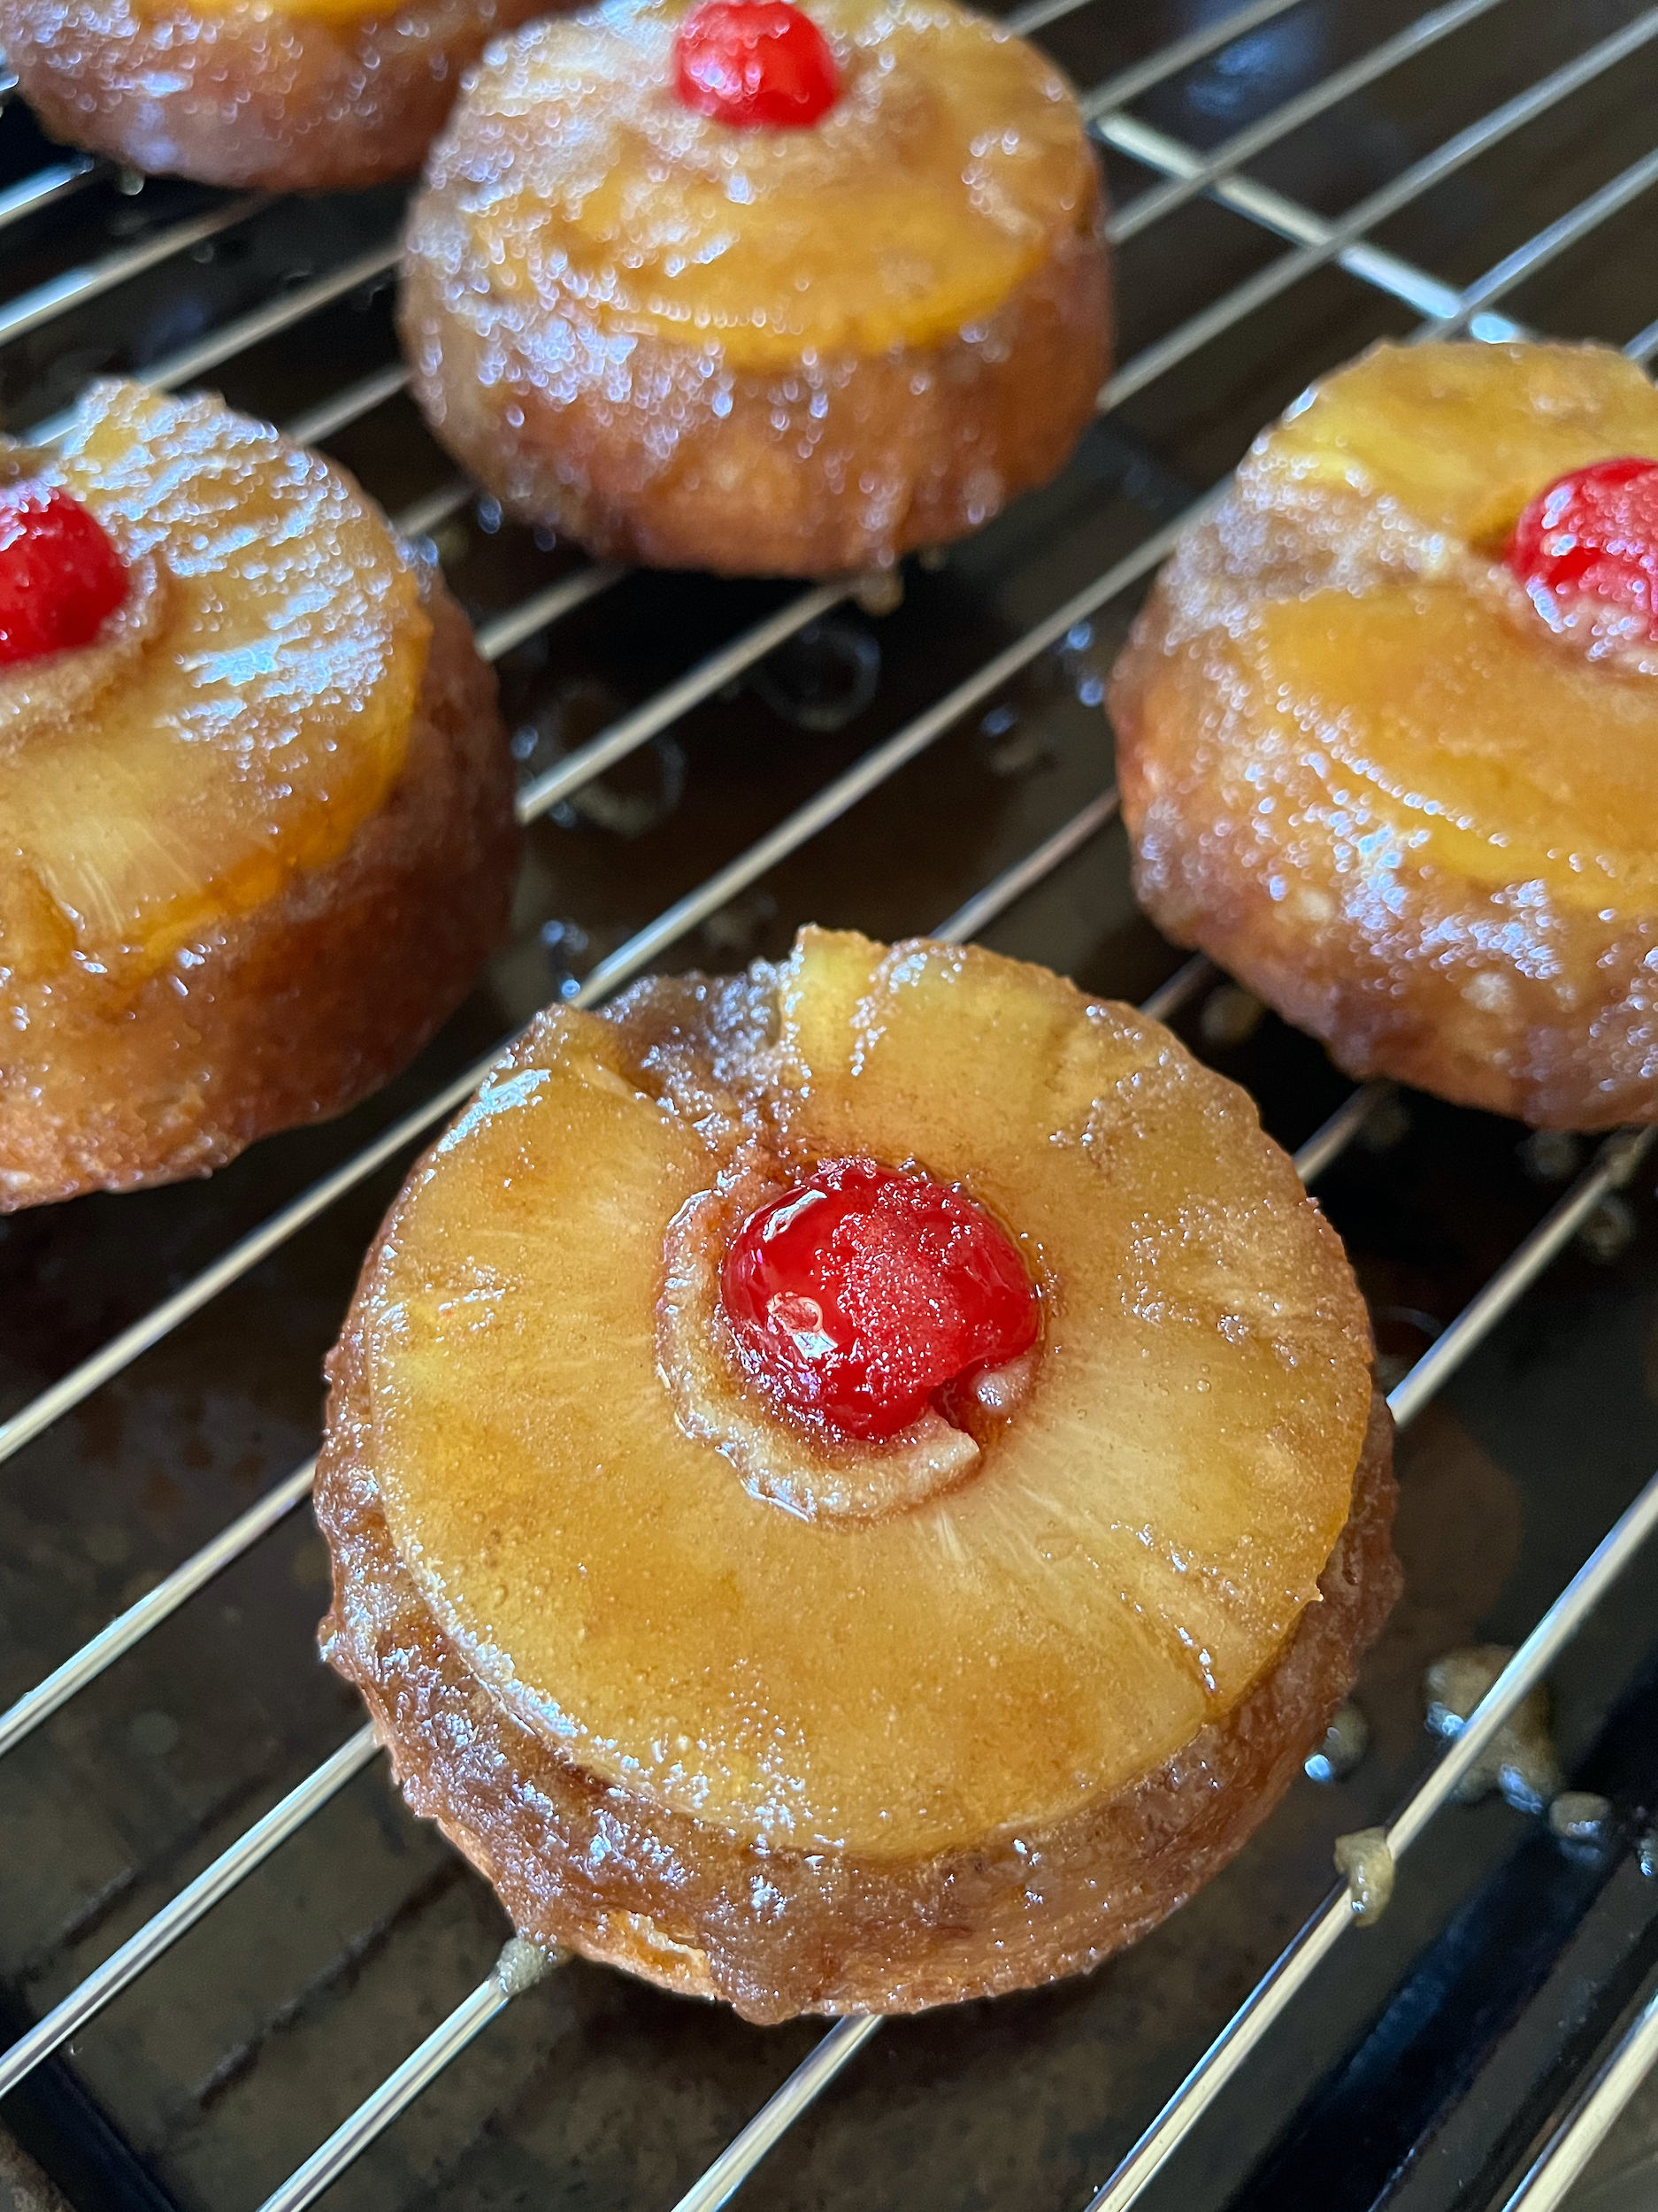
Welcome back friends! This week we’ll be baking miniature pineapple upside down cakes from Disney’s The Reluctant Dragon.

This recipe is featured when the dragon recites his poem “To An Upside-Down Cake” to the boy and Sir Giles.

Sweet little upside-down cake,

Cares and woes, you’ve got’em,

Poor little upside-down cake,

Your top is on your bottom.

Alas, little upside-down cake,

Your troubles never stop,

Because, little upside-down cake,

Your bottom’s on your top.

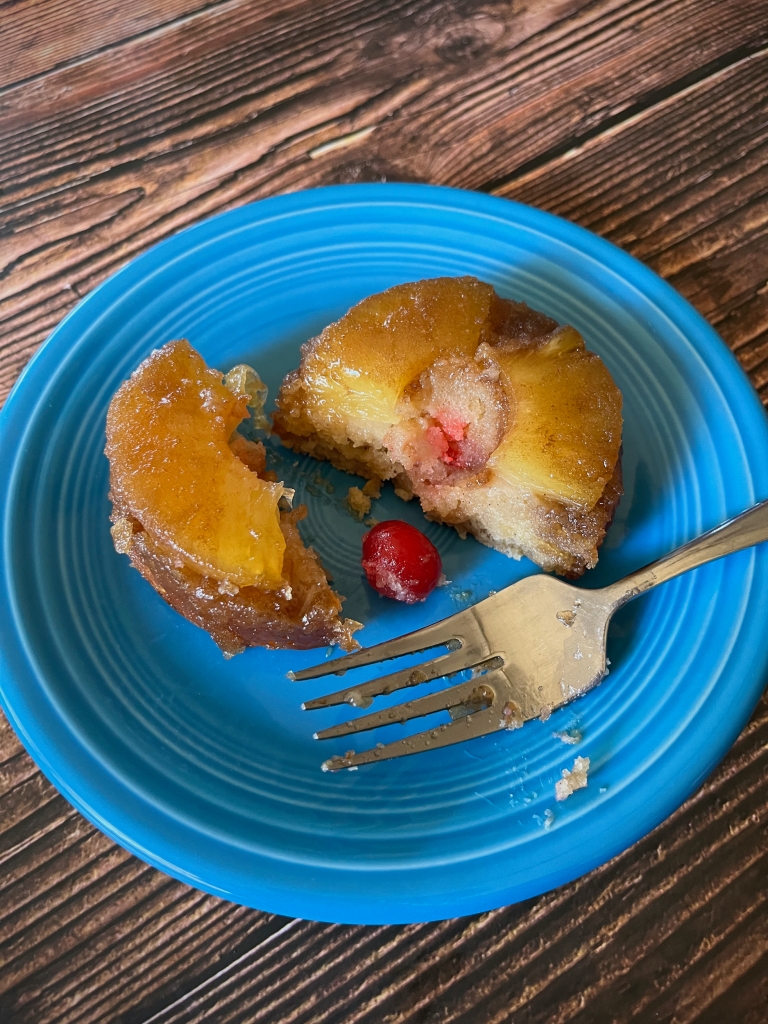
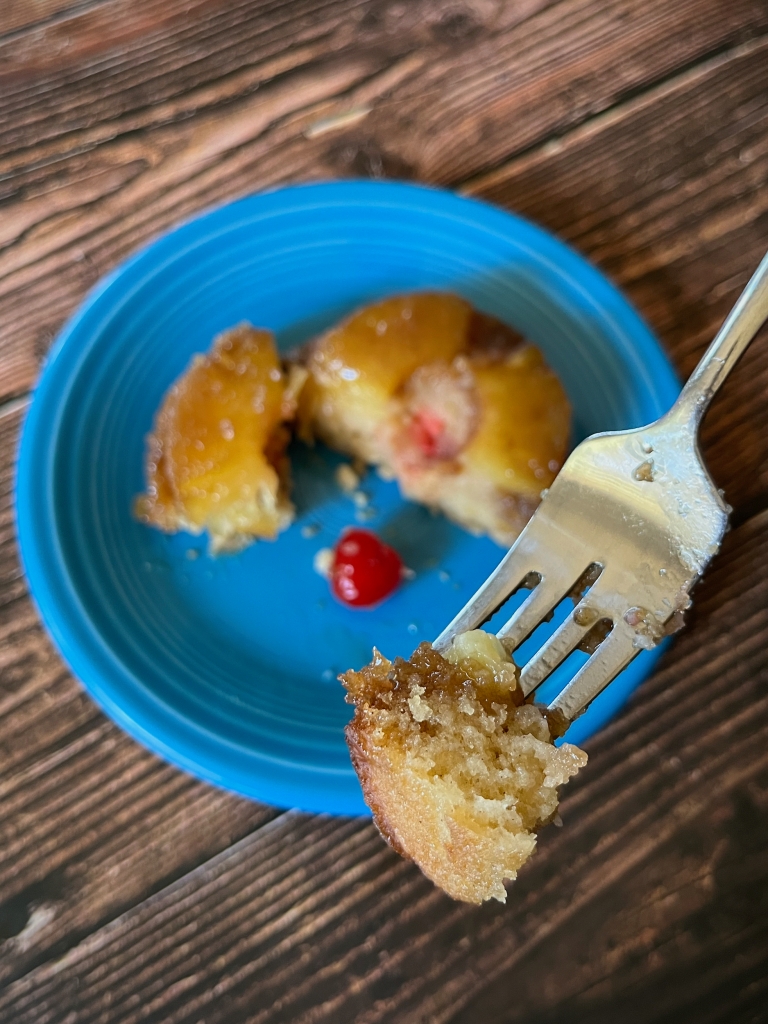
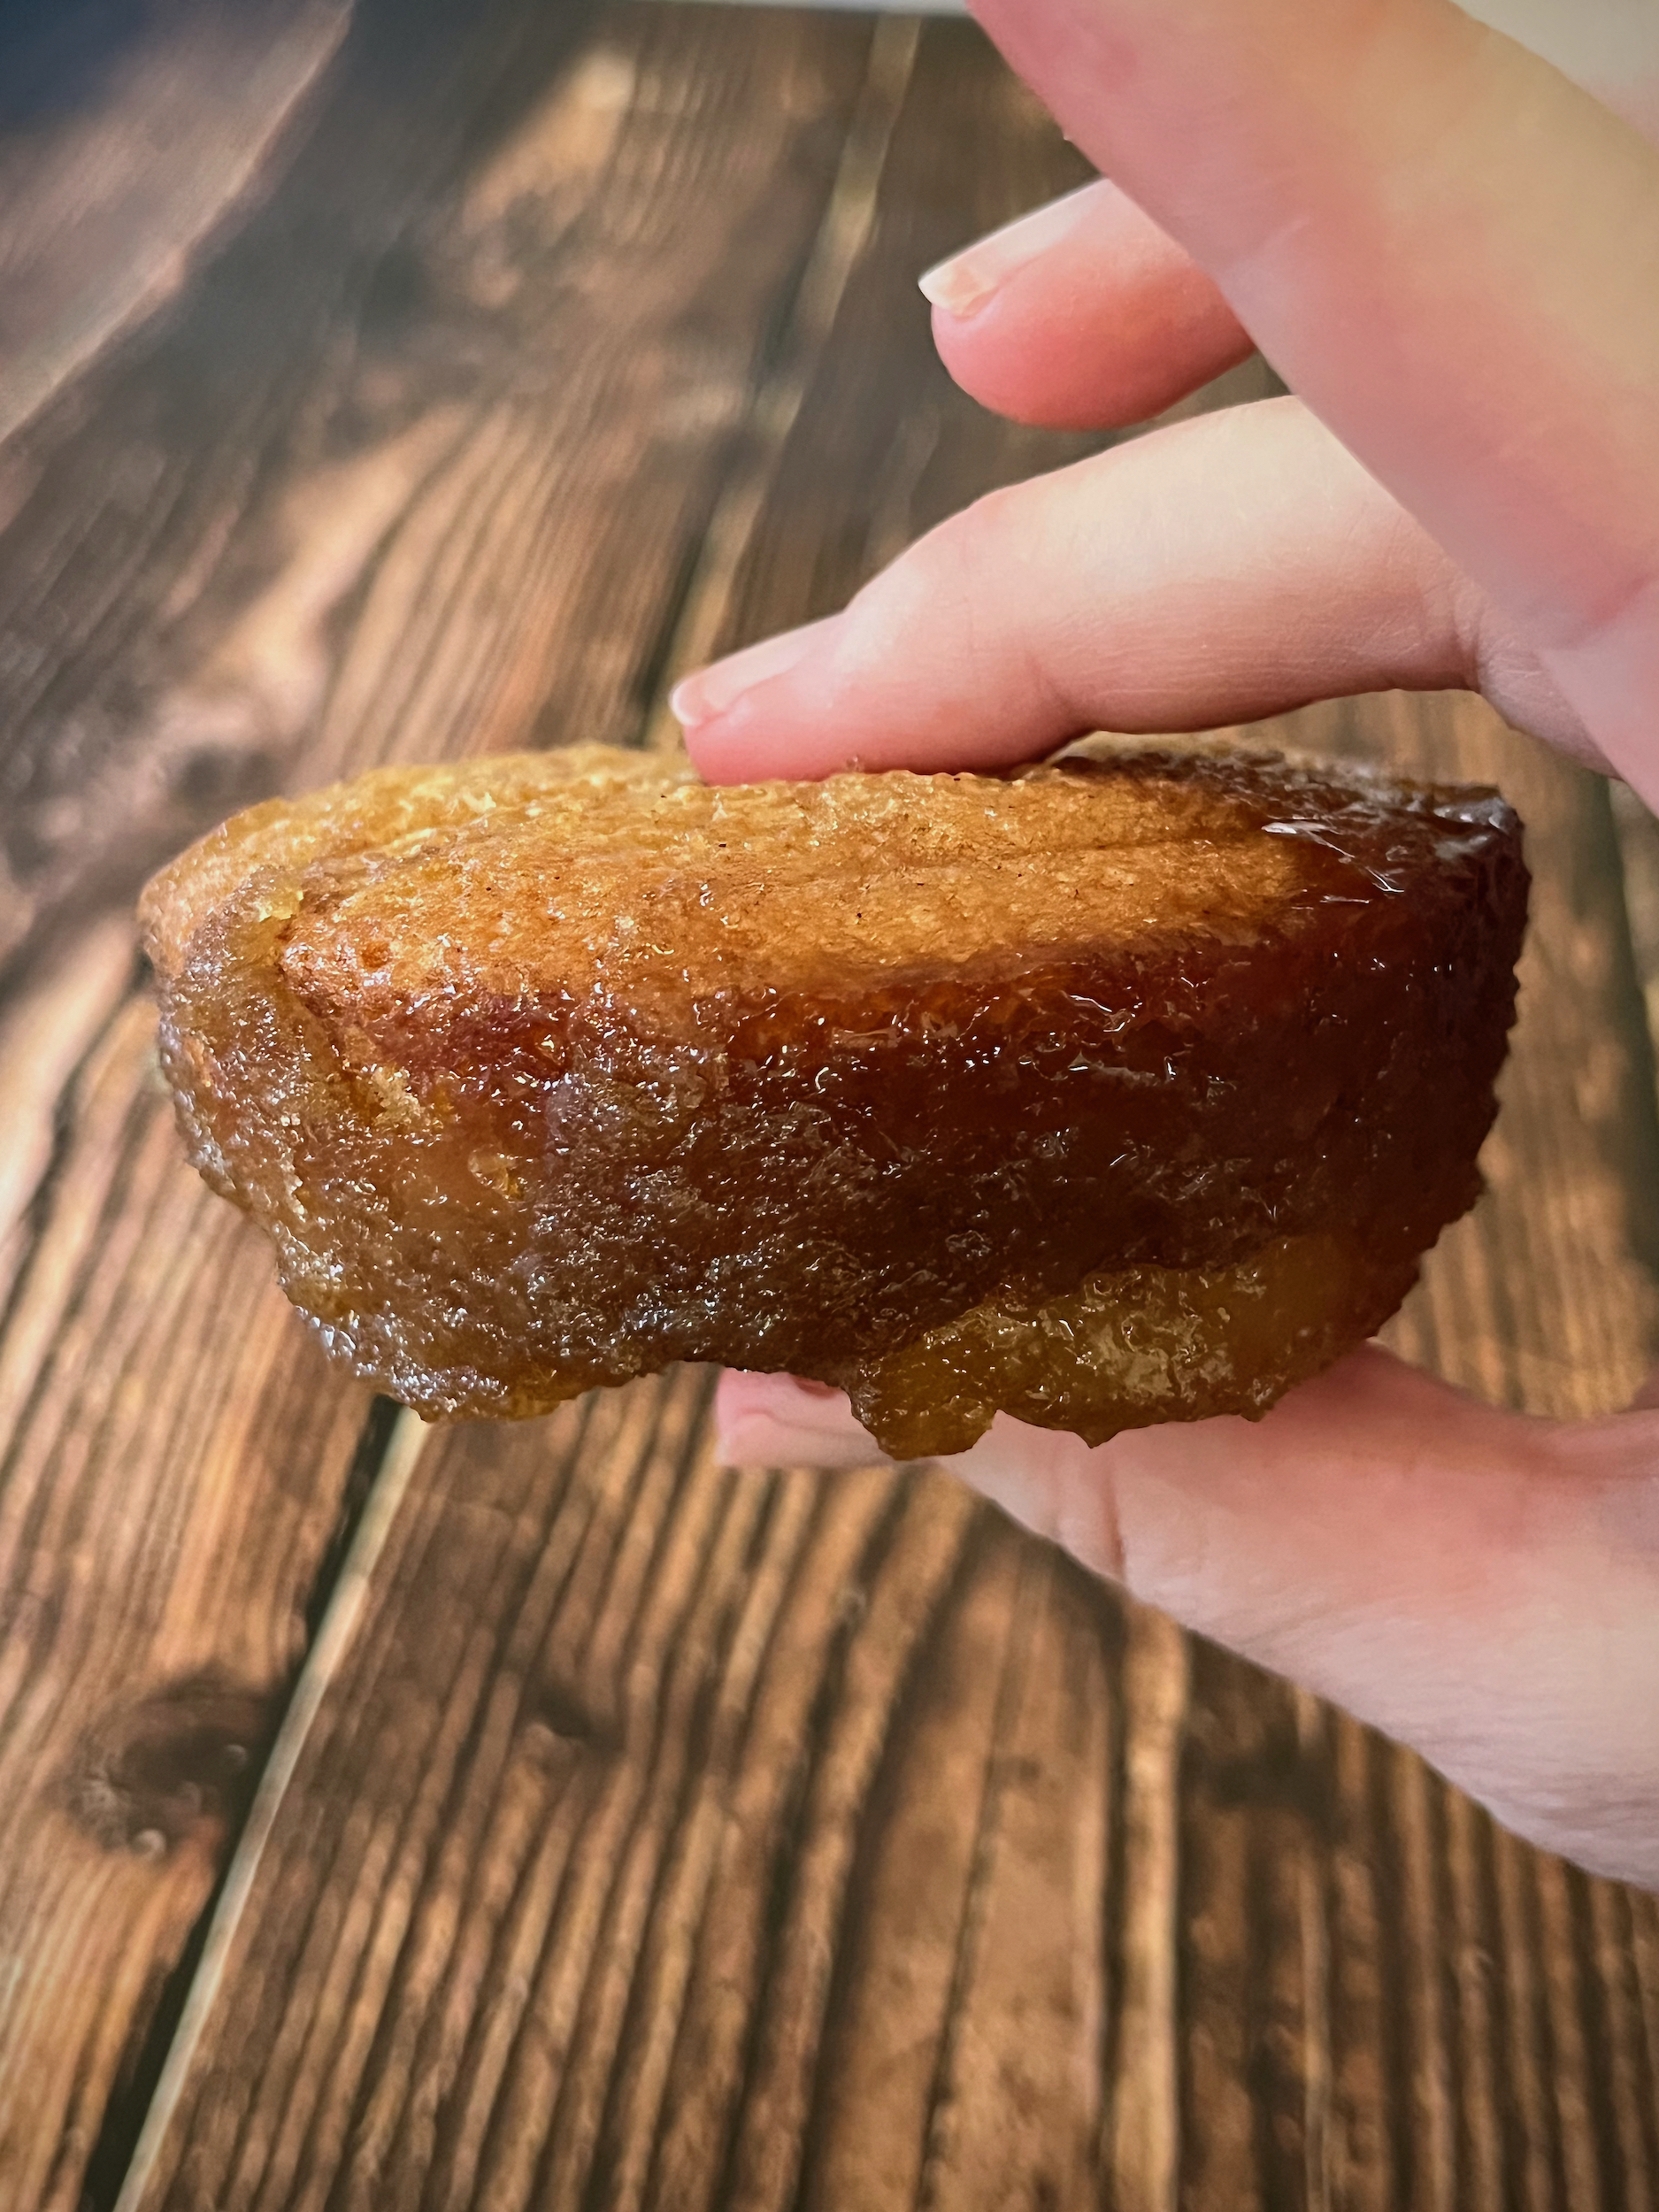
Now I do not see a pineapple nor cherry on his little cake, so I took artistic liberty and chose pineapple upside down cake; I have no regrets! These little cakes are delicious! My favorite part is the topping, all that brown sugar, mmmm!

INGREDIENTS

CAKES

  • 4 large eggs, at room temperature
  • 1/4 cup of dark brown sugar, packed
  • 1 1/4 cups of granulated sugar 
  • 1/2 cup of pineapple juice 
  • 2 teaspoons of pure vanilla extract
  • 2 1/4 teaspoons of baking powder
  • 1/2 teaspoon of cinnamon
  • 2 tablespoons of cornstarch
  • 1 1/2 cups of all purpose flour
  • 1/4 teaspoon of salt

TOPPING

  • 6 tablespoons of unsalted butter
  • 1 1/2 cups dark brown sugar (packed) 
  • 1/8 teaspoon of salt 
  • 1 teaspoon of vanilla extract
  • 10-12 pineapple rings
  • 10-12 maraschino cherries
INSTRUCTIONS
  1. Pre-heat oven to 350 F. Spray a jumbo muffin tin with non-stick cooking spray and set aside.
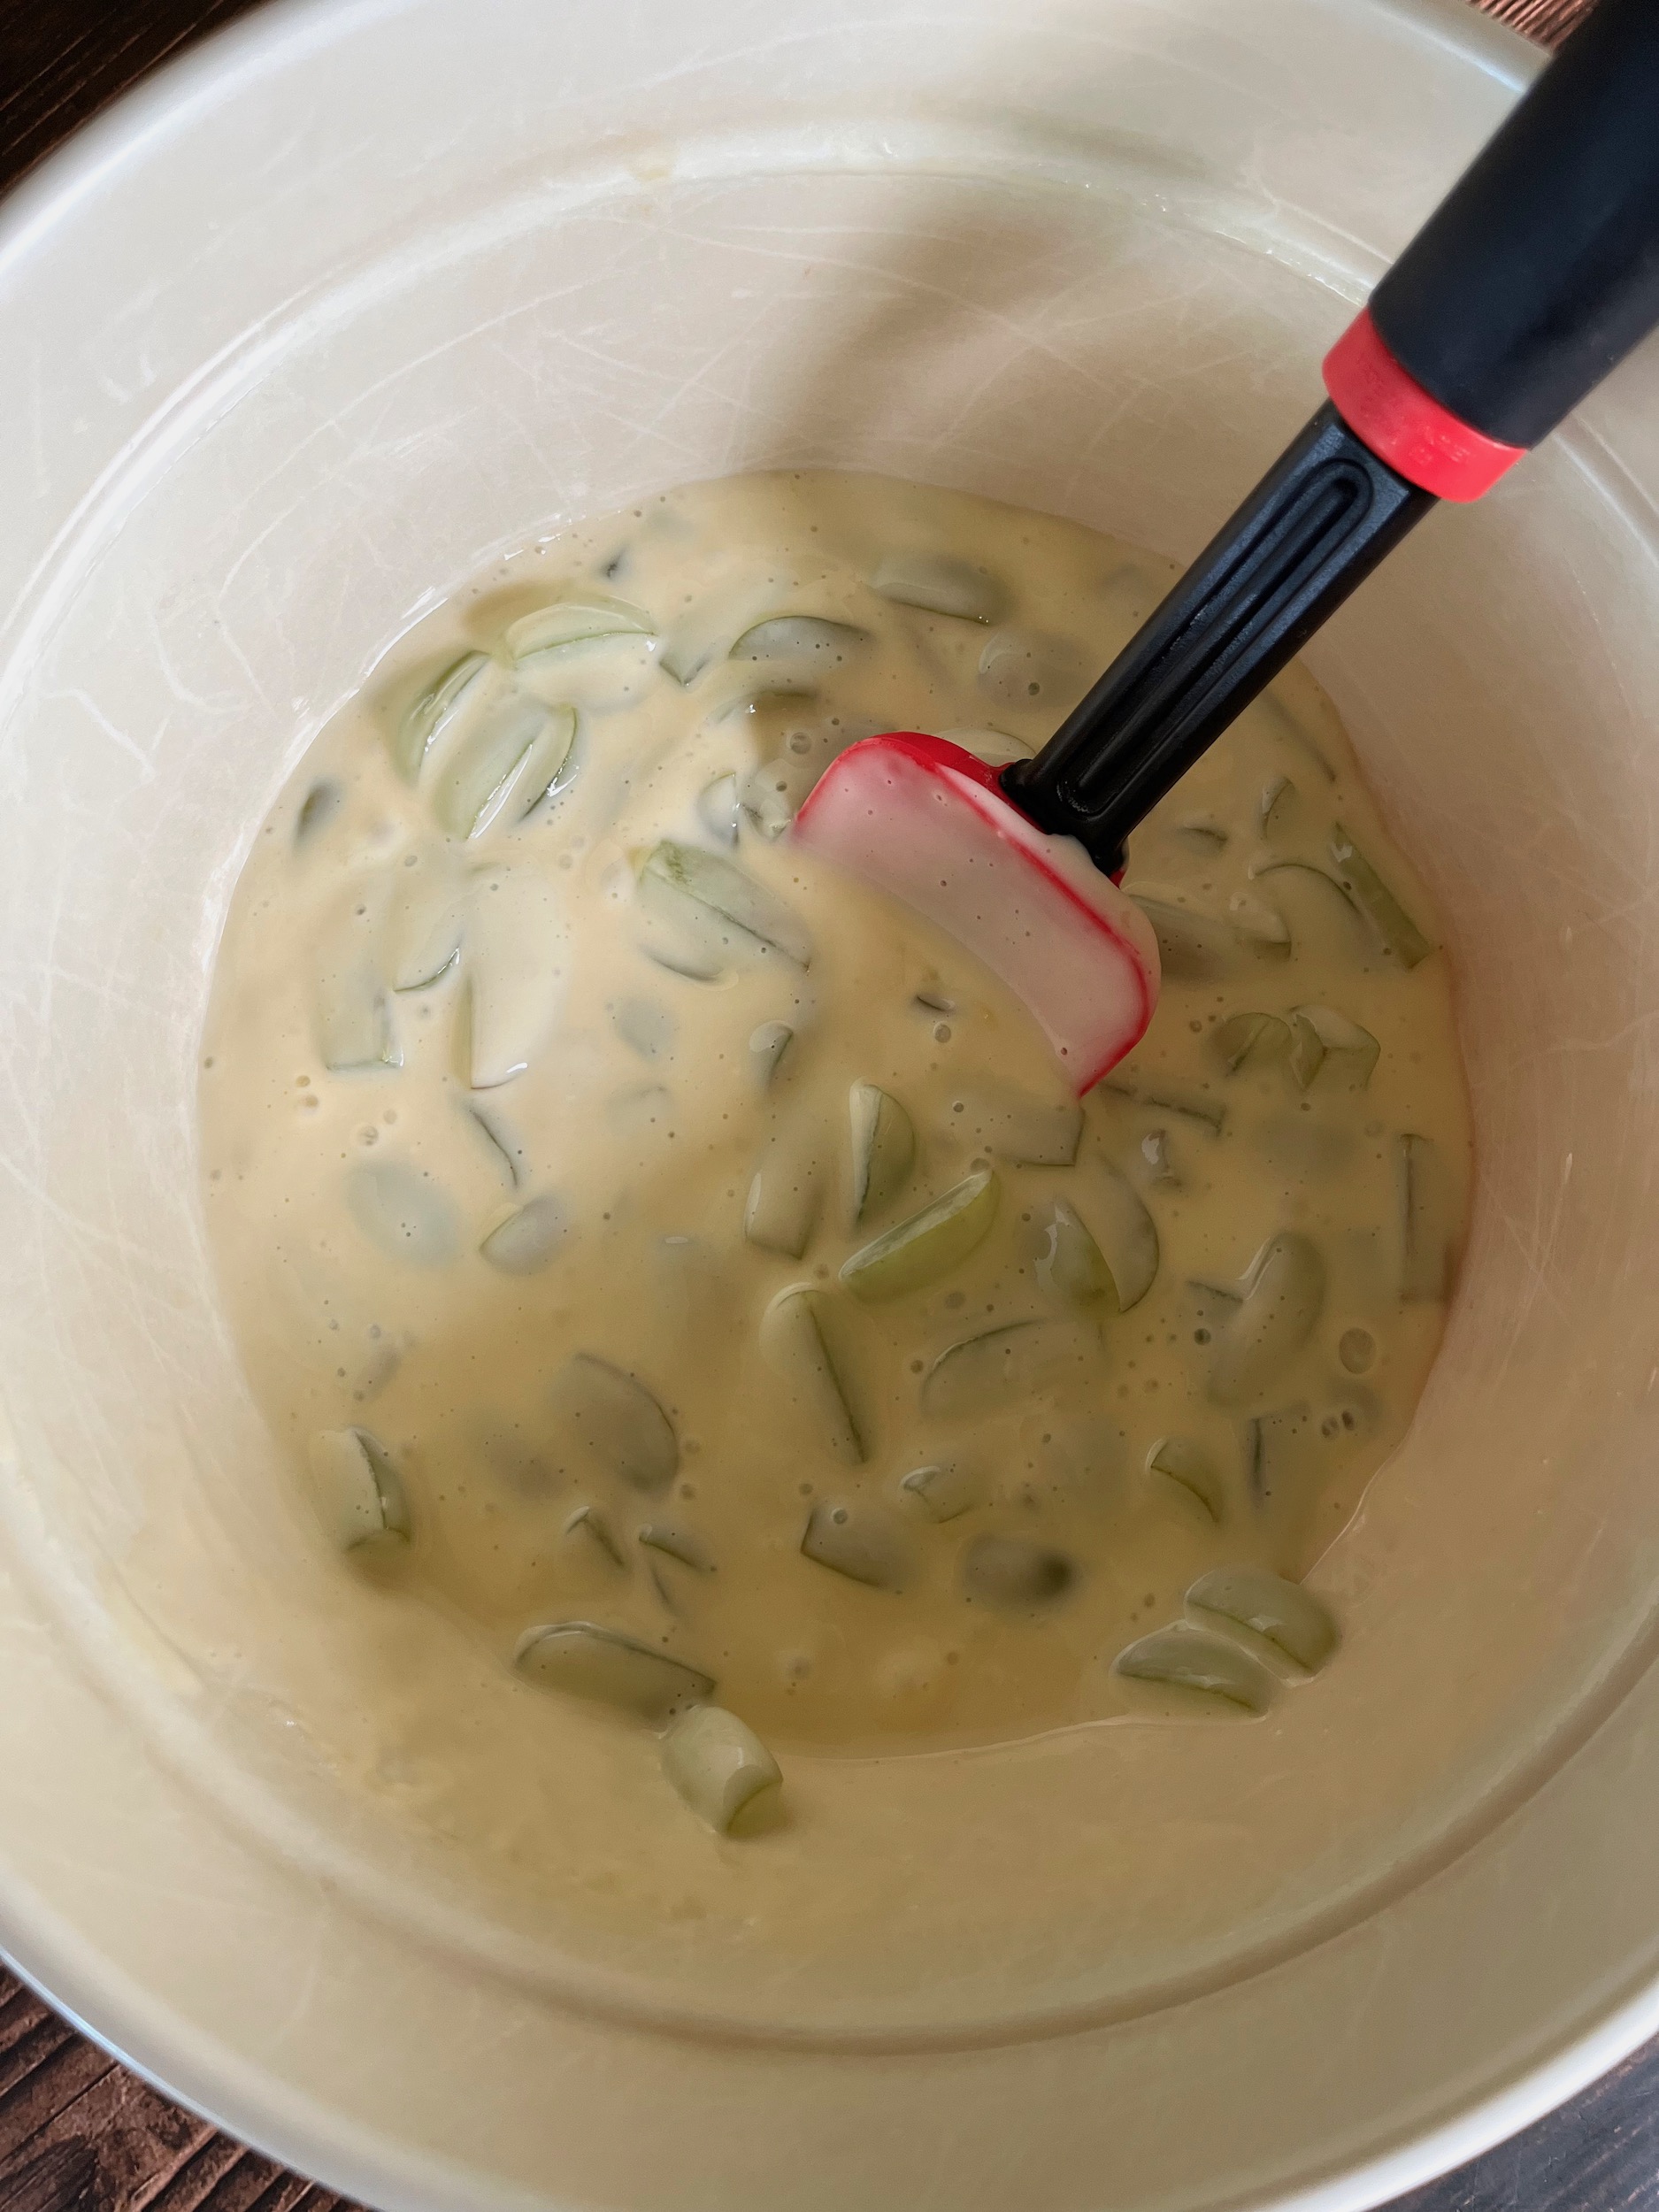
  2. Crack the eggs into a large mixing bowl and whisk until smooth. 
  3. Add the brown sugar, granulated sugar, pineapple juice and vanilla, then whisk again until smooth. 
  4. In a separate bowl, sift together the baking powder, cinnamon, cornstarch, flour and salt.
  5. Gradually add the dry ingredients into the wet ingredients and whisk until just combined (be sure not to over mix), then set the mixture aside while you make the topping. 
  6. In a small sauce pan, melt the butter over medium to low heat. 
  7. Add the brown sugar, salt, and vanilla.
  8. Cook for one minute, whisking constantly, then remove the saucepan from the heat. 
  9. Spoon two tablespoons of the topping into the bottom of each muffin tin, then place a pineapple ring over that with a cherry in the middle.
  10. Divide the cake batter evenly among the prepared tins, filling each muffin tin 3/4 of the way full. 
  11. Bake for 20 to 25 minutes, until the tops are puffed and golden brown and a toothpick inserted in the center of the cake comes out clean. 
  12. Remove from the oven and allow to cool in the pan for 5 minutes. Gently run a knife around the edge of each cake to help loosen any stuck bits, then gently place a wire cooling rack over a sheet pan (to help with the drips) on top and quickly flip over.
  13. Allow to cool and enjoy!

How to Play – Save the Bee

Part of the fun in raising Zoey is finding things that delight and educate her; I want to find fun, creative board games to play with her during our family game nights! This week I found a game called Save the Bee by Gamie. Which is essentially a Jenga-type game with a bee atop a honeycomb. Each player takes turns removing pieces of the honeycomb and whoever drops the bee, loses.

Zoey loves this game and has pretty much contributed to the bee falling every time we’ve played, but that does not stop her from enjoying it! Or requesting that I stack the honeycombs back up immediately to play again. My only gripe would be that it is slightly inconvenient to re-stack the honeycomb, but other than that, it is a wonderful game to play with children!

IN THE BOX
  • A base
  • 2 sides
  • 45 honeycomb pieces
  • A cardboard honeycomb shape
  • 2 wands
  • A spinner
INSTRUCTIONS
  1. Snap the 2 sides of the honeycomb into the base.
  2. Slide the honeycomb shaped cardboard piece into the base behind the sides and lay the whole thing down.
  3. Arrange the individual honeycomb pieces within the base and sides until they reach the top, then gently stand the whole thing upright and carefully remove the cardboard piece.
  4. Gently set the bee on the top center honeycomb and you’re ready to begin!
  5. Each player gets a wand and then takes turns spinning the spinner and removing a honeycomb piece of the same color they land on. If they land on space with multicolor honeycombs, they can remove a piece in the color of their choice. If they land on the prohibition symbol, they lose a turn.
  6. There are no rules that mention what happens if a player accidentally knocks out more than one honeycomb piece, we’ve just decided to let them fall and keep playing!
  7. Enjoy!

DIY – Bee Watering Station

Whether you keep a garden or not, bees are so essential to the plant life around us! They need water too, and sometimes sources of water are too deep for them to safely reach. To aid the bees while they are pollinating our plants, let’s create a decorative water dish for them to safely get a drink and keep moving!

SUPPLIES
  • 1 plant saucer
  • 1 plant pot (smaller than the plant saucer)
  • Small, foam paint brush
  • Paint palette (or a tray for your paint)
  • Non-toxic acrylic paint
  • Mod Podge
  • Glass gem marbles
INSTRUCTIONS
  1. Wipe the plant pot and saucer clean with a damp rag and allow to them to dry.
  2. To prime and seal the plant pot and saucer, spread an even layer of Mod Podge on them with a small foam paint brush. Allow them to dry before switching sides and/or applying new layers.
  3. Once the Mod Podge is dry, begin painting the plant pot and saucer with whichever color of non-toxic acrylic paint you prefer! Allow them to dry before switching sides and/or applying new layers.
  4. Apply the paint in layers until you’re happy with the color and texture.
  5. Once the paint is dry, seal the plant pot and saucer again with even layers Mod Podge. Allow them to dry before switching sides and/or applying new layers.
  6. Once the Mod Podge is dry, flip the plant saucer over and find its center. Place the bottom of the plant pot centered on the bottom of the plant saucer and use a pencil to trace around the edge.
  7. Remove the plant pot and carefully apply an even trail of glue just inside the traced circle on the bottom of the plant saucer.
  8. Immediately place the bottom of the plant pot on the bottom of the plant saucer over the circle of glue and press down gently. Leave the assembled water dish as it is, upside down, for at least 24 hours to dry before moving it.
  9. Now, Mod Podge should be left to fully cure for at least 3 weeks before filling the dish with water. Allow the Mod Podge to fully cure before moving on to the next step!
  10. Once the Mod Podge has fully cured (you will know it is when it is no longer tacky to the touch), fill the water dish with glass gem marbles and then with water.
  11. Place the Bee water station outdoors to hydrate those bees!
  12. Enjoy!

DIY – Felt Pie

What child (or inner child) doesn’t love preparing toy food in a play kitchen? 

I had a play kitchen when I was a little girl and loved preparing pie for myself, my sister and my parents. Now that I’m grown and have a daughter of my own, I want to make her some handcrafted play food so she can enjoy making meals for everyone during play, or while we cook in the kitchen next to her!

Please feel free to use these patterns to create some play food for you and yours! This pattern will make one slice of pie. I made 6 slices total to create a whole pie. You can duplicate it as much as you want to make multiple pieces of each food!

SUPPLIES
  • Pie patterns (see above) 
  • Paper scissors
  • Light tan felt material
  • Red felt material (or whichever color you want for the pie’s interior)
  • Fiberfill stuffing
  • Sewing pins
  • Sewing scissors
  • Sewing needle
  • Embroidery floss (light tan and red or whichever color you choose for the pie’s interior)
INSTRUCTIONS
  1. Print out the pie pattern I’ve provided, then cut the patterns from the paper.
  2. Pin the patterns on the appropriate colored felt, then use sewing scissors to cut the felt.
  3. Thread a sewing needle with red embroidery floss to sew the pie filling together.
  4. Using a whipstitch, begin sewing along one of the short edges of the pie filling, conceal the knots in between the two pieces of felt.
  5. Pin the red vent piece to the top crust piece and use red embroidery floss to whipstitch the vent “hole” in place.
  6. Thread a sewing needle with light tan embroidery floss and whipstitch the triangular shape of the pie filling to the triangular shape of the bottom crust. Conceal the knots inside.
  7. Continue using light tan embroidery floss to whipstitch the triangular shape of the top crust to the triangular other side of the pie filling. Conceal the knots inside.
  8. Align the back crust to the open back end of the pie we’ve already stitched together. This piece will be taller than the main pie structure and that’s perfect! We are going to fold the excess down to create the edge of the crust!
  9. Beginning at the top of one side of the filling, whipstitch down the filling, along the bottom crust then up the other side of the filling. Stop here to stuff the pie.
  10. Stuff the inside of the pie with fiberfill, then continue stitching the back crust to the top crust. Conceal the knots inside.
  11. Fold the extra felt down to create the edge of the crust and stitch along where the end meets the back of the pie. Conceal the knots inside.
  12. Stuff the edge of the crust with fiberfill and then sew the sides shut to keep the stuffing in. Conceal the knots inside.
  13. Repeat steps 2 through 12 five more times for a full pie!
  14. Enjoy!

DIY – Snow White and the Seven Dwarfs Peg Dolls

Part of the fun in raising Zoey is making things that delight her; I want to create lasting, meaningful toys for her that are made with love and will be loved! Wooden toys are classic and beautiful, when created and treated right, they can last a lifetime; so let’s make some!

It’s no secret that Cameron and I love Disney. We’ve begun showing Zoey the classics, starting with the first full length animated feature that started them all! Snow White!

This week I’ll be sharing the steps I took to create a Snow White peg doll, along with her friends, the seven dwarfs.

SUPPLIES
  • Blank peg doll(s)
  • Small, flat & fine tip paint brushes
  • Paint palette (or a tray for your paint)
  • Non-toxic acrylic paints
  • Non-toxic varnish (I used Duraclear Ultra Matte Varnish)
INSTRUCTIONS
  1. With a pencil, lightly sketch Snow White onto a blank peg doll.
  2. Begin painting your peg doll with the base layers first. I started with the yellow of her dress and the white of her collar. Allow this paint to dry before moving on to avoid smudging, then apply a few more layers of each until you’re happy with the colors and textures.
  3. Paint the very bottom and its edges of the peg doll black to signify her slippers. Also take this opportunity to paint the black of her hair. Allow this paint to dry and apply a few more layers until you’re happy with the colors and textures.
  4. Move to painting the dark blue of her bodice, the light blue of her sleeves and the red of her cape. Allow this paint to dry and apply a few more layers until you’re happy with the colors and textures.
  5. Paint the red of the accents on her sleeves and the red of the bow in her hair. Allow this paint to dry and apply a few more layers until you’re happy with the colors and textures.
  6. Finish up with outlining and/or adding small details, including a small thin yellow line down the middle of her bodice. Allow this paint to dry and apply a few more layers until you’re happy with the colors and textures.
  7. Taking something small and round (I used the opposite end of one of my smaller paint brushes) dip it in black paint and dot the two eyes. Using the finest tipped paintbrush you can find, give her an eyelash or two on each eye.
  8. Using the same method as the eyes, dip the opposite end of a slightly larger paintbrush into light pink paint and dot the blush under each eye.
  9. Allow for all paint to completely dry, then apply a varnish and allow it to dry. You can apply as many coats as you want for the finish you want, just allow them to dry in between applications and before handing her over to your child.
  10. If you want to paint the dwarfs too, lightly sketch them on blank peg dolls. I used different characteristics to define each one. For example, Grumpy has scowling eyebrows, Bashful has large blush spots on his cheeks, Sneezy has wrinkles above his nose, etc.
  11. The dwarfs are a colorfully dressed bunch! With different colored hats, shirts and pants it may take awhile to paint them all, but take your time and reference the picture for color. Allow each layer paint to dry and keep applying layers until you’re happy with the colors and textures.
  12. Using a fine tipped paintbrush, paint each dwarf’s white beard (except Dopey of course)! Allow this paint to dry and apply a few more layers until you’re happy with the color and texture.
  13. Taking something small and round (I used the opposite end of one of my smaller paint brushes) dip it in black paint and dot the two eyes.
  14. Using a fine tipped paintbrush, paint each dwarf’s nose and cheeks light pink.
  15. Finish up with outlining/and or adding small details like buttons and buckles!
  16. Allow for all paint to completely dry, then apply a varnish and allow it to dry. You can apply as many coats as you want for the finish you want, just allow them to dry in between applications and before handing them over to your child.
  17. Viola! Snow White and the seven dwarfs are done and ready to be played with! Enjoy!

Take a Look – Wholesome Game Direct!

Change into some comfortable clothes, get a yummy drink, drape a soft blanket over your lap and maybe even cuddle with a pet; the Wholesome Game Direct aired this Saturday, June 10th!

Here is the full presentation:

I am pretty excited to play most of the games presented, but if I had to choose my top five (in no particular order):

What games piqued your interest? I’d love to know!

Snow White’s “Gooseberry” Pie Recipe

INTRODUCTION

Welcome back friends! This week we’ll be baking Grumpy’s “Gooseberry” Pie from Disney’s Snow White and the Seven Dwarfs!

This recipe is featured near the end of the film when Snow White is warming Grumpy’s heart through is stomach by baking him his own pie.

But Gooseberries are hard to track down! They were federally banned in the early 1900s due to a fungal disease called “white blister pine rust”, but the federal ban has been lifted and is on a state by state basis. They are legal here in California, but I haven’t grown any and apparently not many others have either! I found several canned options online, but the most affordable option would have been almost $30.00 for one ingredient! So we are substituting with green grapes! Hence the quotations on “Gooseberry” pie.

I found these illustrated instructions created and shared by Disney and followed them! I wrestled with the idea of making my own crust, but opted for store-bought. The finished pie had good flavor, but the texture was not what I prefer. Try it for yourself and let me know what you think!

INGREDIENTS
  • Pie crust
  • 2 eggs
  • 1 1/3 cup of sour cream or greek yogurt
  • Zest of one lemon
  • 1 1/2 teaspoons of vanilla
  • 1 cup of sugar
  • 1/3 cup of flour
  • Pinch of salt
  • 4 cups of gooseberries (or green grapes), whole or sliced

INSTRUCTIONS

  1. Pre-heat the oven to 400 F. 
  2. Roll out the pie crust and press the bottom layer into a 9” pie dish.
  3. Beat the two eggs in a bowl, then add the sour cream, vanilla and lemon zest.
  4. In a separate bowl, combine the flour, sugar and salt.
  5. Gently incorporate the dry ingredients into the wet ingredients a little at a time.
  6. Once fully mixed, gently fold in the gooseberries (or green grapes).
  7. Pour the gooseberry mixture into the pie crust, distributing evenly.
  8. Lay the top layer of pie crust over the filled pie plate and use a fork to seal and design the edges. Cut a few vent slits through the top crust.
  9. Cut the excess pie dough off of the sides and roll it into a thin cylinder shape. Use this to write “Grumpy” on the top of the pie.
  10. Place the pie in the oven and bake for 30 to 35 minutes, or until golden brown. 
  11. Allow to cool and enjoy!

Fun and Easy Non-alcoholic Butterbeer Recipe

Welcome back friends! With the release of Hogwarts Legacy, I am in a Harry Potter kind of mood, and craving some Harry Potter food!

Wowee, Butterbeer is sweet! It best enjoyed with something salty to counteract just how sweet it is! Another way to counteract the sweetness is to leave the whipped cream plain, no added sugar or sweetener, just the whipped cream. If you mix the whipped cream and the butterbeer it creates a perfectly balanced bite! Not too sweet!

Let’s make some!

INGREDIENTS
  • 1⁄2 cup of butterscotch syrup
  • 1⁄2 tablespoon of butter, melted
  • 1 cup of cream soda
  • Heavy whipping cream
INSTRUCTIONS
  1. Measure and pour the butterscotch syrup into a bowl.
  2. Add the melted butter to the butterscotch syrup and whisk gently until combined.
  3. Measure and pour the cream soda into the butter, butterscotch mixture and whisk gently again until combined, then set aside.
  4. In a separate mixing bowl, whip the heavy cream until it forms stiff peaks. 
  5. Pour the butterbeer into mugs of your choosing, leaving room for the whipped cream topping.
  6. Top the butterbeer with a few dollops of whipped cream and enjoy! 

DIY Heart Handprint Painting for Valentine’s Day

Welcome back friends!

My little girl hasn’t quite reached the age of exchanging multitudes of valentines amongst her classmates and/or friends so I thought we would create a few fun pieces of artwork instead! These heart handprint paintings are the perfect Valentine for moms, dads, grandmas, grandpas, aunts and uncles; the sky is the limit!

Let’s have some fun and get painting!

SUPPLIES
  • Small mounted canvas (large enough for a handprint)
  • Foam paint brushes
  • Acrylic paint
  • Heart shaped paper, small
  • Scissors
  • Sticky tape
INSTRUCTIONS
  1. Select the colors you would like for a background, this can be one or more dependent on your preference.
  2. Squeeze dots of the background paint color(s) you selected on the canvas in any pattern you prefer. I was going for a gradient look so I arranged my dots from light to dark.
  3. Using a a foam paint brush, you and your little one can spread and blend the paint over the canvas in back and forth strokes.
  4. For a completed look, paint the edges of the canvas if you have not already done so, then set it aside and allow it to fully dry.
  5. Print and cut a heart out of paper and use sticky tape to attach it to the dry canvas.
  6. Select the colors you would like to use to create the handprint, this could be one color or more, we did six, one for each finger and another color for the palm!
  7. Using a different foam paint brush for each color, brush the colors onto your little one’s hand. Gently press the painted hand down on the canvas, aligning the heart under their palm.
  8. Gently pull the hand away, then peel away the heart if it did not come off onto the hand.
  9. If needed, use a small paint brush to touch up the edges of the heart, then allow the painting to dry.
  10. Enjoy!

DIY Knit Loom Hat for Beginners

Welcome back friends! Do you have or have you heard of knit looms? They are fantastic! Whether you’re a beginner or not, it is cozy and comforting, sitting and creating items for yourself and/or loved ones!

I have a set of knit looms with four different sizes. I’ve recently been experimenting with different hat knits and patterns! Let’s create one of my favorites!

This pattern is pretty straight forward and easy to handle for any beginner! If you have any questions, please let me know!

SUPPLIES

  • Extra Large Knit loom XL gauge (41 pegs)
  • Bulky yarn (weight #5)
  • Loom hook
  • Scissors
  • Yarn needle

INSTRUCTIONS

  1. Create a slip-knot and cast it over the first vertical peg to the left of the horizontal anchor peg, with the tail of yarn draped within the loom.
  2. Working counter-clockwise, wrap the next peg twice, then use the loom hook to pull the bottom loop over the top loop and off the peg. Do this for each peg until you’ve completed the “cast-on” round.
  3. Now we’ll work on the brim! Continuing to work counter-clockwise, e-wrap each peg once and pull the bottom loops from the previous row over the new top loops and off the pegs. Repeat this step for at least 18 rounds.
  4. Once you’ve completed 18 rounds, find your original slip-knot and place its loop back on the first peg. Continue replacing the loops of the “cast-on” round back on to the loom, then tuck the tail of yarn from the knot into the folded brim.
  5. To anchor the brim, pull the loops from the previous round over the top “cast-on” round loops and off the pegs.
  6. Now we will work on the main part of the hat! Begin with a round of e-wrapping each peg once and pulling the bottom loops from the previous round over the new top loops and off the pegs.
  7. The next round will consist of alternating e-wrap pegs and purl pegs all the way around. To purl, stick your pick underneath the center of yarn on a peg, use it to grab ahold of the new yarn and pull it up under the existing yarn to make a loop. Carefully take the whole stitch off of the peg and loop this new loop of yarn on to the peg and pull it tight.
  8. Repeat steps 6 and 7 for as many times as you’d like the hat to be long. I did 14 e-wrap rounds and 14 e-wrap and purl rounds for a total of 28.
  9. When finished, take your yarn and wrap it around the outside edge of the loom until it touches back on itself and cut it here for extra yarn.
  10. Thread the extra yarn on to the yarn needle and stitch it upward through each loop, then you can remove that loop off of its peg. Once all of the loops have been stitched through with the needle, you can pull the string to begin forming the top of the hat.
  11. Turn the hat inside out and pull the needle and extra yarn through the still existing hole at the top of the hat, then pull the drawstring as tight as possible to close the hole completely.
  12. Stitch around the edges of where the hole was and tie it in knots to secure it. Then stitch the rest of the end into the inner stitches of the hat to hide it.
  13. Turn the hat right side out and if you have a patch (like my nifty Super Mario star) stitch that patch onto the brim.
  14. Enjoy!