Part of the fun in raising Zoey is making things that delight her; I want to create fun, educational crafts for her that are made with love and will be loved! I see much play dough in our future, and while buying it is always a viable option, how fun and cost effective is it to make some on your own?
So let’s make some homemade play dough!
SUPPLIES
Large saucepan
Wooden spoon
Wax paper
Gloves
Sandwich bags
INGREDIENTS
2 cups of all-purpose flour
3/4 cup of salt
4 teaspoons of cream of tartar
2 cups of warm water
2 tablespoons of vegetable oil
Food coloring
INSTRUCTIONS
Place the cream of tartar, flour, and salt in a large saucepan and stir to combine.
Slowly add the oil and water, stirring until well incorporated.
Cook over medium heat, stirring consistently, until the mixture thickens into a dough.
Remove the pan from the heat and allow the dough to cool slightly until it can be handled comfortably.
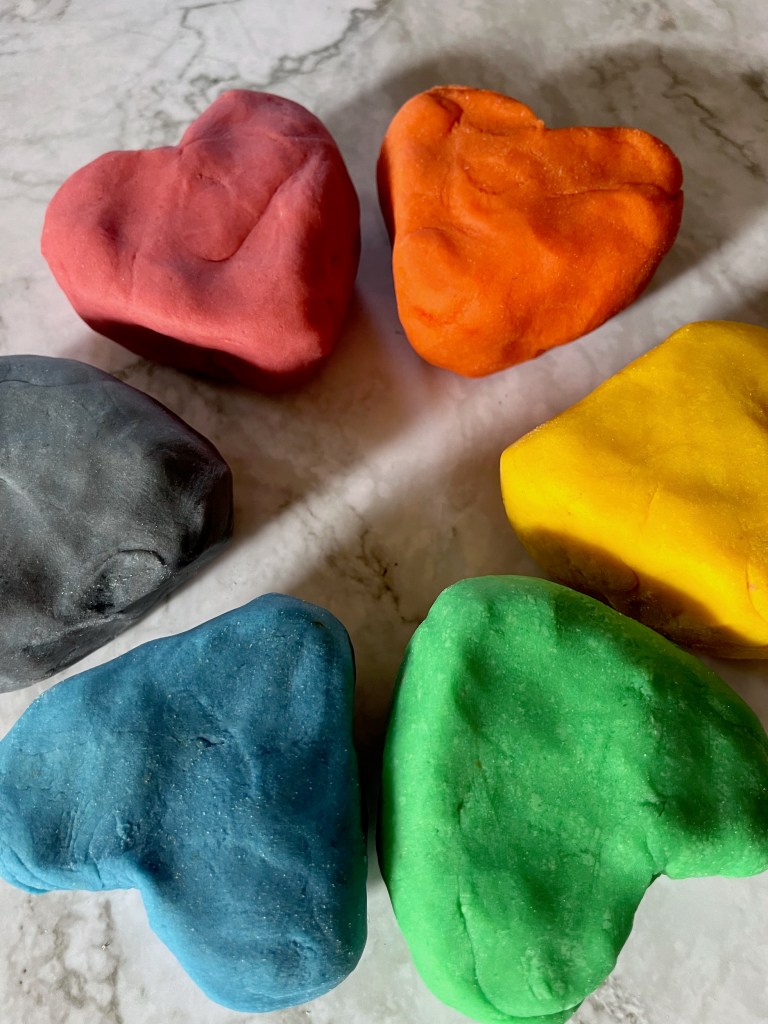
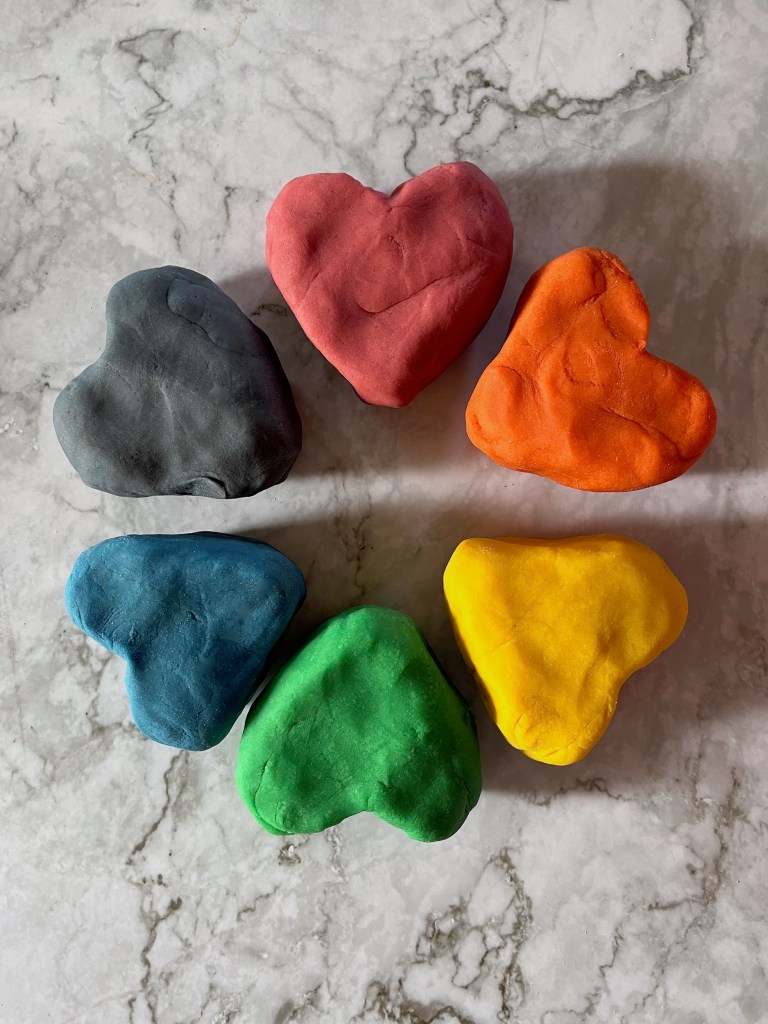
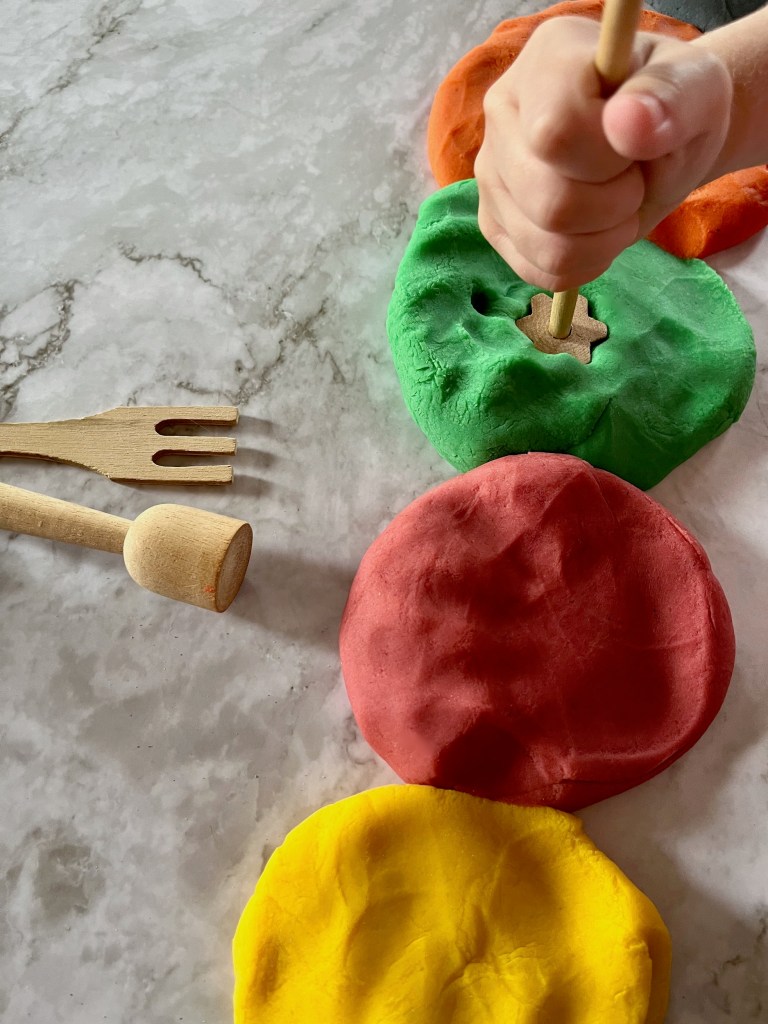
Divide the dough into equal portions based on how many colors you would like, and roll into balls.
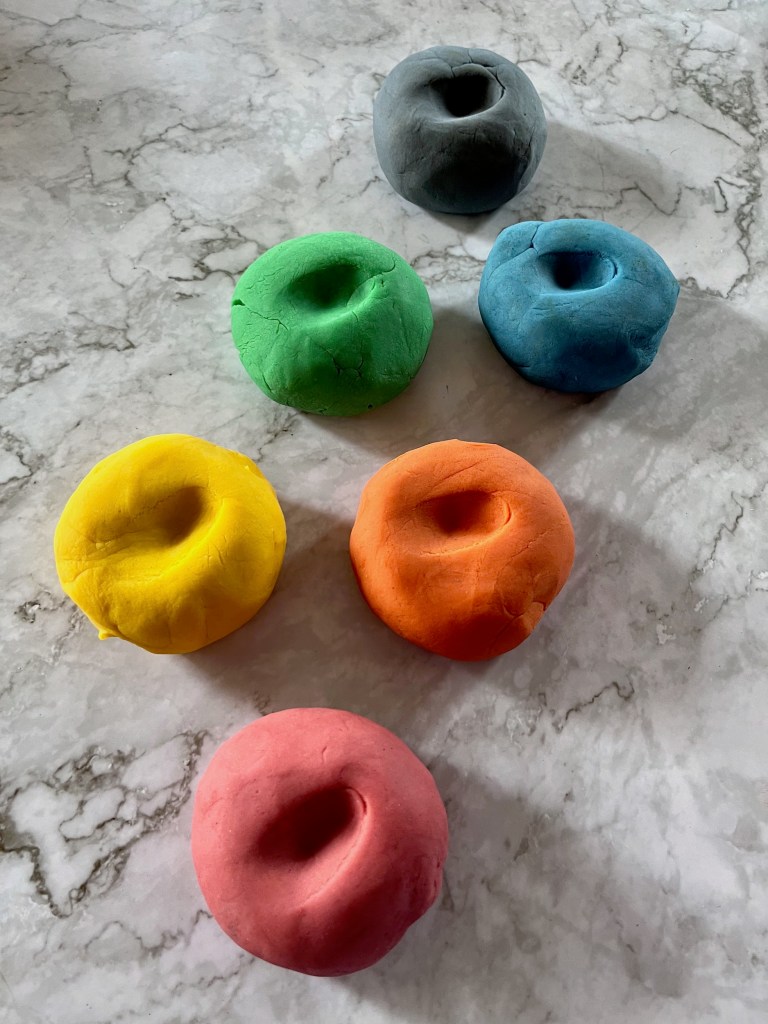
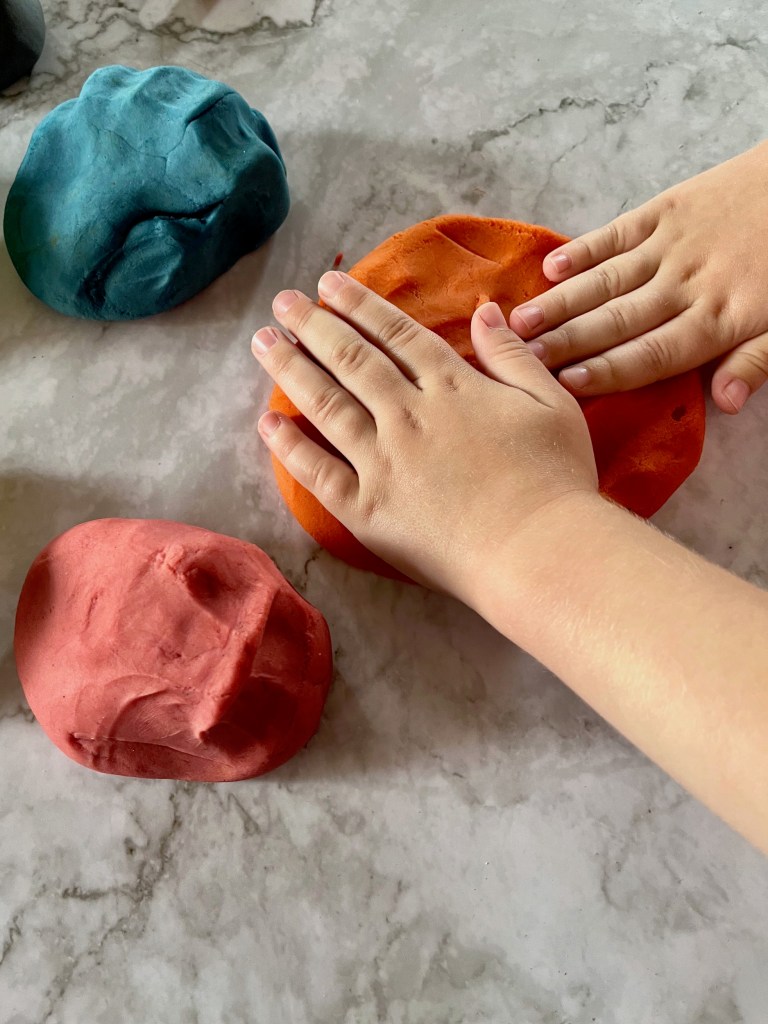
Put on gloves and press an indentation into each ball of dough, then add 15 drops of food coloring to the indentation of each ball to start, you can always add more later.
Knead each ball of dough until the color is well incorporated. If the color is not as bright as you want, you can add more food coloring and knead again.
Enjoy!
*This can be stored in sandwich bags, one for each color. Just be sure to remove all the excess air for longevity of the dough!
Welcome back Autumn! Every year I look forward to the Autumn and the warmth it generates inside my home and soul. Where I live, September and October are still rather warm on some days, and turn wet and cold as the months progress toward Winter. I cannot get enough of the rain this time of year. The cold, wet weather begins to take over outside, driving us all inside to be together and warm. There’s nothing like cuddling up with people you love, reading a good book, watching a movie or playing a video game while the weather misbehaves outside.
I intend to spend a lot of time with my family this year and came up with some family friendly ideas I’d like to experience with Zoey! Follow along and try some of these activities for yourself, this is a time we should all enjoy!
Christmas is nearly here and we love celebrating every moment!
What better way to celebrate than having a Christmas box! Now when I first heard of these, they were and are referred to as Christmas Eve boxes and presented on Christmas Eve for the family to enjoy, but then some of the items can only be enjoyed for one to two nights before Christmas is technically over, so I’ve decided to just call it a Christmas box and we can present it a week before Christmas to really enjoy its contents!
SUPPLIES
Wood crate
White acrylic paint
Red acrylic paint
Foam paint brushes
Painter’s tape
Matte varnish
Embellishments (optional)
Hot glue (optional)
INSTRUCTIONS
Paint every other beam of the crate (outside and inside) with white paint and then allow it to dry.
Repeat step 1 until the desired brightness of the paint is reached.
Once the paint is dry, use painters tape to tape up and protect the edges of the white beams or anywhere else where the red paint may drip or bleed.
Paint the remaining beams and the sides of the crate (outside and inside) with red paint and then allow it to dry.
Repeat step 4 until the desired brightness of the paint is reached.
Carefully peel off the painter’s tape and coat the whole crate with varnish, this may take two coats to reach the desired coverage.
If you have any embellishments like an ornament or two, carefully glue them on with a hot glue gun and allow it to dry.
Fill it up and enjoy!
If you’re looking for ideas to fill your new Christmas box with here are a few to spark your imagination!
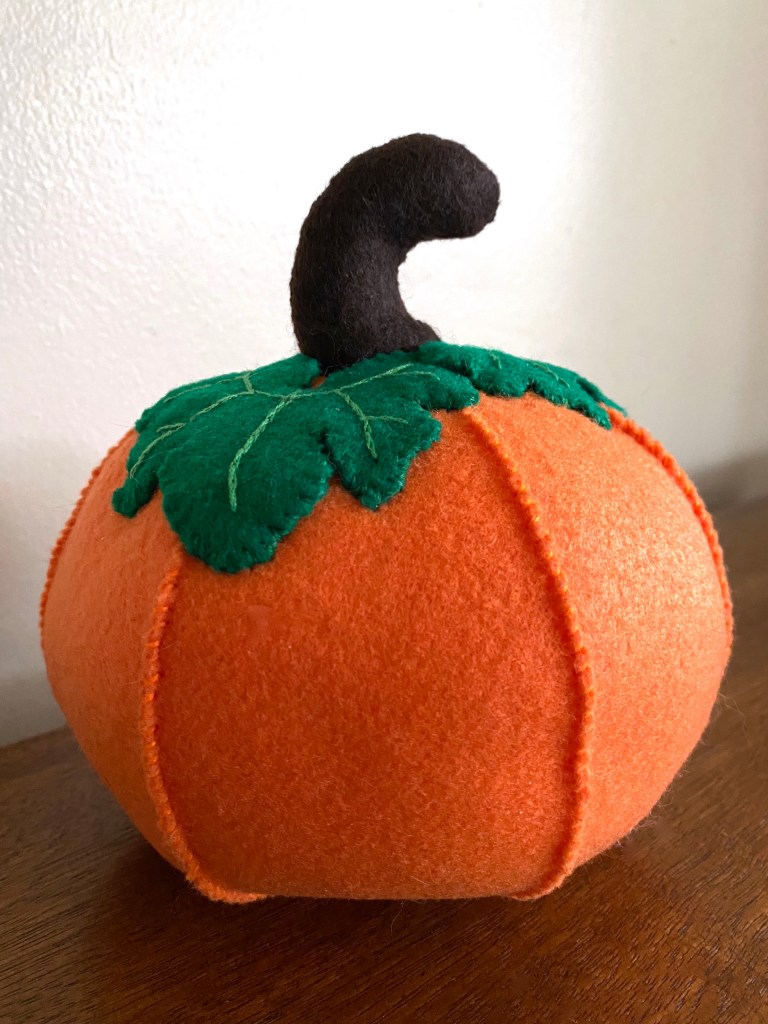
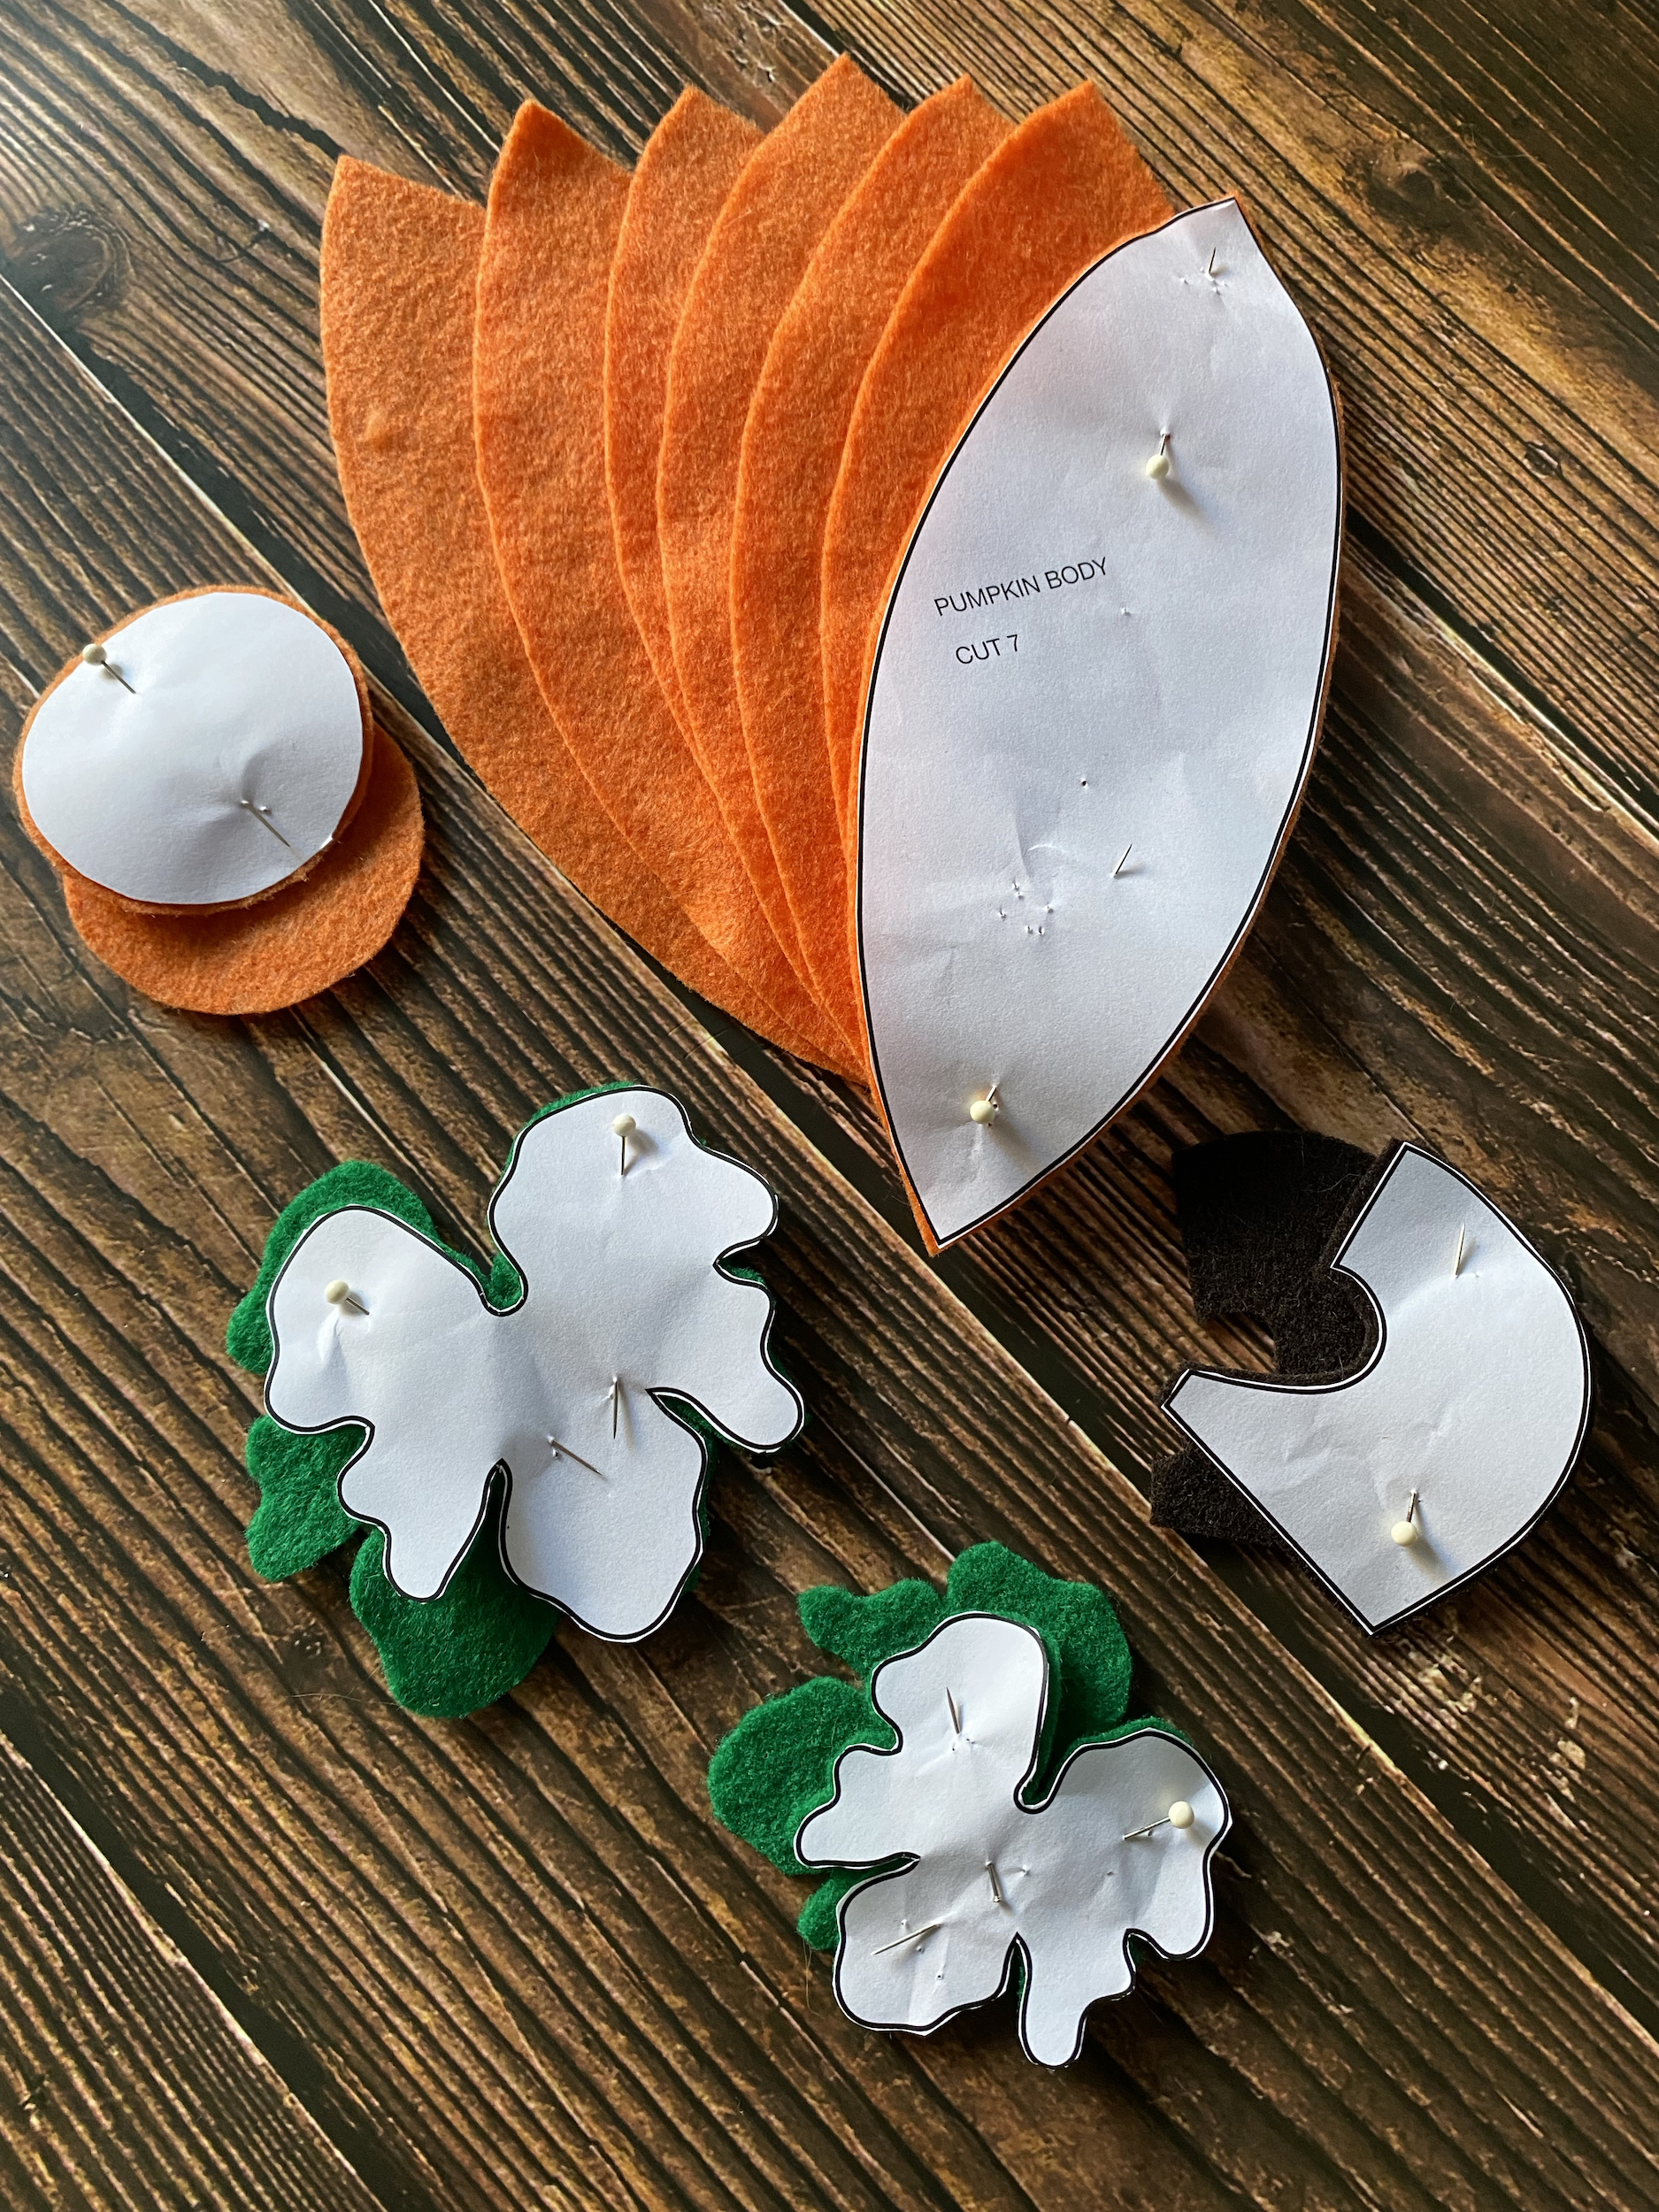
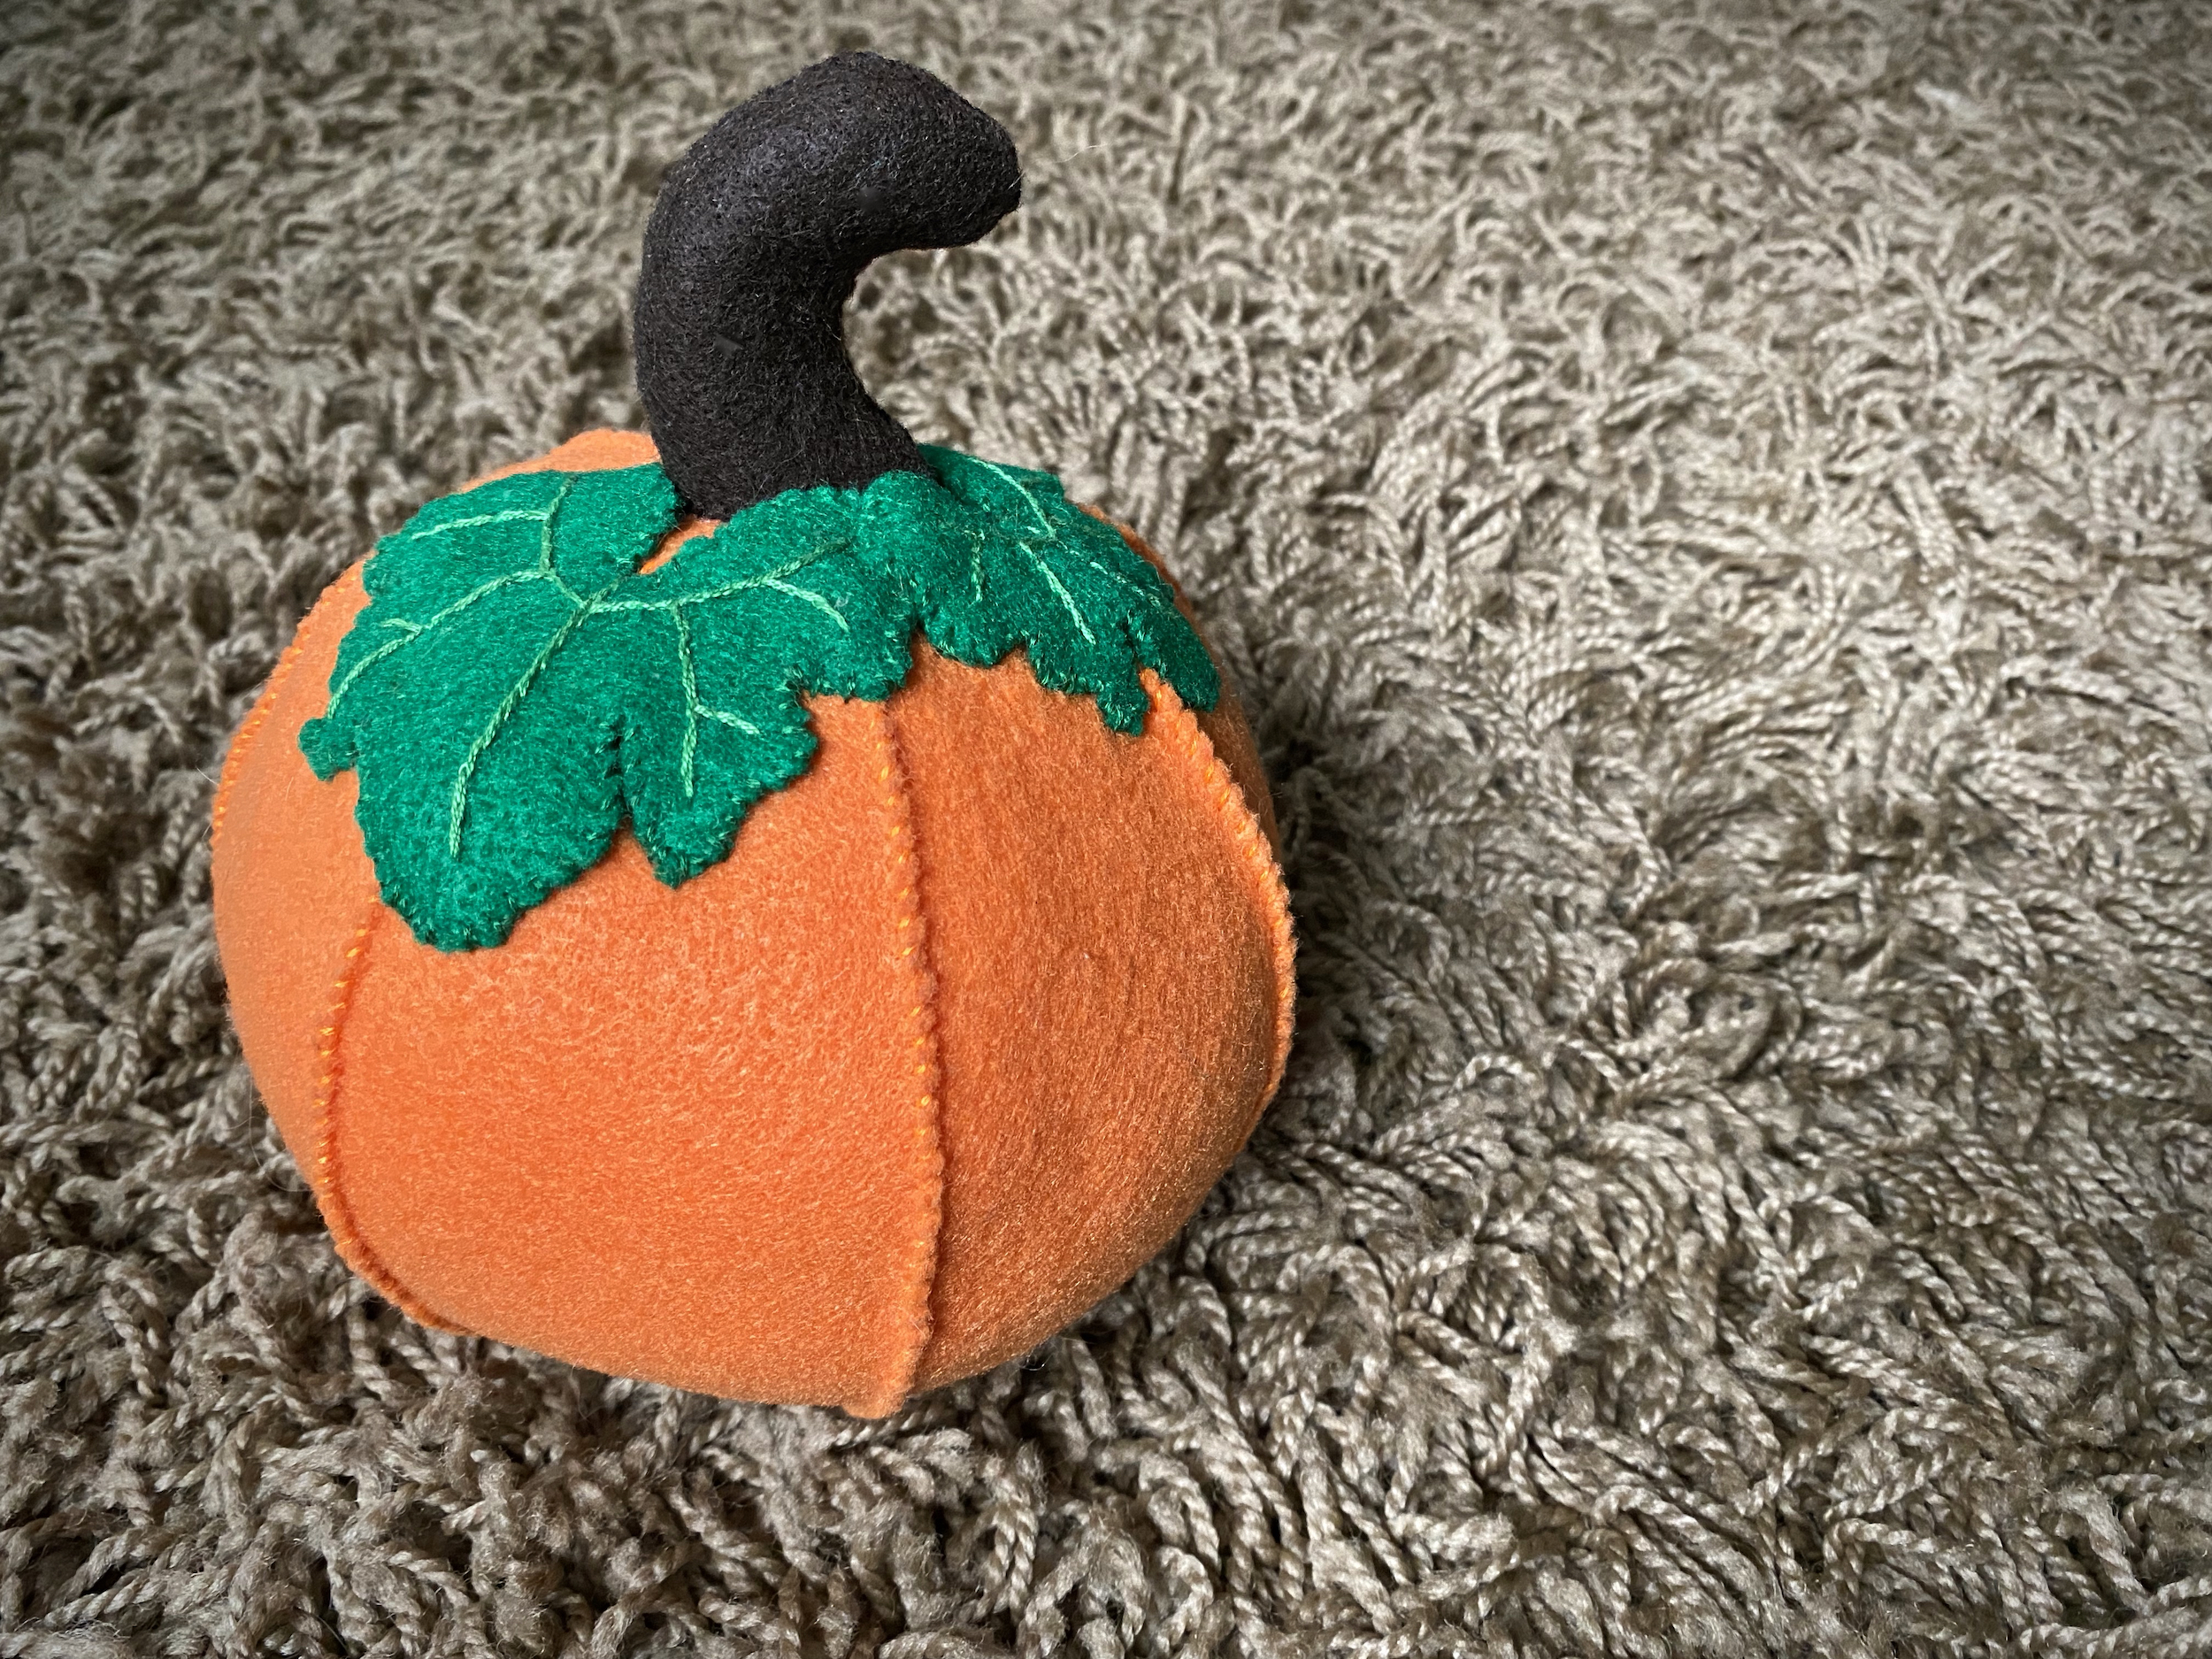
I want to begin creating well-made decorations that mean something to us and will last. What better way to start than by something that will go great with Halloween and Thanksgiving, pumpkins! I’ve created a pattern for fabric pumpkins and you’re welcome to use it to create your own! This will work to create either felt or regular fabric pumpkins, I’m excited to create a few different colors and sizes!
Print out the pumpkin patterns I’ve provided, then cut the patterns from the paper.
Pin the patterns on the appropriate colored felt, then use sewing scissors to cut the felt.
Thread orange embroidery floss onto your sewing needle.
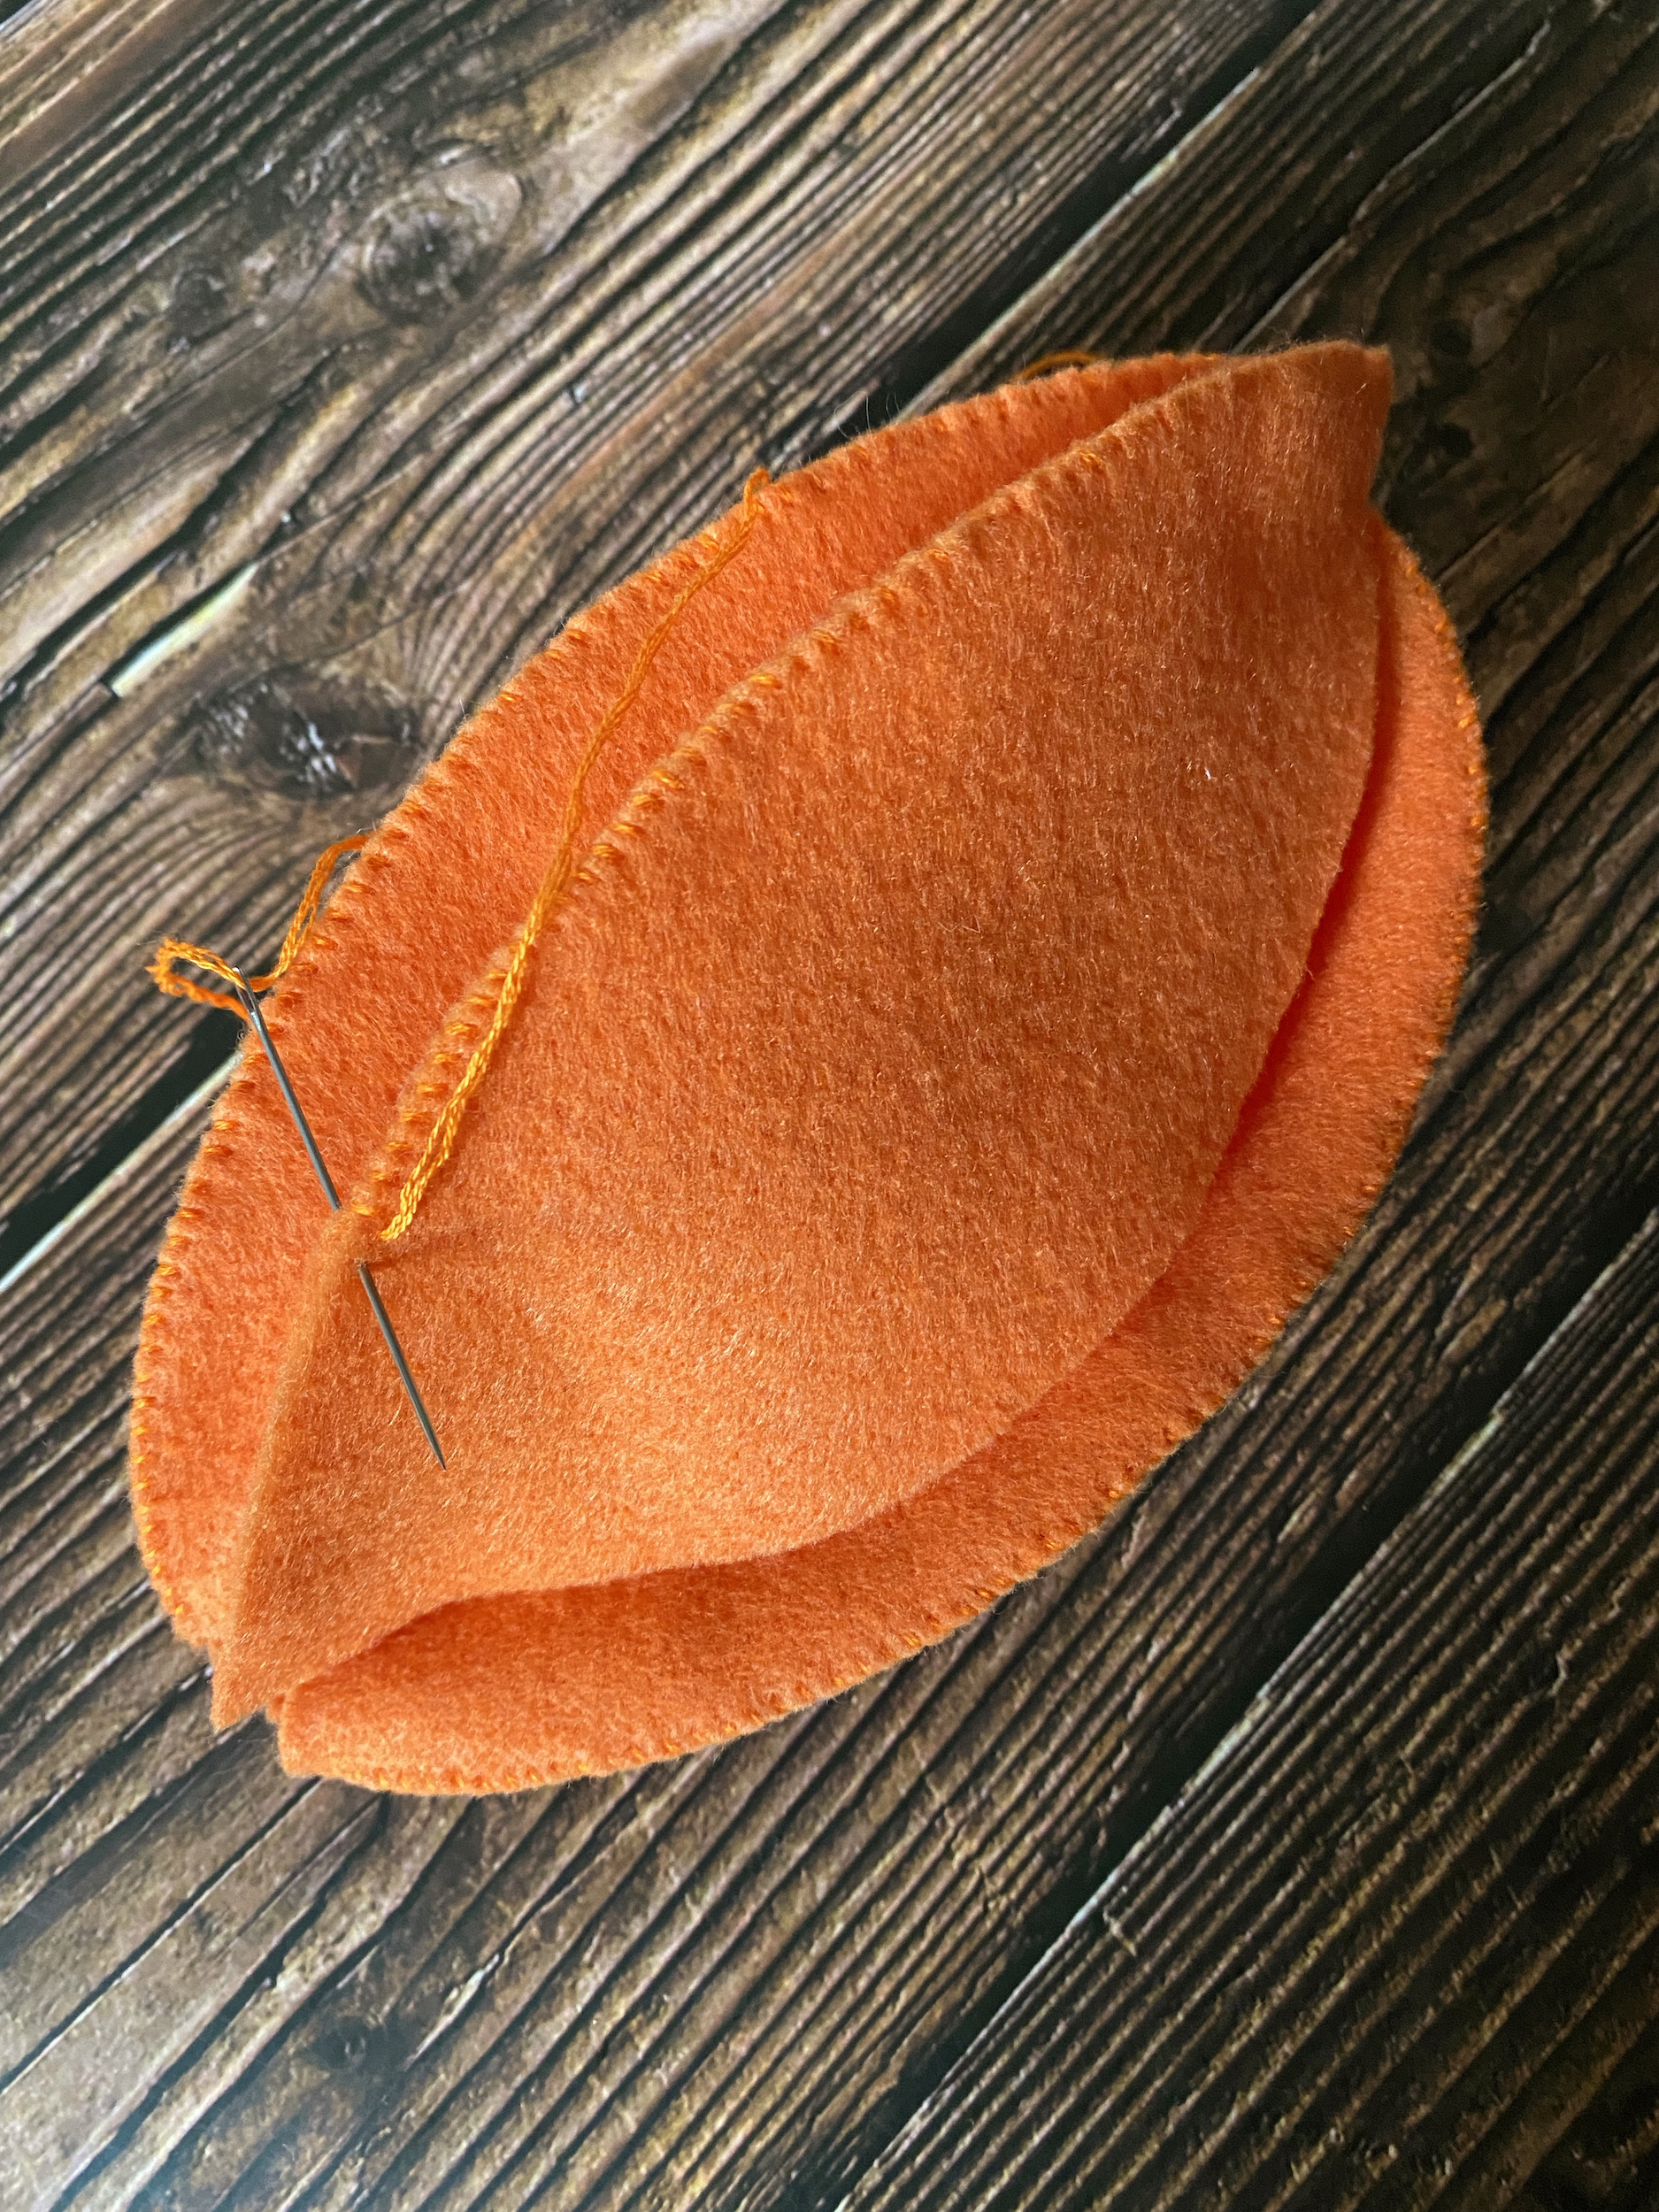
Align two of the pumpkin pieces and whip stitch along one side, from one point to the next, concealing the first and ending knot underneath so that the stitching will be exposed.
Repeat step 3 to continue adding pieces of the pumpkin.
Once you’ve stitched the last piece on, join the two ends together with a whip stitch to complete the pumpkin body.
Stuff the pumpkin, then place the circles on the top and bottom of the pumpkin and secure them with sewing pins.
Using a whip stitch, attach the circles to the pumpkin, concealing the first and ending knots underneath. Then remove the sewing pins.
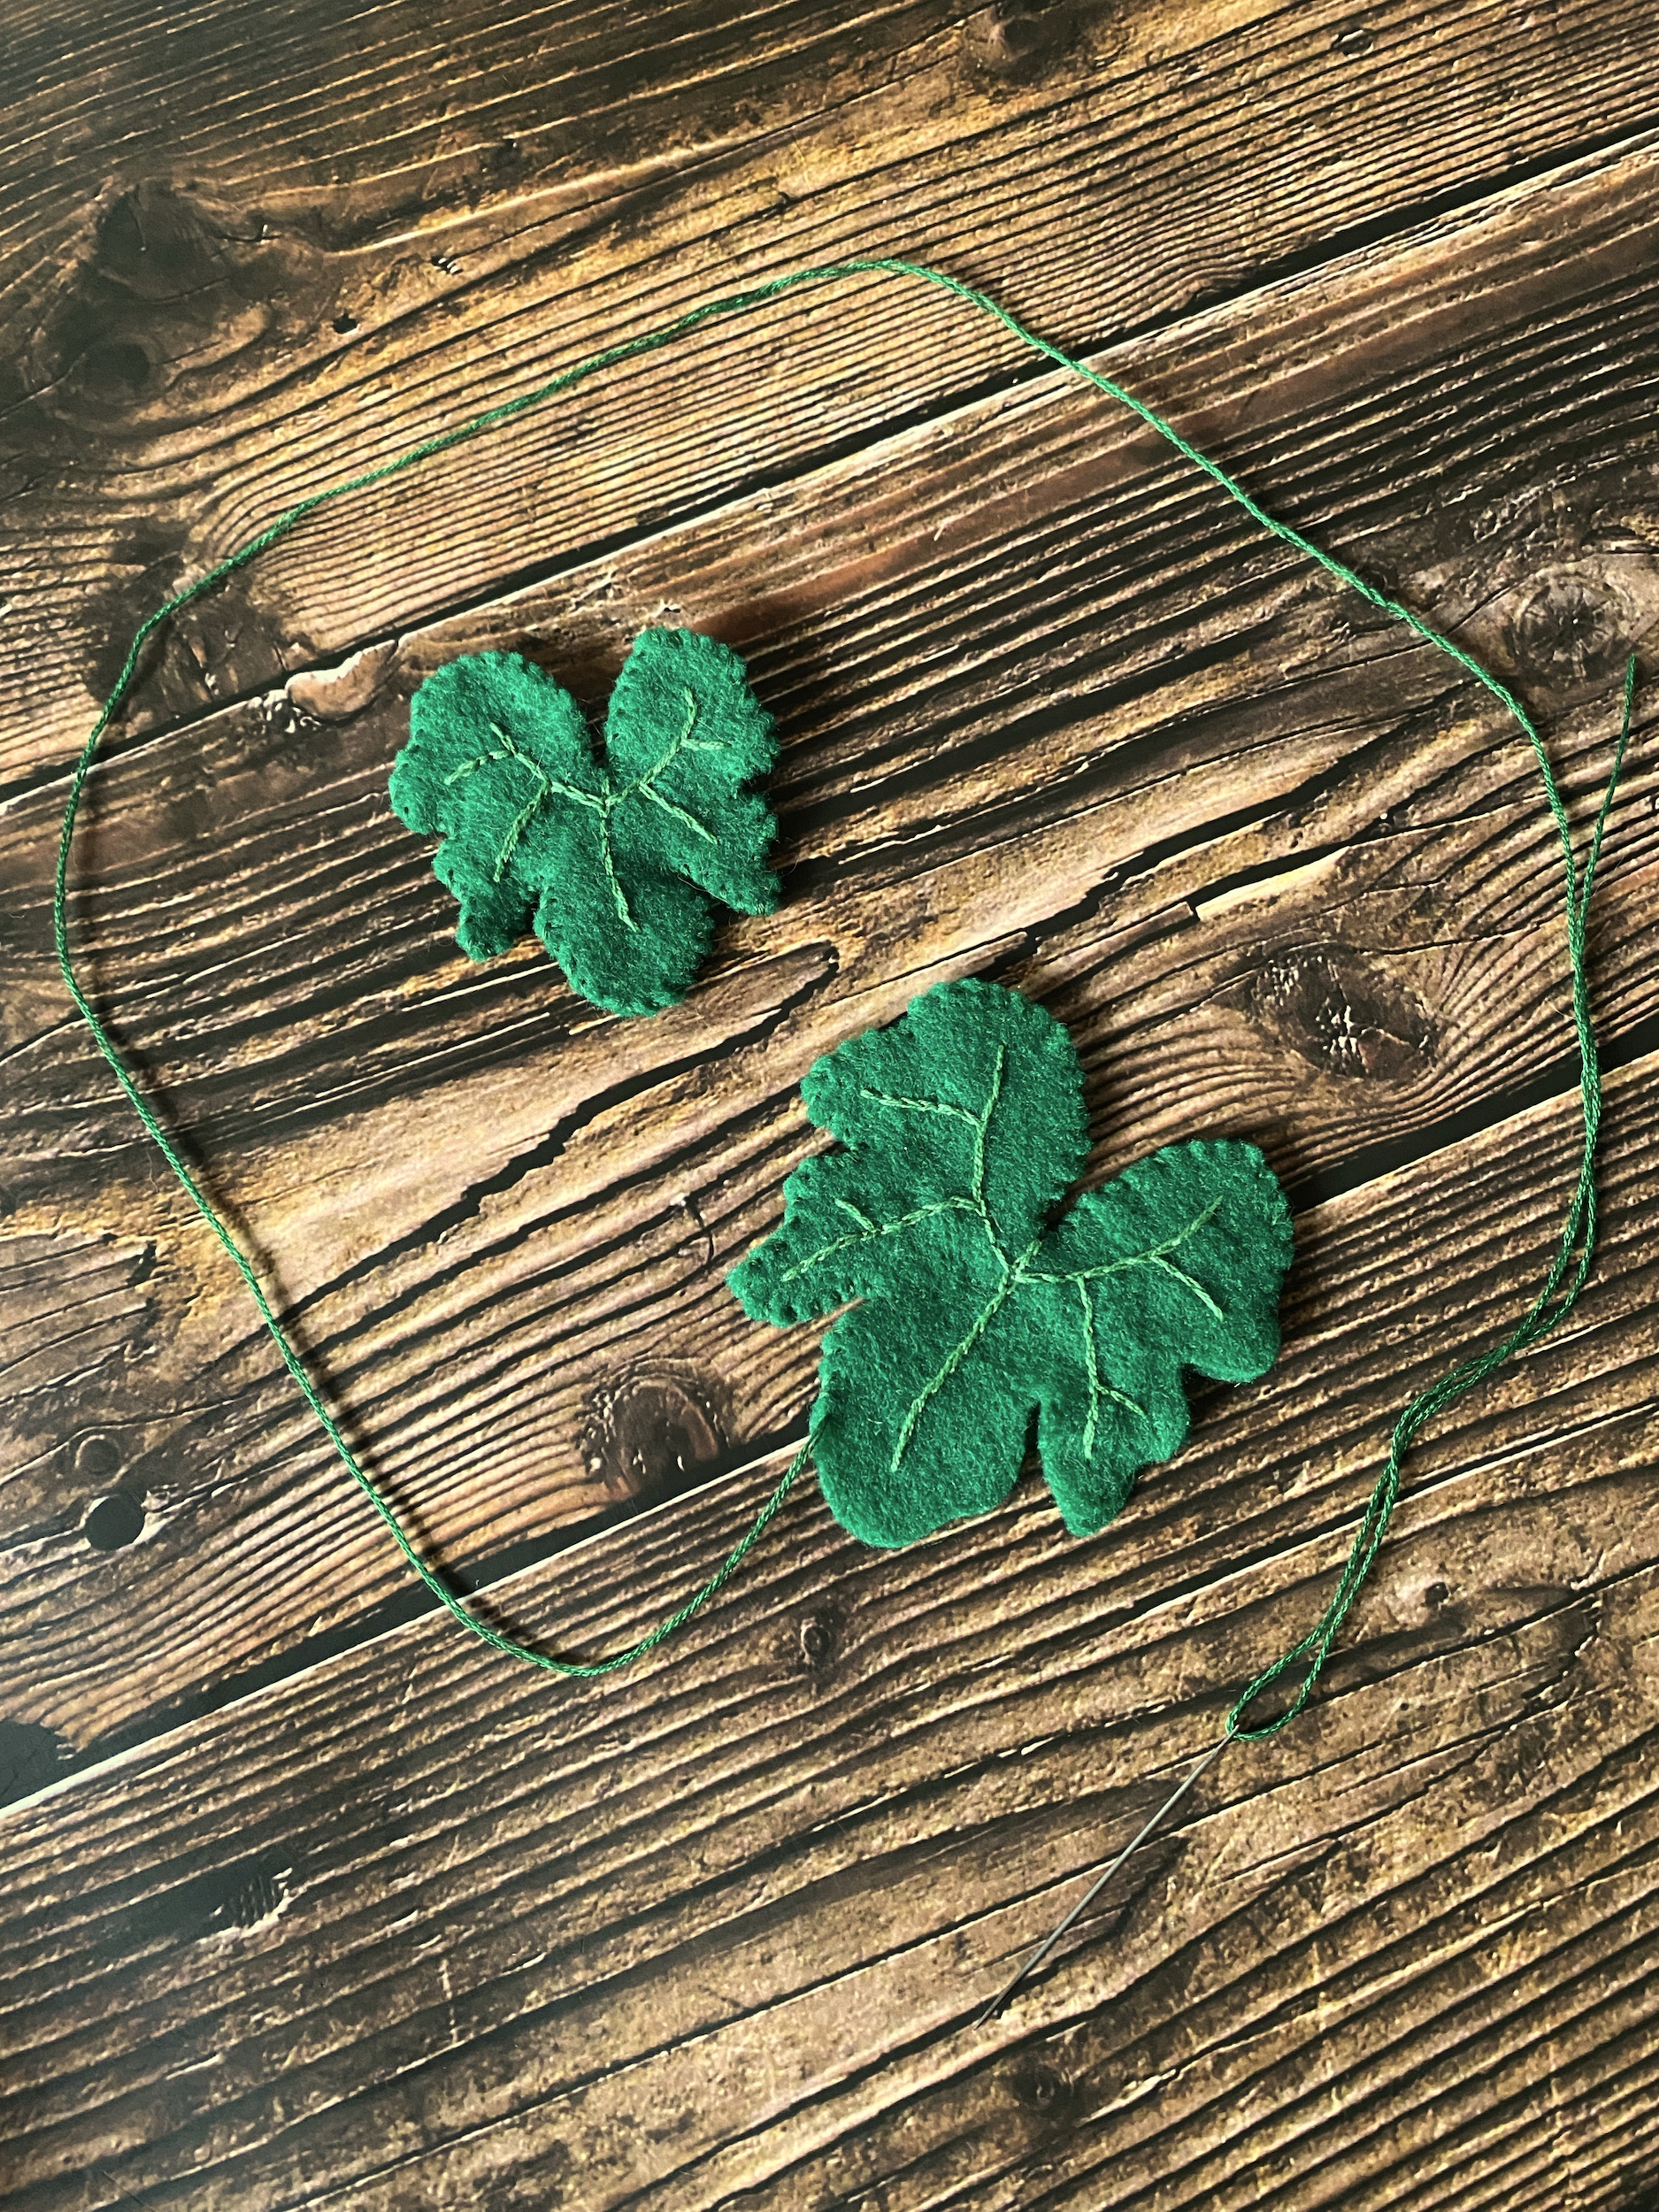
Thread green embroidery floss on your sewing needle and stitch the veins onto one side of each leaf.
Once done with the veins, align the two halves of each leaf (concealing the stitching in between) and whipstitch around the edges of the leaves to make them whole.
Thread brown embroidery floss onto your sewing needle and whipstitch around the outside edges of the stem, leaving the bottom of the stem open. At this point you can leave the stem as it is or turn it around to conceal the stitching.
Stuff the stem, then place it on top of the pumpkin and secure it with sewing pins.
Using a whip stitch, attach the stem to the body of the pumpkin.
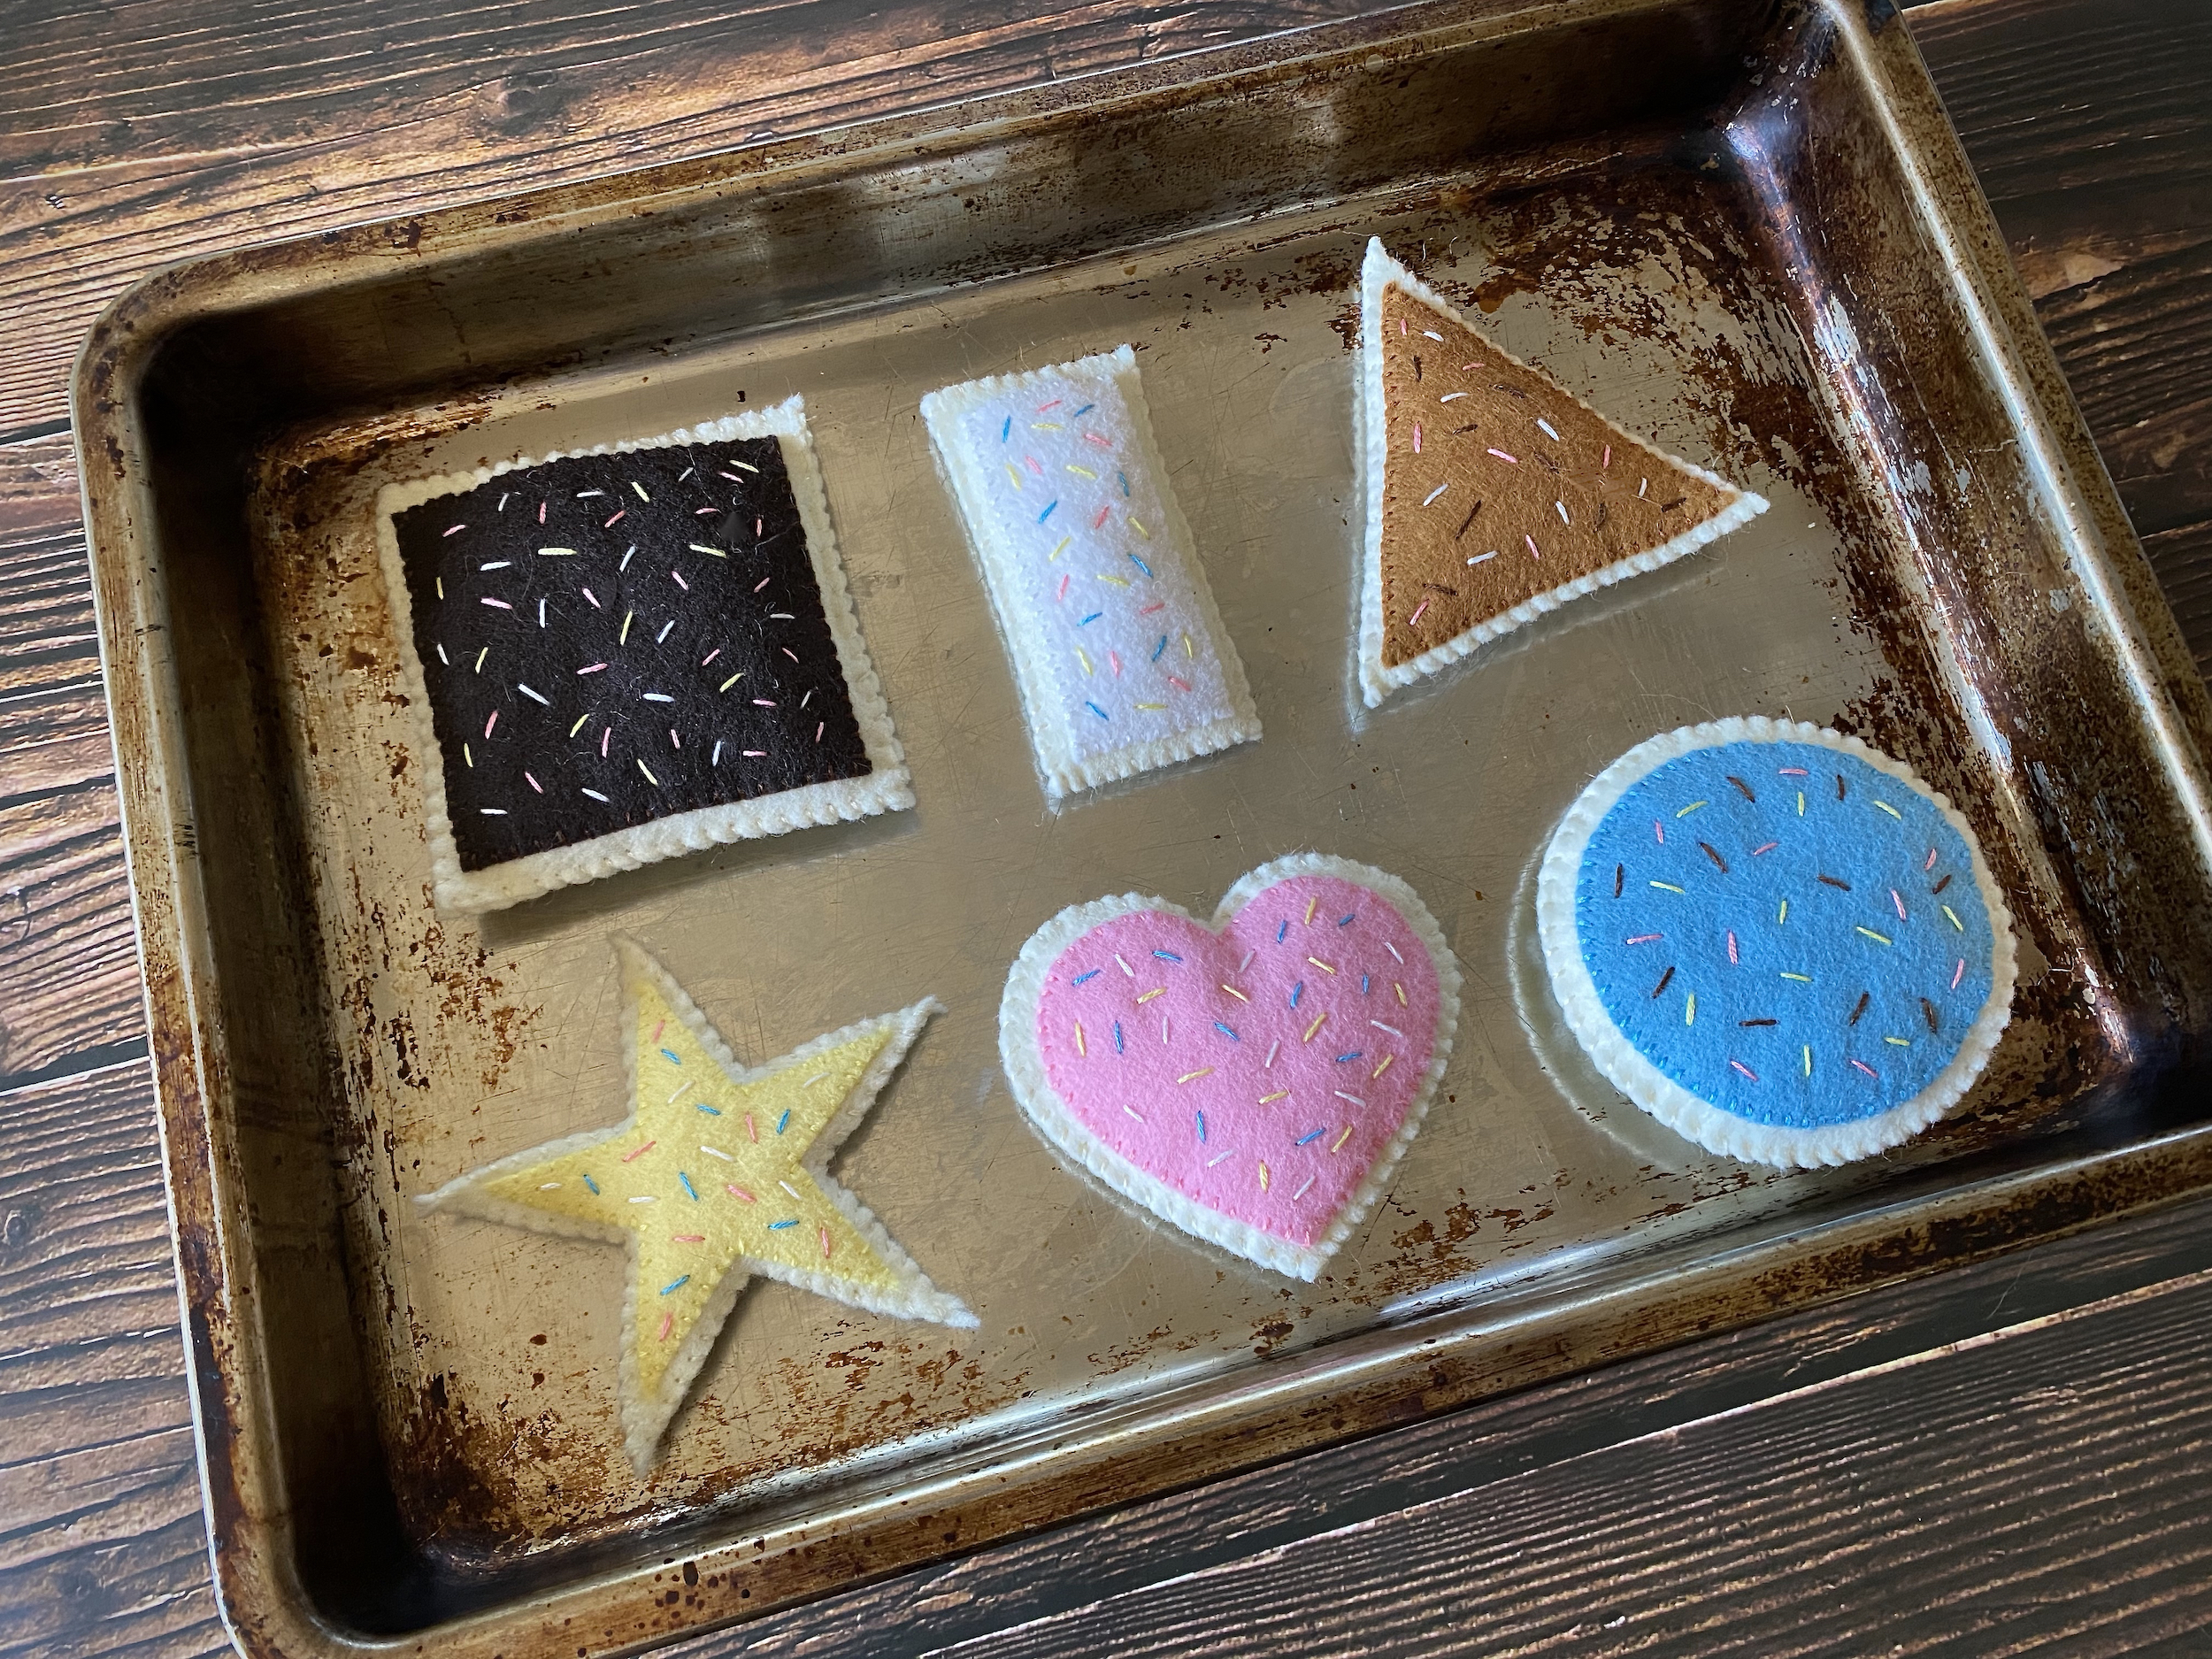
What child (or inner child) doesn’t love preparing toy food in a play kitchen?
I had a play kitchen when I was a little girl and loved baking cookies for myself, my sister and my parents. Now that I’m grown and have a daughter of my own, I want to make her some handcrafted play food so she can enjoy making meals for everyone during play, or while we cook in the kitchen next to her!
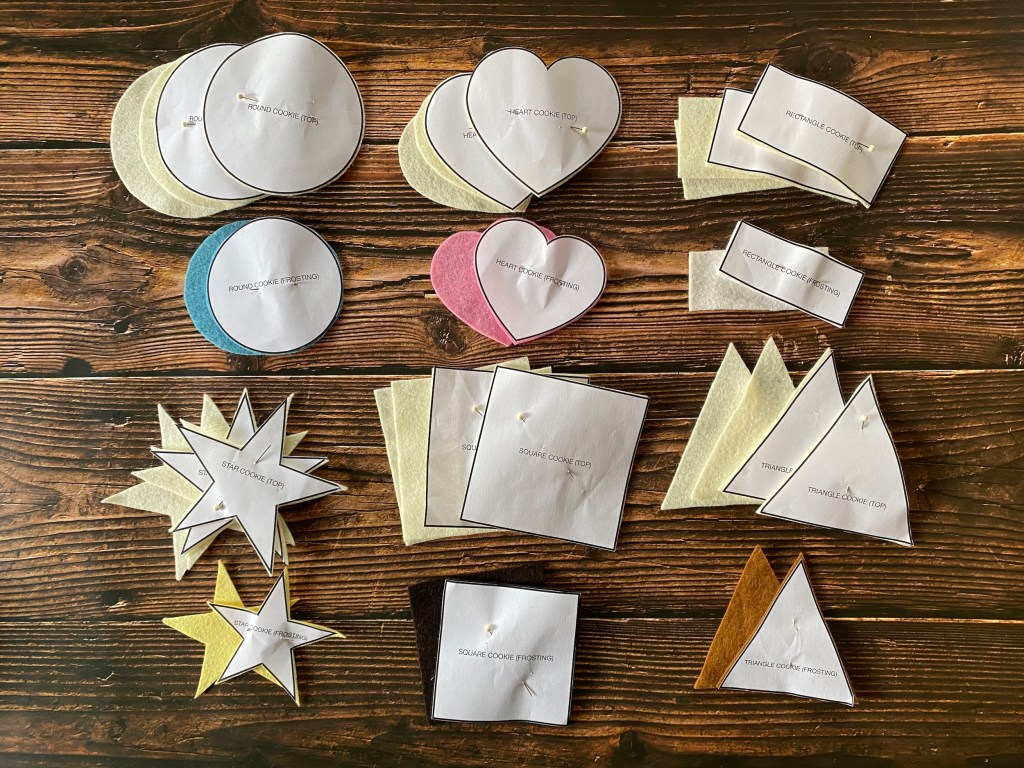
Please feel free to use these patterns to create some play food for you and yours! This pattern will make one circle cookie, one heart cookie, one star cookie, one triangle cookie, one square cookie and one rectangle cookie, each with frosting. I made one extra of each cookie shape so Zoey will have two of each. You can duplicate it as much as you want to make multiple pieces of each food!
Embroidery floss (pale tan, pale blue, light brown, dark brown, pale pink, white)
Sewing needle
INSTRUCTIONS
Print out the cookie pattern I’ve provided, then cut the patterns from the paper.
Pin the patterns on the appropriate colored felt, then use sewing scissors to cut the felt.
Align and pin the pale blue circle of frosting to one half of the circle of pale tan felt, then thread pale blue embroidery floss onto your sewing needle.
Begin sewing around the outer edges of the frosting using a whipstitch, concealing the first and ending knots underneath the layer of cookie.
One at a time, thread three of the other colors of embroidery floss onto your needle and create randomized stitches within the frosting to make sprinkles. Conceal the first and ending knots of each color underneath the layer of cookie.
Thread a sewing needle with pale tan embroidery floss and pin the bottom cookie layer over the stitching on the back of the frosted top half.
Using a whipstitch, begin sewing around the edges of the circle cookie, concealing the first knot and end knot in between the layers.
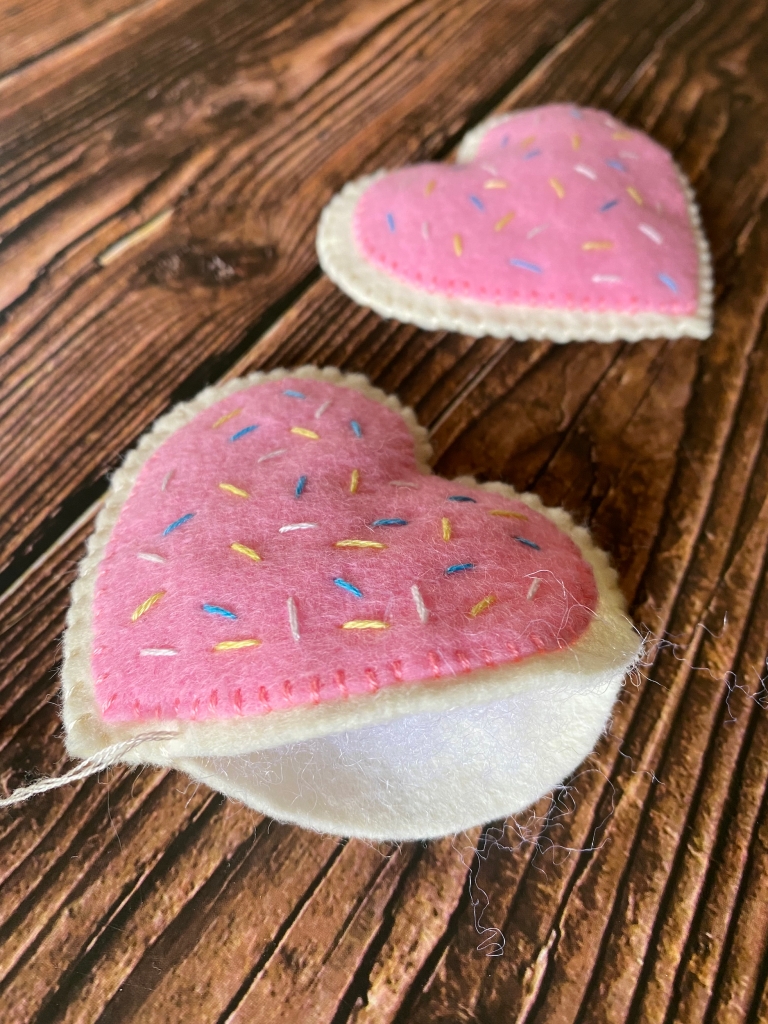
Align and pin the pale pink heart of frosting to one half of the heart of pale tan felt, then thread pale pink embroidery floss onto your sewing needle.
Begin sewing around the outer edges of the frosting using a whipstitch, concealing the first and ending knots underneath the layer of cookie.
One at a time, thread three of the other colors of embroidery floss onto your needle and create randomized stitches within the frosting to make sprinkles. Conceal the first and ending knots of each color underneath the layer of cookie.
Thread a sewing needle with pale tan embroidery floss and pin the bottom cookie layer over the stitching on the back of the frosted top half.
Using a whipstitch, begin sewing around the edges of the heart cookie, concealing the first knot and end knot in between the layers.
Align and pin the pale yellow star of frosting to one half of the star of pale tan felt, then thread pale yellow embroidery floss onto your sewing needle.
Begin sewing around the outer edges of the frosting using a whipstitch, concealing the first and ending knots underneath the layer of cookie.
One at a time, thread three of the other colors of embroidery floss onto your needle and create randomized stitches within the frosting to make sprinkles. Conceal the first and ending knots of each color underneath the layer of cookie.
Thread a sewing needle with pale tan embroidery floss and pin the bottom cookie layer over the stitching on the back of the frosted top half.
Using a whipstitch, begin sewing around the edges of the star cookie, concealing the first knot and end knot in between the layers.
Align and pin the white triangle of frosting to one half of the triangle of pale tan felt, then thread white embroidery floss onto your sewing needle.
Begin sewing around the outer edges of the frosting using a whipstitch, concealing the first and ending knots underneath the layer of cookie.
One at a time, thread three of the other colors of embroidery floss onto your needle and create randomized stitches within the frosting to make sprinkles. Conceal the first and ending knots of each color underneath the layer of cookie.
Thread a sewing needle with pale tan embroidery floss and pin the bottom cookie layer over the stitching on the back of the frosted top half.
Using a whipstitch, begin sewing around the edges of the triangle cookie, concealing the first knot and end knot in between the layers.
Align and pin the dark brown square of frosting to one half of the square of pale tan felt, then thread dark brown embroidery floss onto your sewing needle.
Begin sewing around the outer edges of the frosting using a whipstitch, concealing the first and ending knots underneath the layer of cookie.
One at a time, thread three of the other colors of embroidery floss onto your needle and create randomized stitches within the frosting to make sprinkles. Conceal the first and ending knots of each color underneath the layer of cookie.
Thread a sewing needle with pale tan embroidery floss and pin the bottom cookie layer over the stitching on the back of the frosted top half.
Using a whipstitch, begin sewing around the edges of the square cookie, concealing the first knot and end knot in between the layers.
Align and pin the pale brown rectangle of frosting to one half of the rectangle of pale tan felt, then thread pale brown embroidery floss onto your sewing needle.
Begin sewing around the outer edges of the frosting using a whipstitch, concealing the first and ending knots underneath the layer of cookie.
One at a time, thread three of the other colors of embroidery floss onto your needle and create randomized stitches within the frosting to make sprinkles. Conceal the first and ending knots of each color underneath the layer of cookie.
Thread a sewing needle with pale tan embroidery floss and pin the bottom cookie layer over the stitching on the back of the frosted top half.
Using a whipstitch, begin sewing around the edges of the rectangle cookie, concealing the first knot and end knot in between the layers.
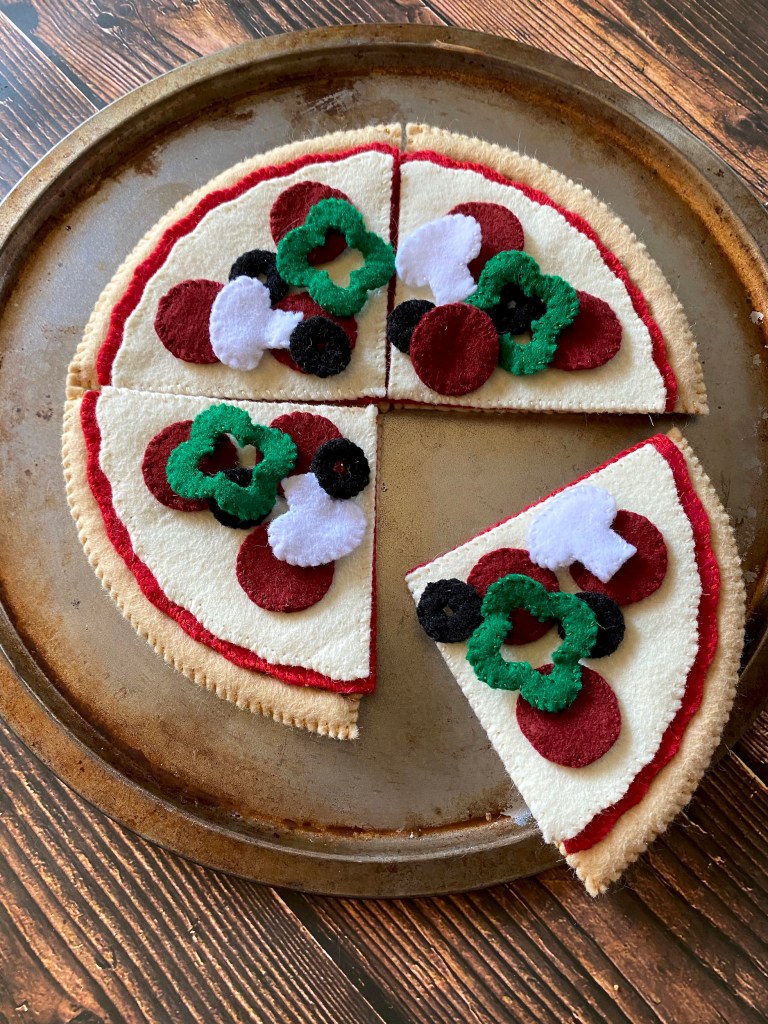
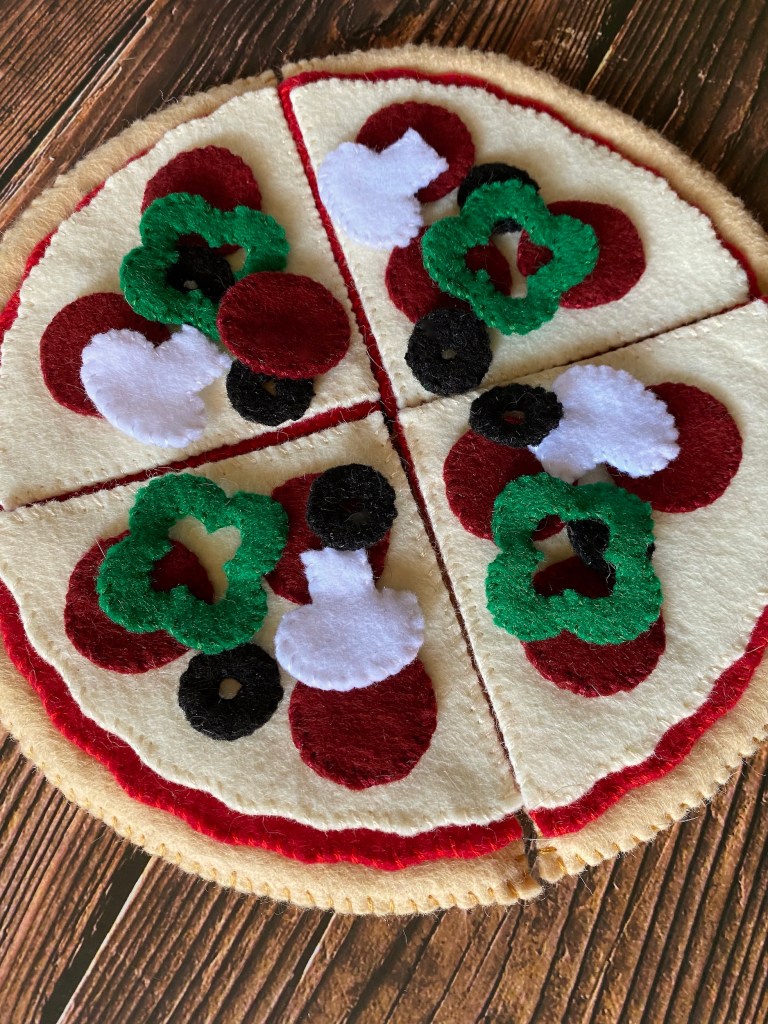
What child (or inner child) doesn’t love preparing toy food in a play kitchen?
I had a play kitchen when I was a little girl and loved preparing pizza for myself, my sister and my parents. Now that I’m grown and have a daughter of my own, I want to make her some handcrafted play food so she can enjoy making meals for everyone during play, or while we cook in the kitchen next to her!
Please feel free to use these patterns to create some play food for you and yours! This pattern will make four slices of pizza with sauce and cheese. Toppings include 4 slices of bell pepper, 4 slices of mushroom, 12 slices of pepperoni, and 6 slices of olives. You can duplicate it as much as you want to make multiple pieces of each food!
Embroidery floss (light tan, red, dark red, white, off-white, green, and black)
INSTRUCTIONS
Print out the pizza patterns I’ve provided and cut them from the paper.
Place the patterns on the appropriate colored felt and pin them in place, then use sewing scissors to cut out the felt pieces.
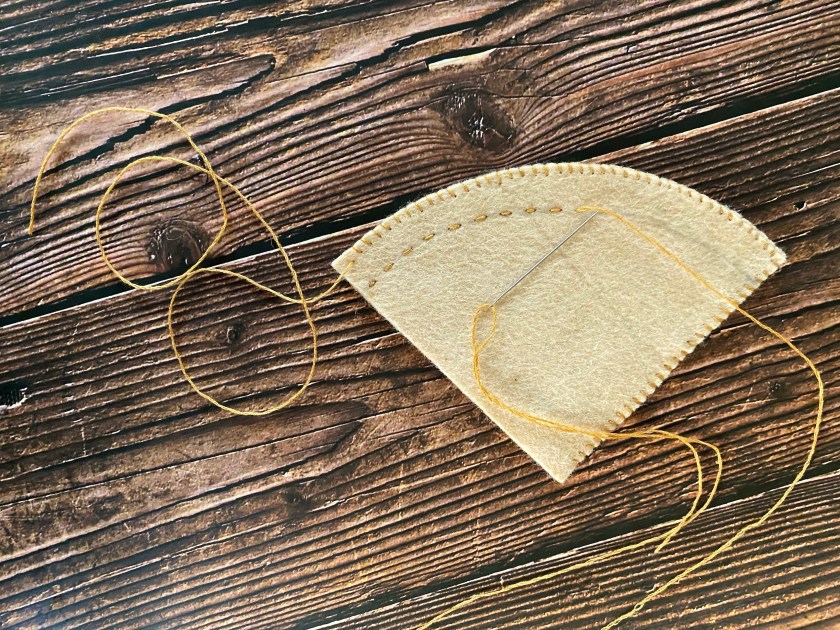
Align and pin the two halves of pizza crust together and thread light tan embroidery floss onto your sewing needle. Then, with a pencil, lightly sketch a curved line along and about 1/2 inch in from the arc of the crust.
Starting to one side of the pizza slice’s point, whipstitch along that edge and the top arc of the crust, stopping at the far end of the arc and setting that thread aside for a moment.
From the open edge of the pizza slice, use a running stitch along the pencil line to seal off the crust, concealing the first and ending knot between the layers, then use a little stuffing to inflate.
Pick up the previous thread and continue stitching down the remaining side of the pizza slice, concealing the end knot in between the layers.
Repeat steps 3 through 6 to create the three other pizza slices.
Align and pin the two halves of pizza sauce together and thread red embroidery floss onto your sewing needle.
Begin sewing around the edges of your pizza sauce using a whipstitch, concealing the first knot and ending knot in between the layers.
Repeat steps 8 and 9 to create the three other pizza sauces.
Align and pin the two halves of cheese together and thread off-white embroidery floss onto your sewing needle.
Begin sewing around the edges of your cheese using a whipstitch, concealing the first knot and ending knot in between the layers.
Repeat steps 11 and 12 to create the three other cheeses.
Align and pin the two halves of bell pepper together and thread green embroidery floss onto your sewing needle.
Begin sewing around the outer and then inner edges of your bell pepper using a whipstitch, concealing the first knot and ending knot in between the layers.
Repeat steps 14 and 15 to create the rest of the bell pepper pieces.
Align and pin the two halves of mushroom together and thread white embroidery floss onto your sewing needle.
Begin sewing around the edges of your mushroom using a whipstitch, concealing the first knot and ending knot in between the layers.
Repeat steps 17 and 18 to create the rest of the mushroom pieces.
Align and pin the two halves of pepperoni together and thread dark red embroidery floss onto your sewing needle.
Begin sewing around the edges of your pepperoni using a whipstitch, concealing the first knot and ending knot in between the layers.
Repeat steps 20 and 21 to create the rest of the pepperoni pieces.
Align and pin the two halves of olive together and thread black embroidery floss onto your sewing needle.
Begin sewing around the outer and then inner edges of your olive using a whipstitch, concealing the first knot and ending knot in between the layers.
Repeat steps 23 and 24 to create the rest of the olive pieces.
What child (or inner child) doesn’t love preparing toy food in a play kitchen?
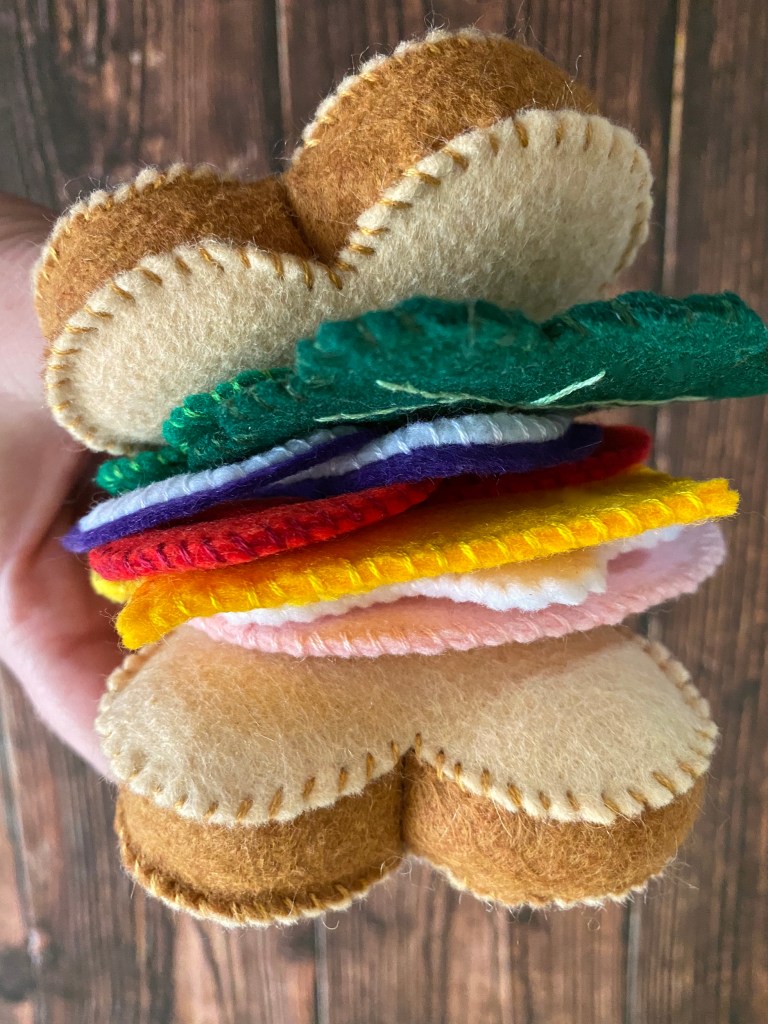
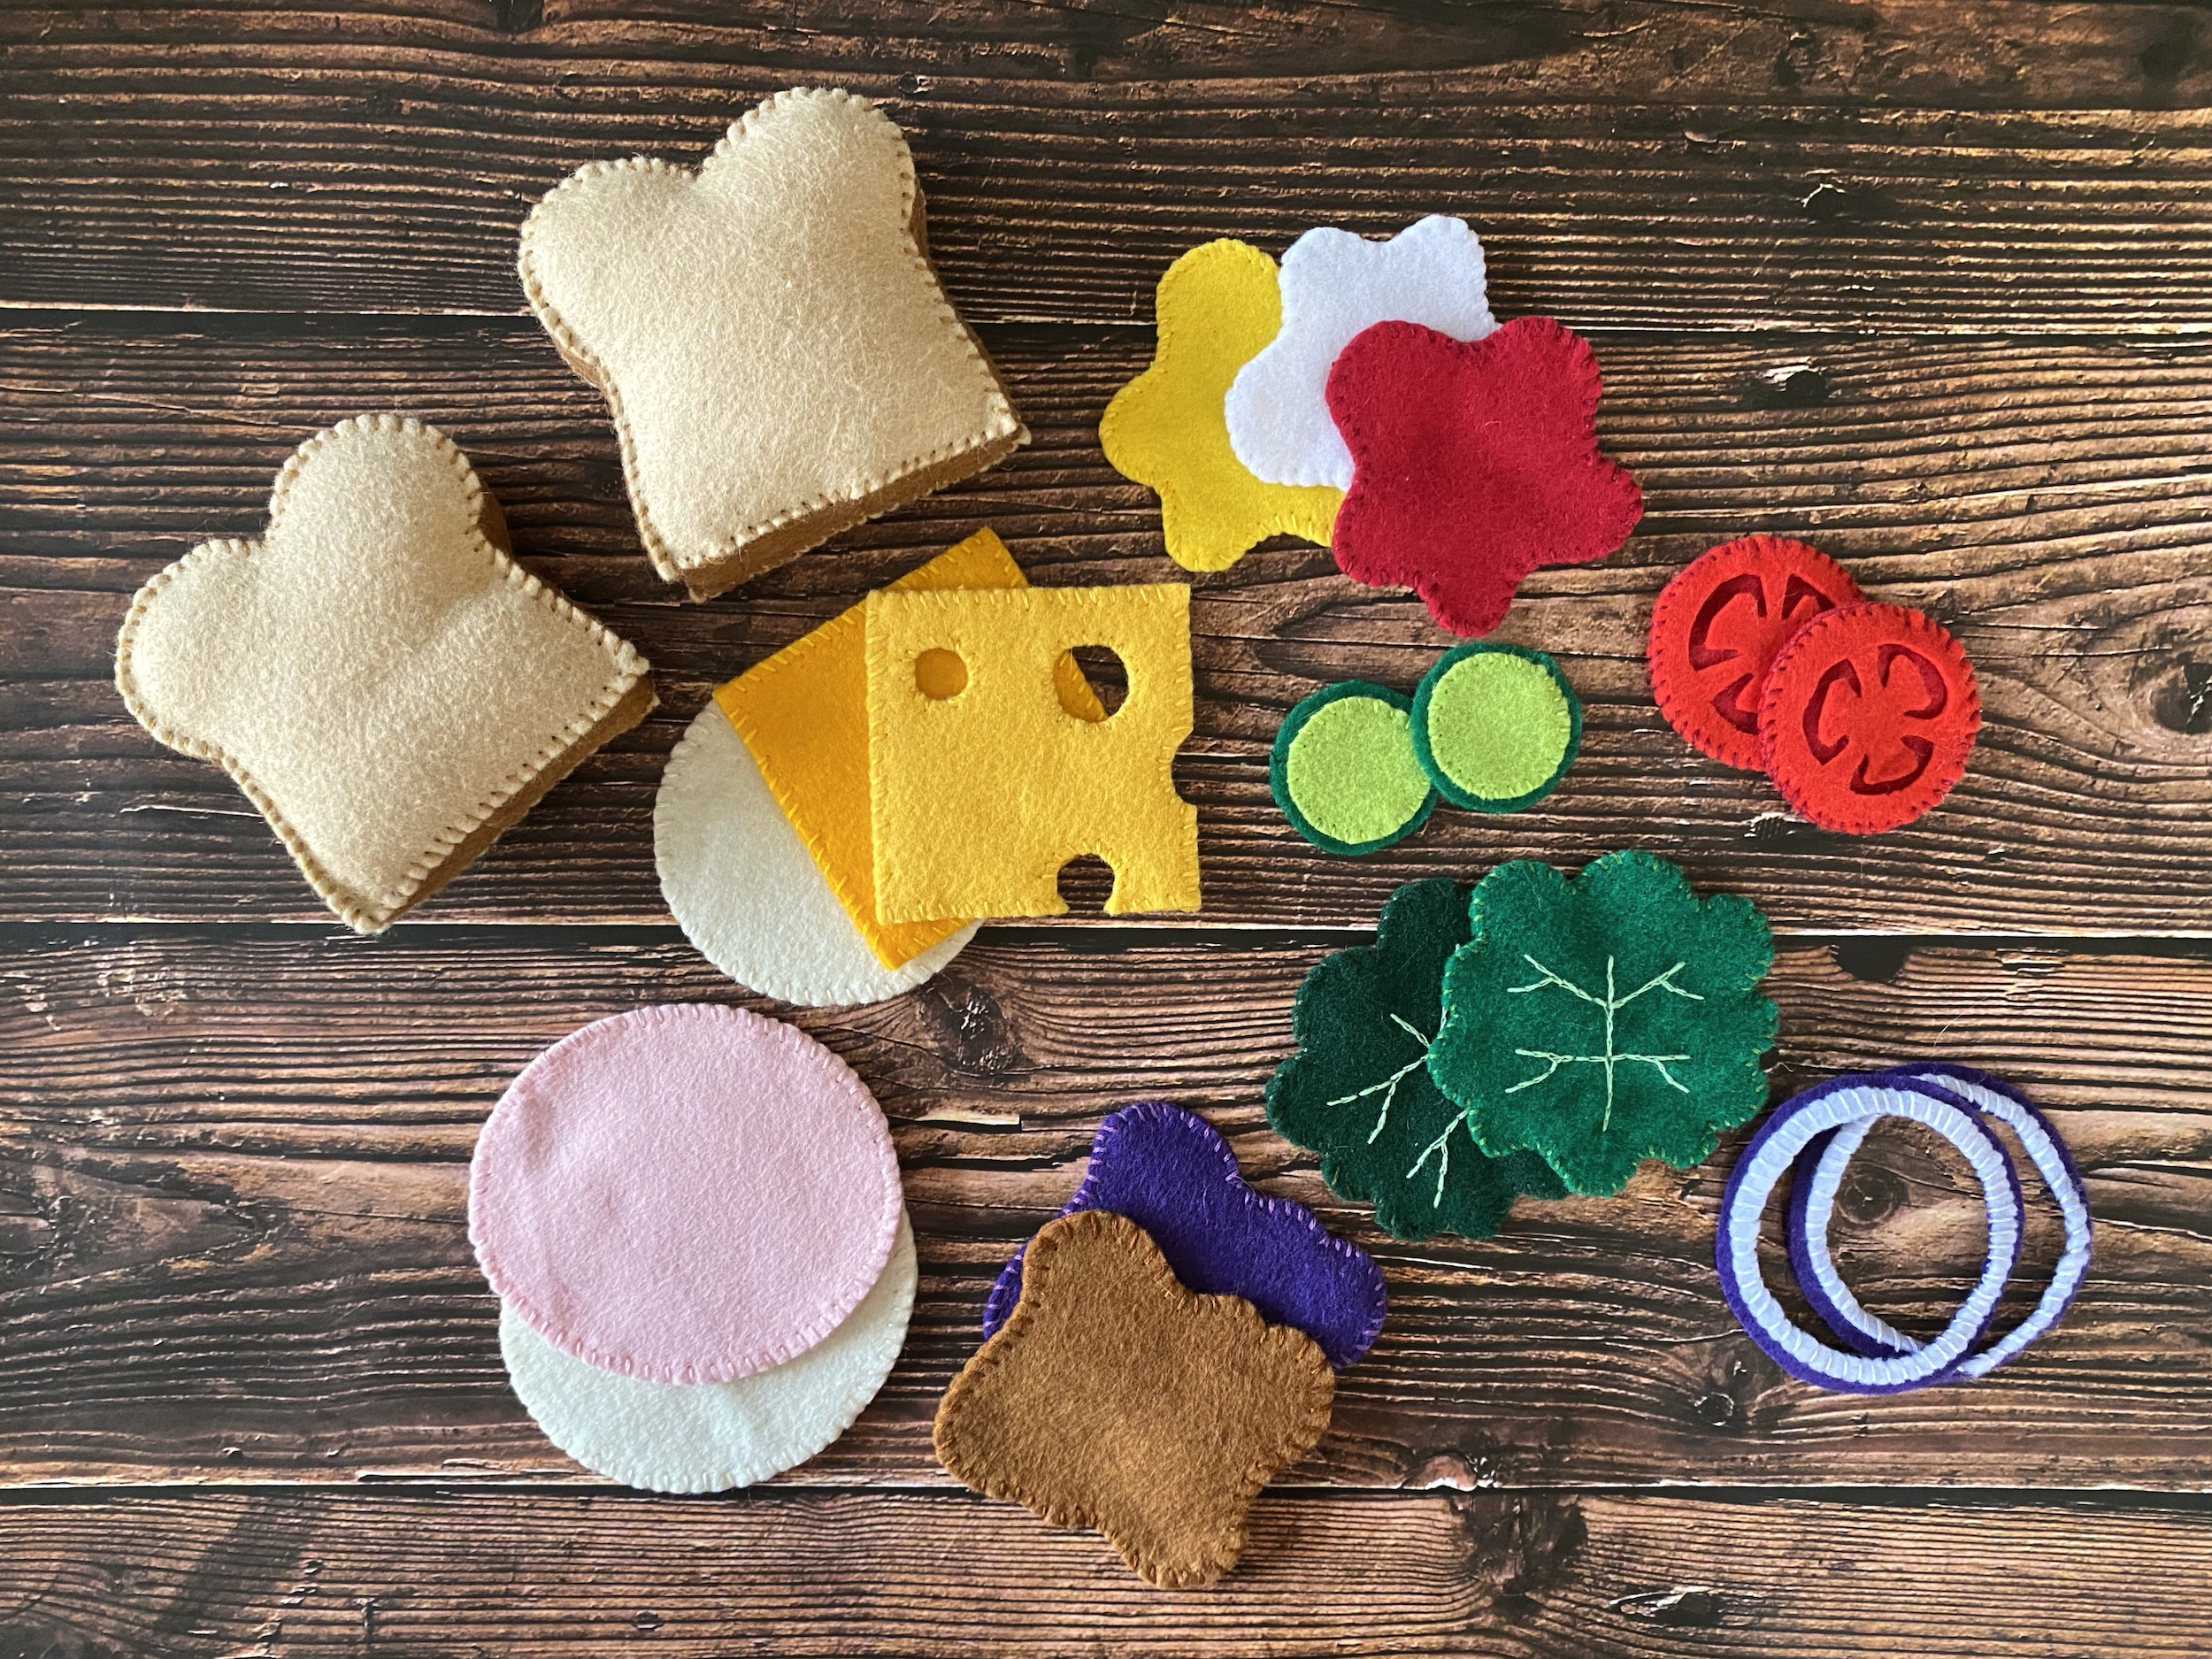
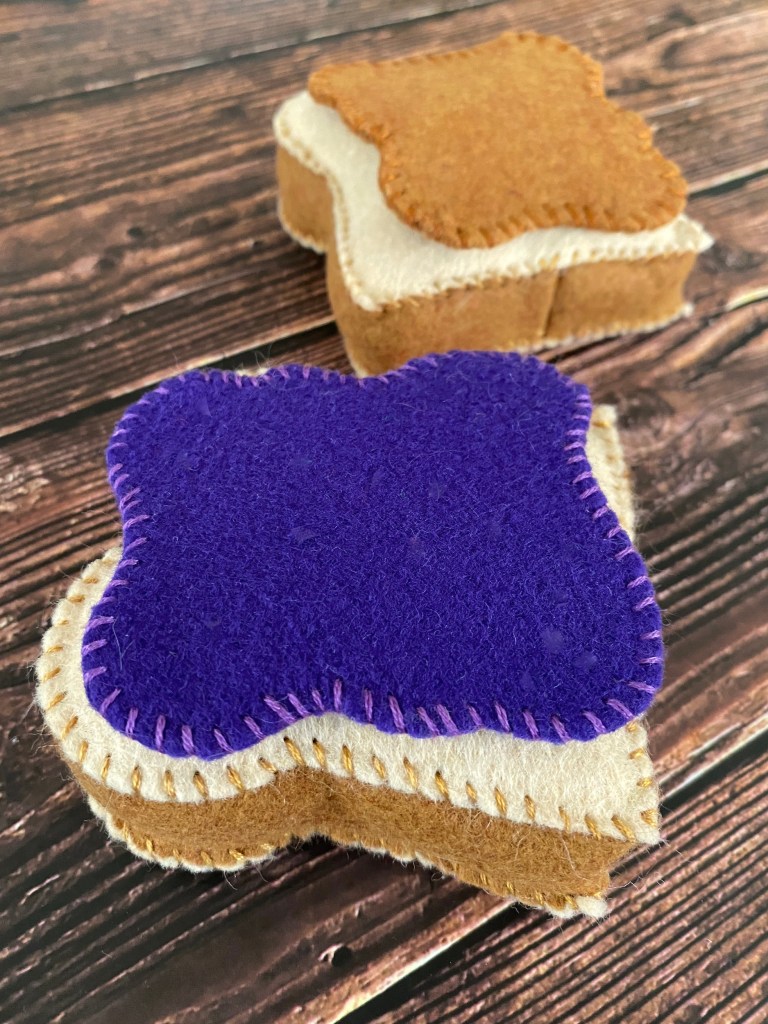
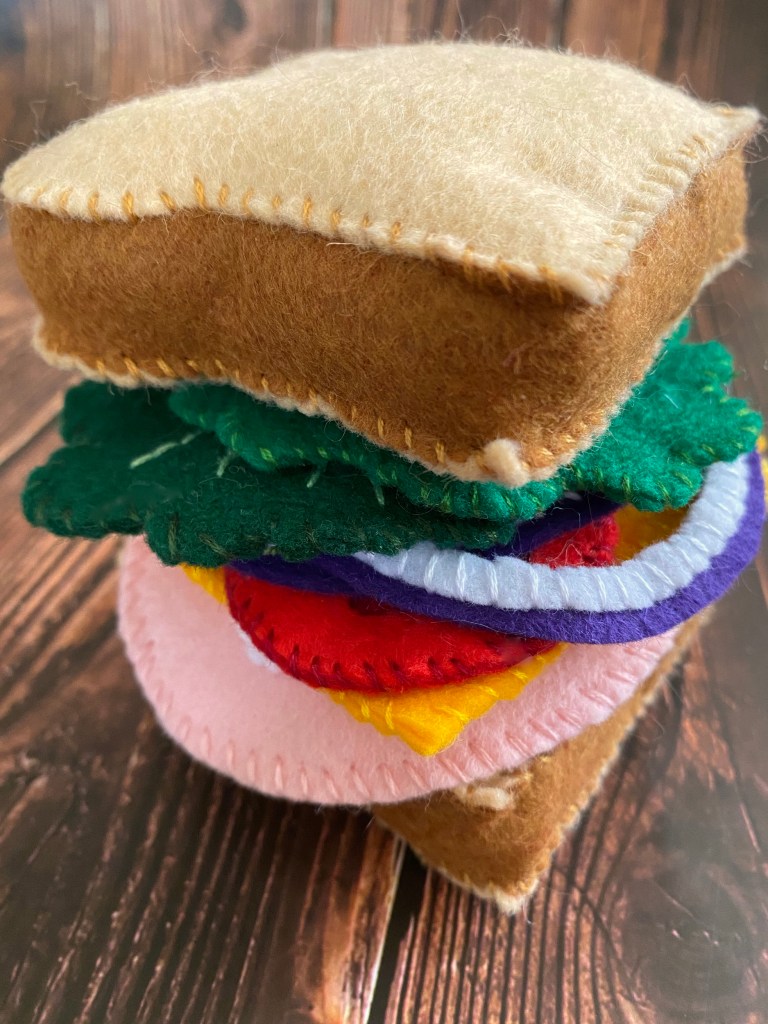
I had a play kitchen when I was a little girl and loved preparing sandwiches for myself, my sister and my parents. Now that I’m grown and have a daughter of my own, I want to make her some handcrafted play food so she can enjoy making meals for everyone during play, or while we cook in the kitchen next to her!
Please feel free to use these patterns to create some play food for you and yours! This pattern will make two slices of bread, a slice of American cheese, a slice of Swiss cheese, a slice of provolone cheese, a slice of deli meat, a lettuce leaf, two slices of tomato, two onion rings, two slices of pickle, ketchup, mayonnaise, mustard, peanut butter and jelly. I made an extra slice of deli meat and an extra (darker) leaf of lettuce. You can duplicate it as much as you want to make multiple pieces of each food!
Embroidery floss (light brown, green, light green, vibrant green, pale pink, purple, red, dark red, white, off-white, yellow, dark yellow and vibrant yellow)
Hot glue gun
INSTRUCTIONS
Print out the sandwich patterns I’ve provided and cut them from the paper.
Place the patterns on the appropriate colored felt and pin them in place, then use sewing scissors to cut out the felt pieces.
Align the two pieces of bread crust onto one another and thread your sewing needle with light brown embroidery floss. Whipstitch one of the shorter sides together, then pull open the strips to reveal what will be the dip in the top center of the bread.
Align the joined point of the bread crusts to the dip in the top of one half of the bread slice and begin to whipstitch around and down one side to attach. When you reach the bottom center, stop and tie it off. Begin at the top dip again and whipstitch down the other side of the bread until the two halves of crust meet, then tie it off. Within the piece of bread, join the two ends of the bread crust together and stitch them for reinforcement.
Lay the other half of the bread slice over the bread crust and whipstitch all the way around the bread, stopping 2/3 of the way around to insert stuffing, then complete the bread slice and conceal the knot between layers.
Repeat steps 3 through 5 to create the second slice of bread.
Align and pin the two halves of American cheese together and thread dark yellow embroidery floss onto your sewing needle.
Begin sewing around the edges of your American cheese using a whipstitch, concealing the first knot and ending knot in between the layers.
Align and pin the two halves of Swiss cheese together and thread yellow embroidery floss onto your sewing needle.
Begin sewing around the edges and inside the holes of your Swiss cheese using a whipstitch, concealing the first knot and ending knot in between the layers.
Align and pin the two halves of provolone cheese together and thread off-white embroidery floss onto your sewing needle.
Begin sewing around the edges of your provolone cheese using a whipstitch, concealing the first knot and ending knot in between the layers.
Align and pin the two halves of deli meat together and thread pale pink embroidery floss onto your sewing needle.
Begin sewing around the edges of your deli meat using a whipstitch, concealing the first knot and ending knot in between the layers.
Thread your sewing needle with light green embroidery floss and create the veins on each half of the the lettuce using a backstitch. Check before you begin to make ensure your stitches and knots will be concealed between the two halves.
Align and pin the two halves of lettuce together and thread green embroidery floss onto your sewing needle.
Begin sewing around the edges of your lettuce using a whipstitch, concealing the first knot and ending knot in between the layers.
Align and pin the two red halves of tomato (with the dark red base in between them) together and thread red embroidery floss onto your sewing needle.
Begin sewing around the edges of your tomato using a whipstitch, concealing the first knot and ending knot in between the layers.
Use small dabs from the hot glue gun to secure down the inner ridges of the tomato.
Repeat steps 18 through 20 to create the second tomato slice.
Align and pin the two different onion rings together and thread white embroidery floss onto your sewing needle.
Begin sewing around and over the white ring of the onion using a whipstitch and concealing the first and ending knots between the layers.
Repeat steps 22 and 24 to create the second onion ring.
Align and pin the two halves of the pickle (with the dark green base in between them) together and thread vibrant green embroidery floss onto your sewing needle.
Begin sewing around the vibrant green of your pickle using a whipstitch, concealing the first knot and ending knot in between the layers.
Align and pin the two halves of ketchup together and thread dark red embroidery floss onto your sewing needle.
Begin sewing around the edges of your ketchup using a whipstitch, concealing the first knot and ending knot in between the layers.
Align and pin the two halves of mayonnaise together and thread white embroidery floss onto your sewing needle.
Begin sewing around the edges of your mayonnaise using a whipstitch, concealing the first knot and ending knot in between the layers.
Align and pin the two halves of mustard together and thread vibrant yellow embroidery floss onto your sewing needle.
Begin sewing around the edges of your mustard using a whipstitch, concealing the first knot and ending knot in between the layers.
Align and pin the two halves of peanut butter together and thread light brown embroidery floss onto your sewing needle.
Begin sewing around the edges of your peanut butter using a whipstitch, concealing the first knot and ending knot in between the layers.
Align and pin the two halves of grape jelly together and thread purple embroidery floss onto your sewing needle.
Begin sewing around the edges of your grape jelly using a whipstitch, concealing the first knot and ending knot in between the layers.
What child (or inner child) doesn’t love preparing toy food in a play kitchen?
I had a play kitchen when I was a little girl and loved preparing pancakes for myself, my sister and my parents. Now that I’m grown and have a daughter of my own, I want to make her some handcrafted play food so she can enjoy making meals for everyone during play, or while we cook in the kitchen next to her!
Please feel free to use these patterns to create some play food for you and yours! This pattern will make one pancake, one dollop of syrup and one pat of butter. I made two extra pancakes for a stack of three underneath the syrup and butter. You can duplicate it as much as you want to make multiple pieces of each food!
Embroidery floss (light tan, dark tan, light brown and yellow)
INSTRUCTIONS
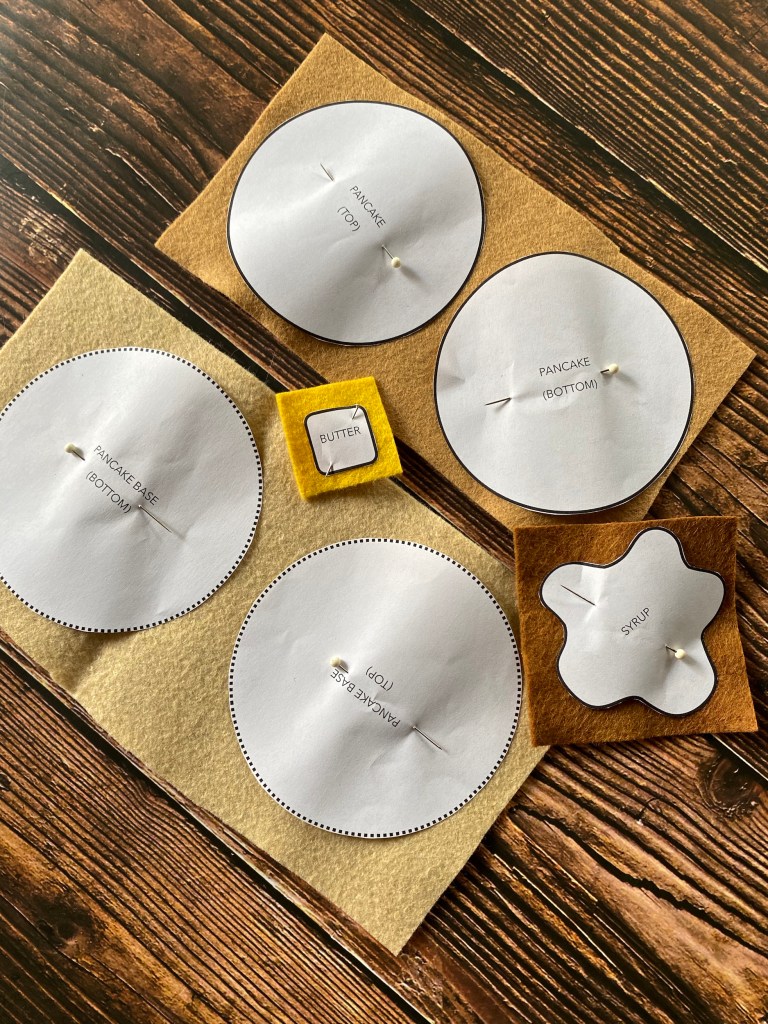
Print out the pancakes pattern I’ve provided, then cut the patterns from the paper.
Pin the patterns on the appropriate colored felt, then use sewing scissors to cut the felt.
Thread a sewing needle with yellow embroidery floss and pin the two layers of yellow butter to one layer of the syrup.
Using a whipstitch, begin sewing around the edges of the butter, attaching it to the syrup, then tie it off underneath the syrup layer.
Thread a sewing needle with light brown embroidery floss and pin the second brown syrup layer over the stitching on the back of the first.
Using a whipstitch, begin sewing around the edges of the syrup, concealing the first knot and end knot in between the layers.
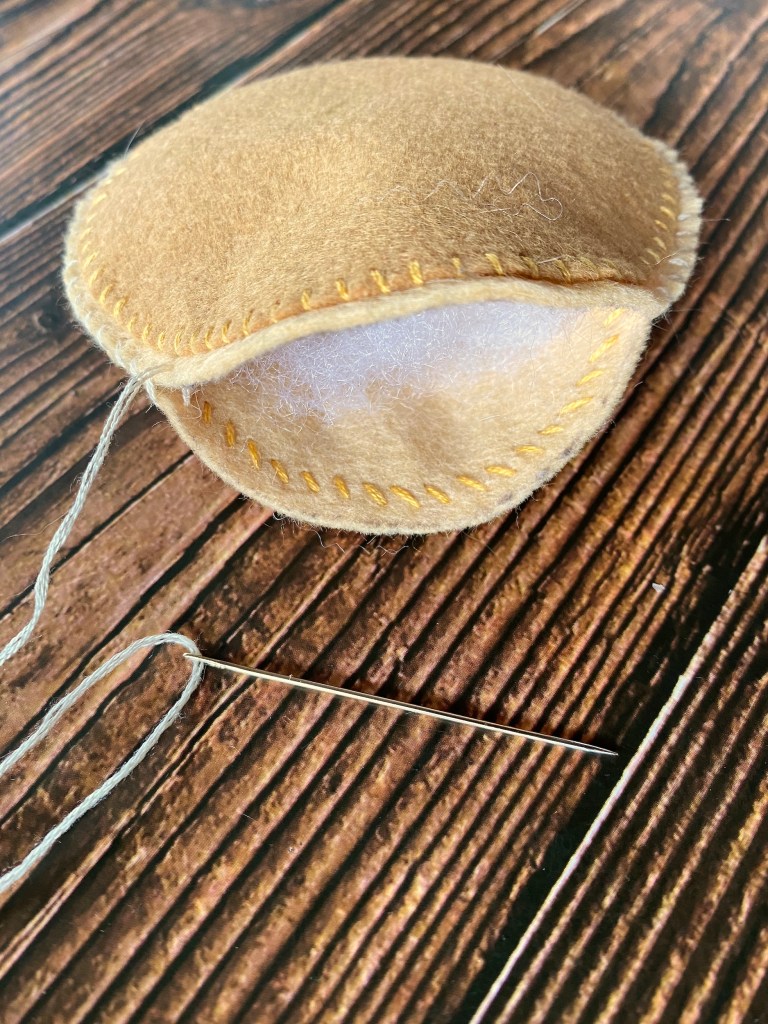
Thread a sewing needle with dark tan embroidery floss and pin each dark tan toasted circle of pancake to a lighter tan larger circle.
For each half of the pancake, completely sew the darker tan circle onto the lighter tan circle using a whipstitch, then tie it off underneath the lighter tan circle.
Thread a sewing needle with light tan embroidery floss and pin the two halves of the pancake together with the stitches concealed between the two halves.
Begin sewing the two halves together with a whipstitch. About 3/4 of the way around the pancake, stop sewing and gently stuff the pancake. Once you’re satisfied with the fullness of the pancake, complete stitching around the pancake and concealing the first knot and end knot in between the layers.
What child (or inner child) doesn’t love preparing toy food in a play kitchen?
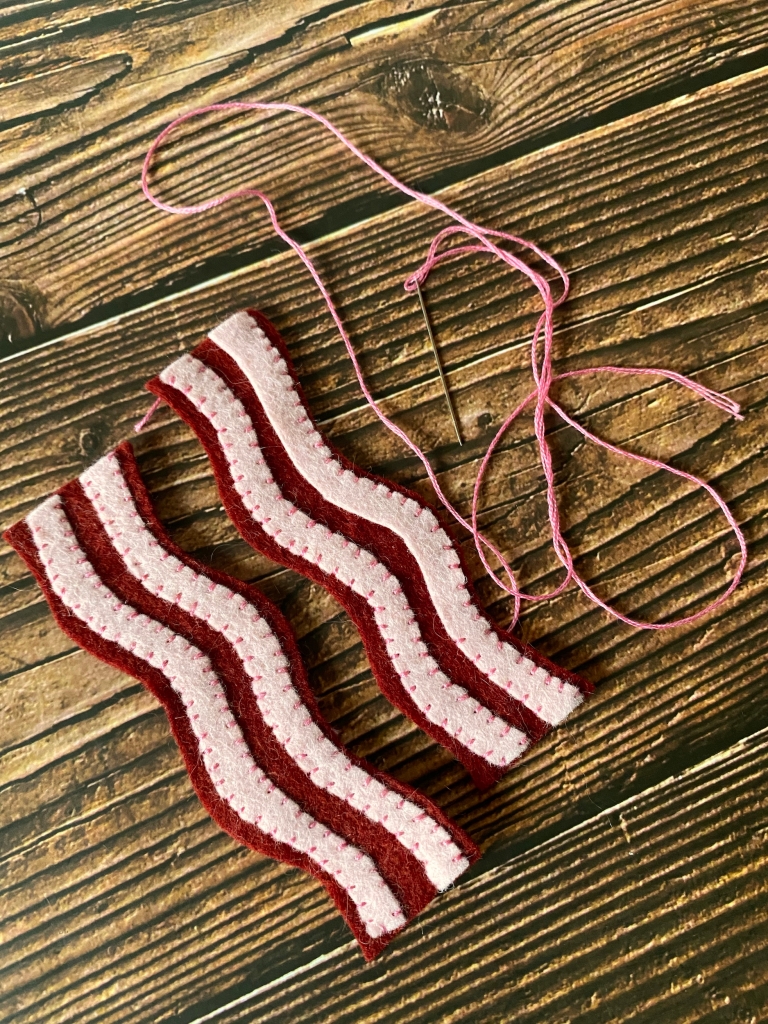
I had a play kitchen when I was a little girl and loved preparing eggs and bacon for myself, my sister and my parents. Now that I’m grown and have a daughter of my own, I want to make her some handcrafted play food so she can enjoy making meals for everyone during play, or while we cook in the kitchen next to her!
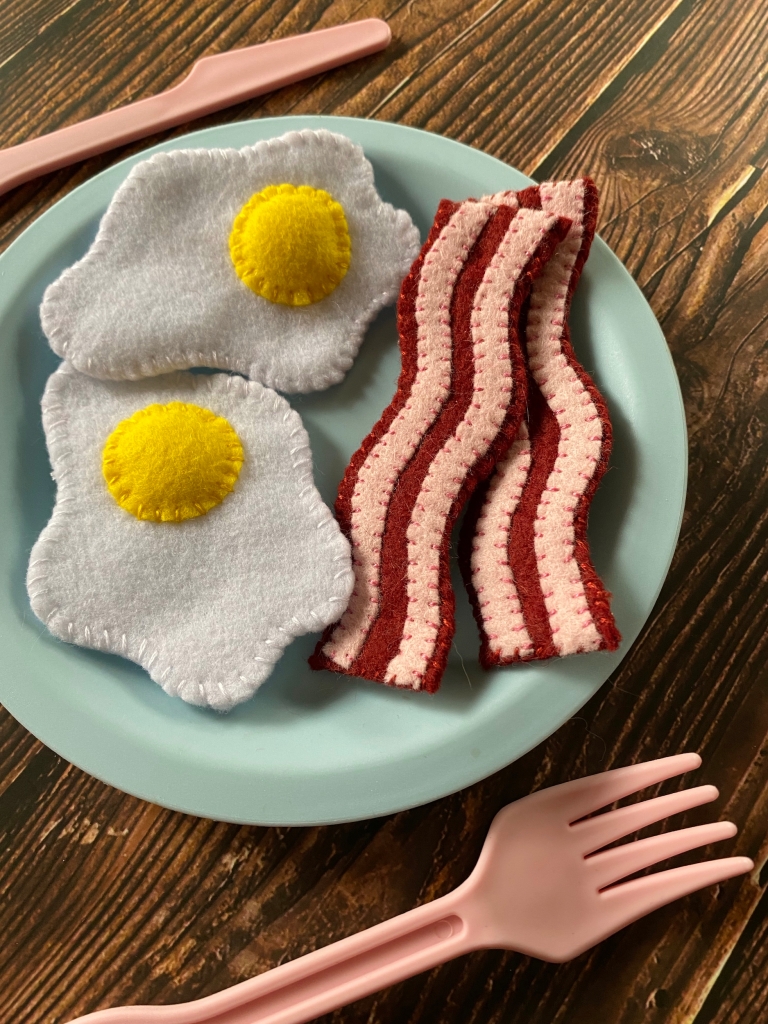
Please feel free to use these patterns to create some play food for you and yours! This pattern will make two eggs and two pieces of bacon. You can duplicate it as much as you want to make multiple pieces of each food!
Embroidery floss (white, yellow, dark red, and pale pink)
INSTRUCTIONS
Print out the eggs and bacon pattern I’ve provided, then cut the patterns from the paper.
Pin the patterns on the appropriate colored felt, then use sewing scissors to cut the felt.
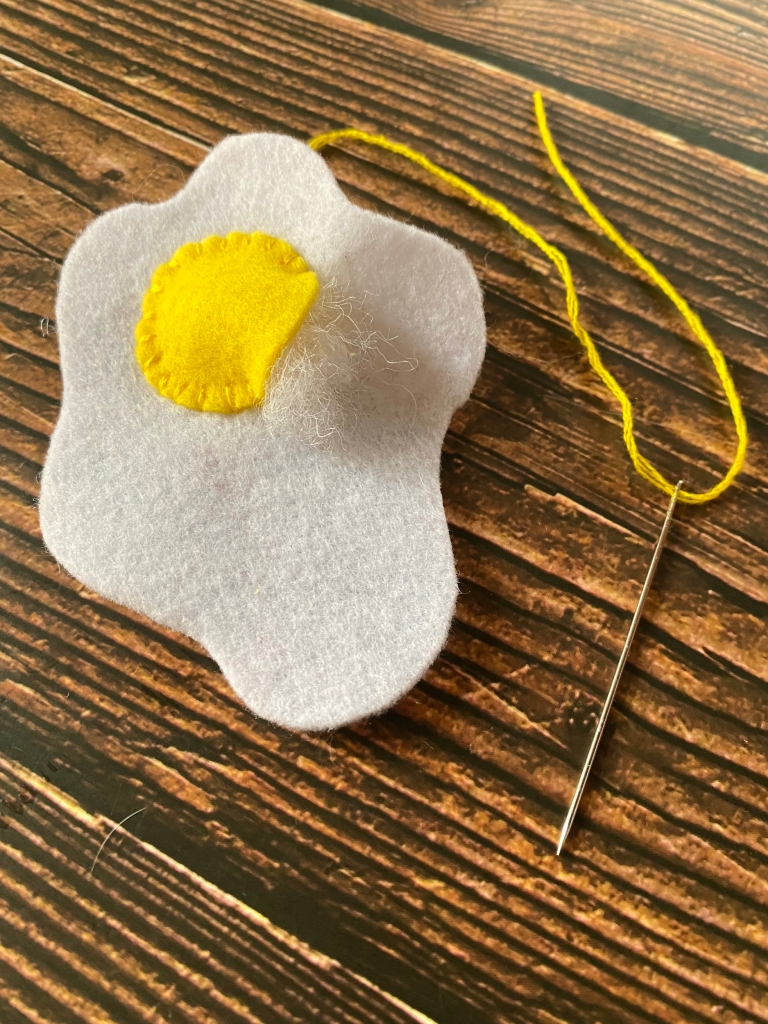
Thread a sewing needle with yellow embroidery floss and pin the egg yolk to a piece of the egg white.
Begin sewing the yellow yolk onto the egg white felt using a whipstitch. When you reach 2/3 of the way around the yolk, stop and place a small pinch of stuffing underneath it, then complete the circle and tie it off underneath the egg white layer.
Thread a sewing needle with white embroidery floss and pin the second egg white layer over the stitching on the back of the first.
Using a whipstitch, begin sewing around the edges of the two layers of egg white, concealing the first knot and end knot in between the layers.
Thread a sewing needle with pale pink embroidery floss and pin two pieces of marbling onto one side of two different bacon strips.
Begin sewing the pale pink marbling onto the dark red felt bacon using a whipstitch. When completed with each streak, tie it off underneath the bacon layer.
Thread a sewing needle with dark red embroidery floss and pin the second bacon layer over the stitching on the back of the first.
Using a whipstitch, begin sewing around the edges of the two layers of bacon, concealing the first knot and end knot in between the layers.
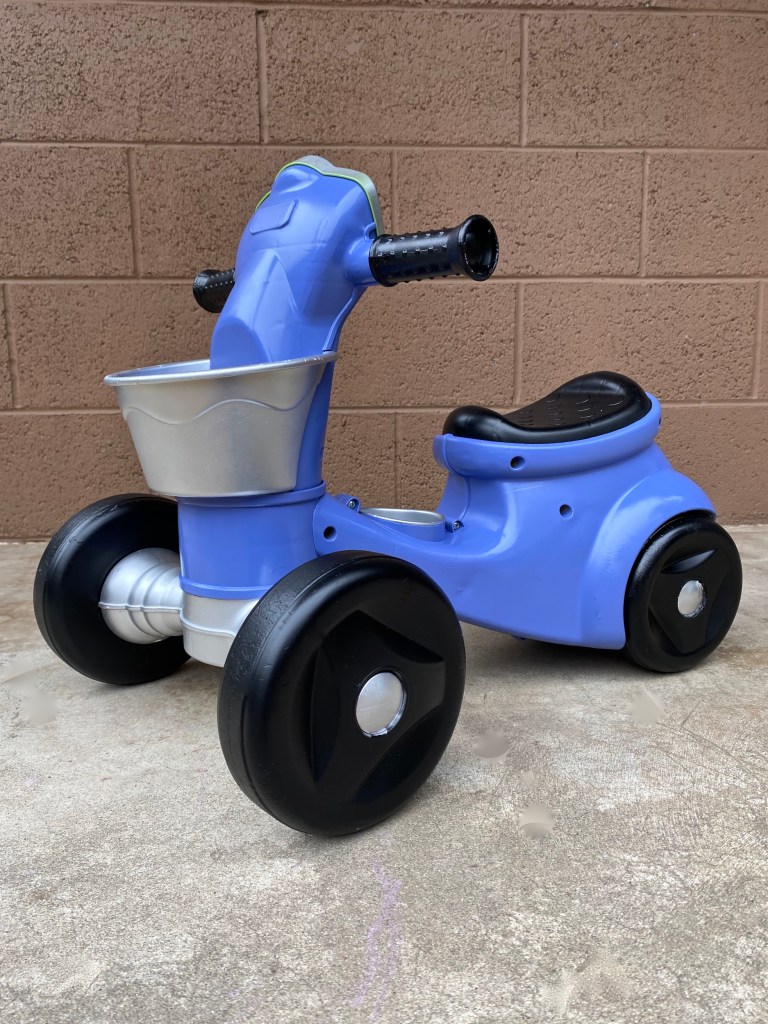
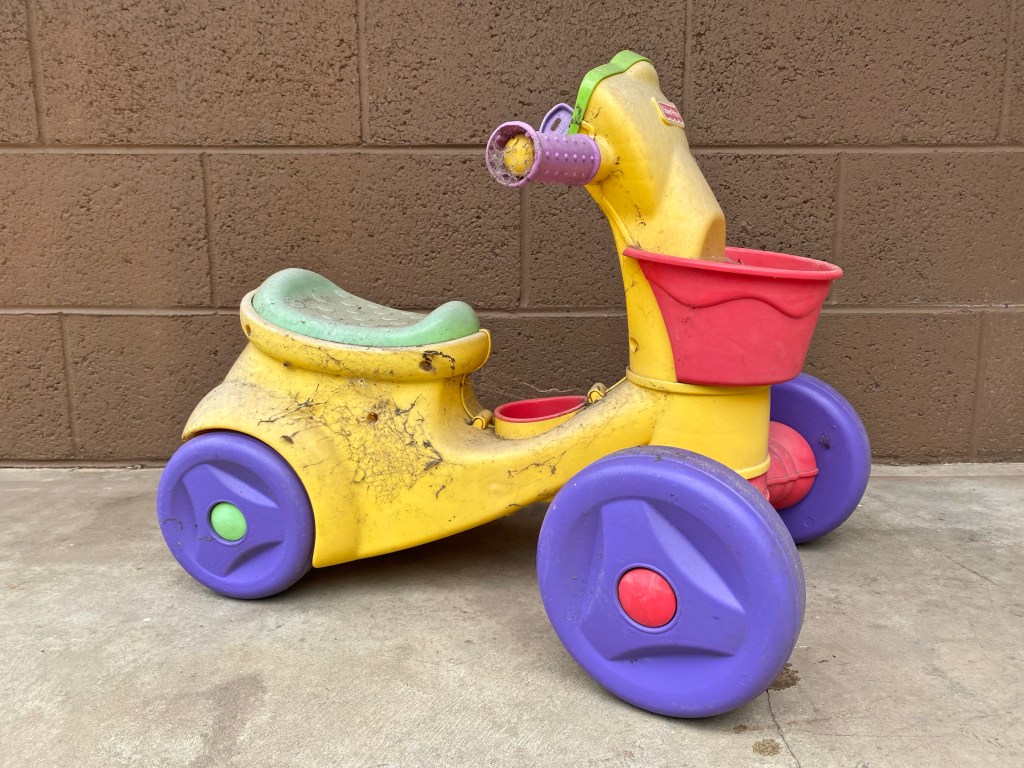
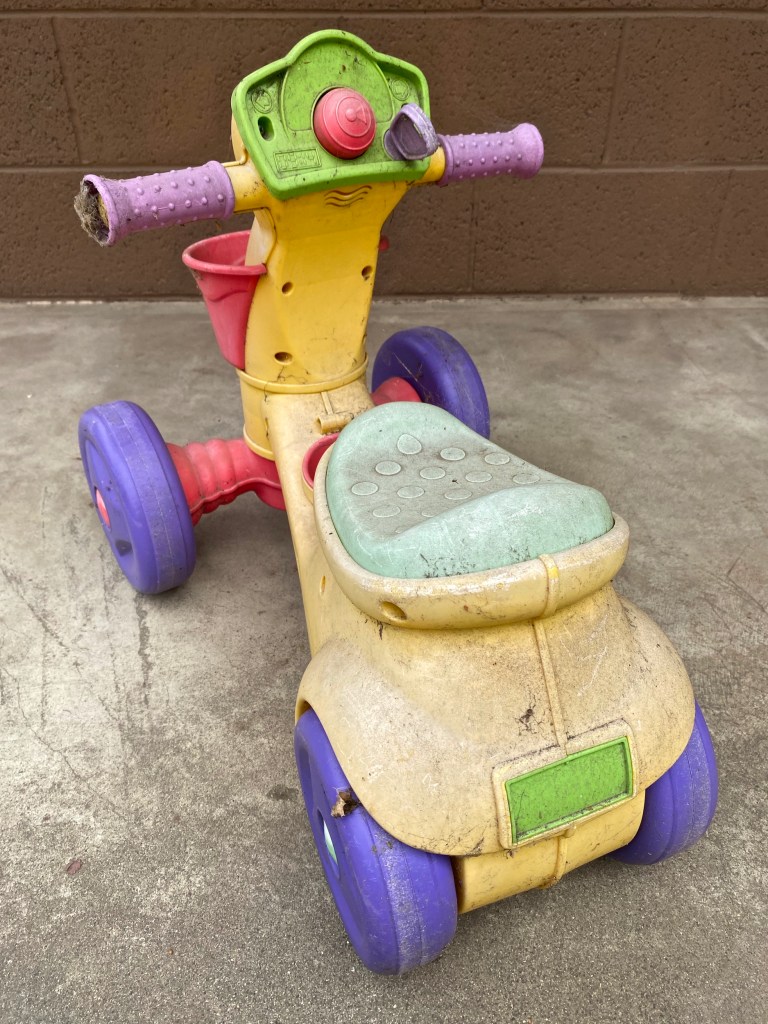
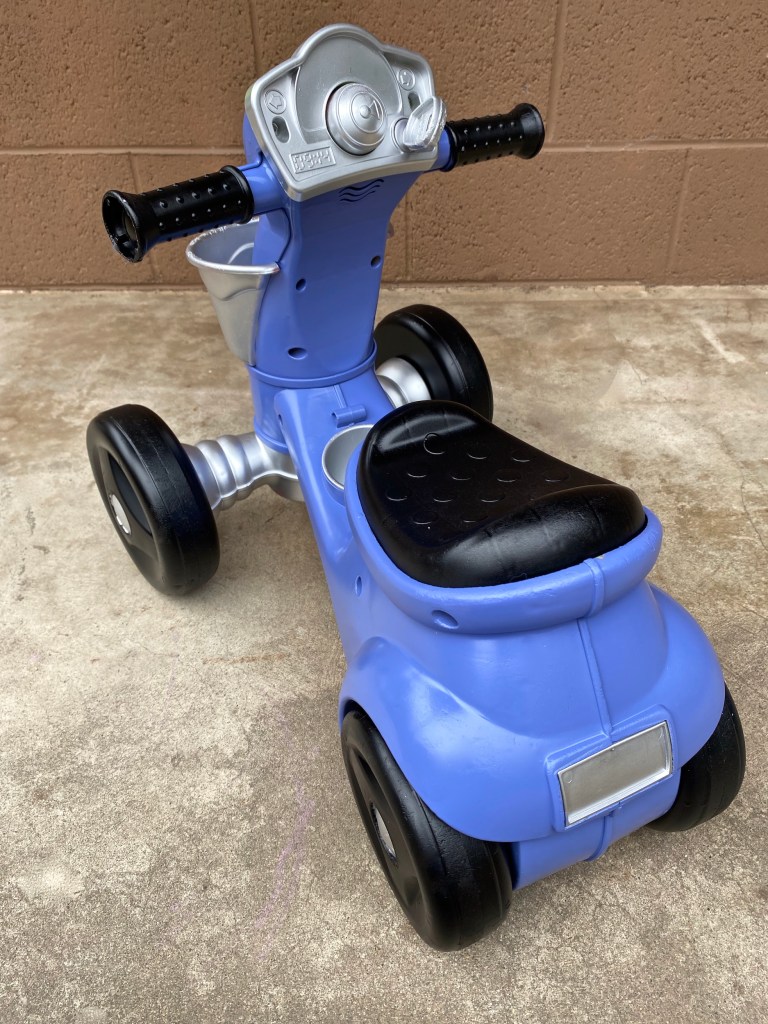
This little Fisher-Price Ready Steady Ride On has seen better days! It was ridden hard and well-loved by its previous owner. Once outgrown, it was set to the side of the road for my Aunt to find and bring to me for my daughter. Zoey wasn’t quite ready for it yet, so I left it sitting outside for another year, yikes! Now she’s ready to scoot, and it’s time to give this toy a makeover!
Please feel free to use this information to breathe new life into an old toy and, if you have any new tips, please feel free to share!
SUPPLIES
Fisher-Price Ready Steady Ride On or similar
Krylon Fusion All-in-One spray paint
Cardboard (optional)
Newspaper or scratch paper
Disposable bags
Painter’s tape
Screwdriver
Sandwich bag (to hold the screws)
INSTRUCTIONS
Using a screwdriver, dismantle the toy as much as possible without breaking anything. The Ready Steady Ride On was mostly made to click together and stay there! I was only able to remove the bottom of the front axle with the front wheels, the cupholder, the dashboard and the seat.
Completely wash and clean the plastic toy, then allow it to dry.
Wipe the toy down with rubbing alcohol to prepare the surfaces before painting, then allow it to dry.
Spread flattened cardboard (or something similar) in a well ventilated space to protect the floor.
Paint base layers first (where any surrounding paint can be covered with top layers) and allow to dry completely. This may take a few layers so be patient and wait for each coat to dry before painting another. I started with the chrome pieces: the axles, basket, cupholder, dashboard and wheel hubcaps.
Using painter’s tape, bags and/or paper, cover the painted items that cannot be removed. I covered the basket with paper and tape, wheel hubcaps with painter’s tape, and the top of the front axle with bags and tape.
Once this layer is covered, paint the next layer up and allow to dry completely. This may take a few layers so be patient and wait for each coat to dry before painting another. For me, this was painting the handlebars, seat, and tires black.
Using painter’s tape, bags and/or paper, cover everything painted that cannot be removed. In addition to the previously covered items, I also covered the handlebars with paper and tape, and the wheels with bags and painter’s tape.
Once everything is covered, paint the body of the toy and allow it to dry completely. This may take a few layers so be patient and wait for each coat to dry before painting another.
10.Gently remove all of the coverings and reassemble the Fisher-Price Steady Ride On.
Scoot, scoot and enjoy!
*This was my first time painting plastic and a learning experience. Heavily used pieces like the wheels normally would not be painted because the paint is much more likely to chip and flake off. I did this for aesthetic reasons and my daughter is only using the scooter indoors. Even so, the paint on the wheels is working its way off slowly in some places. There are other methods (suggested to me after I finished the paint) that may help paint adhere to the plastic better, but I have yet to try them and want to test them before recommending.