


 Part of the fun in raising Zoey is making things that delight her; I want to create lasting, meaningful toys for her that are made with love and will be loved! Wooden toys are classic and beautiful, when created and treated right, they can last a lifetime; so let’s make some!
It’s no secret that Cameron and I love Disney. Zoey’s middle name was inspired by one of my favorite Disney princesses, Belle, and that Belle in her name has also led to another Disney nickname, Tinker Bell. I cannot wait to create a whole set of peg dolls for her, but these two characters hold the most significance until she begins watching the classics on her own.
We’ve created a Tinker Bell Peg Doll, check her out!
This week I’ll be sharing the steps I took to create a Belle peg doll in her blue peasant dress for Zoey.

SUPPLIES
- Blank peg doll (I used a “small angel” or “girl” shape/size)
- Small, flat & fine tip paint brushes
- Paint palette (or a tray for your paint)
- Blue non-toxic acrylic paint
- White non-toxic acrylic paint
- Light blue non-toxic acrylic paint
- Brown non-toxic acrylic paint
- Dark brown non-toxic acrylic paint
- Black non-toxic acrylic paint
- Non-toxic varnish (I used Duraclear Ultra Matte Varnish)
INSTRUCTIONS


- With a pencil, lightly sketch Belle onto your blank peg doll. Belle wears a dress over a white blouse, I gave her sleeves so more of the blouse can be seen.
- Begin painting your peg doll with the base layers first. I started with the blue of her dress and hair bow, the white of her blouse and apron, and the brown of her hair. Allow this paint to dry before moving on to avoid smudging, then apply a few more layers of each until you’re happy with the colors and textures.
- Paint the very bottom and edges of the peg doll black to signify her shoes.
- After the base layers have dried, paint a border of light blue on the edges of her apron, shirt and hair bow. If you don’t have a lighter shade of blue, you can create some by adding a small amount of white paint to the original blue and blending.
- Paint dark brown accents on and around the hair, don’t forget her ponytail in the back!
- Taking something small and round (I used the opposite end of one of my smaller paint brushes) dip it in black paint and dot the two eyes. Using the finest tipped paintbrush you can find, give her an eyelash or two on each eye.
- Once the eye paint has dried, add a highlight dot to each eye with a fine tipped paintbrush and white paint.
- Using the same method as the eyes, dip the opposite end of a slightly larger paintbrush into light pink paint and dot the blush under each eye.
- With a little white paint, give her a few sparkles of pixie dust on the hem of her dress or wherever else you feel it will look right!
- Allow for all paint to completely dry, then apply a varnish and allow it to dry. You can apply as many coats as you want for the finish you want, just allow them to dry in between applications and before handing her over to your child.
- Voilà! Belle is done and ready to be played with! Enjoy!


 Part of the fun in raising Zoey is making things that delight her; I want to create lasting, meaningful toys for her that are made with love and will be loved! Wooden toys are classic and beautiful, when created and treated right, they can last a lifetime; so let’s make some!


 Last week,
 It’s the middle of Summer and I would love to take Zoey to the beach for the first time, but just about everything she picks up is quickly introduced to her mouth! I understand she’s figuring things out (and more power to her), but I’m not super enthusiastic about her ingesting beach sand. So, until she gets a little less eager to put everything in her mouth, why not bring a little beach experience to her?


 During these Summer months, and even into Fall, we get some pretty warm and sometimes uncomfortably hot days. To cool Zoey off and soothe her teething gums, I thought it would be fun and refreshing to make some frozen treats using the food she already eats and candy molds!


 Part of the fun in raising Zoey is making things that teach and fascinate her. I’ve seen the stacking toy done in so many fun and creative ways, but I don’t believe I’ve seen a felt doughnut stacking toy yet, so let’s make one!
 I have provided the patterns I used to make the four different sizes of donuts for my stacking toy. You’re welcome to use them if the base of your toy closely resembles mine, or you can make them as play food without the base. Another option would be to create your own patterns using the measurements of your base and a compass.
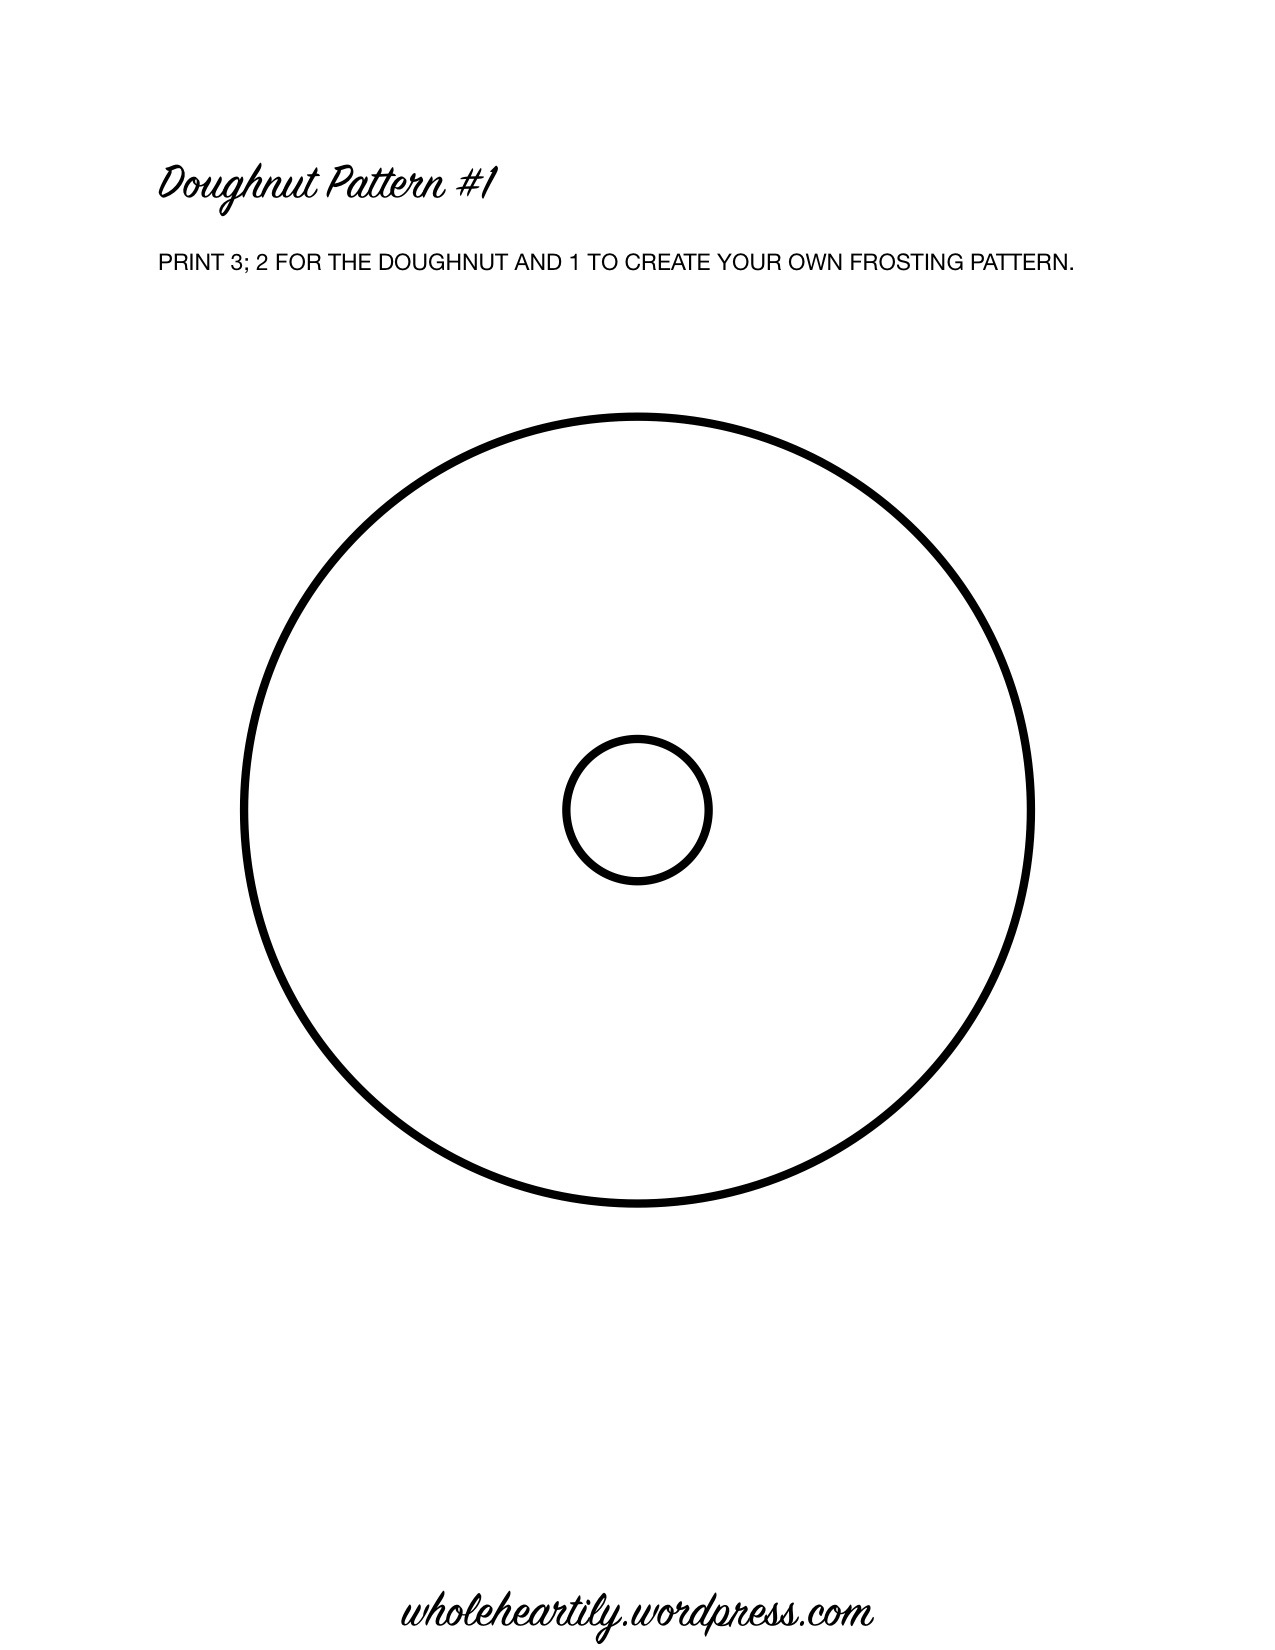


 Reading has always been very special to me. I remember my mom reading to me as a child and I believe it had a profound impact on my love for reading and books, not to mention my performance in school. I want to continue that tradition with Zoey. I want her to hear my voice, hear the diction and the pronunciation, see the beautiful images and eventually enjoy the stories.
 I’ve also started a
  With Summer solstice right around the corner, I was thinking about the beach and got inspired to make an ocean wave sensory bottle (not to mention I had all the ingredients already on hand)! Part of the fun in raising Zoey is making things that teach and fascinate her. And, if I’m being completely honest, I find sensory bottles fascinating too, so let’s make one!


