Homemade Tinker Bell Smash Cake Recipe (No Added Sugar)

Disney Tinker Bell Smash Cake RecipeZoey, our little Tinker Bell, is one year old! This year has been an unusual one (understatement of the century), but it has flown by faster than I could have imagined and I have been fortunate enough to spend the majority of it at home with her; grateful for every moment.

Like many one year birthday boys and girls, Zoey has not been exposed to much sugar. Now I don’t mind a little sugar, but I did not want to sugar bomb her all at once so I created a homemade smash cake with frosting for her without adding extra sugar.

This Tinker Bell petal smash cake is a variation of a banana bread recipe my family has made for years without added sugar and a variation of cream cheese frosting without powdered sugar. I would consider the cake a tame banana flavor and the frosting a tangy cream cheese flavor, smoothed out with the addition of a natural sweetener (I used agave nectar). I purchased a used Disney Infinity Tinker Bell figurine off of Mercari, gave it a good cleaning, and used it as a cake topper with the obligatory “1” candle.

Disney Tinker Bell Smash Cake Recipe Disney Tinker Bell Smash Cake RecipeShe was very tentative about smashing  her smash cake, almost like she wasn’t sure if she was allowed to. Even with her audience coaxing her she only tasted a little bit of cake I broke off for her and mostly just played around in the frosting. Her favorite part of the cake was the Tinker Bell figurine up top and she ended up fixating on that. And what the hey, as long as she had fun!

So let’s make a smash cake for the little Tinker Bell in your life!

Disney Tinker Bell Smash Cake Recipe

BANANA SMASH CAKE
  • 3 bananas, overripe
  • 1/2 cup of butter, softened
  • 2 eggs
  • 1 1/4 cup of flour
  • 3/4 teaspoon of baking soda
  • 1/2 teaspoon of salt
INSTRUCTIONS (CAKE)
  1. Preheat the oven to 350F.
  2. Grease two 6-inch cake pans, or line them with parchment paper.
  3. Cream the butter and bananas together with a (hand) mixer.
  4. Add the eggs in one at a time, beating each in with the (hand) mixer.
  5. In a separate bowl, combine the flour, baking soda and salt.
  6. Add the dry ingredients to the wet ingredients a little at a time, mixing and scraping down the sides of the bowl in between each addition.
  7. Pour the mixed batter into the prepared cake pans about half to 3/4 of the way full.
  8. Bake for about 30 to 35 minutes until a toothpick inserted into the centers comes out clean. The timing may vary depending on your oven so keep an eye on them!
  9. Remove the cakes from the oven and allow them to cool in their pans for about 10 minutes, then remove them from the pans and allow them to cool completely on a wire rack.
  10. Mine were pretty flat. If yours do not turn out flat, cut the very tops off of the cakes to create flat tops for stacking and frosting.
  11. Frost your cake (see below).

Disney Tinker Bell Smash Cake Recipe

CREAM CHEESE FROSTING (NO ADDED SUGAR)
  • 5 tablespoons of butter, room temperature
  • 1 1/2 packs of cream cheese (8 ounce), room temperature
  • A pinch of salt
  • 2 to 3 tablespoons agave nectar, honey or maple syrup
  • 1 to 2 tablespoons whole milk
  • 2 teaspoons of vanilla extract
  • 1 to 2 tablespoons corn starch
  • Green food coloring
INSTRUCTIONS (FROSTING)

*You can make the frosting up to several days in advance and store it in the refrigerator. Bring it to room temperature before frosting.*

  1. Whip the butter and cream cheese together in a large bowl until well combined.
  2. Add the agave nectar (or sweetener of choice), milk, salt and vanilla extract. Whip again, scraping down the sides of the bowl as needed.
  3. Add 1 tablespoon of corn starch and whip until well incorporated. If at this point the consistency is right for you, you can move on to the next step. If not you can add cornstarch one teaspoon at a time until it reaches the desired thickness (careful not to exceed 2 tablespoons total).
  4. Divide the frosting four equal parts in separate bowls. Add green food coloring to each bowl of frosting, ranging from dark to light green. Put each shade of green frosting into a pastry bag.
  5. Pipe and smear frosting on the top of the first layer of cake and gently place the second layer on top of this.
  6. Begin the petals by piping a dollop of dark green frosting on the side of the cake at the base. Take a flat slender spatula or butter knife press gently into the dollop and smear it to the right. Pipe another dollop of dark green near the end of the smear and repeat all the way around the cake.
  7. Repeat this process with the next shade of green and repeat, but stop before you reach the lightest shade of green and the top of the cake.
  8. Pipe and smear a healthy dollop of the lightest green frosting onto the top of the cake and smooth it out with a flat spatula, then continue with the last layer of petals in the lightest shade of green around the top of the cake.
  9. Adorn your cake with decorations.
  10. Enjoy!

Disney Tinker Bell Smash Cake Recipe

DIY Peasant Belle Peg Doll

DIY Peasant Belle Peg Doll DIY Peasant Belle Peg Doll DIY Peasant Belle Peg DollPart of the fun in raising Zoey is making things that delight her; I want to create lasting, meaningful toys for her that are made with love and will be loved! Wooden toys are classic and beautiful, when created and treated right, they can last a lifetime; so let’s make some!

It’s no secret that Cameron and I love Disney. Zoey’s middle name was inspired by one of my favorite Disney princesses, Belle, and that Belle in her name has also led to another Disney nickname, Tinker Bell. I cannot wait to create a whole set of peg dolls for her, but these two characters hold the most significance until she begins watching the classics on her own.

We’ve created a Tinker Bell Peg Doll, check her out!

This week I’ll be sharing the steps I took to create a Belle peg doll in her blue peasant dress for Zoey.

DIY Peasant Belle Peg Doll

SUPPLIES
  • Blank peg doll (I used a “small angel” or “girl” shape/size)
  • Small, flat & fine tip paint brushes
  • Paint palette (or a tray for your paint)
  • Blue non-toxic acrylic paint
  • White non-toxic acrylic paint
  • Light blue non-toxic acrylic paint
  • Brown non-toxic acrylic paint
  • Dark brown non-toxic acrylic paint
  • Black non-toxic acrylic paint
  • Non-toxic varnish (I used Duraclear Ultra Matte Varnish)
INSTRUCTIONS

DIY Peasant Belle Peg Doll

DIY Peasant Belle Peg Doll

  1. With a pencil, lightly sketch Belle onto your blank peg doll. Belle wears a dress over a white blouse, I gave her sleeves so more of the blouse can be seen.
  2. Begin painting your peg doll with the base layers first. I started with the blue of her dress and hair bow, the white of her blouse and apron, and the brown of her hair. Allow this paint to dry before moving on to avoid smudging, then apply a few more layers of each until you’re happy with the colors and textures.
  3. Paint the very bottom and edges of the peg doll black to signify her shoes.
  4. After the base layers have dried, paint a border of light blue on the edges of her apron, shirt and hair bow. If you don’t have a lighter shade of blue, you can create some by adding a small amount of white paint to the original blue and blending.
  5. Paint dark brown accents on and around the hair, don’t forget her ponytail in the back!
  6. Taking something small and round (I used the opposite end of one of my smaller paint brushes) dip it in black paint and dot the two eyes. Using the finest tipped paintbrush you can find, give her an eyelash or two on each eye.
  7. Once the eye paint has dried, add a highlight dot to each eye with a fine tipped paintbrush and white paint.
  8. Using the same method as the eyes, dip the opposite end of a slightly larger paintbrush into light pink paint and dot the blush under each eye.
  9. With a little white paint, give her a few sparkles of pixie dust on the hem of her dress or wherever else you feel it will look right!
  10. Allow for all paint to completely dry, then apply a varnish and allow it to dry. You can apply as many coats as you want for the finish you want, just allow them to dry in between applications and before handing her over to your child.
  11. Voilà! Belle is done and ready to be played with! Enjoy!

DIY Peasant Belle Peg Doll DIY Peasant Belle Peg Doll

DIY Tinker Bell Peg Doll

DIY Tinker Bell Peg DollDIY Tinker Bell Peg DollPart of the fun in raising Zoey is making things that delight her; I want to create lasting, meaningful toys for her that are made with love and will be loved! Wooden toys are classic and beautiful, when created and treated right, they can last a lifetime; so let’s make some!

It’s no secret that Cameron and I love Disney. Zoey’s middle name was inspired by one of my favorite Disney princesses, Belle, and that Belle in her name has also led to another Disney nickname, Tinker Bell. I cannot wait to create a whole set of peg dolls for her, but these two characters hold the most significance until she begins watching the classics on her own.

We’ve created a Peasant Belle Peg Doll, check her out!

This week I’ll be sharing the steps I took to create a Tinker Bell peg doll for Zoey.

DIY Tinker Bell Peg Doll

SUPPLIES
  • Blank peg doll (I used a “small angel” or “girl” shape/size)
  • Small, flat & fine tip paint brushes
  • Paint palette (or a tray for your paint)
  • Green non-toxic acrylic paint
  • Yellow non-toxic acrylic paint
  • Light brown non-toxic acrylic paint
  • Light blue non-toxic acrylic paint
  • Light pink non-toxic acrylic paint
  • White non-toxic acrylic paint
  • Black non-toxic acrylic paint
  • Non-toxic varnish (I used Duraclear Ultra Matte Varnish)
INSTRUCTIONS
  1. With a pencil, lightly sketch Tinker Bell onto your blank peg doll.

    DIY Tinker Bell Peg DollDIY Tinker Bell Peg Doll

  2. Begin painting your peg doll with the base layers first. I started with the green of her dress, the white of her wings and the yellow of her hair. Allow this paint to dry before moving on to avoid smudging, then apply a few more layers of each until you’re happy with the colors and textures.

    DIY Tinker Bell Peg DollDIY Tinker Bell Peg Doll

  3. Paint the very bottom and edges of the peg doll green to signify her slippers.
  4. After the base layers have dried, paint a border of darker green on the edges of her dress. If you don’t have a darker shade of green, you can create some by adding a small amount of black paint to the original green and blending.
  5. Paint an accent of lighter green on the inner layer of the dark green border of her dress. If you don’t have a lighter shade of green, you can create some by adding a small amount of white paint to the original green and blending.
  6. The wings can stay matte white, or you can add a pearly white finish to give them a sheen. Once the wings have dried, border and accent them with light blue paint.
  7. Paint light brown accents on and around the hair.
  8. Once the hair has dried, paint a small light blue ribbon around Tinker Bell’s bun.
  9. Taking something small and round (I used the opposite end of one of my smaller paint brushes) dip it in black paint and dot the two eyes. Using the finest tipped paintbrush you can find, give her an eyelash or two on each eye.
  10. Once the eye paint has dried, add a highlight dot to each eye with a fine tipped paintbrush and white paint.
  11. Using the same method as the eyes, dip the opposite end of a slightly larger paintbrush into light pink paint and dot the blush under each eye.
  12. With a little white paint, give her a few sparkles of pixie dust on the hem of her dress or wherever else you feel it will look right!
  13. Allow for all paint to completely dry, then apply a varnish and allow it to dry. You can apply as many coats as you want for the finish you want, just allow them to dry in between applications and before handing her over to your child.
  14. Voilà! Tinker Bell is done and ready to be played with! Enjoy!

DIY Tinker Bell Peg Doll DIY Tinker Bell Peg Doll

Homemade Teething Cookies Recipe

Homemade Teething Cookies RecipeLast week, we brought some of the beach to Zoey with edible “sand” made out of graham crackers and oatmeal. After she was done playing, I could not let good food go to waste so I made her some teething cookies with the remaining “sand”.

Not too sweet, but sweet enough to be called cookies instead of crackers, these treats are a hit! They are springy, yet firm enough to soothe her teething gums and she likes them!…Although so does my husband so I’m going to have to convince him not to eat all of them before she can knaw on a few.

Homemade Teething Cookies Recipe

INGREDIENTS
INSTRUCTIONS
  1. Grease a baking sheet and preheat the oven to 325 F.
  2. Combine the ingredients into a mixing bowl and stir them with a mixing spoon until a thick dough has formed. You may need to adjust the amount of water or coconut oil you add depending on how juicy your bananas are.
  3. Section the dough into smaller portions and (using a flat surface and a rolling pin) roll out your dough to 1/4 of an inch thick. You will need to use flour to keep the dough from sticking to the rolling pin and surfaces.
  4. With a circular cookie cutter or a drinking glass (I used a drinking glass), cut cookies out of the dough and place them onto the greased baking sheet.
  5. Cook each sheet of cookies for 12 to 15 minutes. Be careful they are hot! Use the spatula or a spoon to test their springiness. They should be firm yet springy when pressed as they are brought out of the oven.
  6. Allow the cookies to cool before serving. These can be stored in the refrigerator for a little more firmness.
  7. Serve and enjoy, but please watch your baby as they eat this to make sure they handle the texture well!

DIY Edible “Sand” for Sensory Playtime

DIY Edible Sand for Sensory PlayIt’s the middle of Summer and I would love to take Zoey to the beach for the first time, but just about everything she picks up is quickly introduced to her mouth! I understand she’s figuring things out (and more power to her), but I’m not super enthusiastic about her ingesting beach sand. So, until she gets a little less eager to put everything in her mouth, why not bring a little beach experience to her?

Part of the fun in raising Zoey is making things that teach and fascinate her. We can make edible “sand” that’s fun to play in and safe to eat out of graham crackers and oatmeal; let’s make it!

Check back next week for the homemade teething cookies I made with the remaining edible “sand”.

DIY Edible Sand for Sensory Play

SUPPLIES
  • 1 box of graham crackers.
  • 2 cups of oatmeal (I used whole grain old-fashioned oats)
  • A food processor
  • A mixing bowl
  • A mixing spoon
  • A container for playing in the “sand” (I used a heavy casserole dish)
  • Beach or ocean themed toys (optional)
INSTRUCTIONS
  1. Open the graham crackers and blend them in the food processor until they are a fine sand-like texture.
  2. Remove the graham crackers from the food processor and pour them into a mixing bowl.
  3. Measure the oatmeal into the food processor and blend it until it is also a fine sand-like texture.
  4. Remove the oatmeal from the food processor and add it to the mixing bowl with the graham crackers.
  5. Using a mixing spoon, stir the graham crackers and oatmeal together until well combined.
  6. Pour the edible “sand” into the container you’ve chosen for your baby to play in. I used a heavy casserole dish since Zoey’s not strong enough to flip it yet. You can always double or triple the graham cracker and oatmeal ratio if you want to fill a larger container.

    DIY Edible Sand for Sensory Play
  7. Arrange beach and/or ocean themed toys in the sand for your little one to play with (optional).

    DIY Edible Sand for Sensory Play
  8. Introduce the edible “sand” to your baby and enjoy!

    DIY Edible Sand for Sensory PlayDIY Edible Sand for Sensory Play DIY Edible Sand for Sensory Play

DIY Frozen Mickey and Minnie Baby Treats using Candy Molds

DIY Frozen Mickey and Minnie Baby Treats using Candy MoldsDuring these Summer months, and even into Fall, we get some pretty warm and sometimes uncomfortably hot days. To cool Zoey off and soothe her teething gums, I thought it would be fun and refreshing to make some frozen treats using the food she already eats and candy molds!

DIY Frozen Mickey and Minnie Baby Treats using Candy Molds

SUPPLIES
  • Candy mold of your choice (I used Mickey and Minnie)
  • Baby food
  • Yogurt (optional)
INSTRUCTIONS
  1. Wash and dry the candy mold.

    DIY Frozen Mickey and Minnie Baby Treats using Candy Molds
  2. Choose the flavor of baby food and/or yogurt you would like to freeze and spoon it into the candy molds until it’s even with the top of the mold. I wiped the top of my mold down to make it look better, but you do not need to do this.

    DIY Frozen Mickey and Minnie Baby Treats using Candy MoldsDIY Frozen Mickey and Minnie Baby Treats using Candy Molds
  3. Place the mold in the freezer for an hour or more until the contents are frozen.

    DIY Frozen Mickey and Minnie Baby Treats using Candy Molds
  4. Remove the mold from the freezer and pop out one or two frozen treats at a time for baby to enjoy!

    DIY Frozen Mickey and Minnie Baby Treats using Candy MoldsDIY Frozen Mickey and Minnie Baby Treats using Candy Molds

DIY Stacking Felt Doughnuts with Sprinkles!

DIY Felt Stacking or Stackable Doughnuts with SprinklesPart of the fun in raising Zoey is making things that teach and fascinate her. I’ve seen the stacking toy done in so many fun and creative ways, but I don’t believe I’ve seen a felt doughnut stacking toy yet, so let’s make one!

My Dad, Zoey’s Grandpa Kev, made the base of this toy. If you do not have access to a competent woodworker/carpenter to make a base, I would recommend using the base of another stacking toy. You can switch out between the rings that came with the toy and felt doughnuts!

DIY Felt Stacking or Stackable Doughnuts with SprinklesI have provided the patterns I used to make the four different sizes of donuts for my stacking toy. You’re welcome to use them if the base of your toy closely resembles mine, or you can make them as play food without the base. Another option would be to create your own patterns using the measurements of your base and a compass.

Pattern for Felt Doughnuts
Doughnut Patterns

SUPPLIES
  • Doughnut and frosting patterns
  • Scissors
  • 4 sheets (9” x 12”) of a doughnut colored felt of your choice
  • A skein of closely matching doughnut colored embroidery thread
  • 4 sheets (9” x 12”) of frosting colored colored felt of your choice
  • 4 skeins of closely matching frosting colored embroidery thread
  • Embroidery needle
  • Fiber filling (stuffing)
INSTRUCTIONS
  1. Print 3 copies each of the two supplied pattern pages.
  2. Use the first two copies to cut out a pair of each size of circle, one for either side of the doughnut.
  3. Create your own wavy frosting pattern within each of the circles on the third pages, and cut those patterns out for your frosting.
  4. Lay the circular patterns on the felt you’ve chosen for you doughnuts and pin them in place.
  5. Lay the frosting patterns on the felt you’ve chosen for the frosting; these can be all the same color, or different colors.
  6. Cut around the patterns. You can do this directly or trace around the edges of the patterns with a pen, then remove the patterns and cut out each shape.

    DIY Felt Stacking or Stackable Doughnuts with Sprinkles
  7. Place the frosting for each doughnut on one of the doughnut halves, aligning the center holes, and pin them to keep them secure.
  8. Cut a length each of three different colored embroidery threads for the sprinkles; there are 6 strands in each embroidery thread, split them in half three by three and peel them apart.
  9. Thread the needle with your first sprinkle color, and poke the threaded needle up from the bottom of the top of the doughnut, emerging through the top of the frosting, and pull it through. Create a sprinkle size length in any direction you choose and poke the needle back down through the frosting to underneath the doughnut. Repeat this process all around the doughnut in a pattern you prefer and tie it off underneath.

    DIY Felt Stacking or Stackable Doughnuts with Sprinkles DIY Felt Stacking or Stackable Doughnuts with Sprinkles
  10. Remove the pins, repeat this process and create sprinkles in two more colors.
  11. Thread the needle with thread that matches the color of your frosting. Begin using neat whip stitches around the outside edges of the frosting starting with your knot underneath the top half of the doughnut.

    DIY Felt Stacking or Stackable Doughnuts with Sprinkles DIY Felt Stacking or Stackable Doughnuts with Sprinkles
  12. Using the same thread color as your frosting, align the bottom half of the doughnut to the top, frosted half and use neat whip stitches around the center hole. To hide your thread, knot it and pull it up through the bottom of the frosted layer to begin. When finished, poke the needle through the bottom doughnut layer, but only come through the middle in between the top and bottom of the doughnut to tie off your knot.
  13. Thread the needle with embroidery thread the color of your doughnut. Once again, use neat whip stitching along the outside edge of your doughnut, concealing the knot inside. About two thirds around, stop stitching and begin adding stuffing. Keep stitching and stuffing as space allows until you’ve made your doughnut whole.

    DIY Felt Stacking or Stackable Doughnuts with Sprinkles DIY Felt Stacking or Stackable Doughnuts with Sprinkles
  14. To conceal the knot, tie a knot at the base of your string still attached to the doughnut and pull it within the edges of the doughnut, going through the stuffing and coming out somewhere near he center hole, then trim this piece off.
  15. Repeat steps 7 through 10 to complete each size doughnut.

    DIY Felt Stacking or Stackable Doughnuts with Sprinkles
  16. Enjoy!

“Try Everything” Lyric Page from Disney’s Zootopia

Try Everything Lyric Page

I love singing to Baby Zoey and she loves being sung to! This is also a song Zoey loves moving to or dare I say, dance to. She’s still learning to walk, so we do the dancing for her with her in our arms, but she laughs and squeals the whole time!

I used to know all the songs from Disney movies by heart, but I’m a little rusty. I’ve started making lyric pages to refresh my memory or teach me new songs I’ve never known! Feel free to save them to your phone for a quick reference, and please let me know if there are any songs you would like to see lyric pages for!

Zoey’s Bedtime Stories

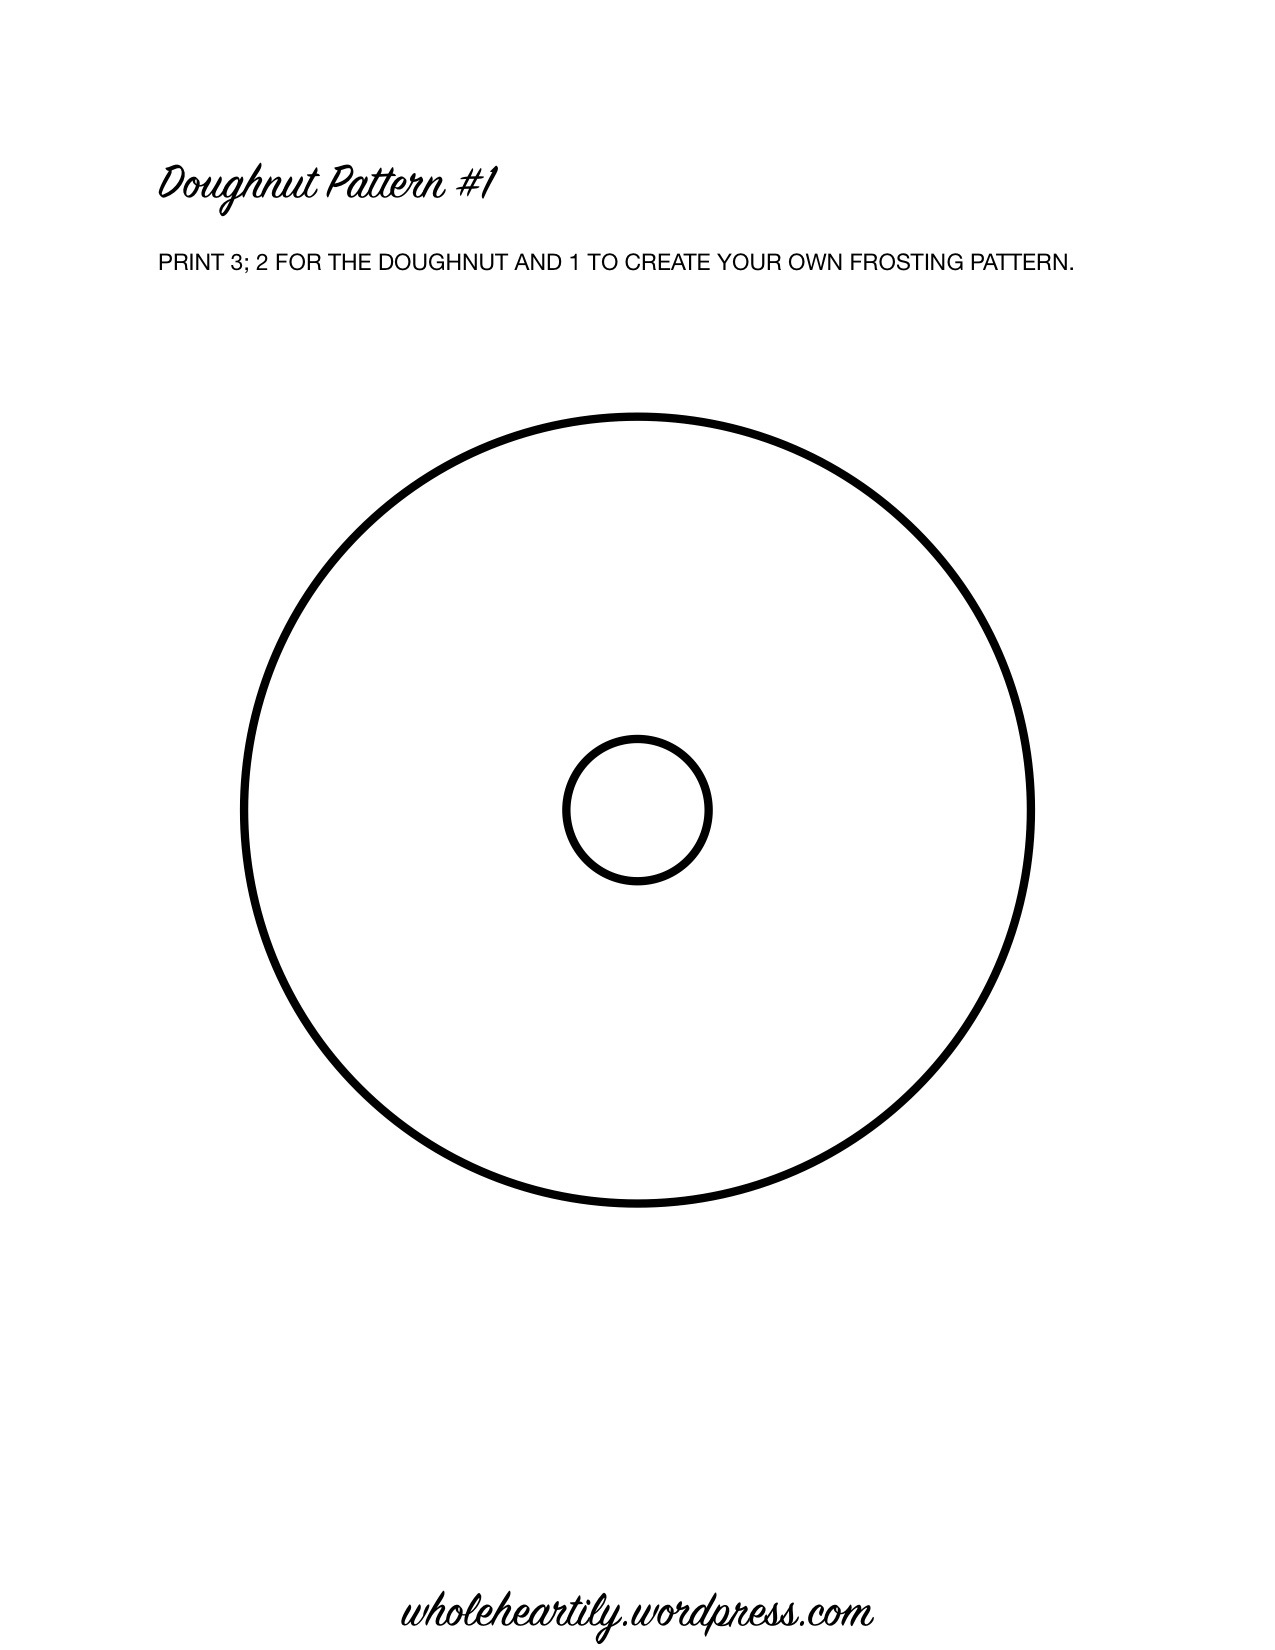
Reading has always been very special to me. I remember my mom reading to me as a child and I believe it had a profound impact on my love for reading and books, not to mention my performance in school. I want to continue that tradition with Zoey. I want her to hear my voice, hear the diction and the pronunciation, see the beautiful images and eventually enjoy the stories.

Zoey’s Bedtime Story (#ZoeysBedtimeStory) is nighttime ritual I started in January of this year. Every night before her bedtime, I read Zoey a book (sometimes the books last two nights if they turn out to be too long). I can honestly say there are very few books that have captured her attention yet (when we started she was 5 months old, now she’s almost 10 months old). She’s more interested in just about everything else, but that doesn’t discourage me. I’ll keep going until she feels like paying attention and that’s when the real fun will begin!

Please come follow along on my Instagram where I post which book we’re reading each night in my story, and every book I’ve read to her has been saved to the highlights on my profile.

Children and Young Adult Books for Zoey.I’ve also started a Pinterest Board of all the books I would like to read to Zoey or share with her someday. Check it out to get inspired and please let me know if there are any children books you would recommend; we love sharing stories!

DIY Ocean Wave Sensory Bottle

DIY Ocean Wave Sensory BottleWith Summer solstice right around the corner, I was thinking about the beach and got inspired to make an ocean wave sensory bottle (not to mention I had all the ingredients already on hand)! Part of the fun in raising Zoey is making things that teach and fascinate her. And, if I’m being completely honest, I find sensory bottles fascinating too, so let’s make one!

DIY Ocean Wave Sensory Bottle

SUPPLIES
  • 16 ounce clear, plastic bottle
  • Funnel
  • 8 ounces of water
  • Blue and green food coloring.
  • 8 ounces of baby oil
  • Glue

DIY Ocean Wave Sensory Bottle
DIY Ocean Wave Sensory Bottle DIY Ocean Wave Sensory Bottle

INSTRUCTIONS
  1. Place the funnel in the mouth of your bottle and use it to fill the bottle with 8 ounces of water.
  2. Remove the funnel and add several drops of blue and green food coloring until you reach your desired shade of ocean aqua. I used 8 drops of blue and 2 drops of green, as you can see that led to a very deep shade of blue green.
  3. Screw the lid back onto the bottle and shake the water until the food coloring is well incorporated, then remove the lid and replace the funnel.
  4. Add up to 8 ounces of baby oil.
  5. If your child is older and you worry about him/her undoing the lid, you can coat the inside of the lid with glue, then screw it back onto the bottle. This will secure the lid and make it harder for little ones to unscrew the lid and create a leak or spill the bottle’s contents. If you’re still concerned they may be able to get the lid off, please use cooking oil instead of baby oil.